

Ubuntu Server 20.04 LTS has been a reliable, stable release for many organizations, providing essential support for critical workloads. But as technology develops, so does the need to upgrade Ubuntu to a new release to ensure the system stays up-to-date and secure.
Ubuntu Server 22.04 LTS offers several new features and improvements, making this release appealing to those looking to upgrade. And in this tutorial, you will walk through the steps involved in upgrading Ubuntu Server 20.04 LTS to 22.04 LTS.
Read on and enjoy the new features that come with your Ubuntu upgrade!
Prerequisites
This tutorial comprises hands-on demonstrations. To follow along, ensure you have an account that is a member of the sudoers group.
Performing a Pre-upgrade Checkup
Although upgrades are typically safe, there is always a chance that something may go wrong. For good measure, before upgrading your Ubuntu system, a pre-upgrade checkup is a must.
To prepare your Ubuntu system for an upgrade:
1. First, safely copy your data to a backup location to allow restoration if any problems or complications arise during the upgrade process.
2. Next, check the release notes and ensure no changes could negatively impact your current system.
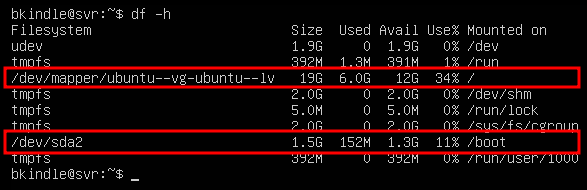
3. Open a terminal, and run the below df command to check how much space you have on your boot (/boot) and root (/) volumes.
df -hEnsure you have enough free space available to upgrade. Why? Upgrading from one release to another will download new packages and replace the existing ones on your system. This process consumes disk space.
If you do not have enough space in your /boot partition, jump to the following step for a cleanup. Otherwise, jump to step five instead.
4. Run the following apt autoremove command to clean up (--purge) old kernel images.
If you use personal package archives (PPAs) or any other third-party repositories, any software installed from these repositories is not removed or downgraded. Software installed from these repositories is the single most common cause of upgrade issues.
sudo apt autoremove --purge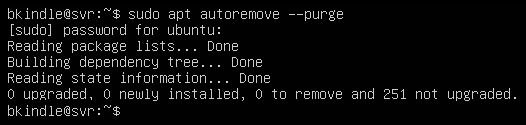
5. Lastly, run the following steps to open port 1022 on your UFW firewall, reload the firewall, and check the firewall status.
If you are connected to your Ubuntu instance via SSH, the upgrade tool will open another SSH port (1022) as a fallback port in case the SSH connection drops on port 22.
But remember to close the port after your Ubuntu upgrade. Doing so ensures you avoid inadvertently opening your system to potential security issues.
# Add a firewall rule to allow port 1022
sudo ufw allow 1022/tcp
# Reload the firewall
sudo ufw reload
# Check the firewall status
sudo ufw status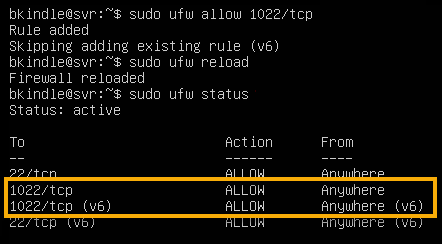
Installing the update-manager-core Package
With the pre-upgrade checkup out of the way, the next step is to ensure the upgrade runs smoothly. You must install the update-manager-core package, essential for upgrading an Ubuntu Server distribution from one version to another.
But first, you must ensure your system has the latest repositories and packages, as follows:
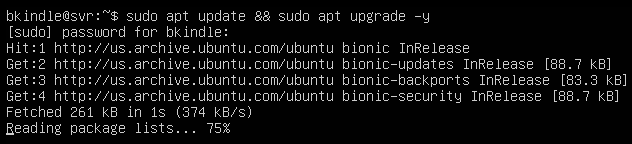
1. Run the below commands to perform the following:
apt update– Update the APT package index to ensure you have the latest repositories.apt upgrade– Upgrade the installed packages in your system to their latest versions.
sudo apt update && sudo apt upgrade -yThe overall process can take a few minutes or longer, depending on how up-to-date your Ubuntu Server host is.
2. Once updated, run the below command to reboot your Ubuntu system.
reboot3. Lastly, run the below apt install command after the reboot to install the update-manager-core package.
sudo apt install update-manager-core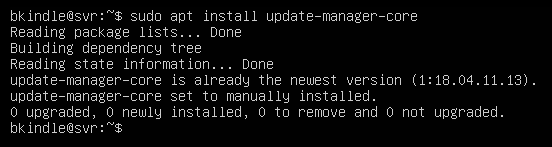
Performing an Upgrade on Ubuntu
After installing the update-manager-core package, you can finally begin to upgrade your Ubuntu system. But do you really need an upgrade?
Some people choose not to upgrade as they are content with their current Ubuntu system. But the catch is that they will not benefit from new features and improvements in new releases.
To perform an Upgrade on Ubuntu:
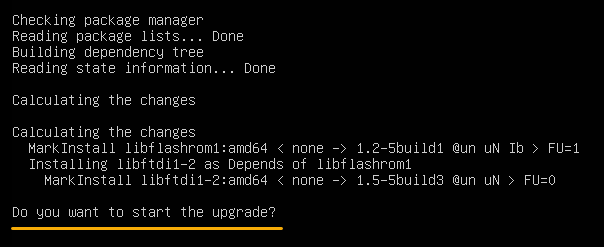
1. Run the do-release-upgrade command below to check (-c) for a new release of the Ubuntu Server.
sudo do-release-upgrade -cIf a new release is available, you will get an output like the one below.
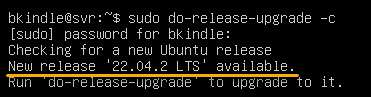
Upgrades from one LTS to the next LTS release are only available after the first point release. For example, Ubuntu 18.04 LTS will only upgrade to 20.04 LTS after the 20.04.1 point release.
2. Now, run the following do-release-upgrade without additional parameters to perform the actual release upgrade to the next available version of Ubuntu.
sudo do-release-upgrade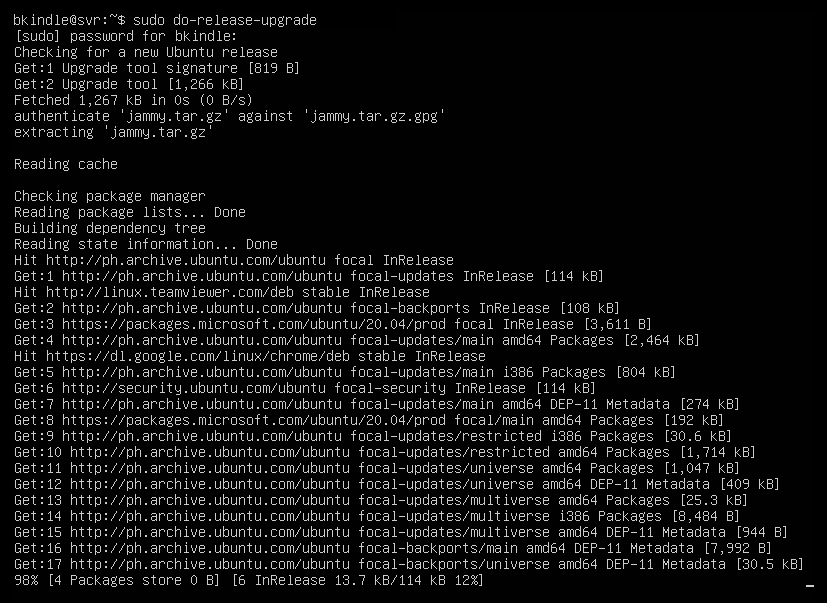
3. Press Enter when prompted, as shown below, to start the upgrade and download the packages for the new release.
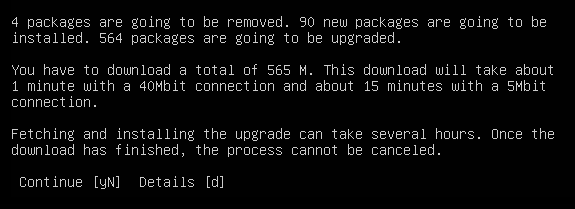
4. Review the upgrade information, input y, and press Enter to continue.
The prompt below shows the total packages to be removed, installed, and upgraded and the total size of the resources to download for the upgrade.
Note that the upgrade process may take some time to complete, depending on the speed of your system and the amount of data being transferred.
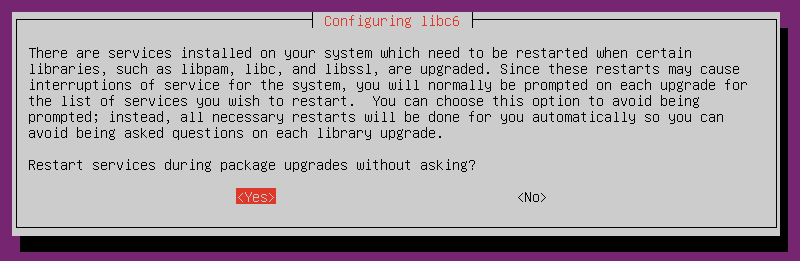
5. Now, choose <Yes>, and press Enter to restart services during package upgrades.
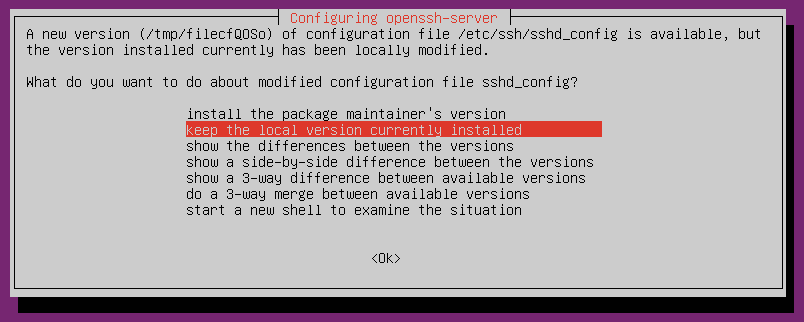
During the upgrade process, you may be prompted to answer some questions or confirm certain actions, such as the one below. These prompts occur when existing configuration files are edited by the user and the new package configuration file are different.
Or choose to keep the local version of the configuration files currently installed.
The default action is to keep the existing version, but you will want to inspect the differences in the files. Older configurations may have deprecated options that can cause the software to fail or the system not to boot properly.
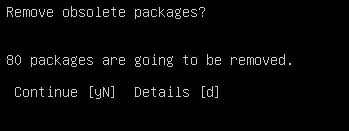
6. Input y or N to remove or keep obsolete packages no longer needed by the new release.
7. Once the upgrade is complete, input y and press Enter to reboot your Ubuntu system.

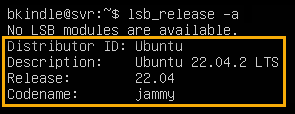
8. Finally, after the reboot, run the below command to get the Linux Standard Base (LSB) details.
lsb_release -aBelow, the output verifies you are now running Ubuntu Server 22.04 LTS, with the Codename jammy.
Congratulations! You have successfully performed a new release upgrade on Ubuntu!
Conclusion
In this tutorial, you have learned how to stay caught up on new features and improvements by performing an upgrade on Ubuntu systems.
Always remember to back up your system before proceeding with the upgrade and to test the process in a non-production environment.
Post-upgrade, you will never know when you will face some startup issues. Why not start learning about how to fix them?


