


There is no question that SQL server management in a GUI platform works great. But if traditional T-SQL queries are more of your expertise, you will find the PowerShell Invoke-SQLCmd cmdlet enjoyable.
The Invoke-SqlCmd cmdlet provides a more PowerShell-oriented experience for working with SQL Server databases. And in this tutorial, you will start managing your SQL databases with the Invoke-SqlCmd cmdlet.
Dive in and start streamlining your SQL database management!
Prerequisites
Before jumping to the PowerShell Invoke-SQLCmd command, be sure you have the following in place to follow along with this tutorial:
- A computer to run PowerShell – This tutorial uses Windows Server 2022 with PowerShell v7.3.X.
- A Microsoft SQL Server with an existing database – This tutorial uses an SQL 2022 Standard edition with a database called EmployeesDB.
- An SQL Server user with privileges to connect to the server and make actions.
Installing the SqlServer Module
With the Invoke-SqlCmd cmdlet, you can execute SQL queries and scripts within a PowerShell console. As a result, you can automate database management tasks and integrate SQL Server with other PowerShell commands and modules. And yes, without having to switch between different tools and interfaces.
But like other cmdlets, to take advantage of the Invoke-SQLCmd cmdlet, you must install the SqlServer module. This module supports the latest SQL features that allow you to automate database development and server administration.
1. Open PowerShell as administrator and run the following Install-Module command to download and install the SQLServer module from the PowerShell gallery.
Install-Module SQLServerInput Y and press Enter when prompted to proceed with the installation.

2. Once installed, run the below Import-Module command, which does not provide output, but enables all commands related to the SqlServer module.
Import-Module SQLServer3. Now, run each command below, which does not produce output but sets variables containing appropriate data for the server name, username, and password. Doing so lets you streamline your workflow and avoid manually entering commonly used data when needed.
Using these variables consistently throughout your scripts and commands saves time and reduces errors caused by typos or other mistakes.
# Set the SQL server name
$serverName = "mssql-vm"
# Set the SQL server credentials
$adminSqlLogin = "vmsilvamolina"
$password = "S3cur3P4ss@1"
Perhaps you plan for these variables to persist. If so, set them as environment variables you can call when needed.
Connecting to an SQL Server via the PowerShell Invoke-SQLCmd
With the SqlServer module installed, you are ready to get started with the PowerShell Invoke-SQLCmd cmdlet. This cmdlet lets you connect to your SQL server and run a query.
Before you can query your SQL server, ensure you have the variables you set in the last step of the “Installing the SqlServer Module” section handy.
Run the following Invoke-SQLCmd command, which does not provide output but performs the following:
- Connect to your SQL server (
$serverName). - Authorize the connection with the specified credentials (
$adminSqlLoginand$password). - Run a
-Queryto your SQL server toPRINTtheHello worldtext.
Invoke-SQLCmd -ServerInstance $serverName -Username $adminSqlLogin -Password $password -Query "PRINT 'Hello world'"Note that the
-Usernameparameter can only specify an SQL account, not a Windows account.
Did nothing happen? Not exactly. If you do not see errors, everything went well.
Now, run the same command in step one, but this time, with a -Debug parameter to expose more information about the operation performed by the command.
Invoke-SQLCmd -ServerInstance $serverName -Username $adminSqlLogin -Password $password -Query "PRINT 'Hello world'" -DebugPerfect! In the output below, the query shows the result with no errors. Input Y and press Enter to confirm running the operation.

Connecting to an SQL Server with a Password as SecureString
You have successfully connected to your SQL server using variables that hold your credentials, which undoubtedly works. But note that hard-coding or putting your password as it is to a variable leaves it at risk. Why not try converting your password to SecureString?
PowerShell offers the secret management module if you wish to encrypt your password instead for added security.
Run the following commands to perform the following:
ConvertTo-SecureString– Convert your$passwordvariable’s string value to a secure string stored to$secStringPassword.New-Object– Create a PSCredential object with a username ($adminSqlLogin) and password ($secStringPassword).
# Convert the $password variable's value to SecureString
$secStringPassword = ConvertTo-SecureString $password -AsPlainText -Force
# Create a credential object
$credObject = New-Object System.Management.Automation.PSCredential ($adminSqlLogin, $secStringPassword)
Now, run the following command to connect to your SQL server and run the same query of printing the Hello world text. This time, use the credential object you created in the previous step ($credObject) to authorize the connection.
Invoke-SQLCmd -ServerInstance $serverName -Credential $credObject -Query "PRINT 'Hello world'" -Debug
Connecting to an SQL Server as a Windows User
When querying data, you typically want to execute commands with the appropriate permissions and access levels. Suppose you need to run your command as a Windows user. If so, you must launch a new PowerShell session as that specific Windows user.
To query data as a Windows user without relying on the -Username parameter:
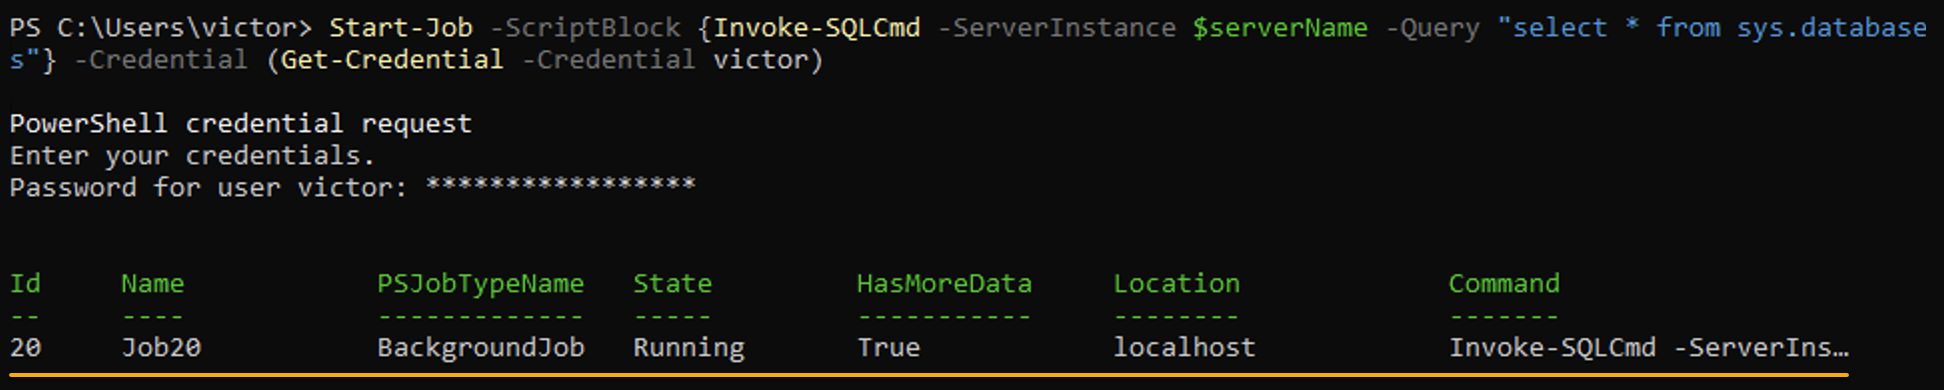
Run the following command to start a PowerShell background job (Start-Job) within a -ScriptBlock.
The background job runs to -Query data from the sys.databases table as a Windows user (<USERNAME>) authenticated with its credentials.
Start-Job -ScriptBlock { `
Invoke-SQLCmd -ServerInstance $serverName -Query "select * from sys.databases"`
} -Credential (Get-Credential -Credential <USERNAME>)
Take note of the job’s Name (i.e., Job20), as shown below. You will need the job name to verify the job in the following step.
Now, run the below command to get (Get-Job) and receive (Receive-Job) all PowerShell background jobs. Ensure you change <jobName> with the one job name you noted in the previous step.
The -Keep parameter allows you to retrieve the collected stream data again after the first view, printed in table format (Format-Table).
Get-Job -Name <jobName> | Receive-Job -Keep | Format-Table
Creating and Querying Data from a Database
Since you can now connect to your SQL server, it is time to start working more deeply with the Invoke-SQLCmd command’s parameters. First, you will connect to a specific database and create a table with data to query.
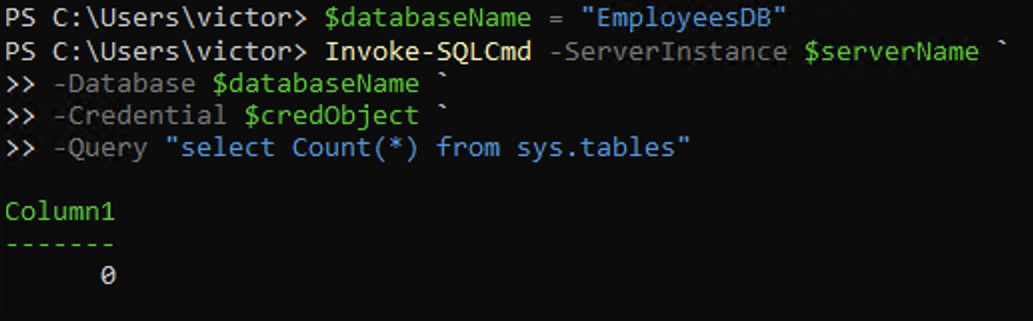
1. Run the following commands to set a database name to a variable ($databaseName) and run a -Query to confirm the database access.
# Add a new variable for the database name
$databaseName = "EmployeesDB"
# Run a query to confirm the access
Invoke-SQLCmd -ServerInstance $serverName `
		-Database $databaseName `
		-Credential $credObject `
		-Query "select Count(*) from sys.tables"
The query returns the number of tables created on the database, as shown below:
2. Next, execute the following commands to run a -Query to CREATE a TABLE called EmployeeData and INSERT two entries (records).
These commands do not provide output but create a table with columns called EmployeeID, EmployeeName, and EmployeeHireDate.
$query = @"
CREATE TABLE EmployeeData (
    EmployeeID int,
    EmployeeName varchar(255),
    EmployeeHireDate varchar(255)
);
INSERT INTO EmployeeData(EmployeeID, EmployeeName, EmployeeHireDate)
VALUES (1, 'Victor', '2023-01-01');
INSERT INTO EmployeeData(EmployeeID, EmployeeName, EmployeeHireDate)
VALUES (2, 'Manuel', '2023-01-01');
"@
Invoke-SQLCmd -ServerInstance "$serverName" `
		-Database $databaseName `
		-Credential $credObject `
		-Query $query
3. After creating a table, run the below command to retrieve data from the newly-created table (EmployeeData). The information is stored in $EmployeesDB, a PowerShell object you can access and manipulate like any other PowerShell object.
This command does not produce output, but you will access the data in the following step.
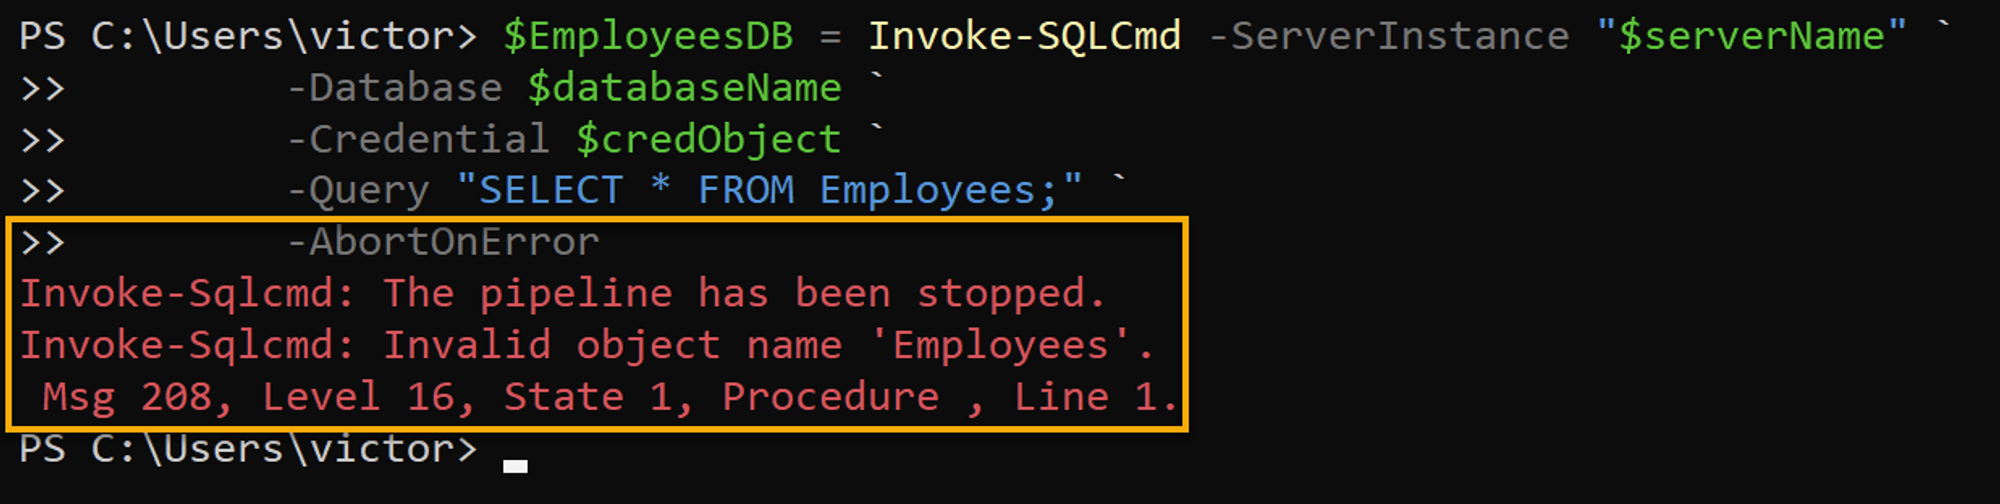
$EmployeesDB = Invoke-SQLCmd -ServerInstance "$serverName" `
		-Database $databaseName `
		-Credential $credObject `
		-Query "SELECT * FROM Employees;"
Did you get an error? Errors occur at some point that you must learn how to handle, and below are some of them:
- The error below shows up because the queried table name needs to be corrected. Rectify the specified table name from
EmployeestoEmployeeData, and the query will be successful.

- Perhaps you wish to abort the query execution immediately after getting an error. If so, using the
-AbortOnErrorparameter. Like in the screenshot below, you will see information about the error.
- Or you can just suppress error messages from popping up with the
-OutputSqlErrorsparameter with a$falsevalue, as shown below. Note that this parameter only accepts Boolean values.

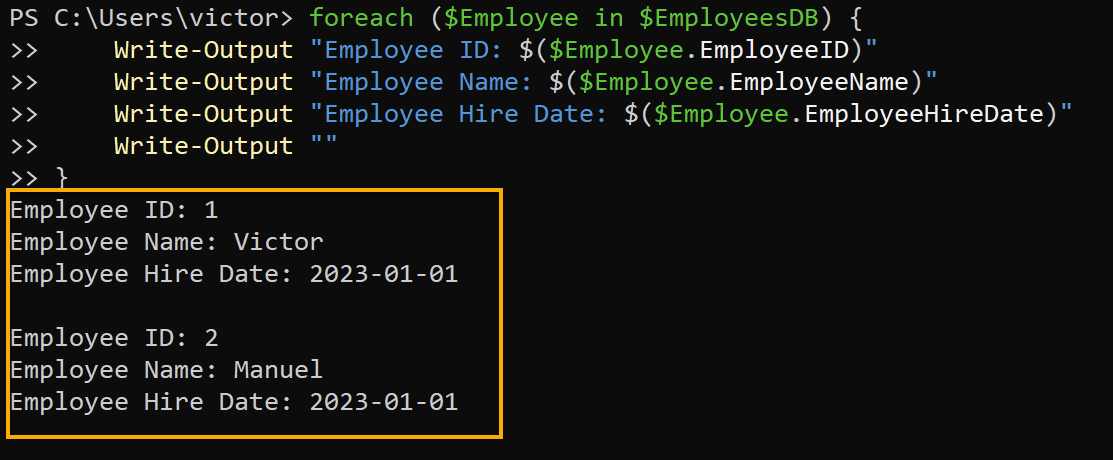
4. Lastly, run the below foreach statement to access and output the data in the $EmployeesDB object to your PowerShell console.
# Print the queried information from EmployeesDB
foreach ($Employee in $EmployeesDB) {
	Write-Output "Employee ID: $($Employee.EmployeeID)"
	Write-Output "Employee Name: $($Employee.EmployeeName)"
	Write-Output "Employee Hire Date: $($Employee.EmployeeHireDate)"
	Write-Output ""
}
As you can see below, with the Write-Output commands, the retrieved data are printed to the console.
Inserting Data Into a Database From an SQL File
Successfully inserting and querying data felt good, right? But when you have to insert multiple entries, writing the query for each entry can be tedious. Worry not, though. The InputFile parameter with the Invoke-SQLCmd command will come in handy.
Instead of manually writing the queries, use an SQL file with one INSERT query and multiple values of each entry, as follows:
1. Open your preferred text/code editor, populate the following query to the file and save it as run.sql. Notice below that you only have to focus on writing the values for each entry.
The query below inserts new employees to your EmployeeData table.
INSERT INTO EmployeeData (
    EmployeeID,
    EmployeeName,
    EmployeeHireDate
)
VALUES
    (
        3,
        'Jhon',
        '2023-01-02'
    ),
    (
        4,
        'Mike',
        '2023-01-02'
    ),
    (
        5,
        'Peter',
        '2023-01-02'
    );
2. Next, execute the following command, which does not provide output, but runs the query from your SQL file (C:\run.sql).
$EmployeesDB = Invoke-SQLCmd -ServerInstance "$serverName" `
-Database $databaseName `
-Credential $credObject `
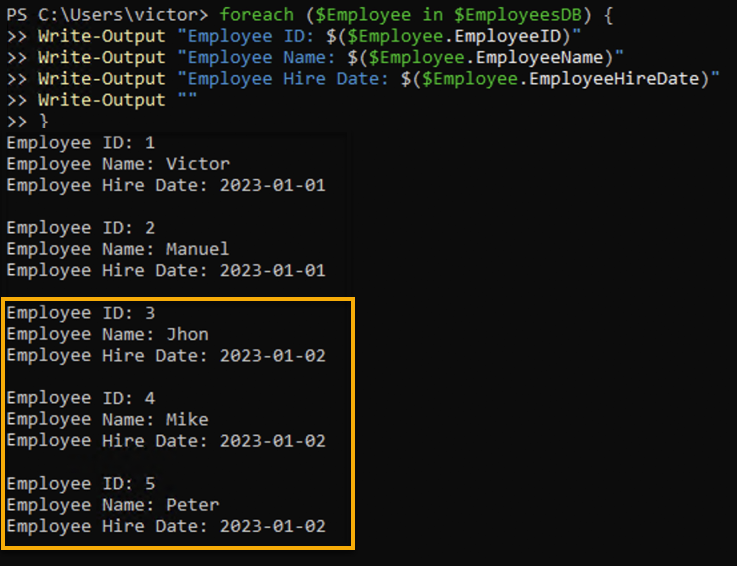
-InputFile "C:\run.sql"3. Now, run the below foreach statement to output data from your EmployeesDB table.
foreach ($Employee in $EmployeesDB) {
	Write-Output "Employee ID: $($Employee.EmployeeID)"
	Write-Output "Employee Name: $($Employee.EmployeeName)"
	Write-Output "Employee Hire Date: $($Employee.EmployeeHireDate)"
	Write-Output ""
}
Below, you can see data from your EmployeesDB table including the three newly-inserted employee data via the run.sql file.
If you need to specify the number of seconds before the query time out, use the
-QueryTimeoutparameter, as shown below. By default, when you run anInvoke-SQLcmdcommand without the timeout parameter, queries do not time out. The-QueryTimeoutparameter indicates how long the command waits for an SQL request to complete.
Invoke-SQLCmd -ServerInstance "$serverName" `
		-Database $databaseName `
		-Credential $credObject `
		-InputFile "C:\run.sql" `
		-QueryTimeout 5
Manipulating Query Outputs
Overall, you have seen how versatile and powerful is the PowerShell Invoke-SQLCmd command for executing SQL queries and scripts. But did you know you can customize the Invoke-SQLCmd command’s output to suit your specific requirements? Yes, by appending the -OutputAs parameter.
You can integrate your customized output with other PowerShell commands and modules to automate and streamline your database management tasks.
To see how you can manipulate query outputs:
1. Run the following command to -Query data from the EmployeeData table and store the output as DataRows to $EmployeesDB. This parameter lets you display query results to a table-like format.
This command does not print output to the console, but you will verify the queried data in the following
# Store data in a variable
$EmployeesDB = Invoke-SQLCmd -ServerInstance "$serverName" `
-Database $databaseName `
-Credential $credObject `
-Query "SELECT * FROM EmployeeData;" `
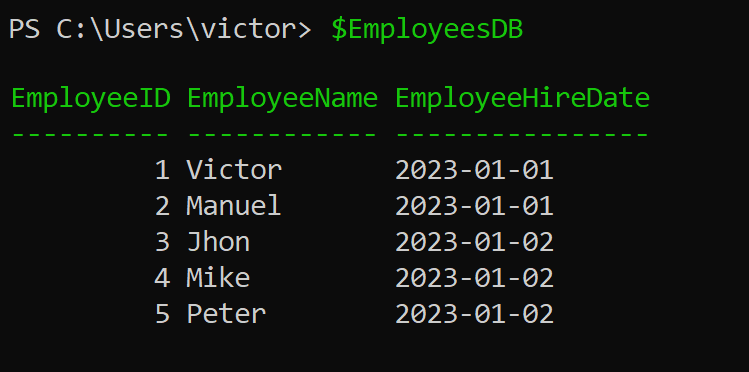
-OutputAs DataRows2. Next, call the $EmployeesDB variable to verify the stored data.
$EmployeesDB
Or append a period, and keep pressing TAB to cycle through different functions you may use, as shown below.

3. Run the same command below as in the previous step, but this time, replace the DataRows value with DataSet. This parameter value lets you save the query results into an XML-formatted object ($xmlEmployeeData).
Like the previous example, this command does not produce output to the console, but you will verify the output in the next step.
$xmlEmployeeData = Invoke-SQLCmd -ServerInstance "$serverName" `
		-Database $databaseName `
		-Credential $credObject `
		-Query "SELECT * FROM EmployeeData;" `
		-OutputAs DataSet
4. Finally, call $xmlEmployeeData and verify the XML-formatted object.
$xmlEmployeeData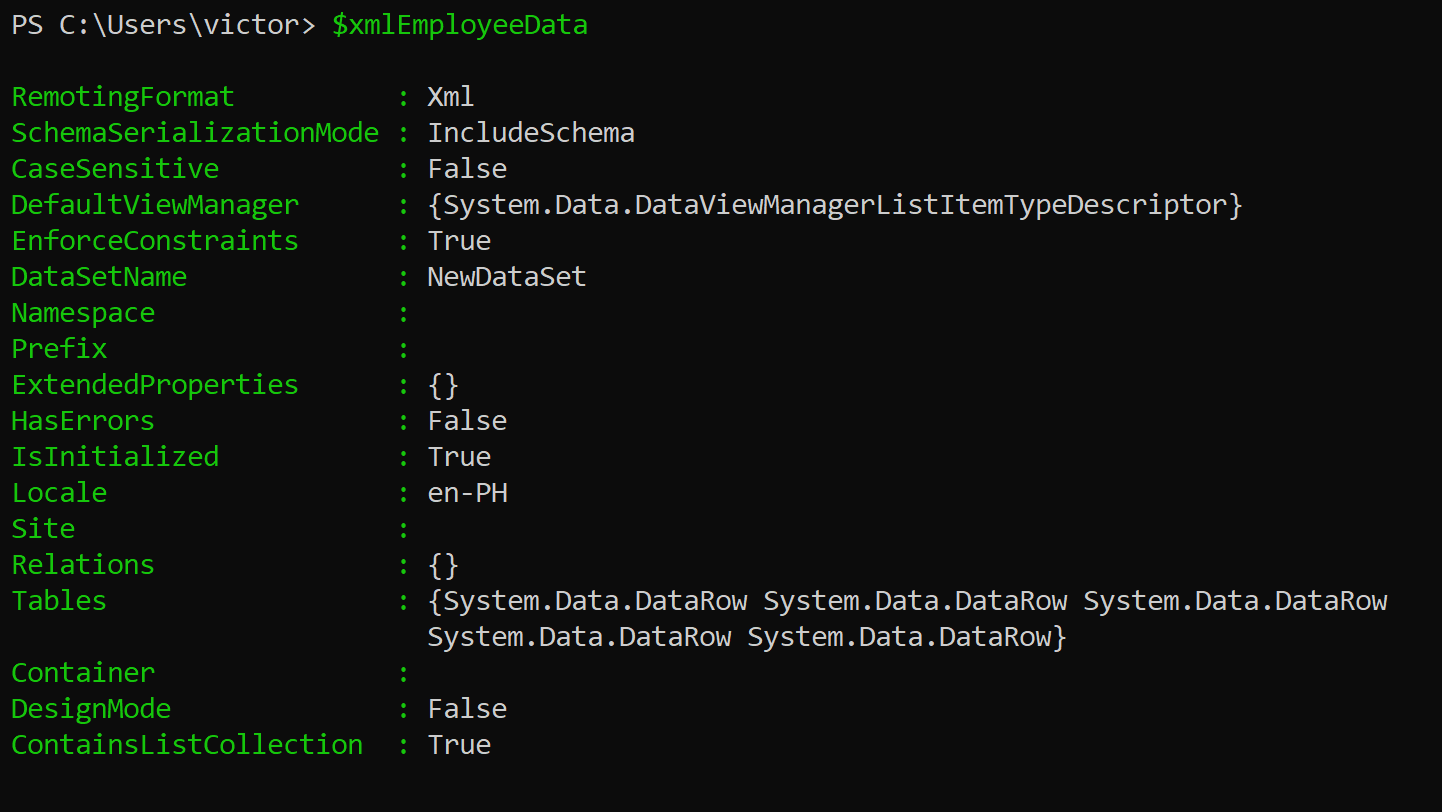
Or run the below command to view the data in a table format (.Tables) like in step two.
$xmlEmployeeData.Tables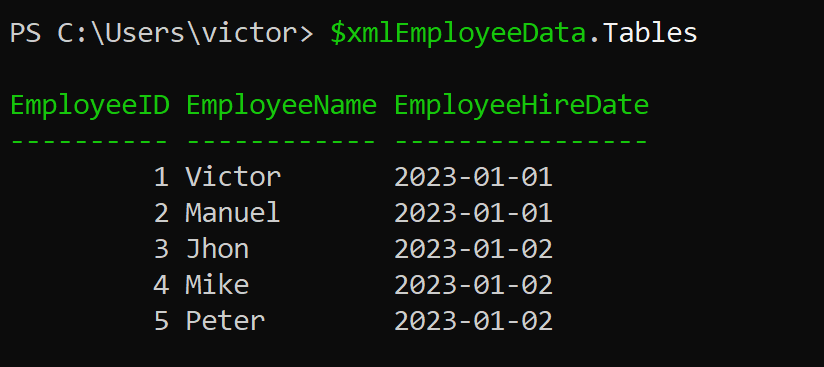
Conclusion
Throughout this tutorial, you have taken the first steps to learning the PowerShell Invoke-SQLCmd command. You have successfully connected to an SQL database, run different queries, and manipulated result outputs.
Working within a GUI, like the SQL Server Management Studio, certainly makes database management less disheartening. But if you know the Invoke-SQLCmd command like the back of your hand, you can accomplish more with PowerShell.
Why not automate daily tasks with the Invoke-SQLCmd command? Or extract data from your SQL servers to manipulate with PowerShell? Whichever next step you choose, good luck in your journey to becoming a PowerShell or DBA expert!


