

Say goodbye to dull, predictable script output! With the PowerShell Write-Output cmdlet, you can add a touch of creativity and personality to your PowerShell scripts.
The Write-Output cmdlet is a powerful tool and a perfect companion for all your automation and system management needs. And in this tutorial, you will learn to maximize the Write-Output cmdlet’s potential.
Ready? Read on and discover the magic of the Write-Output cmdlet!
Prerequisites
This tutorial will be a hands-on demonstration. To follow along, be sure you have a computer with PowerShell installed (preferably the latest version). This tutorial uses Windows 10 with PowerShell 7 installed.
Outputting Objects to the Console
The PowerShell Write-Output cmdlet writes objects to the output stream and displays the output of a command or message in the console. But you will be surprised how this tool makes the output more meaningful and valuable.
Instead of displaying the output in the console, use the Write-Output cmdlet to customize the output. The Write-Output cmdlet can output any object or data type, such as strings, integers, arrays, and even complex objects.
Run the below command to output a Hello, World! message to the console.
Write-Output "Hello, World!”Below, you can see the most basic function of the Write-Output cmdlet. But read on to learn more intermediate to advanced usage of this cmdlet.<>

Passing Objects to Another Command
In addition to displaying the output in the console, you can use the Write-Output command to send the object to another command for further processing. How? By using the pipeline operator (|). Pipelining makes Write-Output a handy and versatile command for automation and system management tasks.
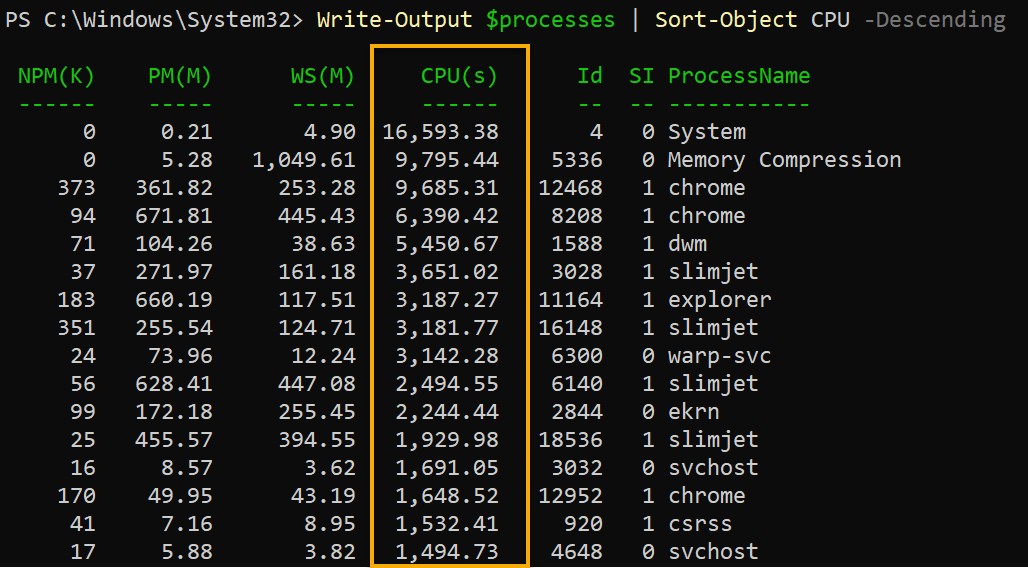
Suppose you wish to see which process consumes most of your resources, like the CPU.
Run the commands below to perform the following:
- Retrieve a list of all processes (
Get-Process) running on your system. - Output the list to the pipeline, which is then passed to the
Sort-Objectcommand. The pipeline operator allows you to chain multiple commands together and process the output of one command as the input for another. - Sort the list of processes (
Sort-Object) by theirCPUusage in-Descendingorder.
$processes = Get-Process
Write-Output $processes | Sort-Object CPU -Descending
Note that you can put any of the commands in this tutorial into a PowerShell script and run it.
The sorted list is displayed in the console, as shown below.
Outputting Objects with a Custom Format
You have seen the Write-Output cmdlet’s basic output format, which works fine. But if you like, you can also output objects with a custom format to add a personal touch. A custom format can be useful when you wish to display specific object properties or customize the output’s appearance.
To output an object with a custom format, the Format-Custom together with the Write-Output cmdlet will do the trick, as follows:
to create the custom output format, and then pipe the output of the Format-Custom cmdlet to Write-Output.<>
Run the below command, which does not produce output, but creates an object (a hashtable) that contains three properties with the corresponding values to output.
$object = [pscustomobject]@{
Property1 = "Value1"
Property2 = "Value2"
Property3 = "Value3"
}
Now, run the below command to perform the following:
- Create a custom format (
Format-Table) for the output (Write-Output) of your hashtable ($object). TheProperty1,Property2, andProperty3properties are set as columns. - Adjust the column widths (
-AutoSize) to fit the content.
$object | Format-Table -Property Property1, Property2, Property3 -AutoSize | Write-Output
Alternatively, you can use the Format-List cmdlet with Write-Output to output the object as a list of property-value pairs.
$object | Format-List -Property Property1, Property2, Property3 | Write-Output
Passing a Collection Object as a Single Entity
By default, Write-Output sends each collection element through the pipeline separately, a process called enumeration. But you can prevent this behavior by appending the -NoEnumerate parameter, passing the entire collection object as a single entity.
To see how the -NoEnumerate parameter works, follow these steps:
Run the commands below to perform the following:
- Declare an array of
$numbersfrom one to three (1,2,3).
- Count the number of objects (
Measure-Object) passed through the pipeline. - Output the object measurement (
Write-Output $numbers).
Without the NoEnumerate parameter, Measure-Object returns a count of three (3), as each element of the $numbers array was enumerated and passed individually through the pipeline.
# Declares an Array
$numbers = 1,2,3
# Outputs the object count passed through the pipeline
Write-Output $numbers | Measure-Object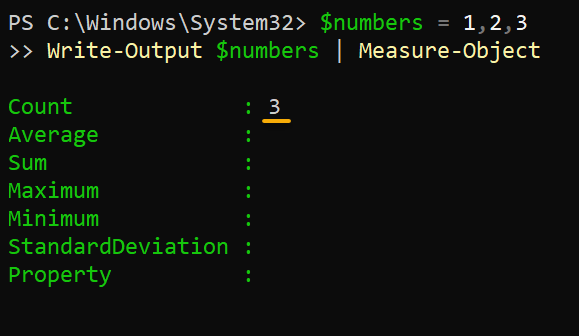
Now, run the following commands to output the count of the objects passed through the pipeline.
But since you appended the -NoEnumerate parameter, the Measure-Object cmdlet treats the object as a single entity, returning a count of one (1).
# Declares an Array
$numbers = 1,2,3
# Outputs the object count as a single entity passed through the pipeline
Write-Output -NoEnumerate $numbers | Measure-Object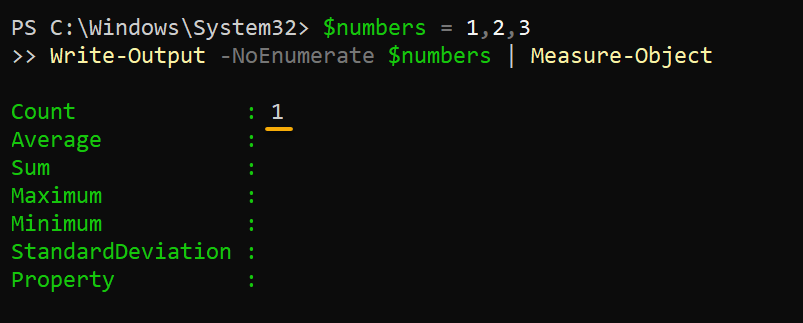
Enclosing the
Write-Outputcommand in parentheses (i.e.,(Write-Output 1,2,3)) will force enumeration to happen regardless of the-NoEnumerateparameter.
Creating a Menu System and Input Prompts
Another excellent use of the Write-Output cmdlet is creating a menu system with a PowerShell script that prompts the user for input.
Create a .ps1 file with your preferred text/code editor, populate the code below, and save the file. You can name the file as you like, but this tutorial’s choice is myoutput.ps1.
The code below uses a loop to continually prompt the user to select an option from a list of options until the user selects the Exit option.
# Initialize the $exit variable to $false
$exit = $false
# Start a loop that will run until the user selects the "Exit" option
while (!$exit) {
# Display a list of options to the user
Write-Output "Please select from the following options:"
Write-Output "1. Option 1"
Write-Output "2. Option 2"
Write-Output "3. Option 3"
Write-Output "4. Exit"
# Prompt the user for a selection
$selection = Read-Host
# Use a switch statement to execute different codes based on the user's selection
switch ($selection) {
1 {
# If the user selects option 1, display a message and do something for option 1
Write-Output "You selected Option 1."
# Do something for option 1
}
2 {
# If the user selects option 2, display a message and do something for option 2
Write-Output "You selected Option 2."
# Do something for option 2
}
3 {
# If the user selects option 3, display a message and do something for option 3
Write-Output "You selected Option 3."
# Do something for option 3
}
4 {
# If the user selects option 4, set $exit to $true to exit the loop
$exit = $true
}
}
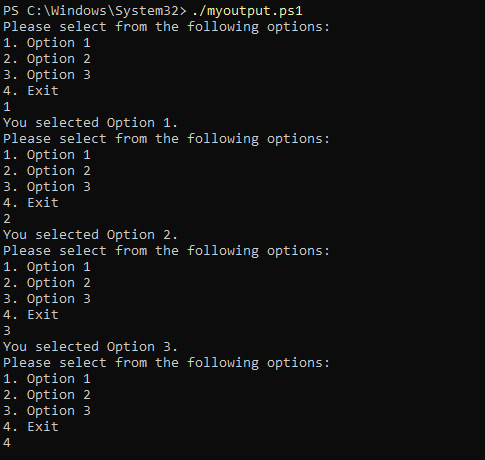
}Now, run the script (myoutput.ps1) from the working directory.
./myoutput.ps1As shown below, the message associated with your selection is displayed when you choose options 1, 2, or 3. But when you select option 4, the script terminates.
Displaying a Splash Screen or Welcome Message
Besides listing options the users can choose from, with Write-Output, you can also display a splash screen or a welcome message. Fancy splash screens make a good impression (professional and polished) on your script.
Replace the code in your myoutput.ps1 file with the one below, which outputs a splash screen (a banner of a welcome message) when you run your script.
You can customize the splash screen by modifying the text and formatting of the banner. You can add additional elements, such as a logo or text, to the splash screen as desired.
# Clear the screen
Clear-Host

# Display the splash screen using Write-Output
Write-Output "##############################################"
Write-Output "#                                            #"
Write-Output "#   Welcome to the SuperScript 3000!         #"
Write-Output "#                                            #"
Write-Output "##############################################"
Now, run the script and see how your splash screen looks.
./myoutput.ps1
Displaying a Progress Bar
When running scripts, a progress indicator eliminates a user’s anxiety about whether the script is running or not. Progress bars can be useful for indicating the progress of a long-running script or operation to the user. Luckily, with the Write-Output cmdlet, you can craft a progress bar to your liking.
Open your myoutput.ps1 file, and add the code below to the bottom of the existing one in the script file.
The code below uses a while loop to iterate through several steps. In this example, 100 steps. Each iteration of the loop calculates the percentage of steps that have been completed and displays a progress bar using Write-Output.
The progress bar is created using a combination of the following operators:
*– Repeats a string a specified number of times$()– Allows the output of an expression to be included in a string.
The script then pauses (Start-Sleep) for 1 second to simulate progress before moving on to the next step.
# Set the total number of steps for the progress bar
$steps = 100

# Initialize the counter for the current step
$currentStep = 0

# Start a loop that will run for the number of steps
while ($currentStep -lt $steps) {
  # Increment the current step counter
  $currentStep++

  # Calculate the percentage of steps completed
  $percentComplete = [int] ($currentStep / $steps * 100)

  # Display a progress bar using Write-Output
  Write-Output "Progress: [$("=" * $percentComplete)$(" " * ($steps-$percentComplete))] $percentComplete% complete"

  # Pause for 1 second to simulate the progress
  Start-Sleep -Seconds 1
}
Now, run the script and see how the progress bar works.
./myoutput.ps1Below, you can see the splash screen together with the progress bar.
Conclusion
In this tutorial, you have seen how Write-Output can easily output objects, data types, and custom formats. Moreover, you touched on using the pipeline operator to send output to other commands for further processing.
Whether you are writing a simple message output or complex automation tasks, Write-Output is an indispensable tool for creating more informative and professional PowerShell scripts.
With this newfound knowledge, why not write your outputs to different file types, like .txt and .xml files? Regardless of the intent, output copies come in handy in troubleshooting issues with your system or applications. The Write-Output and the Out-File cmdlet grant you the power you never knew you needed.


