


PowerShell is a powerful scripting language that provides many features for automation and managing Windows-based systems. One of the most commonly used constructs is the PowerShell while loop.
Worry not if you have been stuck in an endless loop while trying to learn PowerShell scripting. Let the PowerShell while loop guide you to your great escape. And in this tutorial, you will jump back to the basics of working with while loops in PowerShell as you write your scripts.
Read on to take your PowerShell scripting skills to the next level!
Prerequisites
This tutorial will be a hands-on demonstration. To follow along, be sure you have the following:
- A Windows machine – This tutorial uses Windows 10.
- Windows PowerShell 5.0 or higher installed – This tutorial uses PowerShell 7.
- A user account with administrator privileges.
Executing Single Condition while Loops
One of the simplest types of while loop is the single condition type. Unlike the If statement, this type of loop executes a set of given commands so long as a specified condition evaluates to true. When a ‘False’ is returned, the loop breaks, and the execution continues with the rest of the script.
Below is the syntax for a single condition while loop:
- The first thing you will notice is the use of parentheses. The condition must be enclosed in parentheses, while the code block is a set of PowerShell commands that executes while the condition is true.
- The second thing to note is that the condition must return a Boolean value, which evaluates to either True or False.
while (condition)
{
# Code block to execute
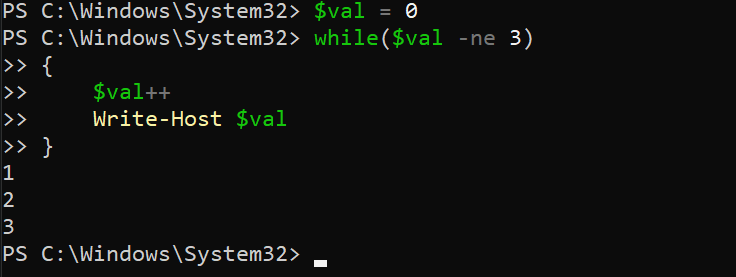
}Run the code below, where the value of $val starts at 0 and is incremented by 1 each time the code block runs until the $val variable’s value equals 3.
When $val reaches a value of 3, which makes the condition False, the loop breaks, and execution continues with the rest of the script.
# Declares the $val variable with the initial value of 0
$val = 0

# Sets the while loop to run until the $val variable's value reaches 3
while($val -ne 3)
{
	# Increments the $val variable's value by 1
	$val++

	# Prints the current value of the $val variable
	Write-Host $val
}
Executing PowerShell While Loop with Built-in Variables ($true/$false)
The previous example, using conditions in the while loop, works fine. But you can also use PowerShell’s built-in variables, such as $true and $false, to create a While loop.
The syntax below executes until $true is no longer $true. In other words, the loop runs forever. But you must always include a way to break out of an infinite loop. Otherwise, you are forever stuck. You will learn more about how to break from a loop using break and continue later in this tutorial.
while($true)
{

	# Code block to execute

}
Execute the code block below, which runs forever, printing the value of $i to the console.
# Declares the $i variable with the initial value of 0
$i = 0

# Sets the While loop to run while the condition is $true
while($true)
{
	# Increments the $i value by 1
	$i++

	# Prints the $i variable's current value
	Write-Host $i
}
Now, press Ctrl+C to break out of the loop. This loop consumes many system resources, so be careful when using them.

while loop with PowerShell’s built-in ($true) variableExecuting Multi-Condition While Loops
In addition to single-condition while loops, you can also create multi-condition while loops. Like the single condition While loop, the conditions must return a Boolean value, either True or False.
Below is the syntax for a multi-condition while loop, similar to the syntax for a single-condition while loop. The main difference is that you can include multiple conditions separated by the following operators:
- AND (
-and)- Both conditions must be true. - OR (
-or) (Either condition can be true).
# AND operator
while (condition1 -AND condition2)
{

	# Code block to execute

}

# OR operator
while (condition1 -OR condition2)
{

	# Code block to execute

}
Execute the code below, which loops while $val is not equal (-ne) to 3 -and $i is not equal (-ne) to 5.
When both variables’ values reach their respective conditions, the loop breaks, and execution continues with the rest of the script.
# Declares the $val and $i variables with initial values of 0
$val = 0
$i = 0

# Sets the While loop to execute until $val is equal to 3 and $i is equal to 5
while($val -ne 3 -and $i -ne 6)
{
	# Increments $val by 1
  $val++
	# Increments $i by 2
  $i += 2
	# Prints $val and $i variables' current value
  Write-Host "$val, $i"
}
Executing a while loop with AND operator
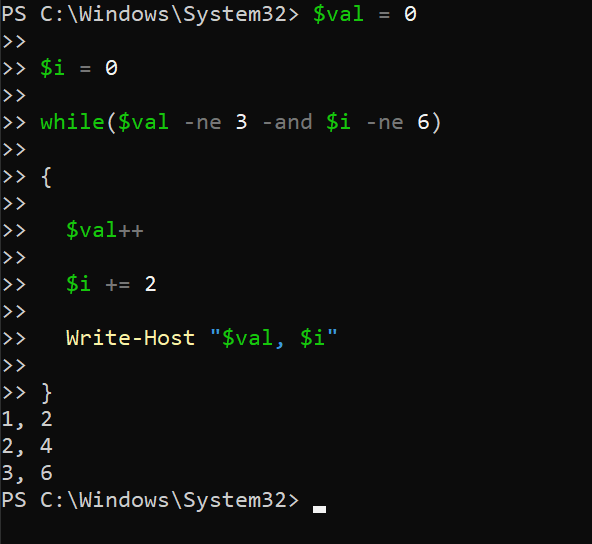
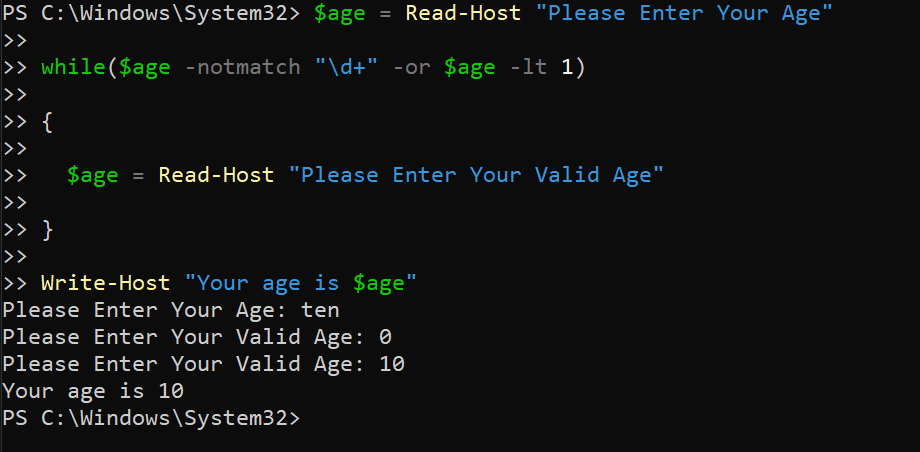
while loop with AND operatorNow, execute the below code, which asks the user for their age, stored in the $age variable.
If the user enters a number either less than (-lt) 1 or is not a number (-nomatch), the user is prompted again to enter a valid number. This behavior is useful in giving users multiple chances to enter valid input.
# Prompts the users to enter their age
$age = Read-Host "Please Enter Your Age"

# Sets the While loop to run until the user provides a valid input
while($age -notmatch "\\d+" -or $age -lt 1)
{
	# Re-prompts the user to enter a valid age number
  $age = Read-Host "Please Enter Your Valid Age"
}
# Prints the valid age input
Write-Host "Your age is $age
In the output below, you can see the user was prompted to enter their age three times, as follows:
- The first time, the user entered ten, which is not a number.
- The second time, the user entered 0, which is below 1.
- The third time, the user entered 10, which is a valid age.
while loop with the OR operatorUsing BREAK and CONTINUE Keywords in While Loops
You have seen how while loops add flexibility to your PowerShell script. But to better control, your While loops’ execution, add the break and continue keywords.
For example, if you only want to process a certain number of items in an array, you can use the BREAK keyword to exit the loop when the desired number of items has been processed.
These keywords function as follows:
| Keyword | Function |
|---|---|
| break | Immediately exits the loop and continues execution with the rest of the script. |
| continue | Skips over the remaining code block in the current iteration of the loop and continues with the next iteration. |
Execute the code below, which loops through an array of 10 items.
In the code below, the if statement checks the value of $i. If the value of $i is 5, the continue keyword skips over the remaining code in the loop and continues with the next iteration. If the value of $i is 8, the break keyword exits the loop and continues with the rest of the script.
Otherwise, the while loop prints (Write-Host) and increments the $i variable’s value by 1.
# Declares an $array of 10 items
$array = 1..10
# Declares the $i variable with the initial value of 0
$i = 0
# Sets the While look to execute until the condition is met
while($i -lt $array.Count)
{
	# Checks if $i equals 5
  if($i -eq 5)
  {
		# If yes, increment $i by 1
    $i++
		# Continue with the next iteration
    continue
  }
	# Checks if $i equals 8
  if($i -eq 8)
  {
		# If yes, break the While loop and continue with the rest of the script
    break
  }
	# Prints the current value of $i
  Write-Host "Processing item $i"
	# Increments $1 by 1
  $i++
}
As you can see in the output below, the loop skipped over the fifth and eighth items in the array. The while loop processed all other items in the array and exited after reaching the eighth item.

while loop with break and continue keywordsLimiting the Time a While Loop Runs
Typically, you may want to limit the amount of time a loop runs. Perhaps you are trying to connect to a remote server. If so, you can give the server time to respond before timing out and exiting the loop by using the Start-Sleep cmdlet inside your while loop.
The Start-Sleep cmdlet pauses the execution of the script for a specified amount of time.
Execute the code below to get and store the current date and time Get-Date in the $startTime variable. The while loop runs while the current date/time is less than 10 seconds from the value stored in $startTime.
As the while loop runs, a message prints while the Start-Sleep cmdlet pauses the execution of the script for 1 second.
The code block below is just a boilerplate for what you would actually use in practice. You can put more in the code inside the loop as needed.
# Get and store the current date/time
$startTime = Get-Date
# Sets the While loop to run while the current date/time is less than 10 seconds
	# from the value stored in $startTime.
while((Get-Date) -lt ($startTime.AddSeconds(10)))
{
	# Prints a message
  Write-Host "Waiting for server to respond..."
	# Pauses the script for one second
  Start-Sleep -Seconds 1
}
Below, you can see the loop continued to run for 10 seconds before exiting the loop.
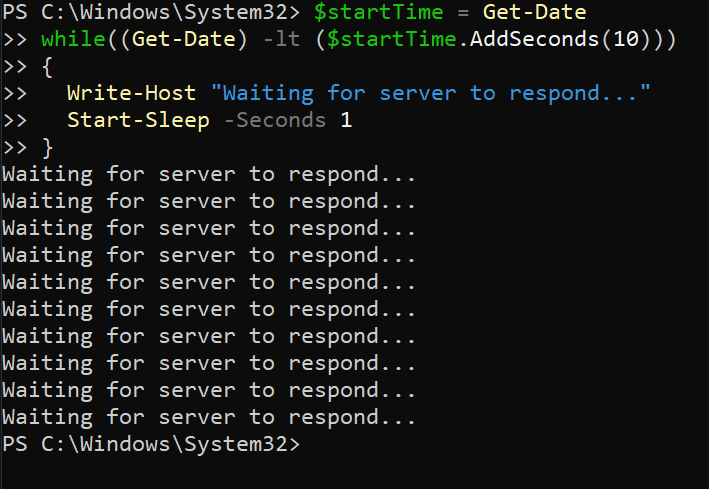
while loop runsConclusion
PowerShell while loops come in handy when faced with complex concepts to avoid getting stuck in a loop or as you write your scripts. And in this tutorial, you have learned many ways to work with while loops for more flexible and powerful scripts.
With this newfound knowledge, the sky is the limit. So why not maximize the use of logical operators and keywords to automate tasks with your scripts?


