


Did you run a script that read a text file and discover that the file had several wrong entries? A PowerShell text editor may come in handy in such situations. You wouldn’t need to fire up an external editor. Instead, you can edit the file without leaving PowerShell. How cool is that?
Keep reading, and you will learn how to install and use three text editors (Nano, Vim, and Emacs) to edit your text files within PowerShell. This tutorial will also cover the benefits of each to help you choose which one is ideal for you.
Let’s get started!
Prerequisites
This tutorial will be a hands-on demonstration. If you’d like to follow along, be sure you have the following:
- A computer running on Windows 7 or higher. The examples in this tutorial will use Windows 10 version 21H1.
- Windows PowerShell v3+ or PowerShell Core v6+. This tutorial will use Windows PowerShell version 5.1.
- The latest version of Chocolatey (v0.11.2 as of the writing of this tutorial).
Using Nano as a PowerShell Text Editor
If you are new to terminal-based text editors or only need to make a quick edit to a file, Nano is ideal for you. Nano is lightweight, intuitive, and more suited for light text editing tasks compared to the other more advanced editors in this tutorial.
Installing Nano
To install Nano, follow the steps below.
1. Open PowerShell as an Administrator.
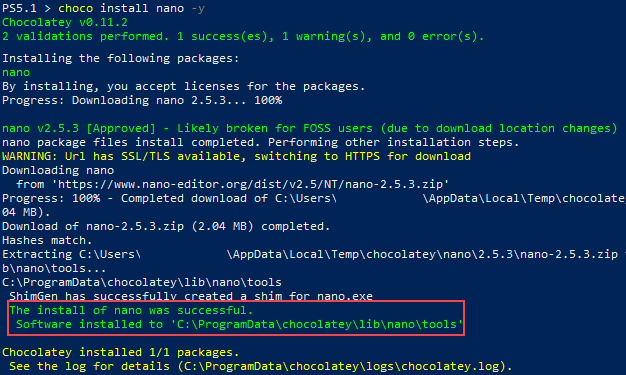
2. In PowerShell, execute the following choco install command to install the Nano text editor. The (-y) switch will bypass the confirmation prompt and proceed with installing the package.
choco install nano -yThe installation process would look similar to the screenshot below. As you can see, in this example, the Nano installation was successful.
3. After installing Nano, run the following command to verify the installation was successful and display the current version.
nano --versionAs you can see below, the command was successful and displayed the Nano version on your computer.

Editing and Saving a File
Now that you have Nano installed, it’s time to take it for a spin!
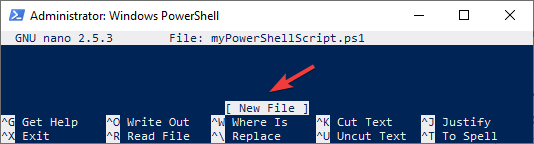
1. To create a new file or open an existing one, run the nano command and follow it with the filename to create or open. For the examples in this tutorial, you will be creating and editing a Windows PowerShell script, which uses the .ps1 file extension. The command below will create a new file called myPowerShellScript.ps1 on the current directory.
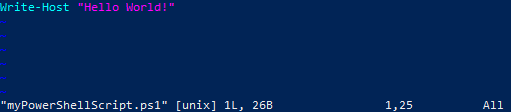
nano myPowerShellScript.ps1The Nano text editor will open within PowerShell. As you can see on the image below, near the bottom says [New File], indicating the Nano has opened a new empty file.
To view all available shortcut commands, press
CTRL+Gon your keyboard to display the help documentation. Commands that start with^means that you have to press theCTRLkey. On the other hand, if the command starts withM, you need to press theALTkey.
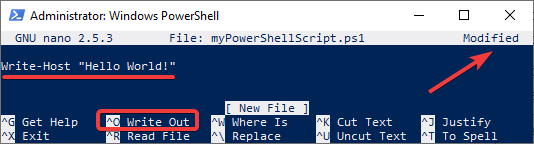
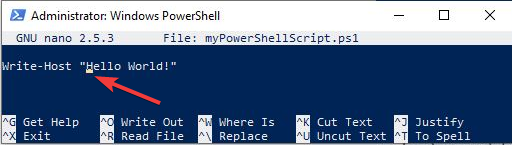
2. Next, start writing your script using the arrow keys on your keyboard to move the cursor. For example, type in the Windows PowerShell command Write-Host "Hello World!" as shown in the following image. When executed, this command will print out the text “Hello World!” to the console.
Notice that once you modify the file’s content, the word Modified appears on the top-right corner of the editor. After editing, press CTRL+O to tell Nano that you want to save the file.
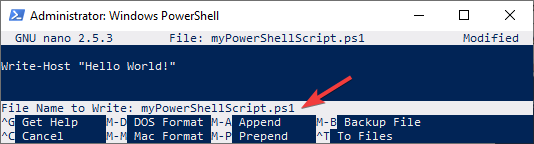
3. Nano prompts you to enter the file name to write the changes. Press Enter to confirm.
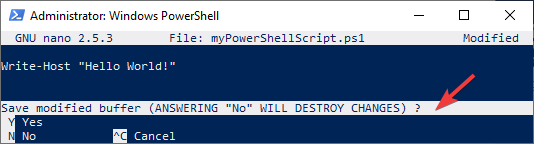
4. Finally, to exit Nano, press CTRL+X.
If you try to exit the editor while there are pending changes, Nano will ask you to save or ignore the changes. If you choose to save, press
Yand specify the filename to write as you did in step 3. Otherwise, pressNto discard the changes.
5. Now run your script by executing the following command. The following command assumes your file is in the C:\ folder.
& C:\myPowerShellScript.ps1The script will print the message ‘Hello World!’ to the terminal, as shown in the following image.

Searching and Replacing Text
Now that you know how to edit and save a file, it’s time to learn to do something slightly more advanced: searching for and replacing strings!
To search for a string, follow these steps.
1. First, open the text file in the Nano editor, if not open yet.
2. Once you’ve opened the text file, press CTRL+W on your keyboard to invoke the Where Is command.
3. Next, type the string to search for next to the Search prompt and press Enter. The example below will search for the word Hello.
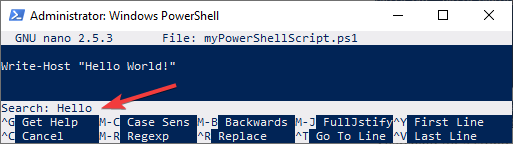
If the string exists in the file, your cursor will move next to it, as shown below.
To search and replace a string, proceed as follows.
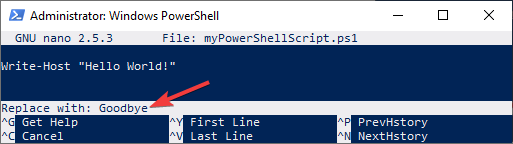
1. Press CTRL+\ on your keyboard to open the search and replace menu. Next to the Search (to replace) prompt, type the string you wish to replace, and press Enter.
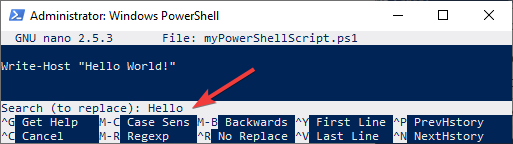
2. Next, at the Replace with prompt, type the new word and press Enter. In the example below, the replacement word will be Goodbye.
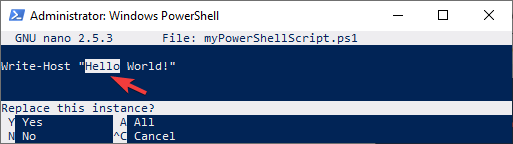
3. Lastly, choose to replace only the current instance or all instances of the matching word in the file. The choices are:
- To replace the single instance, press
Y. - To replace all instances, press
A. - To skip this instance, press
N. - To cancel the replace operation, press
CTRL+C.
In this example, press Y to replace the current instance.
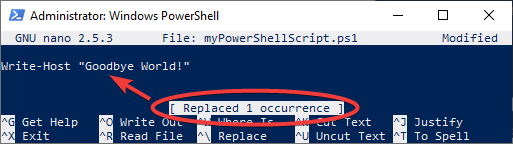
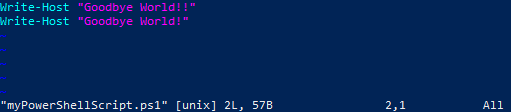
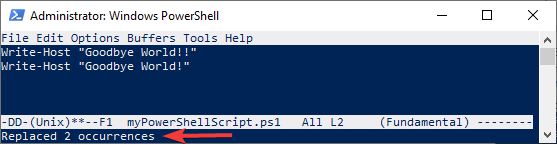
Nano will state the number of occurrences replaced if the replace operation is successful, as shown in the following image.
4. Press CTRL+X on your keyboard to exit Nano and press Y to save the buffer. Re-run your script. The new message ‘Goodbye World!’ will be printed in your terminal.

Using Vim as a PowerShell Text Editor
Vim offers more features than Nano, such as session recovery, syntax coloring, window splitting, and auto-completion. Nano is meant for quick file edits, while Vim is also a lightweight alternative to an IDE.
But, the extra features Vim offers come at the cost of a steeper learning curve. Don’t get discouraged, though. Vim is an excellent editor to learn.
Installing Vim
Now it’s time to get started by installing Vim.
1. Open PowerShell as an Administrator.
2. In the PowerShell terminal, execute the following command to install the Vim editor.
choco install vim -y3, To verify the Vim version, run the following command. vim --v
vim --version
Editing and Saving a File
Now that you have Vim installed, it’s time to get your hands dirty and learn to edit a file. Before you go any further, you should know that there are different modes in Vim. Each mode behaves differently and affects which actions you can do inside the editor.
The three commonly-used modes are:
- Normal – The default mode as soon as you open Vim. This mode allows you to navigate the text file but not add new texts.
- Insert – This mode is where Vim allows you to edit the file. To enter this mode, press
i(case insensitive) on the keyboard. To exit and go back to the normal mode, pressESC. - Command – In this mode, Vim lets you invoke commands such as save the file, quit Vim, or view the help document, among others.
Moving on to editing a file in Vim, follow the steps below.
1. To open a file in Vim, run the vim command followed by the filename to open. The command below opens the myPowerShellScript.ps1 file.
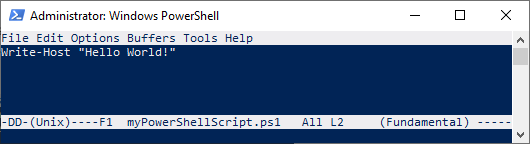
vim myPowerShellScript.ps1The vim text editor will open, as displayed in the following image. Note that the PowerShell command ‘Write-Host’ and the message ‘Hello World!’ display in different colors, as Vim supports syntax coloring.
If you need to view the Vim help document, type
:hand press Enter. Pressing the:character while in normal mode switches Vim to command mode, whilehmeans to open the help file. To exit the help document, type:qand press Enter to return to normal mode.
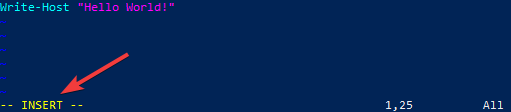
Next, enter the insert mode by pressing i. As you enter the insert mode, the text -- INSERT -- appears at the bottom of the editor, as shown in the following image.
3. Now that you are in insert mode edit the file as you wish. The arrow keys will let you move the cursor inside the editor.
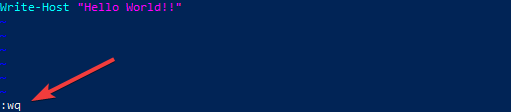
4. After editing, press Esc to return to normal mode.
5. Type the command :wq and press Enter to save and close the file. The command w saves the files while q exits Vim.
Searching and Replacing Text
Follow the steps below to search for strings in Vim.
1. Open the file you want to edit in Vim.
2. On the Vim editor, to search for a string, run the command below, where <string> is the string you want to search.
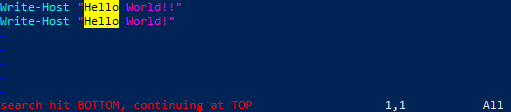
:/<string>For example, to search for the word Hello, type:
:/HelloVim will highlight the matching words, as shown in the following image.
To iterate through multiple instances of the matching texts, press
nto move to the next occurrence or theNkey for the previous occurrence.
3. Lastly, to replace every instance of a string in the entire file, run the command below, where <old> is the text to replace and <new> is the replacement text.
:%s/<old>/<new>/gFor example, the command below will replace the word Hello with the word Goodbye.
:%s/Hello/Goodbye/g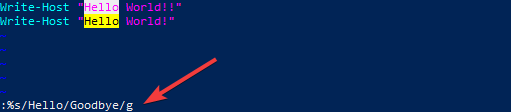
As a result, Vim replaces the text as you can see below.
4. Type the command :wq and press Enter to save and close the file. Re-run the script. The output will display your new message.

Using Emacs as a PowerShell Text Editor
Like Vim, Emacs offers more features than Nano. Moreover, Emacs is also an Integrated Development Environment (IDE). Some of Emacs’ features include syntax coloring, editing multiple files simultaneously, and auto-indentation.
Another benefit of Emacs over the other editors in this tutorial is Emacs is modeless. Emacs is also fully customizable. If there is something that Emacs does not offer, you can add support for it yourself using Emacs Lisp.
Installing Emacs
Follow the steps below to install Emacs.
1. Open PowerShell as an Administrator, if you haven’t yet.
2. In the PowerShell terminal, run the following command to install Emacs using Chocolatey. choco install emacs -y
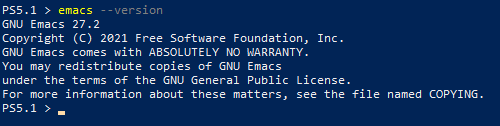
choco install emacs -y3. Run the following command to verify the Emacs version that you installed. emacs --version
choco install emacs -yYou should see an output similar to the image below showing the Emacs version on your computer.
Editing and Saving a File
So you’ve installed Emacs. What next? Dive in and start editing a text file to see Emacs in action. Follow the steps below to edit and save a text file.
1. To open a file in Emacs, run the emacs command followed by the filename in PowerShell. The command below opens the file myPowerShellScript.ps1 for editing. The -nw switch tells emacs to open the editor within the current terminal window (PowerShell) and not in a separate GUI. emacs -nw myPowerShellScript.ps1
emacs -nw myPowerShellScript.ps1Several dropdown menus will be available at the top of the editor. To view the Emacs help documentation, click the Help dropdown menu.
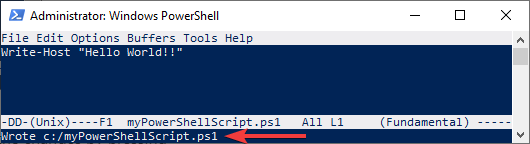
2. Edit the file as you wish and once you’ve completed your edits, save the changes by pressing CTRL+X and CTRL+S consecutively. You will see the file save confirmation at the bottom of the editor, as shown below.
3. To exit the editor, press CTRL+X on your keyboard, followed by CTRL+C.
Searching and Replacing Text
Now that you know the basics of Emacs, how running a search and replace operation? Follow the steps below to do so.
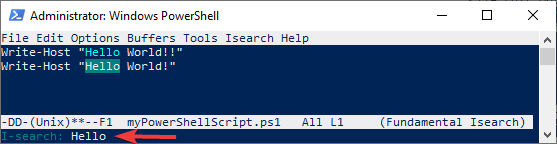
1. Press CTRL+S and type in the text to search next to the I-search prompt to search for a text. The example below searches for the word Hello.
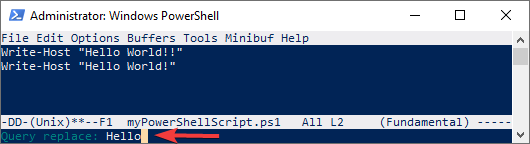
2. To initiate the search and replace option, press ALT+% on your keyboard (the same as ALT+SHIFT+5).
3. Next, type the text to search next to the Query replace: prompt and press Enter.
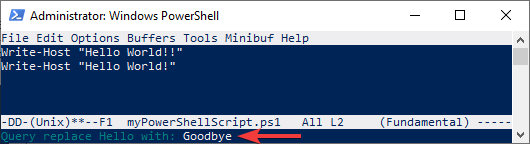
4. Next, type the replacement text next to the prompt and press Enter.
5. Finally, at the Query replacing <old text> with <new text>: prompt, press ! to confirm and replace all occurrences of the text.
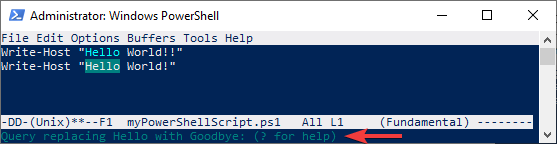
As a result, Emacs replaced the text, as you can see below. Additionally, Emacs shows the number of occurrences of the text it replaced at the bottom of the editor.
6. Exit the editor by pressing CTRL+X on your keyboard, followed by CTRL+C. Re-run the script. The output will display your new message.

Conclusion
Throughout this tutorial, you have learned the basics of using three PowerShell text editors and the benefits of each. Next time you have to edit a file from the terminal, do not waste time setting up an external text editor. Simply open Nano, Vim, or Emacs and make your changes in a few keystrokes!
Which PowerShell text editor did you like best? Do you know of other text editors that weren’t in this tutorial?


