


If you’ve ever felt overwhelmed while working with SQL Server Management Studio (SMSS), you’re not the only one. Understanding all the features SQL Server Management Studio offers can be a challenge. Fortunately, this tutorial is here to help you get started with SQL Server Management Studio (SSMS) efficiently.
In this guide, you’ll master the fundamentals of SQL Server Management Studio, such as establishing a server connection, executing queries, and building databases.
Continue reading to enhance your SQL Server Management Studio expertise!
Prerequisites for SQL Server Management Studio
This tutorial provides a practical demonstration. If you wish to follow along, ensure you meet the following prerequisites:
- A Windows machine – This guide focuses on Windows 10, but subsequent versions are compatible as well.
- MySQL Server on your device – We recommend using Microsoft SQL Server Express, a complimentary, streamlined version of SQL Server.
- A MySQL database server to connect to, either on your local machine or a remote server.
Downloading and Installing SQL Server Management Studio (SSMS)
SQL Server Management Studio (SSMS) is a free tool that offers an integrated environment for overseeing any SQL infrastructure, ranging from SQL Server to Azure SQL Database. It provides a user-friendly interface to handle databases and objects on your server.
However, to fully harness the power of SQL Server Management Studio, it’s crucial to install it correctly. This section will guide you on how to set up SSMS to write, test, and modify queries and database schemas on both local and cloud platforms.
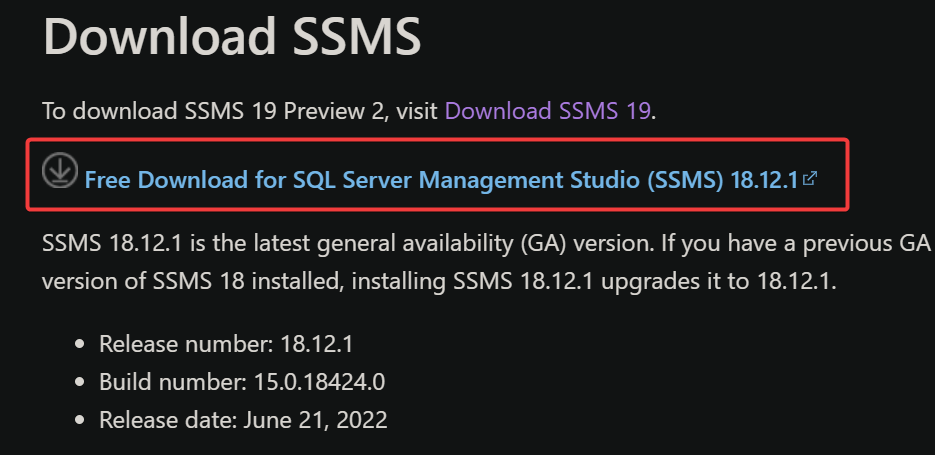
1. Launch your preferred web browser and navigate to the SQL Server Management Studio download page.
2. Proceed to the ‘Download SSMS’ section and select the ‘Free Download for SQL Server Management Studio (SSMS)’ link to initiate the download.
Given that the file is approximately 700MB, the download duration will vary based on your internet speed.
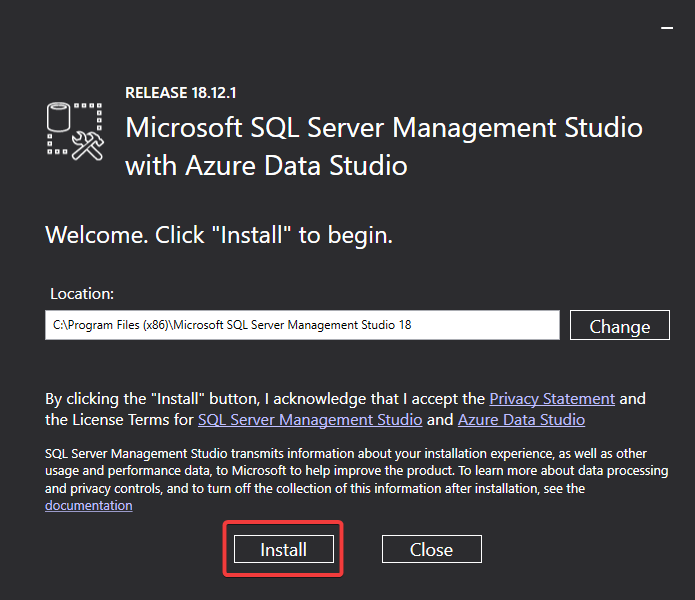
3. Once downloaded, double-click on the file to run the SQL Server Management Studio installer.
4. Press the ‘Install’ button to begin the installation. You have the option to modify the default installation path, but for the majority, the default location suffices.
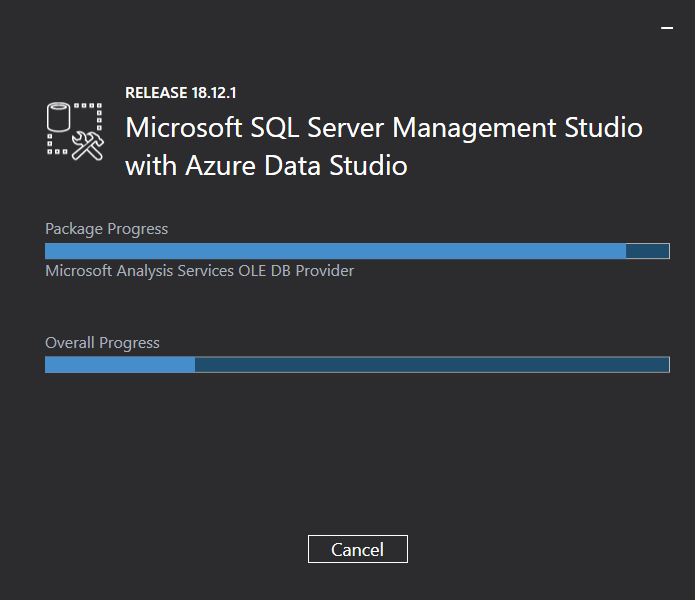
The installation of SQL Server Management Studio will process, extract, and place the necessary files, which might take several minutes.
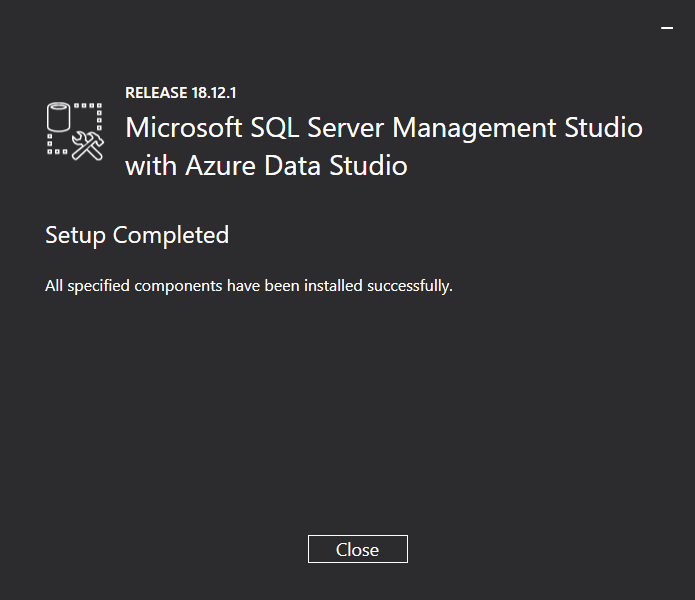
Upon successful installation, the Setup Completed screen will appear, as depicted below.
Congratulations! You’ve just taken a crucial step in mastering SQL Server Management Studio (SSMS) by successfully installing it on your device.
Verifying the MySQL Server in SQL Server Management Studio is Active and TCP/IP Port is Accessible
You’ve successfully installed SQL Server Management Studio (SSMS), but to manage SQL databases, you must first connect to a database server. This guide will help you connect to a MySQL server using SSMS.
But before attempting to connect to a MySQL server, ensure your MySQL server is operational and that the TCP/IP port is accessible.
1. Begin by launching PowerShell as an administrator to access elevated privileges.
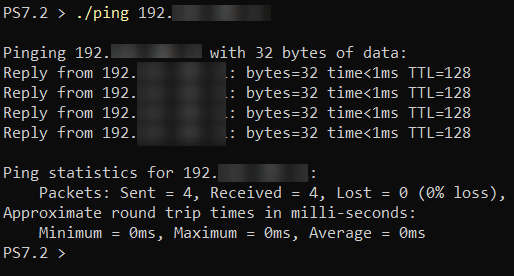
2. Use the following ping command to check if your TCP/IP port is open. Ensure you replace ‘your-ip’ with your MySQL database server’s actual IP address.
./ping your-ipA successful ping response, like the one shown below, indicates your MySQL database server is online and responsive.
If you encounter a “Request timed out” error message, as shown below, it implies your database server is not accessible, prompting you to inspect your network configuration.
3. To ascertain the MySQL database server’s status within SQL Server Management Studio, execute the following commands:
# Retrieve running services with "sql server" in their names
Get-Service | Where {$_.status -eq 'running' -and $_.DisplayName -match "sql server*"}
# Check if the MySQL (MSSQL15) folder exists
Get-ChildItem -Path "C:\Program Files\Microsoft SQL Server\mssql*" -Recurse -Include Errorlog |select-string "SQL Server is now ready for client connections.” 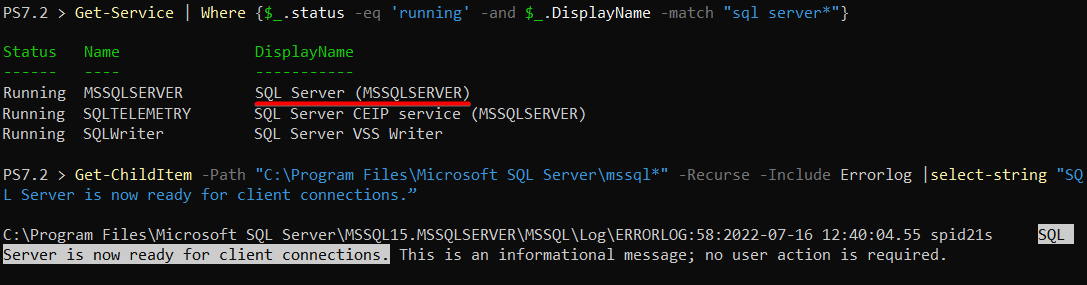
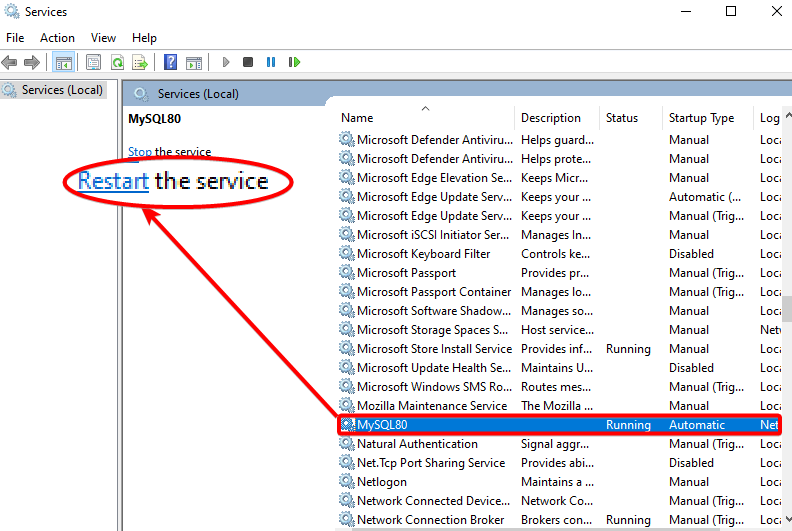
If you notice the database engine service isn’t operational, consider starting it through Windows Services, as illustrated below.
Integrating with the MySQL Database Server using SQL Server Management Studio
Now that your MySQL server is up and running, it’s time to tap into the full potential of SQL Server Management Studio. Connect to your database server using SSMS and start managing SQL databases effortlessly.
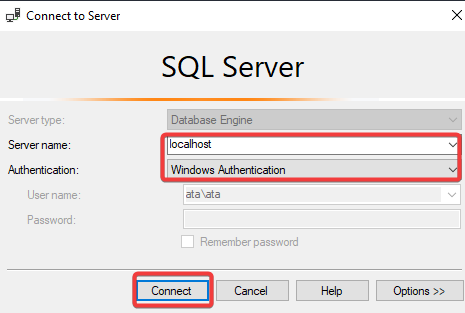
Upon launching SSMS, you’ll encounter the Connect to Server dialog box. This is your gateway to database management in SQL Server Management Studio.
For a seamless connection to your MySQL database server:
- Server name – Input the IP address or hostname of your MySQL database server. If SSMS is on the same device as your database server, simply use localhost as the server name.
- Authentication – For enhanced security, opt for Windows Authentication when connecting to the database server using SQL Server Management Studio (SSMS).
- Click the Connect button, and SQL Server Management Studio (SSMS) will initiate a connection to the database server.
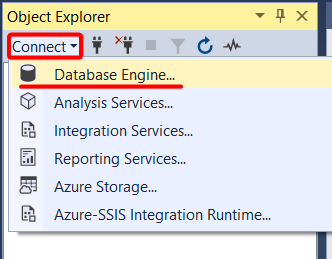
If the Connect to Server dialog box doesn’t appear automatically, navigate to the Object Explorer pane, click the Connect button on the top-left, and then select Database Engine.
The Object Explorer, akin to File Explorer, provides a tree view control, enabling you to navigate various objects within your database server in SQL Server Management Studio.
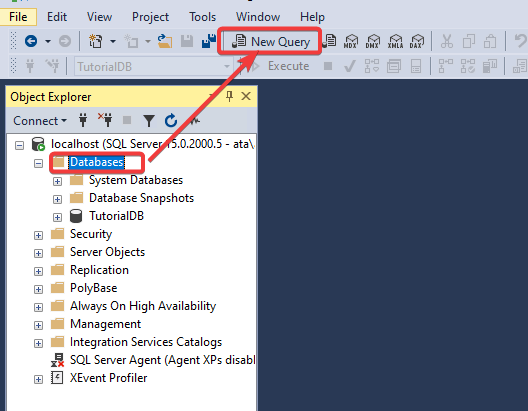
Upon a successful connection, the Object Explorer in SQL Server Management Studio (SSMS) will display your database server, including various objects within each database.

Constructing a New Database using SQL Server Management Studio
Now that you’re connected to your database server via SQL Server Management Studio, it’s time to populate it with databases, tables, and data. Organizing your data into specific databases enhances data retrieval speed, making your work more efficient.
Follow these steps to craft a new database using SQL Server Management Studio:
1. In the Object Explorer pane of SQL Server Management Studio, locate and select the Databases node. Then, click on New Query from the toolbar, which will prompt a new query window (as shown in step two).
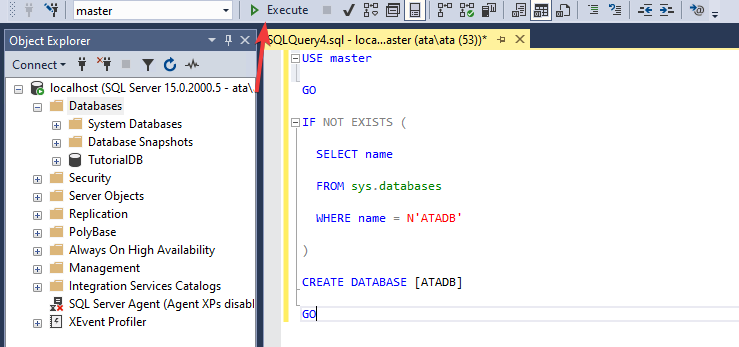
2. In the query window, input the T-SQL snippet provided below. This command will inspect if a database named ATADB is already present.
Should the database be present, the command will bypass any further actions. If not, it will proceed to create a fresh database titled ATADB in SQL Server Management Studio.
-- Utilizing the master database in SQL Server Management Studio.
USE master

GO

-- Probe for the presence of the database named ATADB in SQL Server Management Studio.
IF NOT EXISTS (

  SELECT name

  FROM sys.databases

  WHERE name = N'ATADB'

  -- If ATADB is detected in SQL Server Management Studio, bypass the subsequent steps.
)

-- If the ATADB database doesn't exist, the following SQL in SQL Server Management Studio creates it.
CREATE DATABASE [ATADB]

GO
3. To run your query in SQL Server Management Studio, either press F5 or click the ‘Execute’ button as demonstrated below.
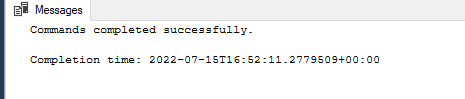
Upon successful execution in SQL Server Management Studio, you’ll be greeted with a message stating “Command(s) completed successfully”. This indicates that SQL Server Management Studio has successfully created the database. The ‘Completion time’ signifies the duration SQL Server Management Studio took to execute your query and construct the database.
4. To view the newly constructed database named ATADB in SQL Server Management Studio, simply hit the refresh icon in the Object Explorer panel.
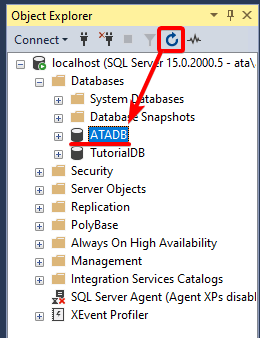
Forming a New Table with SQL Server Management Studio
Having successfully set up your new database with SQL Server Management Studio, the next step is creating a table. Tables are crucial as they store data systematically across columns and rows, facilitating easy retrieval.
Here’s a simple step-by-step guide to create a new table using SQL Server Management Studio:
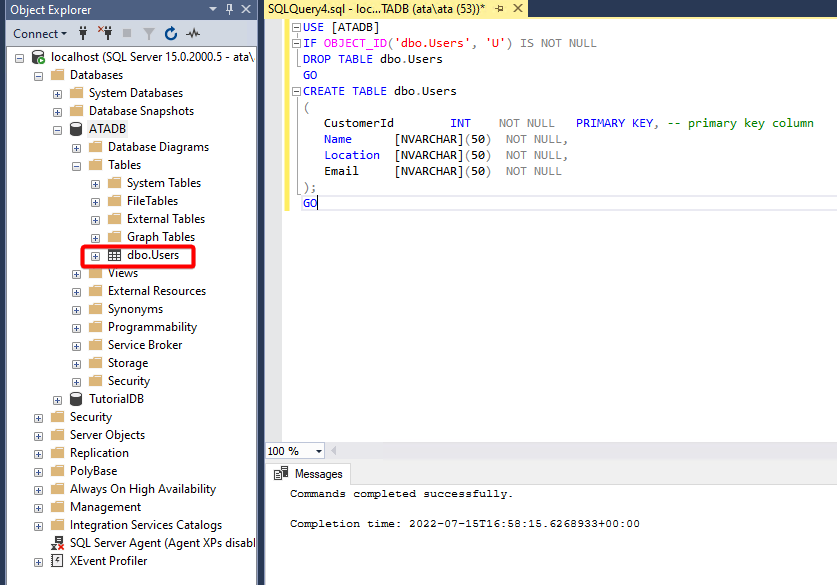
1. In the SQL Server Management Studio query window, paste the following SQL snippet. This command establishes a table named ‘Users’ inside the ATADB database. The table is designed with four distinct columns: CustomerId, Name, Location, and Email.
The inaugural column, CustomerId, acts as the primary key, ensuring each row remains unique within the table. The other columns function as standard data containers. Observe the specific data type affiliated with each column:
- The
CustomerIdcolumn utilizes anINTdata type, apt for storing integral numbers.
- Columns such as Name, Location, and Email are all based on the NVARCHAR data type, ideal for holding textual data.
-- Implement the ATADB database in SQL Server Management Studio
USE [ATADB]

-- Ascertain if the Users table exists within SQL Server Management Studio
IF OBJECT_ID ('dbo.Users', 'U') IS NOT NULL

-- In case the Users table exists in SQL Server Management Studio, this code deletes it
DROP TABLE dbo.Users

GO

-- Construct the Users table if absent in SQL Server Management Studio
CREATE TABLE dbo.Users

(
  -- The main primary key column
  CustomerId INT NOT NULL PRIMARY KEY,

  -- Regular data columns
  Name [NVARCHAR](50) NOT NULL,
  Location [NVARCHAR](50) NOT NULL,
  Email [NVARCHAR](50) NOT NULL
);

GO
2. To finalize and create the ‘Users’ table (provided it’s not already present) in SQL Server Management Studio, run the query.
3. Lastly, in SQL Server Management Studio, click on the refresh icon once more in the Object Explorer panel to visualize the newly established Users table.
Incorporating Data Into a Table using SQL Server Management Studio
Having an empty table isn’t practical, is it? So, why not infuse some life into your freshly-minted Users table in SQL Server Management Studio? Remember, while inputting data in SQL Server Management Studio feels as simple as copying and pasting text into spreadsheet cells, the method is slightly different – here, you’d use the INSERT INTO query.
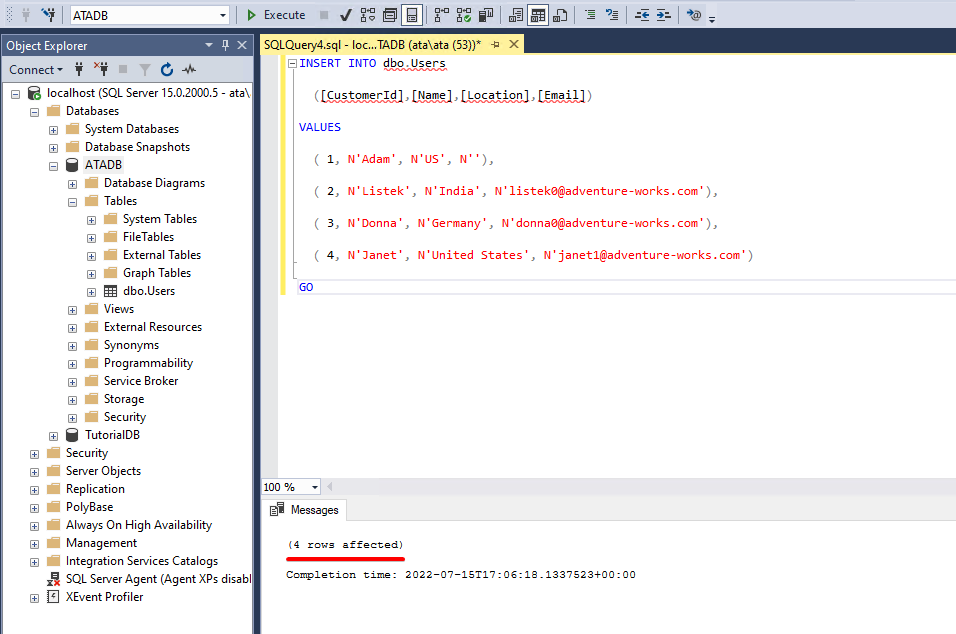
In SQL Server Management Studio, introduce the SQL snippet mentioned below to the query window. This will facilitate the INSERT of data INTO the Users table across all columns.
-- Incorporate data into the columns of the Users table in SQL Server Management Studio
INSERT INTO dbo.Users

  ([CustomerId],[Name],[Location],[Email])

-- Define the set of values for the Users table in SQL Server Management Studio
VALUES

  ( 1, N'Adam', N'US', N''),
  ( 2, N'Listek', N'India', N'[email protected]'),
  ( 3, N'Donna', N'Germany', N'[email protected]'),
  ( 4, N'Janet', N'United States', N'[email protected]')

GO
Execute this query in SQL Server Management Studio, and you’ll witness firsthand how it inserts the specified data into the Users table.
Post execution, if everything goes smoothly in SQL Server Management Studio, you’ll spot a message indicating 4 rows affected. Proceed to the subsequent step to inspect the injected data.
Fetching Data From a Table with SQL Server Management Studio
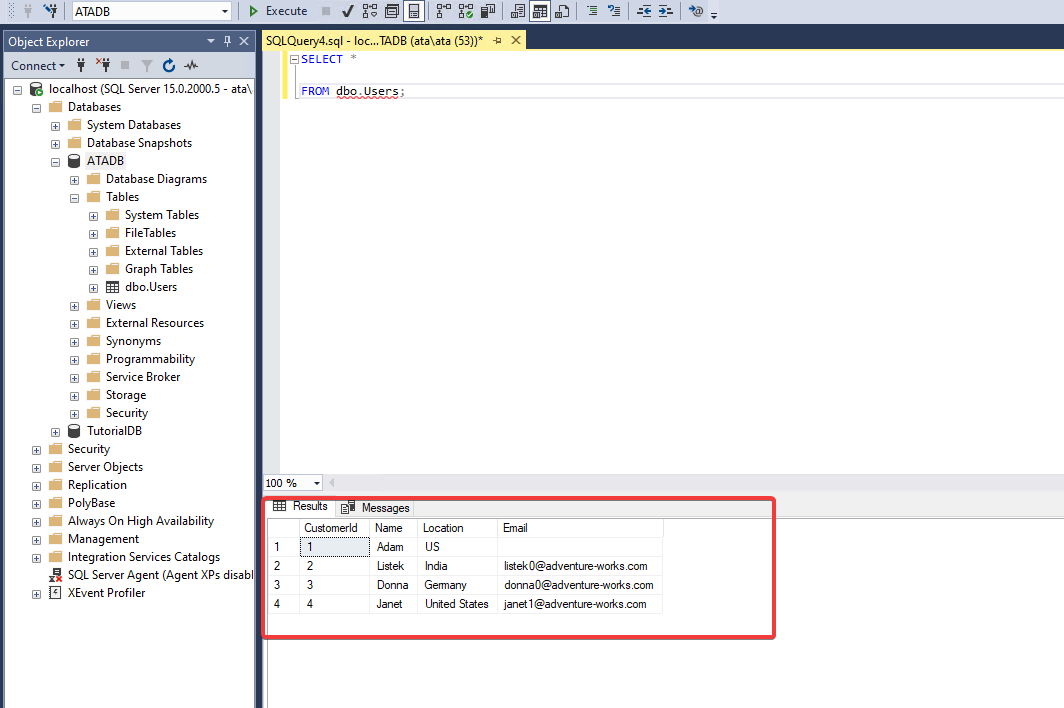
Now, having successfully incorporated data into your Users table via SQL Server Management Studio, how do you ensure everything is in place? Execute an SQL snippet in SQL Server Management Studio to get a first-hand view of the data you’ve placed in the Users table.
Introduce the SQL snippet below into the query window of SQL Server Management Studio. This specific query will SELECT all the columns and rows present in the Users table.
SELECT *
FROM dbo.Users;
Once you execute this query, SQL Server Management Studio will present the data from the Users table in its results pane, as showcased below.
Concluding Notes on SQL Server Management Studio
In this comprehensive guide, you’ve unveiled the art of employing SQL Server Management Studio (SSMS) to craft a database, construct a table, and input data. More so, you’ve grasped how SQL Server Management Studio simplifies the otherwise tedious task of managing database data by letting you cross-verify data within an actual table.
Craving more advanced skills in SQL Server Management Studio? Why not dive into pre-configured templates to swiftly establish databases? Or even better, explore how to craft shortcut key bindings to enhance your SQL Server Management Studio experience?


