


Are you getting frustrated in finding a way to improve content deliveries? Squid, one of the most popular web proxy and caching proxy servers, may just be the solution you are looking for!
Squid supports multiple protocols, such as HTTP, HTTPS, and FTP, and caches the most frequently used content. And in this tutorial, you will learn how to set up Squid as proxy server with basic authentication for better content deliveries.
Read on and make lightning-fast website access possible with Squid!
Prerequisites
This tutorial comprises hands-on demonstrations. To follow along, ensure you have the following:
- A Linux server – This tutorial uses an Ubuntu 22.04 with IP address
192.168.5.15and hostnameata-ubuntu.
- A non-root user with sudo/root privileges.
- A client machine with a web browser installed – This tutorial uses a Linux mint with Mozilla Firefox installed.
Installing Squid Proxy on Ubuntu
Squid is a fully-featured HTTP proxy and caching system that can be installed in most Linux/Unix operating systems (OSes). There are different package managers you can use to install Squid like Nala Apt, but for this tutorial, you will use the standard APT package manager.
To install Squid Proxy on Ubuntu, follow these steps:
1. Open your terminal, and run the following apt update command to update and refresh the Ubuntu package index.
sudo apt update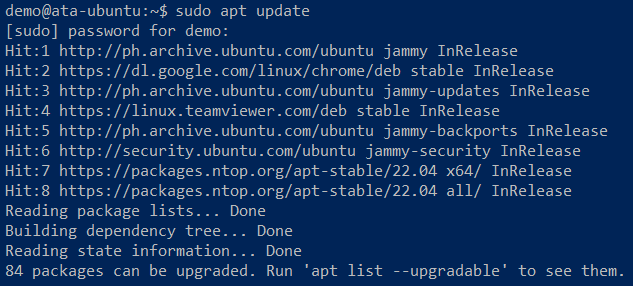
2. Once updated, run the apt install command below to install the squid to your system.
sudo apt install squid -y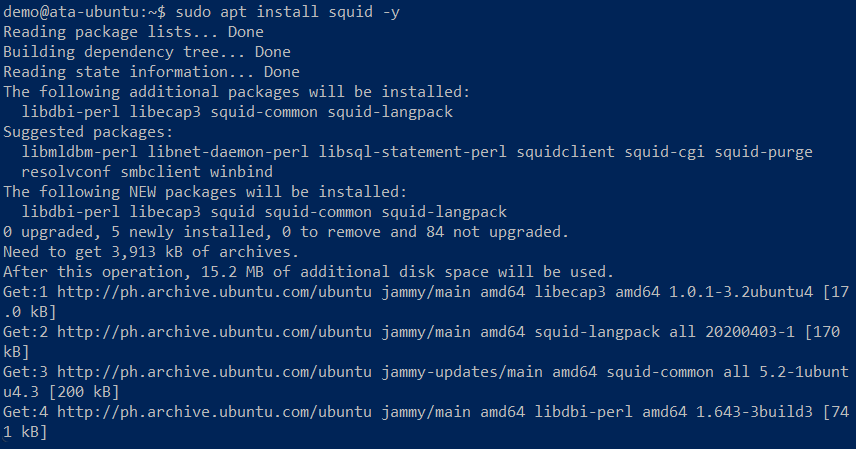
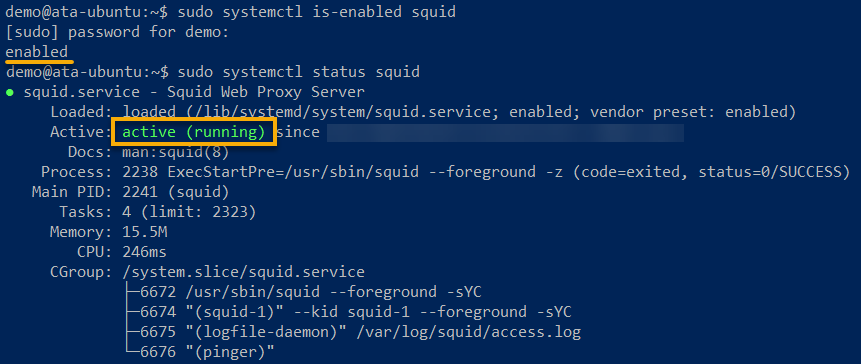
3. Now, run the systemctl commands below to check the squid service and ensure that the service is running.
sudo systemctl is-enabled squid
sudo systemctl status squidYou can see below that the squid.service is enabled and active (running). At this point, the squid service will start automatically upon the system’s startup.
Configuring Squid as a Web Proxy and Cache Server
Now that Squid is installed on your system, it is time to see Squid in action. Typically, you want to accelerate content deliveries and distributions within your local networks. How?
With the right configuration, Squid allows an isolated network or client to connect to the internet via HTTP protocol while caching requested URLs in memory or system disk.
To configure Squid as a web proxy and cache server for your local network:
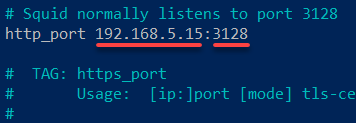
1. Open the default squid configuration (/etc/squid/squid.conf) using your preferred editor.
2. Next, find the http_port 3128 line and input the server IP address followed by the port to run Squid, as shown below.
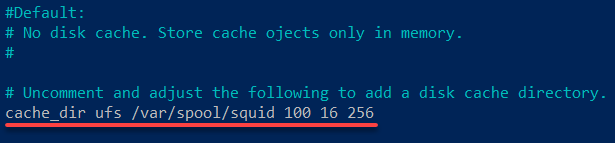
3. Uncomment the cache_dir parameter to enable cache via disk.
By default, Squid uses memory as the caching system. With this configuration, you set up a Squid cache via disk that will be stored in the /var/spool/squid directory.
4. Now, add the following configuration between the include /etc/squid/conf.d/*.conf and http_access deny all lines, as shown below.
This configuration creates a new Squid Access Control List (ACL) named mynet with network 192.168.5.0/24 and allows the ACL to access the internet via the http_access parameter.
# Allow Network 192.168.5.0/24 via ACL (Access Control List)
acl mynet src 192.168.5.0/24

# Allow mynet ACL
http_access allow mynet
Once configured, save the changes, and close the /etc/squid/squid.con file.

5. Run the command below to restart the squid service and apply the changes.
💡 Note that restarting the squid service does not provide output to the terminal.
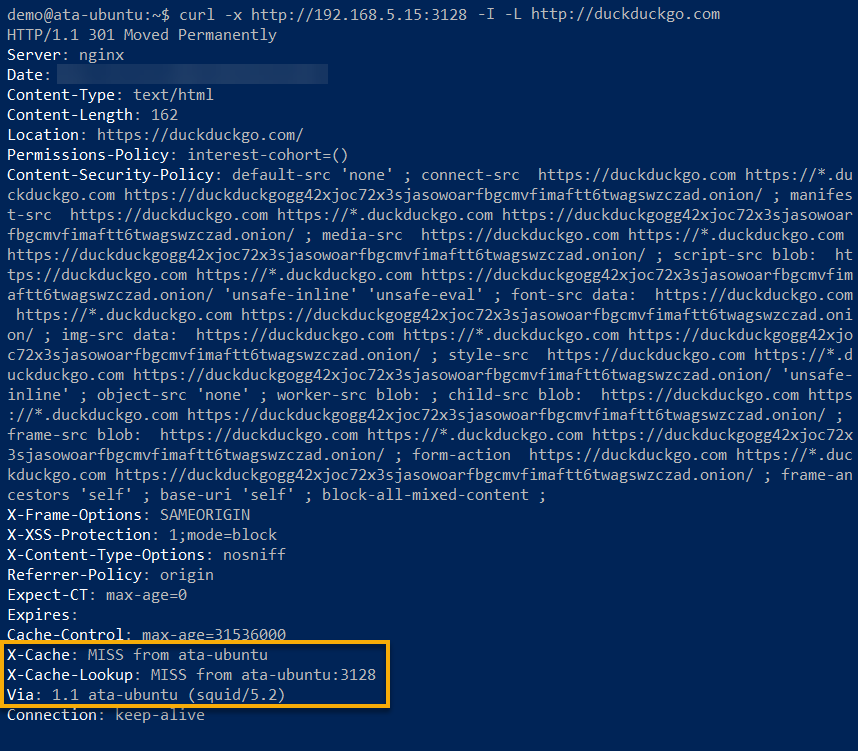
sudo systemctl restart squid6. Next, run the curl command below to access a website (http://duckduckgo.com) via cURL and proxy to ensure that Squid is working. The x parameter allows you to use a proxy and the I parameter shows the details of HTTP headers.
curl -x <http://192.168.5.15:3128> -I -L <http://duckduckgo.com>If Squid is working, you will see the following:
- The Via: 1.1 ata-ubuntu (squid/5.2) message on the HTTP headers, where ata-ubuntu is the hostname of the Squid server.
- X-Cache and X-Cache-Lookup indicate Squid cache status. The first time you visit the URL, both will have MISS values.
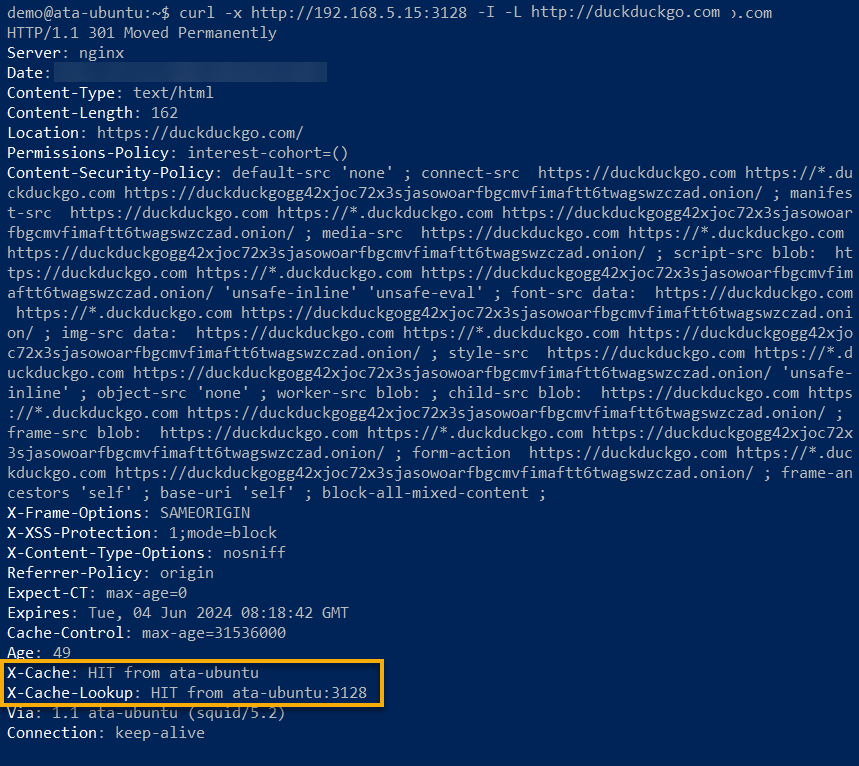
7. Lastly, rerun the command from step six to visit the same URL again.
curl -x <http://192.168.5.15:3128> -I -L <http://duckduckgo.com>The second time you visit the same URL, both X-Cache and X-Cache-Lookup status have the HIT values. This status confirms that Squid has cached the requested URL and handed it back to you.
Setting Up a Squid Basic Authentication
You now have a working Squid as a Web Proxy and Cache Server. But how do you enforce security for your Squid service? Setting up Squid authentication will do the trick!
Squid supports multiple authentication backends, such as SQL database, LDAP, NIS, Radius, and NSCA. But in this tutorial, you will setup Squid authentication via basic authentication.
To enable Squid authentication, follow the steps below:
1. Run the command below to install the apache2-utils package.
This package provides a command utility (htpasswd) that lets you generate a new password for Squid authentication.
sudo apt install apache2-utils -y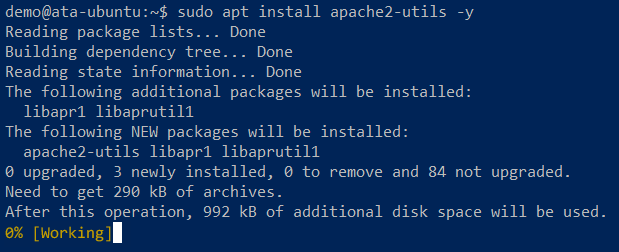
2. Once installed, run the following commands to create a new file (touch) called /etc/squid/passwd and change its ownership to the user proxy.
These commands do not provide output, but the /etc/squid/passwd is where your Squid authentication password gets stored.
# Create a file called /etc/squid/passwd
sudo touch /etc/squid/passwd

# Change the file's ownership to user proxy
sudo chown proxy: /etc/squid/passwd
3. Next, run the htpasswd command below to create a new user called alice (arbitrary).
sudo htpasswd /etc/squid/passwd aliceWhen prompted, provide and confirm a strong password for the newly-created user (alice). If successful, the user credentials are stored to the /etc/squid/passwd file.

4. Open the /etc/squid/squid.conf file again and insert the following configuration in the same order, as shown in the screenshot below.
This configuration creates a new Squid ACL called authusers that allows only authenticated users to access Squid. In this example, you will use the basic_ncsa_auth authentication method via the (/etc/squid/htpasswd) password file.
# Setup authentication via basic_ncsa_auth and /etc/squid/passwd file
auth_param basic program /usr/lib/squid/basic_ncsa_auth /etc/squid/passwd
auth_param basic children 5
auth_param basic realm Squid Basic Authentication
auth_param basic credentialsttl 2 hours

# Create new ACL auth_users
# User must be authenticated
acl auth_users proxy_auth REQUIRED

# Allow ACL auth_users
http_access allow auth_users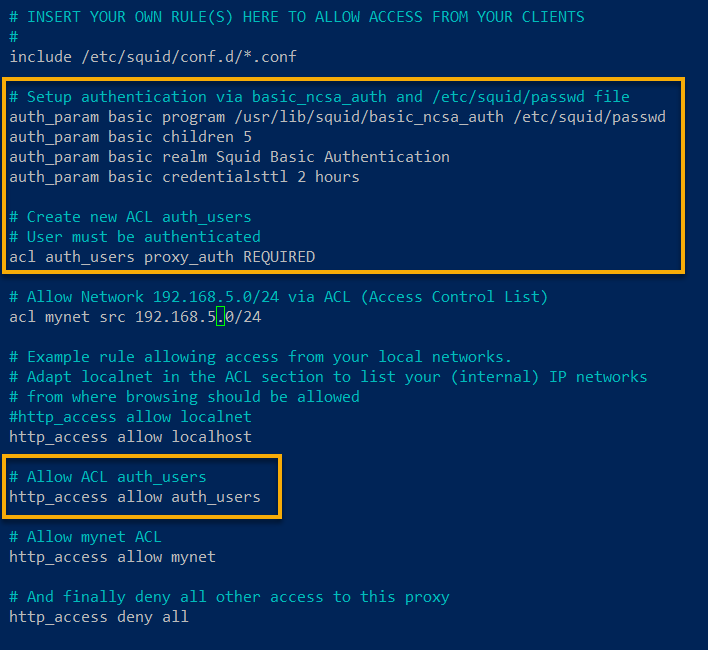
5. Now, run the systemctl command below to restart squid and apply the changes.
sudo systemctl restart squid6. Lastly, run the curl command below to access a website (https://duckduckgo.com) with a specified Squid user credentials (alice:password).
curl -x <http://192.168.5.15:3128> --proxy-user alice:password -I <http://duckduckgo.com>If authentication is successful, you will be redirected to the target URL, as shown below.
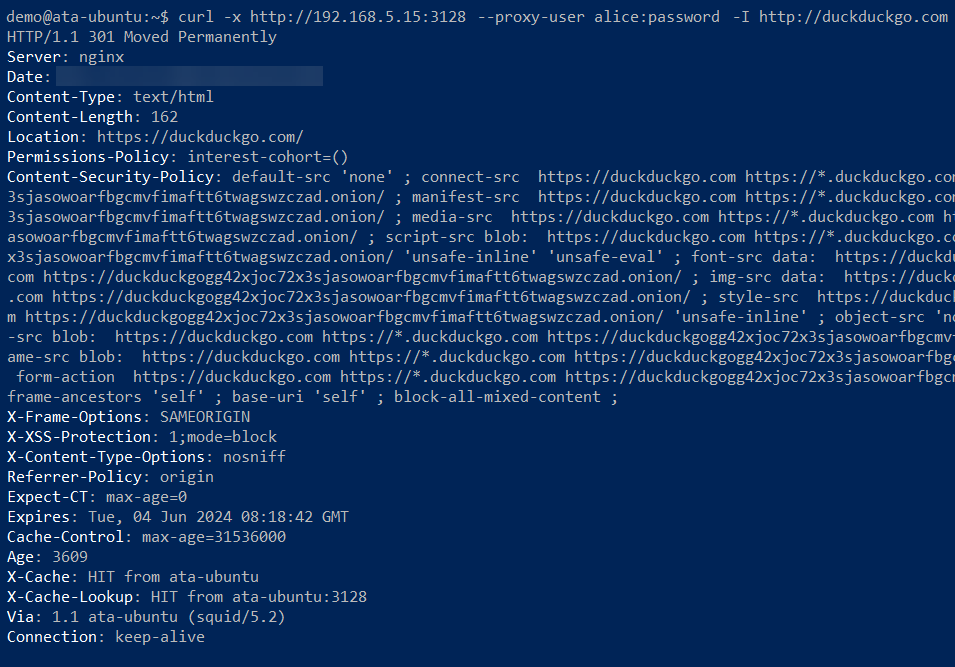
If authentication fails, you will get an output like the one below showing the following messages:
- 407 Proxy Authentication Required.
- X-Squid-Error: ERR_CACHE_ACCESS_DENIED 0.

Blocking Websites with Squid Proxy
Authentication is not the only thing that makes Squid standout. Apart from setting up authentication, you can also prevent your local networks from accessing malicious websites.
One of the most popular Squid features is content filtering or website blocking via ACLs.
To block websites with Squid:
1. Open the default Squid configuration /etc/squid/squid.conf, insert the configuration below, save the changes and close the file.
This configuration creates a new ACL called blocked_websites and block access of sites via the http_access deny parameter.
# Block websites via ACL - see the dstdomain parameter
# .site.com also block all of the subdomains on site.com
acl blocked_websites dstdomain .youtube.com .facebook.com .twitter.com .reddit.com

# Block access of sites within the
# acl blocked_websites
http_access deny blocked_websites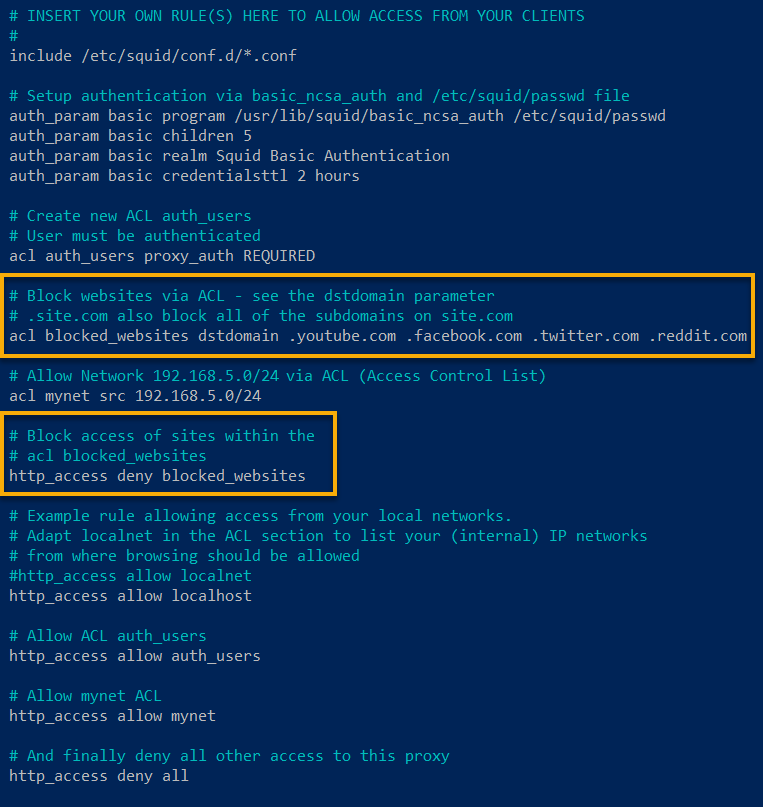
2. Next, run the command below to restart the squid service and apply the changes.
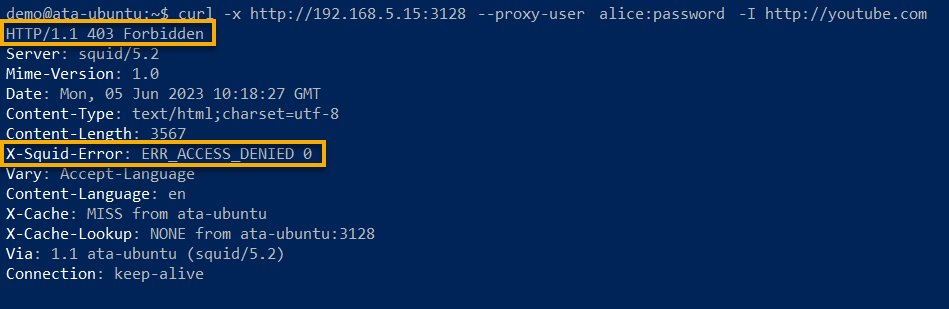
sudo systemctl restart squid3. Lastly, run the curl command below to access (http://youtube.com), one of the blocked sites, to test if the configuration works.
curl -x <http://192.168.5.15:3128> --proxy-user alice:password -I <http://youtube.com>If the blocking operation is successful, you will get the 403 Forbidden and the X-Squid-Error: ERR_ACCESS_DENIED 0 messages.
Configuring Squid Proxy on the Client Machine
Following the previous examples, you should have a fully functional Squid proxy with caching and authentication enabled. But if you need to configure Squid in a client machine, you can click your way through a GUI via a web browser.
To configure Squid on a client machine:
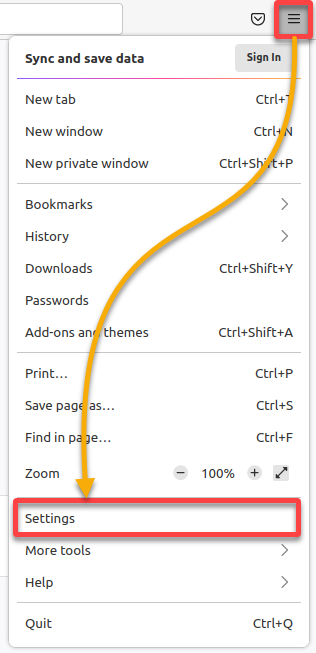
1. Launch Mozilla Firefox, click on the preferences icon (top-right), and select Settings.
2. Next, scroll down to the Network Settings section and click Settings.

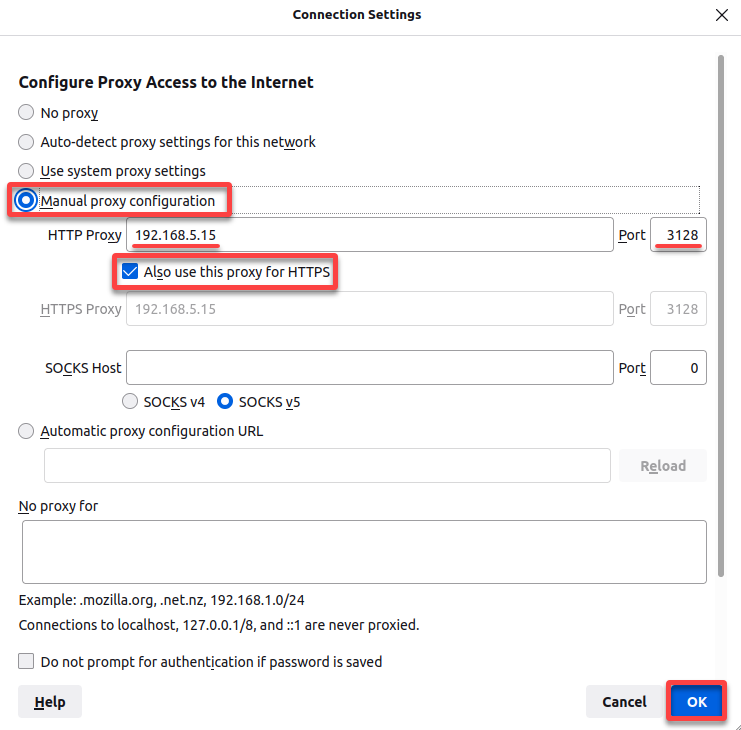
3. Configure the connection settings as follows:
- Select the Manual proxy configuration option.
- Input the Squid server IP address (192.168.5.15) in the HTTP Proxy field, and Port (3128).
- Tick the Also use this proxy for HTTPS box to use the same proxy configuration for HTTPS.
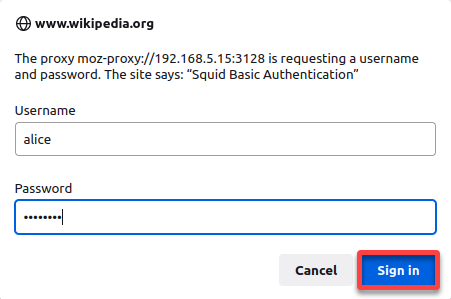
4. Now, visit your favorite website (i.e., wikipedia.org) and you will be prompted for the Squid authentication.
Input your Squid user credentials, and click Sign In.
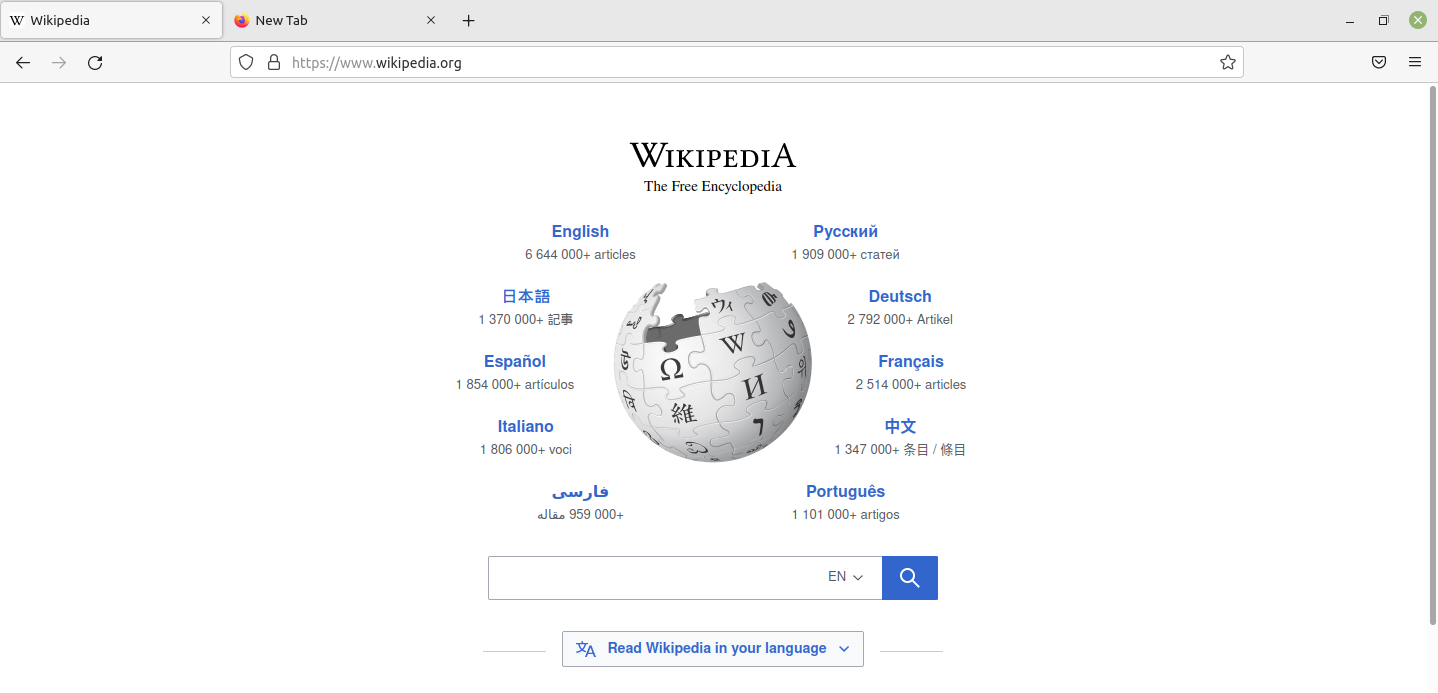
If authentication is successful, your browser redirects to the destination website, as shown below.
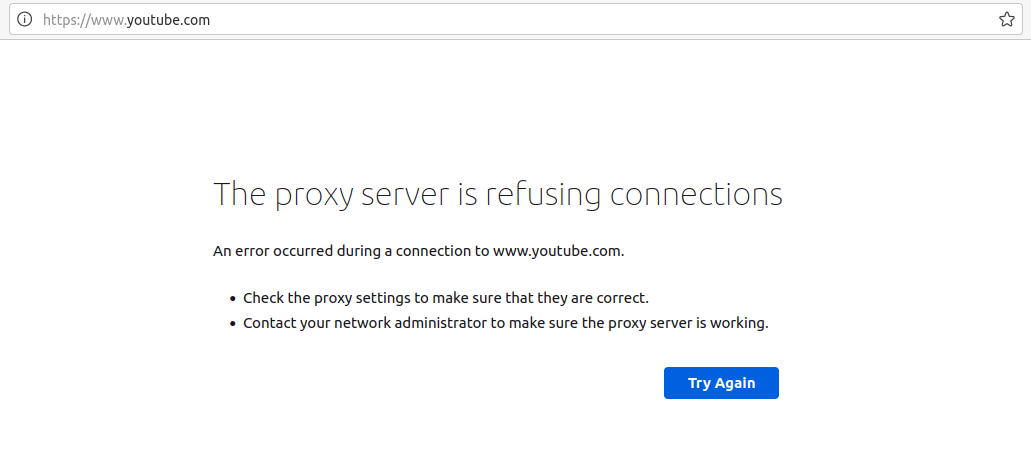
5. Finally, visit https://youtube.com, which is currently blocked by Squid.
If blocking is successful, you should get a message saying The proxy server is refusing connections.
Conclusion
Great job! You have successfully installed and set up Squid as proxy and caching server on your Ubuntu machine. Rest assured that your server is secure with a properly configured authentication and content filtering via ACLs.
With a fully functional Squid server, why on integrate Squid LDAP authentication or analyze the performance of your Squid server?


