


At some point, you definitely felt like your Linux experience could use a little extra flair. Perhaps you’ve encountered repetitive tasks or wished for a smoother command-line interface. Well, guess what? Your system holds the key: the .bashrc file, quietly nestled in your home directory!
Delve into the fundamental aspects of the ~/.bashrc file in this tutorial to transform how you interact with your Linux system. You’re on the right track, from customizing your command prompt to automating tasks and setting up personalized shortcuts.
Say goodbye to mundane tasks and hello to a more efficient and enjoyable Linux experience!
Prerequisites
Before you play around with the ~/.bashrc file, ensure you have the following in place to follow along:
- A Linux distribution is installed on your machine – This tutorial uses Ubuntu 20.04 LTS, but any other distribution works.
- A non-root user with sudo privileges.
What is the Bash Run Commands (.bashrc) File in Linux?
Imagine the ~/.bashrc file in Linux like a secret toy box in your room. This toy box gives you and sets up your favorite toys just the way you like them as you open the box.
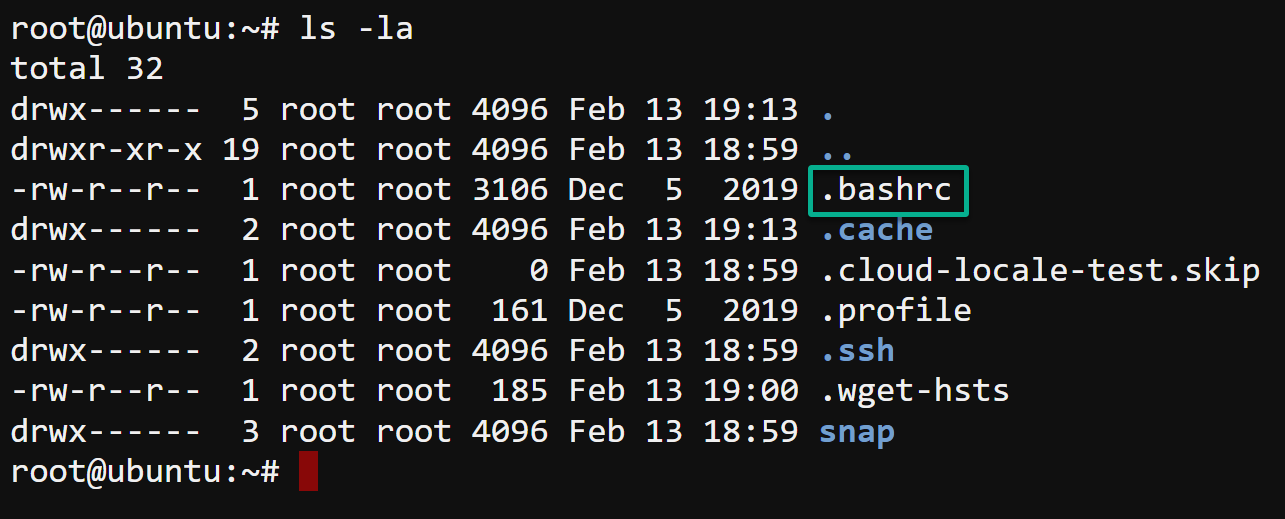
But because ~/.bashrc is a secret file, it doesn’t show when you run the ls command. Well, not unless you specify to show hidden ones, too, with the -la parameter, as shown below.
ls -laBelow, you can see the .bashrc file is listed along with other ones that are also hidden.
Defining Custom Aliases for Quick Command Executions
A short definition wouldn’t cut into realizing the ~/.bashrc file’s role in customizing your Linux experience. So, how does this file work exactly? When you crack open that ~/.bashrc file, one of the powerful tricks it lets you achieve is defining custom aliases for your favorite commands.
For example, instead of typing sudo apt-get update to update your system’s local package index, define an alias in the .bashrc file that works the same way.
💡 Note: This tutorial uses the root account to run commands (not recommended) to illustrate administrative tasks, such as system configuration. But, for security reasons, ensure you’re using a non-root user with
sudoprivileges when performing similar actions on your system.
To define aliases for commands, follow these steps:
1. Open the .bashrc file in your home directory (~/) via your preferred editor, like nano or vim.
💡 If you’re using a non-root account, prepend
sudowhen you run commands that require elevated privileges.
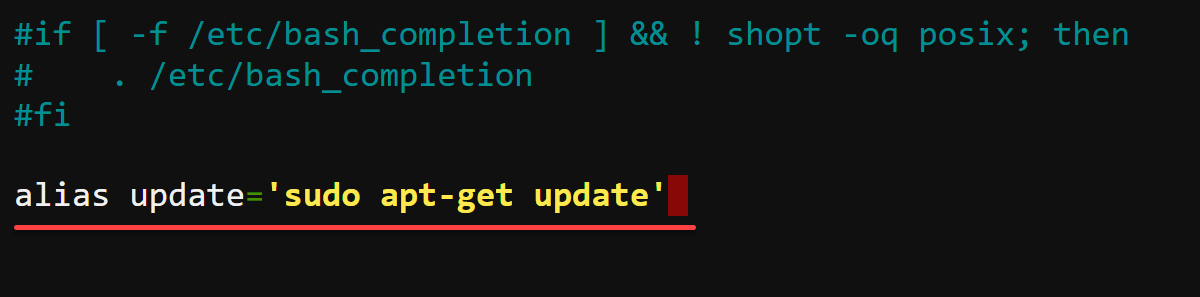
nano ~/.bashrc2. Next, scroll to the bottom of the file and define an alias (i.e., update) for your target command (i.e., sudo apt-get update), as demonstrated below.
alias update='sudo apt-get update'Save the changes to the file, and close the editor.
3. Once saved, execute the following command in your terminal to source the ~/.bashrc file. This command produces no output to the terminal but applies your changes.
source ~/.bashrc4. Now, run the update alias you defined and confirm the corresponding command (sudo apt-get update) takes place.
updateThe output below confirms your update alias works like running the sudo apt-get update command but with fewer keystrokes.

Crafting Functions for Enhanced Productivity
Defining an alias falls short when you have intricate operations to execute repeatedly. But don’t worry; functions are here to step up to the plate for a solution where aliases might stumble.
Unlike aliases that merely serve as a shorthand for a single command, functions encompass a complex series of commands designed to perform intricate operations.
To realize how a function works, carry out the following:
1. In the ~/.bashrc file, append the function below called manage_package (arbitrary).
When executed, this function checks if a given package is installed, and based on that information, it either updates or installs the package.
Remember, this function takes a single argument only, which is the package name you’re interested in.
manage_package() {
# Checks if the package is installed by querying the package status with dpkg.
# $1 is the placeholder for the first argument passed to the function (the package name).
# The output is redirected to /dev/null to suppress it in the terminal.
# The if statement checks the exit status of the dpkg -s command.
# If the status is 0 (package is installed),
# proceeds to the first block, updating the package.
if dpkg -s "$1" &> /dev/null; then
echo "Package '$1' is already installed. Updating..."
sudo apt-get update && sudo apt-get install --only-upgrade "$1"
# If the package is not installed, print a message
# and run sudo apt-get install "$1" to install the package.
else
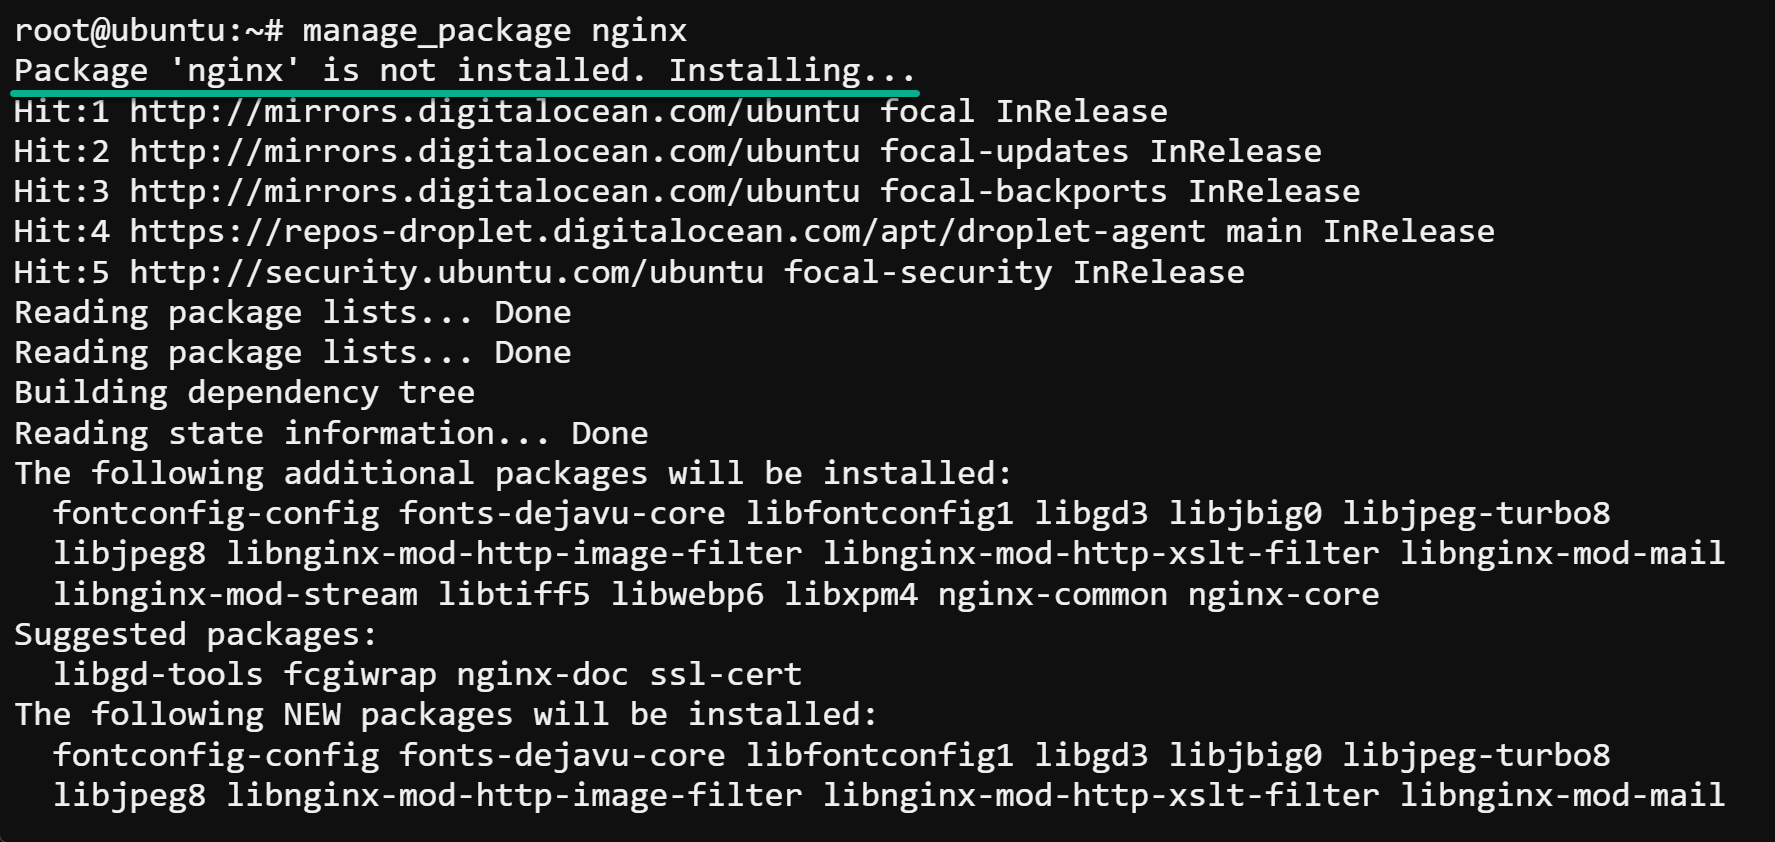
echo "Package '$1' is not installed. Installing..."
sudo apt-get update && sudo apt-get install "$1"
fi
}2. With the function added, save the changes, close the editor, then source the ~/.bashrc file to apply the changes.
source ~/.bashrc3. Once sourced, call the function (manage_package), followed by the package-name you wish to check, update, or install in your terminal, as shown below.
This tutorial’s choice of package is NGINX, but ensure you substitute package-name with your preferred package name.
manage_package package-nameAs you can see in the output, functions like this make package management a breeze by doing the heavy lifting for you. They automatically determine whether the package you want is there, so you don’t have to.
Personalizing Your Linux Terminal and Shell Prompt (PS1)
Think of your Linux terminal as a personal workspace. Customizing your terminal transforms it into a more visually appealing and informative environment.
When spicing up your Linux terminal, the sky’s the limit. You can spruce your terminal up with a cool welcome message or tweak your shell prompt for that extra flair.
To personalize your Linux terminal, proceed with the following:
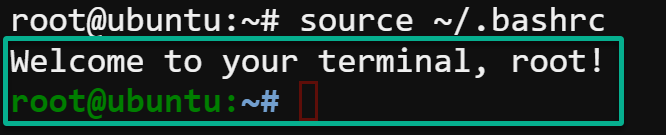
1. Add the following line at the bottom of your ~/. bashrc file. This line prints a (greeting) message each time you start a terminal session.
echo "Welcome to your terminal, $USER!”2. Next, modify the Prompt String 1 (PS1) environment variable if it exists, or add the line below to your ~/.bashrc file. The PS1 variable precisely controls the primary prompt string, which is the main prompt displayed (i.e., user@linux:~#) when the shell is ready to accept commands.
Modifying the PS1 variable lets you change your shell prompt’s appearance, including its color, format, and display information. The following expression:
- Makes the username (
\u) and hostname (\h) appear in bright green (32m). - Causes the current working directory (
\w) to appear in bright blue (34m). - Resets the color attributes to the default color (usually white) (
\[\033[00m\]) for the text that follows the prompt. This reset ensures the rest of your terminal text remains unaffected.
PS1='\[\033[01;32m\]\u@\h:\[\033[01;34m\]\w\$ \[\033[00m\]'3. Afterward, save and close the file, then source your ~/.bashrc file to apply the changes.
source ~/.bashrcNotice below that the welcome message appears immediately after sourcing, and your shell prompt changes its appearance as you defined.
Launching Your Scripts: No Path? No Problem!
Enhancing your system to recognize additional directories for executable commands can streamline your workflow. Take running scripts, for example—no more wrestling with long paths, just pure convenience.
To launch your scripts without memorizing each path, complete the steps below:
1. Execute the following command to make a directory (mkdir) called ~/scripts (arbitrary)) dedicated to storing your scripts.
mkdir -p ~/scripts2. Next, open the ~/.bashrc file and add the following line to the end, which modifies the system’s command search path. This line prepends the ~/scripts directory to your existing PATH variable.
This behavior guarantees the shell prioritizes your scripts over other executables with identical names elsewhere in the system’s PATH.
export PATH="$HOME/scripts:$PATH"3. Save and close the file, then source it to apply the changes without restarting the terminal.
source ~/.bashrc4. Subsequently, run each command below to create a script called testscript (arbitrary) in your ~/scripts directory.
These commands have no output, but this script is made executable (chmod), which prints a message (echo) to the terminal.
# Create a new Bash script called 'testscript' in the ~/scripts directory
echo '#!/bin/bash' > ~/scripts/testscript

# Append a line to the 'testscript' that prints "Script is running!" when executed
echo 'echo "Script is running!"' >> ~/scripts/testscript

# Make the 'testscript' executable by changing its permissions
chmod +x ~/scripts/testscript
5. Finally, execute your script (testscript) by calling its name in the terminal.
The system executes your script from your dedicated ~/scripts directory regardless of your working directory in the terminal.
testscriptThe output below confirms your script, and the system’s modified command search path works as expected.

Conclusion
In the ~/.bashrc file world, you’ve journeyed through the fundamentals of its role and how the command aliases and functions customization works. Even personalizing the feel of your Linux terminal is now within reach.
Besides the looks, you’ve unlocked the convenience of executing scripts without specifying their full paths each time by extending the PATH environment variable. These modifications save time and enhance the user interface, making your interaction with Linux more efficient and more enjoyable at the same time.
As you close this chapter on the ~/.bashrc file, remember that the true essence of Linux is its flexibility and the control it offers you. The journey continues, so why not thirst for a tailored experience by exploring ZSH’s enhancements?
Dive into the ocean of themes and plugins that ZSH and frameworks like Oh My Zsh provide. Watch your terminal transform into a more productive and visually engaging workspace!


