


Have you ever found yourself tangled in the perplexing world of Linux permissions? If you still wonder who gets to read, write, or execute what, well, you are in the right place. Demystify the intricate art of Linux permissions, focusing specifically on the powerhouse duo: chmod and chown!
In this tutorial, you will equip yourself with the skills to control access to your files and directories confidently.
Now roll up those sleeves and conquer Linux permissions like a champ!
Prerequisites
Before you embark on this deep dive into Linux permissions, ensure you have A Linux Machine for mastering the chmod and chown commands. This tutorial uses Ubuntu 22.04 LTS (Jammy Jellyfish).
Grasping the chmod and chown Commands
In the realm of Linux permissions, the chmod and chown commands wield significant power. Understanding how to use these commands effectively is crucial for any Linux user, from beginners to seasoned administrators.
Both commands offer many ways of controlling your Linux system, but below are the basics of what each is capable of:
chmod– This command is the key to managing file and directory permissions in Linux, which allows you to specify who can read, write, and execute a file. By employing a combination of symbols and numeric codes, you can grant or restrict access to users, groups, and others.chown– With this command, you can change the ownership of files and directories. This command is invaluable when you need to transfer administrative control or alter the association between a file and a user/group.
Whether safeguarding sensitive data or streamlining access for a team, these commands are your trusty companions in the world of Linux file operations.
Read on and dive even deeper into the intricacies of these commands.
Listing Files and Viewing Permissions
Before changing permissions and ownership with the chmod and chown commands, the first step is to list files and view their permissions.
Like finding a book in a library, in Linux, you will often need to view a list of files along with their associated permissions. This knowledge is crucial for effective file management.
To view the permissions of a file or directory:
Open a terminal and execute the following ls command to list all files and directories in the current working directory in a long format (-l)
ls -lThe long format provides detailed information about each file or directory, as shown below.
This information includes permissions, number of links, owner, group, size, and modification time. But your focus right now is on the file permissions.

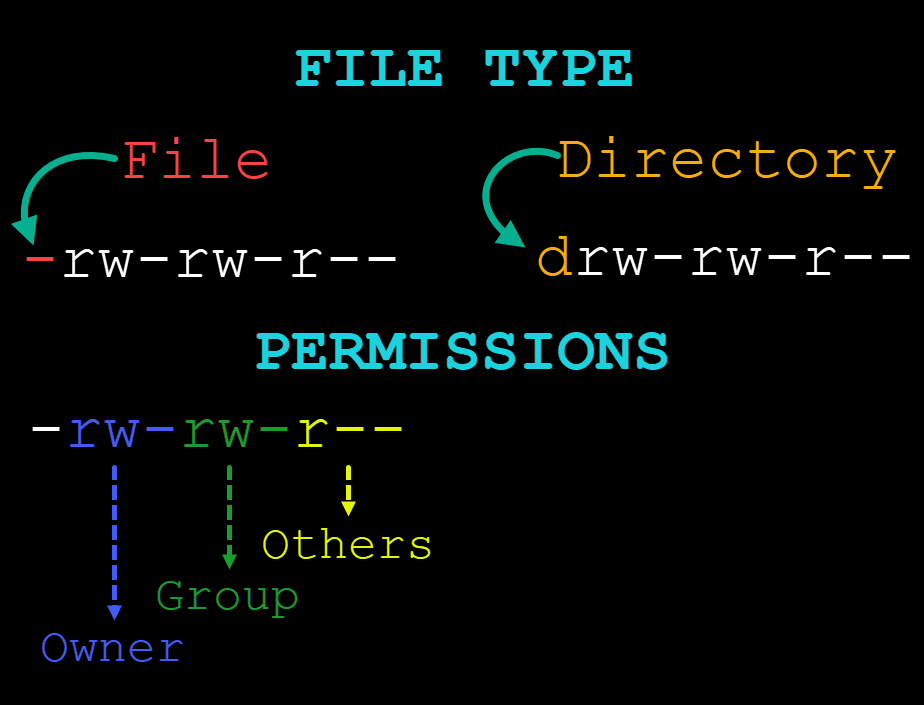
Three key permissions govern every file and directory: read (r), write (w), and execute (x). Each dictates how users interact with the content of every file and directory.
In addition, each of these permissions is applied across three distinct categories of ownership: owner, group, and others (users who are neither nor members of the group).
The following illustrates each part of file permissions:
- The first character indicates a file (–) or a directory (d).
- The first part (rw-) – Provides the owner read and write permissions but not execute.
- The second part (rw-) – Grants group read and write permissions but not execute.
- The last part (r–) – Allows others permission to read but not write or execute.
Modifying Permissions via the chmod Command: Symbolic Mode
Expanding your grasp of file permissions, dive into a powerful tool for modifying permissions. Imagine adjusting who can access, modify, or execute a file or directory with precision. The chmod command (change mode) grants you the power to take control of your Linux system.
When you need a flexible and expressive way to control access to your files and directories precisely, the symbolic mode will do the trick.
To modify permissions with the chmod command via the symbolic mode, follow these steps:
1. Execute the below who command to create a new file (>) called user.txt as a non-privileged user, containing a list of currently logged-in users on your Linux machine.
This command does not provide output on the terminal, but you will verify the file’s permissions in the following step.
who > user.txt2. Next, run the command below to view the permissions for the user.txt file.
ls -l user.txtBelow, you can see the file’s default permissions, the owner, the day and month of creation, and the file name.
Take note of the current file permission, as you will later make a comparison. Your focus for now is the user permissions (rw-).

3. Now, run the following command to remove (-) the write (w) permission for the owner (u), leaving every other permission for other categories unchanged.
The following table breaks down what each symbol represents:
| User Symbol | Details | Operation Symbol | Details | Permission Symbol | Details |
|---|---|---|---|---|---|
| u | Owner | + | Add permissions | r | Read |
| g | Group | – | Remove permissions | w | Write |
| o | Others | = | Set permissions explicitly | x | Execute |
When successful, the chmod command has no output on the terminal, which applies throughout this tutorial.
chmod u-w user.txt4. After changing permissions, run the below command to view the user.txt file’s permissions.
ls -l user.txtCompare the file permissions you noted in step two (rw-) with the one below. Notice that the owner (u) now only has the read permission (r–).

5. Now, execute each command below to perform the following:
- Add (
+), write (w), and execute (x) permissions for the owner (u) on the sameuser.txtfile. - View the
user.txtfile’s information to verify the modified permissions.
chmod u+wx user.txt
ls -l user.txt
As shown below, the user now has read, write, and execute permissions (rwx) for the user.txt file.

6. Instead of adding, run the chmod command below to remove (-) the following:
- Execute (
x) permission for the owner (u). - Write (
w) permission for the group (g). - All permissions (
rwx) for others (o).
This command lets you remove permissions from different categories simultaneously with a single command.
This time, the -v option tells chmod to display a message about the changes made by the operation.
chmod -v u-x,g+w,o-rwx user.txt
7. Next, run the following command to perform the following operations:
- Add (
+) read permissions (r) to all categories. - Remove (
-) write and execute permissions (wx) for all (a) categories.
chmod a+r,a-wx user.txt8. Now, execute the below command to view the user.txt file’s updated permissions.
ls -l user.txt
💡 Alternatively, you can modify the same permission for all three categories (user, group, and others) with the following commands:
chmod ugo-r– Removes (-) read permissions (r) for all three categories (ugo).
chmod ugo+r– Adds (+) read permissions (r) for all three categories (ugo).
9. Lastly, run the commands below to perform the following:
chmod– Set (=) read and write (rw) permissions for the owner and group, and remove permissions of others (o=).
The=symbol lets you explicitly set permissions and override any existing permissions. If no permissions are specified after the=symbol, all permissions for that category are removed.ls– View the changes you made to theuser.txtfile’s permissions.
chmod ug=rw,o= user.txt
ls -l user.txt
Adjusting Access Rights Using the chmod Command: Octal Mode
Imagine having the ability to swiftly and precisely set permissions for your files without the complexities of symbolic notation. Octal mode (base eight notation) will become your new favorite method for managing permissions.
In octal mode (base eight notation), permissions are represented using a four or three-digit number, from 0 to 7. Each number corresponds to a specific set of permissions for the owner, group, and others, as follows:
- Read (r) = 4
- Write (w) = 2
- Execute (x) = 1
- No permissions (-) = 0
To see how octal mode works in managing file permissions, carry out these steps:
1. Execute the below chmod command to add the following permissions (664) to the user.txt file:
- Owner – read (
4) + write (2) + execute (0) =6 - Group – read (
4) + write (2) + execute (0) =6 - Others – read (
4) + write (0) + execute (0)=4
When using a four-digit number with the chmod command for file permissions in Linux, the leading digit (leftmost) represents special permissions, such as setuid, setgid, and sticky bit. The next three digits represent the standard permissions for the owner, group, and others, respectively.
But when using a three-digit number, the first digit represents the permissions of the file’s owner (u), the second for the file’s group (g), and the last for others (o).
In many cases, especially when not dealing with special permissions, you might only see three-digit notation. The leading zero, which indicates octal notation, can be implied and thus omitted. Like in the example below, instead of 0664, you use 664.
chmod 664 user.txt2. Next, run the below command to view the permissions for the user.txt file.
ls -l user.txtIn the output below, you can see the permissions set for the user.txt file are in symbolic mode, which is equivalent to 664 in octal mode.

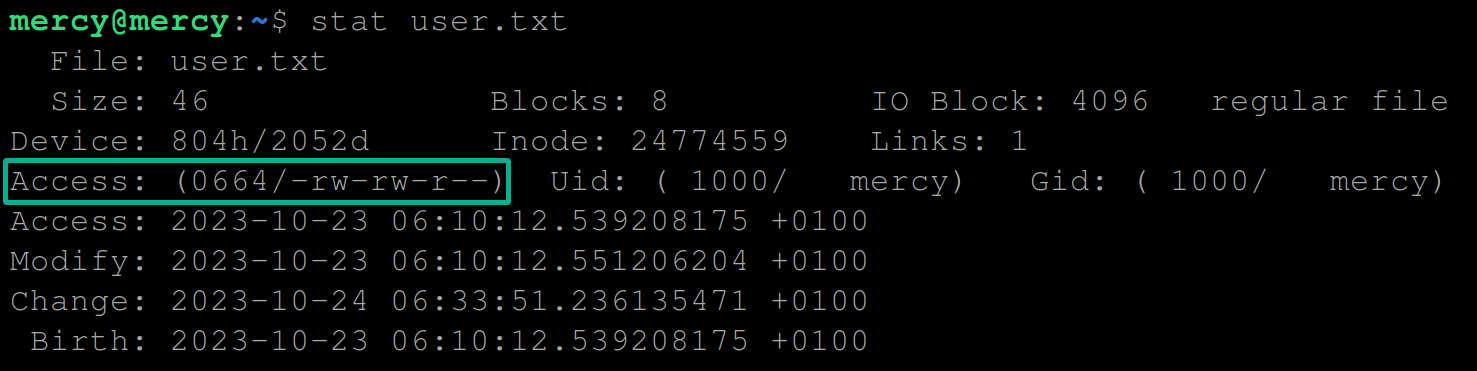
3. Now, run the stat command below to view a comprehensive set of statistics about the user.txt file, including the permissions in the symbolic and octal modes.
stat user.txtOn the Access property, as shown below, you will see the octal and symbolic mode associated with the file permissions of the user.txt file.
With this information, you enhance your comprehension of adjusting permissions using the octal mode.
Changing File Ownership with the chown Command
While permissions dictate what actions can be performed on a file or directory, you can specify who has the right to set or modify these permissions by changing the ownership.
The chown command (change owner) is the primary command for managing file and directory ownership. Like the chmod command, the chown command is a root-only command — only the root user can change ownership of a file or directory.
To manage ownership with the chown command, proceed with the steps below:
1. Run the below commands to create a user (useradd) named bill and provide a strong password.
You need to have more than one user on your local machine other than the default user, which is you, to see how changing ownership works.
sudo useradd bill
sudo passwd bill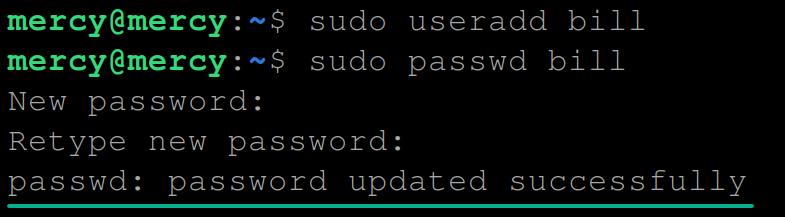
2. Next, execute each command below write a list of currently logged-in users (who) to a file called new.txt as a non-privileged user, and view (ls) its owner and permissions.
who > new.txt
ls -l  new.txt
Below, the output shows the file owner is mercy.

3. With the owner verified, run the chown command below to change the owner of the new.txt file to bill.
Like the chmod command, the chown command does not provide output, but you will verify the owner change in the following step.
sudo chown bill new.txt4. Now, run the following command to view (ls) the new owner of the new.txt file.
ls -l new.txtThe output below confirms you have successfully changed the owner of the new.txt file to bill, who now has control and authority over that file.

Enforcing the chown Command to Modify Group Ownership
In the Linux file system, every file and directory is associated not only with an individual owner but also with a group. Just as a single out-of-tune instrument can disrupt the entire ensemble, incorrect ownership can lead to potential issues.
Should you be worried? Not really. Group association allows for a layered approach to file permissions. This approach enables multiple users to collaborate and share access based on group membership.
To modify group ownership, complete the following steps:
1. Execute the below command to view the group associated with the new.txt file.
ls -l new.txt
2. Next, run the commands below, which do not provide output but perform the following:
- Create a group (
groupadd) calleddevelopers. - Change the group (
chown) ownership of thenew.txtfile todevelopers.
sudo groupadd developers
sudo chown :developers new.txt
💡 Alternatively, instead of an individual approach, use the following commands to recursively change the owner and group ownership of a file or an entire directory.
sudo chown -R john:finance-group user.txt
sudo chown -R john:finance-group ~/Desktop
3. Now, rerun the following command to view (ls) the new group ownership of the new.txt file.
ls -l new.txtBelow, the output confirms you have successfully changed the new.txt file’s group ownership to developers.

Altering File Ownership via Numeric UID and GID
While usernames and group names offer a human-readable way to identify file owners, every user and group is also associated with unique numeric identifiers.
These unique numeric identifiers are User ID (UID) and Group ID (GID). They provide an unambiguous way to set file ownership in environments with overlapping or similar user and group names.
To change the ownership using numeric UIDs and GIDs, perform these steps:
1. Execute the below command to list information (ls) about the new.txt file.
The -n option tells the ls command to display numeric UIDs and GIDs rather than resolving them to their corresponding user and group names.
ls -n new.txtNote the UID and GID associated with the new.txt file, as you will need them for making comparisons in the latter step.

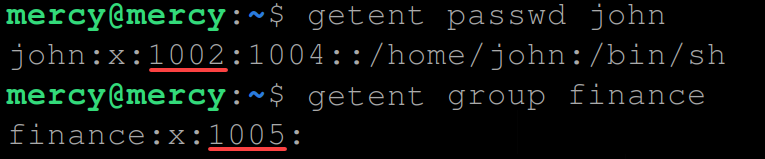
2. Next, run the following getent commands to get the UID and GID of the user and group you wish to set for your file’s ownership.
Ensure you replace <username> and <groupname> placeholders with your preferred username and group name.
getent passwd <username>
getent group <groupname>
Take note of the UID (i.e., 1002) and GID (i.e., 1005) in the following output, as you will need them for changing ownership in the next step.
By default, when a user is created in Linux, a group with the same name as the user is also created. This group serves as the user’s primary group and is automatically added to this primary group.
Thus, the GID for the user john differs from the GID of the finance group. Unless the user is explicitly added to the group, their respective GIDs remain different.
3. Next, run the following command to change the new.txt file’s ownership and group ownership. Be sure to replace 1002 and 1005 with the ones you noted in step two.
💡 Note that using numeric UIDs and GIDs can be less readable than usernames and group names. Thus, ensure you are using the correct numbers to avoid unintended changes.
sudo chown 1002:1005 new.txt4. Finally, rerun the command below to list information (ls) about the new.txt file and verify the changes in the file’s ownership.
ls -n new.txtCompare the UID and GID you noted in step one with the ones below. Notice that the new file ownership has been changed from 1001:1003 to 1002:1005.

Conclusion
You have just embarked on a comprehensive exploration of Linux permissions, gaining mastery over crucial commands like chmod and chown. Throughout this tutorial, you have become adept at modifying permissions using symbolic and octal modes.
You have also acquired the skills to manage file ownership and group assignments, whether by name or through numeric UID and GID. With this newfound expertise in chmod and chown, you now wield powerful tools to govern access and ownership within your Linux system.
But why not further bolster your Linux proficiency? Perhaps consider delving into advanced access control methods, including Access Control Lists (ACLs)? Aim for even more precise control over file and directory permissions!


