


Environment variables are a vital part of any operating system, allowing programs to work together and share data. While most users will never need to change or even view their Ubuntu environment variables, it can be a challenge for those who need to work with these settings.
This guide will walk you through everything you need to know about managing your Ubuntu environment variables, from basic viewing and editing tasks to more advanced management strategies.
Ready? Read on to learn how to wrangle your Ubuntu environment variables!
Prerequisites
This tutorial will be a hands-on demonstration. If you’d like to follow along, be sure you have the following.
- An Ubuntu computer. This tutorial will use Ubuntu 20.04, but other versions and Linux distros should also work.
- You will also need a text editor—this tutorial will use Nano.
What Are Environment Variables?
In simple terms, environment variables are ways of customizing and configuring your operating system. Environment variables store information about the current session, such as the location of files, user preferences, etc.
Environment variables can also store global options, like which is the default editor or shell. Running programs can read these variables to determine how they should function.
Environment variables are also called global variables—because they affect the behavior of many programs on your system.
There are many tasks that you might want to complete with Ubuntu environment variables, including the following:
- Viewing and editing existing values.
- Creating new environment variables on a per-user or global basis.
- Getting a list of all current environment variables.
- Deleting unwanted environment variables.
With these skills, you can confidently manage your Ubuntu environment variables, ensuring that your system is working at its best.
Creating Temporary Ubuntu Environment Variables (Current Session)
When working with Ubuntu environment variables, one of the most basic tasks you will need to perform is setting a variable for the current shell session.
This behavior is useful for temporary changes or testing purposes. For example, suppose you have a script that reads the HOME environment variable that stores the current user’s home directory path.
Your home directory path defaults to /root if you’re the root user. What if you need to simulate how the script works when another user runs it in their session? The typical way is by changing your current directory to the desired location and then running the program.
Or you could set the ‘HOME’ variable to override your home directory.
1. SSH into your machine or open a terminal session.
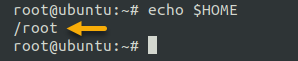
2. Display the current HOME environment variable value by running the below command.
echo $HOMEAs you can see below, the current HOME environment variable value is /root.
3. Now, run the below command to change the ‘HOME’ environment variable and override your home directory. export is a built-in Linux command for setting environment variables.
export HOME="/home/ata"4. Run the below command to verify that the changes have taken effect. The result should show your modified home directory. The echo command is the built-in command that displays output on the screen.
echo "My new home address is @ $HOME"
5. Now, restart your terminal session and run the below command to confirm that your HOME directory has reverted.
echo "I'm at my old home address @ $HOME"As you can see, you’ve moved back to your old home!

This behavior is as expected—the variable was only set for the current shell session and is not persistent across sessions.
Using environment variables is an excellent way to make temporary changes to your system without modifying any configuration files or making permanent changes.
Manipulating Ubuntu environment variables can be helpful in testing new software or scripts and troubleshooting issues.
Creating Permanent Ubuntu Environment Variables (User-Specific)
While setting an environment variable for the current session is useful in many situations, you may need to set a variable permanently at some point. Permanent variables mean that the change will persist across all future sessions and affect how all programs on your system behave.
Manually setting a variable for each shell session can be tedious and prone to errors. Instead, you can use a configuration file to set the environment variable automatically when your system boots up.
In Ubuntu, the ~/.bashrc file is one of the most commonly used files for storing environment variables. By default, starting a new terminal shell session executes the ~/.bashrc file. This file makes the perfect place to set environment variables that you want to be available in all future shell sessions.
To set an environment variable permanently, follow the below steps.
1. Open the ~/.bashrc file in a text editor.
nano ~/.bashrc2. Add the following line at the end of the ~/.bashrc file. This line creates an environment variable called PS_SNAPSHOT_DIR pointing to the /home/ata directory. Change the target directory as you wish.
export PS_SNAPSHOT_DIR="/home/ata"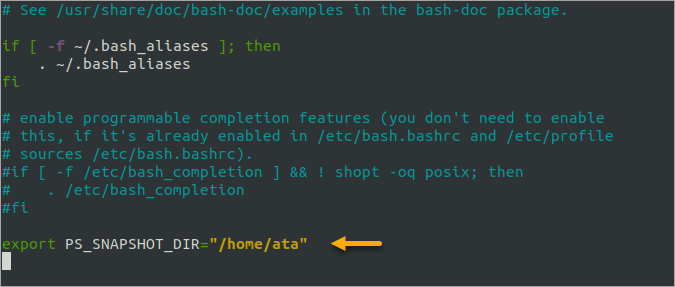
Save and close the ~/.bashrc file after editing.
3. Run the below command to ensure the changes take effect even without restarting the terminal session.
source ~/.bashrc
echo $PS_SNAPSHOT_DIR
As you can see below, the system recognizes the new environment variable $PS_SNAPSHOT_DIR.

4. Restart or open a new terminal session and verify the environment variable persists.
echo $PS_SNAPSHOT_DIRYou should see the same environment variable value that you added in the previous session.
Note: This environment variable is only available to the current user—specifically to the user account who created the variable in their ~/.bashrc file.
5. You can now reference this variable in the terminal or in your script. For example, the below code outputs the currently running processes to a text file named ps.txt under the $PS_SNAPSHOT_DIR directory.
# Output the process list to
ps > $PS_SNAPSHOT_DIR/ps.txt
# Read the saved process list
cat $PS_SNAPSHOT_DIR/ps.txt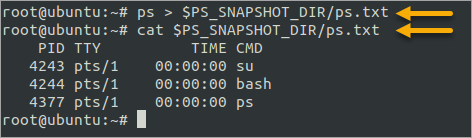
From this point forward, the $PS_SNAPSHOT_DIR variable will be permanent until you remove it from the ~/.bashrc file.
Apart from referencing the variable by running terminal commands, you could schedule Cron jobs to do the same!
Creating Permanent Ubuntu Environment Variables (Global)
In some cases, you may want to set an environment variable for all users on your system. Setting up global environment variables is particularly useful in a shared development environment where multiple users may need access to specific external services or tools.
For example, a team of developers may need to send test emails coming from a common sender using the same SMTP server configuration every time. You can set up system-wide Ubuntu environment variables by adding the variables inside the /etc/environment file.
The use-case demonstration below uses the Office 365 Authenticated SMTP relay.
1. Open the /etc/environment file in a text editor, such as nano.
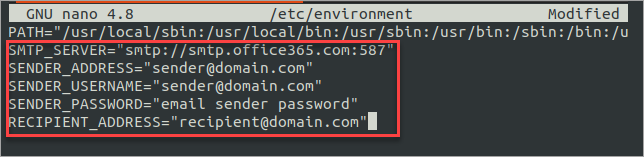
sudo nano /etc/environment2. Add the following lines at the end of the /etc/environment file. These environment variables include the SMTP server, credentials, sender, and recipient information. Modify these values per your SMTP details.
Do not prepend the export command when adding lines to the /etc/environment file. The pam_env processes the /etc/environment file, which does not support the export keyword.
SMTP_SERVER="smtp://smtp.office365.com:587"
SENDER_ADDRESS="[email protected]"
SENDER_USERNAME="[email protected]"
SENDER_PASSWORD="email sender password"
RECIPIENT_ADDRESS="[email protected]"
After editing, your /etc/environment file should look similar to the screenshot below. Save the file and close the editor after adding the variables.
3. Next, log out of the computer and log back in for the changes to take effect. Only then will the system load the global environment variables.
4. After login, verify that the global variables are present by running the below commands. Verify that the environment variable values are correct.
echo $SMTP_SERVER
echo $SENDER_ADDRESS
echo $SENDER_USERNAME
echo $SENDER_PASSWORD
echo $RECIPIENT_ADDRESS
5. Now, put the global environment variables to the test by triggering a test message.
# Create the subject and email body and save it to the file called ./email.txt
echo "Subject: (user=$USER) Ubuntu Environment Variables

This message was sent using Office 365." > ./email.txt

# Send the message using cURL
curl $SMTP_SERVER \
--mail-from $SENDER_ADDRESS \
--mail-rcpt $RECIPIENT_ADDRESS \
--user $SENDER_USERNAME:$SENDER_PASSWORD \
--upload-file ./email.txt \
--ssl-reqd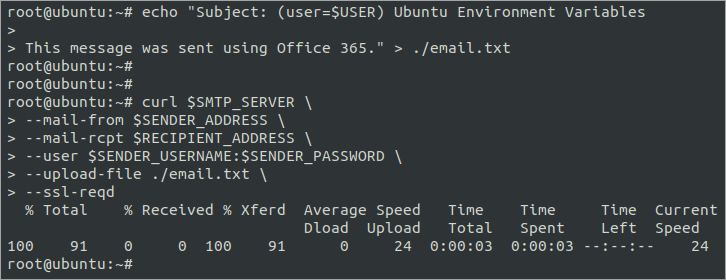
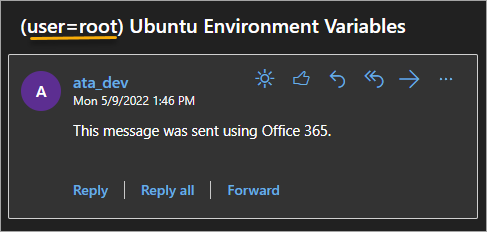
6. Check the recipient’s inbox to confirm email delivery. As you can see below, the root user sent this message and used the global variable values to define the SMTP settings.
7. Now, log on to a different user account. In this example, the account will switch from root to ata.
su - ata8. Re-run the same commands from Step 5 to send a test email from the current user account while reading the same global environment variables.
9. After running the send message commands, check the recipient’s inbox again and confirm the email delivery. As you can see below, the message came from the same sender, but the user who triggered the email delivery is not the same as the first one.
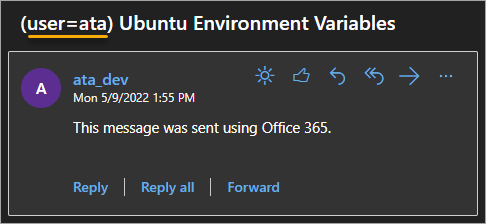
This test confirms that all users on the computer can access the global variables.
Removing Ubuntu Environment Variables
Eventually, you may want to remove an environment variable from your system temporarily. The unset command is what you need, whether you created the environment variable from the terminal or added the variable entries in the ~/.bashrc and /etc/environment files.
For example, to unset the SMTP_SERVER variable, run the below command.
# check the current variable value before unsetting
echo $SMTP_SERVER
# unset the variable
unset SMTP_SERVER
# check the variable value after unsetting
echo $SMTP_SERVER
To print all environment variables on the screen, run the export -p command.
As you can see below, the variable and its value no longer exist after the unset command.
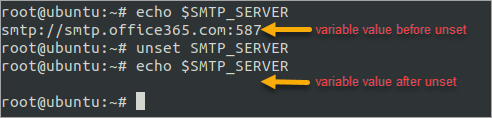
Note: The unset command only removes the environment variables from the current shell session. To remove the environment variables permanently, you must remove the corresponding variables entries from the ~/.bashrc or /etc/environment files.
Conclusion
This tutorial taught you how to set up and manage Ubuntu environment variables on the current session, for the current user, and system-wide. You also learned how to unset environment variables when necessary.
While this tutorial only covered a few basic examples, you can apply the techniques you learned to set up and manage any environment variable on your system. Perhaps changing the default text editor or setting the path to your preferred Java installation would be the next excellent examples you should try!


