


Did you know you can use Office 365 to send email with PowerShell? In this article, you’re going to learn how to send Email with Office 365 Direct Send and PowerShell’s Send-MailMessage cmdlet.
If you’d like an in depth look at sending email with PowerShell, check out this in-depth tutorial on Send-MailMessage.
Office 365 Direct Send vs. SMTP Client Submission
Before we get too far into the PowerShell, know that there’s not just one way to send email through Office 365 using PowerShell. Office 365 has two supported ways to send email. Those options are Direct Send and SMTP Client Submission or SMTP Authenticated Submission.
SMTP Authenticated Submission
SMTP Authenticated Submission is the easiest to set up. You would choose this option if you plan to send emails from a device or application to recipients inside and outside your organization. There is no extra action to do in Office 365 to allow this.
This option allows you to use any sender address. But the address must be from one of your verified accepted domains.
To use SMTP Authenticated Submission, you must:
- Have an Office 365 user mailbox (licensed). This email address will appear as the sender of the message.
- PowerShell (or another client) must be able to resolve and reach smtp.office365.com.
- TCP Port 587 or 25 must be open to Office 365 from the client.
Direct Send
Ramping up the complexity a bit is the Direct Send option. Like SMTP Authenticated Submission, Direct Send allows you to use any sender address. Also, the from address must be from one of your verified accepted domains.
The big difference between Direct Send and SMTP Authenticated Submission is no external recipients are allowed. If you need to send to email recipients outside of your organization, Direct Send will not work for you.
Direct Send has a few of its own requirements/recommendations:
- This sender address does not have to be a valid mailbox. But it is needed if you plan to receive NDRs or replies using this address.
- TCP Port 25 is open from your client to Office 365.
- The device must be able to resolve and reach your MX endpoint URL (eg. yourdomain-com.mail.protection.outlook.com)
- A static public IP address. This is to update your SPF record and avoid your messages getting flagged as spam (optional but recommended)
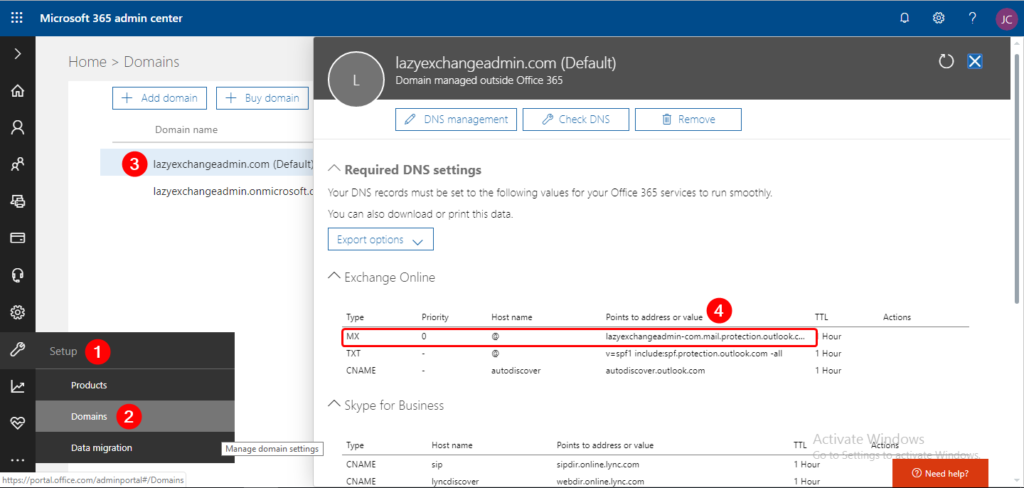
If you don’t know how to find your MX endpoint URL, here’s a quick tutorial:
- Log into the Office 365 Admin Portal.
- Click on Setup (1), select Domains (2), click the Domain name (3), copy the MX Points to address or value (4).
SMTP Authenticated Submission
The first method to send email is via SMTP Client Submission or SMTP Authenticated Submission. Using PowerShell’s Send-MailMessage cmdlet, we can provide all of the parameters we need to send email through Office 365.
Below is a snippet you can use to send email via this method.
You’ll first need to define a PowerShell PScredential object then provide all of the parameters that Send-MailMessage needs.
# Get the credential
$credential = Get-Credential

## Define the Send-MailMessage parameters
$mailParams = @{
    SmtpServer                 = 'smtp.office365.com'
    Port                       = '587' # or '25' if not using TLS
    UseSSL                     = $true ## or not if using non-TLS
    Credential                 = $credential
    From                       = '[email protected]'
    To                         = '[email protected]', '[email protected]'
    Subject                    = "SMTP Client Submission - $(Get-Date -Format g)"
    Body                       = 'This is a test email using SMTP Client Submission'
    DeliveryNotificationOption = 'OnFailure', 'OnSuccess'
}

## Send the message
Send-MailMessage @mailParams
When you run the code above, you should receive an email received by the internal recipient (yourdomain.com) and the external domain (notyourdomain.com).


Direct Send (TLS Required)
Similar to SMTP Authenticated Submission, you can use nearly the same parameters for Send-MailMessage. However this time, the To recipients will only be internal.
Also notice that a PSCredential was not needed.
## Build parameters
$mailParams = @{
    SmtpServer                 = '<tenant>.mail.protection.outlook.com'
    Port                       = '25'
    UseSSL                     = $true
    From                       = '[email protected]'
    To                         = '[email protected]'
    Subject                    = "Direct Send $(Get-Date -Format g)"
    Body                       = 'This is a test email using Direct Send'
    DeliveryNotificationOption = 'OnFailure', 'OnSuccess'
}

## Send the email
Send-MailMessage @mailParams
Summary
You can see that Office 365 provides two different options for sending email. In this article, we used PowerShell as an example to demonstrate both. But you don’t have to use PowerShell. As long as your application or programming language supports TLS authentication, you can use any method you’d like.


