

If you’re on a Linux machine and need to automate Linux shell commands, this Linux shell scripting tutorial is for you. In this tutorial, you’ll learn everything you need to turn Linux shell scripting into your bread-and-butter with automation.
Let’s get going!
Prerequisites
To follow along with this tutorial, it is necessary to have a remote SSH host. This tutorial uses an Ubuntu 18.04.5 LTS machine with sudo/administration rights.
What is a Shell?
Before jumping into shell scripting, it’s necessary to understand what shell is. A shell is a command language interpreter that executes commands read from the standard input device such as a keyboard or a file to execute programs, create files, etc.
Whenever a user opens up the terminal (a console to a shell), the shell issues a command prompt where you’ll type your input. That input is further executed as you hit the Enter key, displaying the output on the terminal.
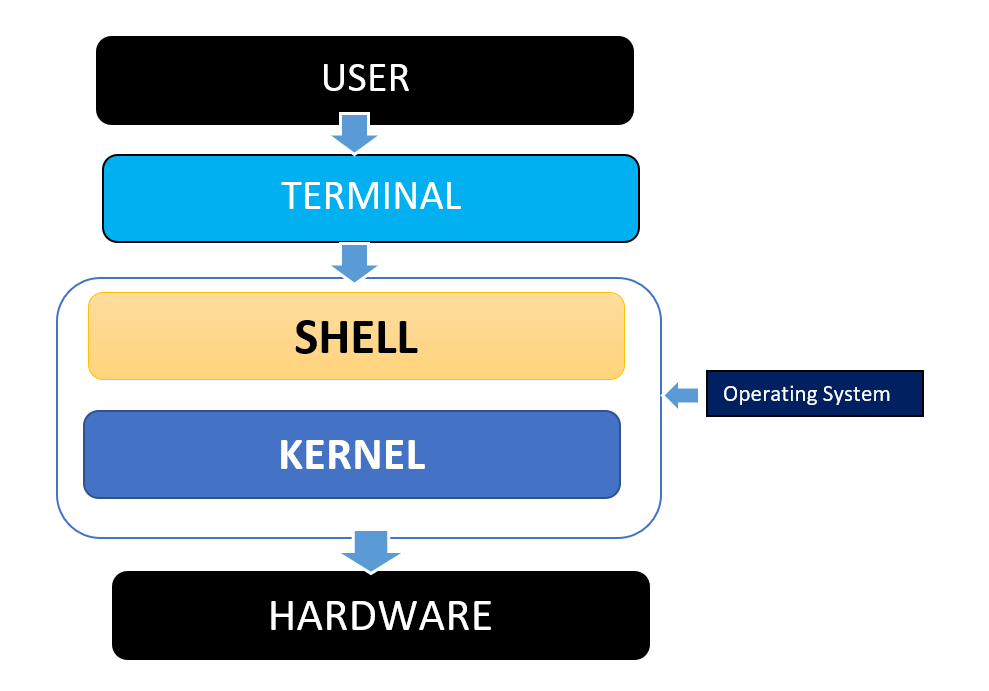
You can see below that the kernel communicates between the hardware and software throughout the shell script workflow.
There are majorly four kinds of Unix shell as listed below:
- Bourne Shell: The Bourne shell (sh) is a shell command-line interpreter for computer operating systems.
- C Shell: C Shell is a Unix shell with an overall language style more like C.
- Korn Shell: Korn Shell (aka ksh) is the default shell on many UNIX systems.
- Bourne-Again Shell: Bourne Again Shell, also known as Bash, is Bourne Shell’s successor with additional functionalities, such as command-line completion, basic debugging, etc. Bash is the default shell environment for most GNU/Linux systems.
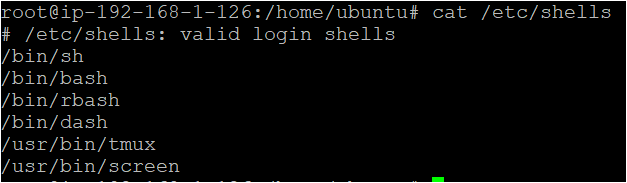
Perhaps you want to view all the shells available on your Ubuntu machine. To do so, launch your terminal and run the cat command below.
Below, the cat command prints out the ~/etc/shells file’s content.
cat /etc/shells
In the output below, you can see that multiple shells are available. Later, you’ll see how to indicate which shell to use when running a script.
Creating a Shell Script
Understanding what a shell is wouldn’t be complete unless you experience a shell script in action. So let’s work on creating your first shell script. Perhaps you want to start with a basic script to print messages on the console.
1. SSH into your Ubuntu VM using your favorite SSH client or open a terminal if you’re already on a Linux machine.
2. Find the running shell by running the echo "$SHELL" command.
echo "$SHELL."In the below image, you will notice the output says /bin/Bash, which indicates Bash is running.

3. Change into the ~/opt directory first and create a shell script file named my_first_shell_script.sh by running the following commands.
Due to security concerns, running or installing your software or programs inside the opt directory is recommended.
# Change directory to ~/opt
cd opt
# Create a text file named my_first_shell_script.sh with vi editor
vi my_first_shell_script.sh
4. Now, copy and paste the code below to the my_first_shell_script.sh file and save it.
In the script below, you can see the shebang (#!) written in the first line of the script. The shebang is a character sequence that tells the kernel which shell to use to execute the script; in this case, it’s Bash (/bin/bash).
#!/bin/bash
echo "Hello World" # Prints the Hello World message
Configuring File Permission to Run a Script as an Executable
After creating the script file, by default, you only have read and write access to it. A shell will only run scripts you have executable permission for. So, before running the script you created, you must first configure the script as executable. Otherwise, you’ll get a “Permission denied” error message when you run the script.
The chmod command below lets you add the execute (x) permissions to all users (a) running the script (my_first_shell_script.sh).
chmod a+x my_first_shell_script.shAfter saving your script, refer to any of the methods below to run your script:
bash script.shor/bin/bash script.sh– Indicates the shell to use and executes the script from the working directory.bash /$HOME/script.sh– Indicates the shell to use and execute the script by specifying the script’s full path../script.sh– Executing the script from the working directory
For this example, run the command below to execute your script, assuming that your script is in the working directory.
./my_first_shell_script.shBelow, you can see that the script printed the words Hello World in the console.

Working with User-Defined Variables
Now you know how to create and run a script, let’s look into declaring variables. In every programming language, variables play an important role. In Linux shell scripting, you’ll run into more than one type of variable, but let’s cover user-defined variables for this example.
Perhaps you don’t want to keep writing the same string or value over and over in a script. Declaring user-defined variable stores a value in memory to substitute to a string or another value.
You can see below the basic syntax of declaring a user-defined variable. Notice that there are no spaces before and after the equal (=) operator; otherwise, you’ll get an error. Why? Because the shell will interpret the variable_name as a command, not a variable.
<variable_name>=<value>Below, you can see the error message saying that the variable_name command is not found.

Let’s see how to substitute string outputs with variables.
Copy and paste the script below to a script file, configure the script as executable like you previously did, and run the script.
The code below declares the year and sitename variables to hold different types of values. It then prints a message where strings are substituted by year and sitename variables.
#!/bin/bash
# Declaring a variable with a number value
year=2020
# Declaring a variable with a string value
sitename="adamtheautomator.com"
# Printing a string message substituting the value from the year and sitename variables
echo "The $sitename website was launched in the year $year."
Working with Environment Variables
Unlike user-defined variables, you can set environment variables system-wide. Environment variables are then made available to all shells. For instance, an application that creates logs could access your USERNAME and your $HOME directory.
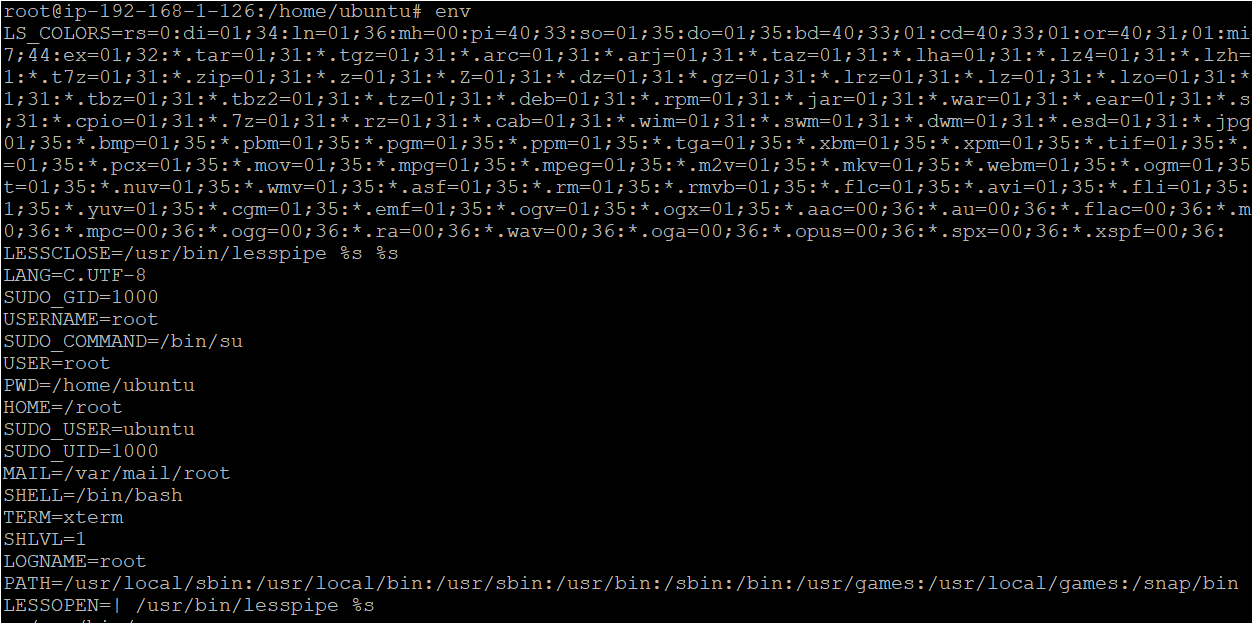
Like other variables, you can set your own environment variable, but predefined environment variables are already set in the Unix shell. Check out the list of predefined environment variables with their corresponding values by running the env command.
In the image below, you’ll notice that all the variables are defined in variable=values format.
Let’s see how environment variables work in a script.
Create a script file named variables.sh in the ~/opt directory, copy and paste the code below to the variable.sh file. Configure the script as executable and run it.
Below, you can see that you’re substituting a string with the $PWD environment variable, pointing to the present working directory.
#!/bin/bash
echo "You are executing this script from $PWD Location"
You can see below that the script executes from the ~/opt directory.

Setting Your Own Environment Variable
You can also set your own environment variables. By default, your own environment variables are only accessible in the current shell session. Still, you can also make environment variables accessible outside the current shell session with the instructions below.
Setting Environment Variables for the Current Shell
By default, environment variables are only accessible within the same shell session you declare them in. To create a session-specific environment variable, use the export command, as shown below.
The command below is created an environment variable called VARNAME with a value of my value.
export VARNAME="my value"Setting Environment Variables with .bashrc
When you just use the export command inside a script as above, the variable will not be available to any other script. To make an environment variable available globally, declare the variable in the .bashrc file in your $HOME directory.
The .bashrc file contains various shell configuration values for each session created. These configuration items include setting up or enabling: coloring, completion, shell history, command aliases, and more.
To create global environment variables, open the .bashrc file in a text editor and write the variable below.
export VARNAME="my value"Below, run the source command to execute the content of the .bashrc file to apply the changes you made to the file. Then, run the printenv command piped with the grep command to print the variable name and its value.
source ~./bashrc # Apply the changes you made to the .bashrc file
printenv | grep VARNAME # Print the environment variable and its value
Setting Environment Variables with /etc/environment
You can also set system-wide environment variables with the /etc/environment file. The /etc/environment file is specifically meant for system-wide settings like the one you’re about to set for your own.
1. To modify the /env/environment file, open the ~/etc/environment file in your preferred text editor. The example below uses the nano text editor.
sudo -H nano /etc/environment2. In the /env/environment file, set the variable’s value, as shown below, save it, and that’s it! All users and processes can now access the variable (VARNAME) anytime.
VARNAME="my value"3. Execute the /etc/environment file and notice that the VARNAME variable is available and will be across all future sessions.
source /etc/environment # Apply the changes you made to the /etc/environment file
printenv | grep VARNAME # Print the environment variable and its value
Below, you can see a comparison table to understand better the scope of setting your own environment variables.
| Method | Scope |
| The export command | The environment variable is only accessible for the current user in the current shell and processes |
| The .bashrc file | The environment variable is permanently accessible for the current user in all future Base sessions and processes |
| The /etc/environment file | The environment variable is permanently accessible for all users in all Bash sessions and processes |
Understanding Special Variables
Special variables are just like other variables, except that you can’t assign values to them, as they are reserved for specific functions. Perhaps you’re trying to substitute strings based on a specific order. In that case, use special positional variables to set the strings’ position.
Let’s test the special positional variables in a script. Copy and paste the script below to a script file named variable.sh, configure it as executable, and run it.
The code below declares a variable with a string value. It then prints out the string value, followed by two other strings based on the declared positional variable.
#!/bin/bash
# Declares a variable with a string value, followed by positional variables ($1 and $2)
fullname="My name is$1 $2"
# Prints out the string value from fullname variable,
# with the following strings substituting the positional variables
echo $fullname Shanky Mendiratta

Check out few other special variables below and what purpose they serve.
$!– Provides the PID of the most recently executed command in the background.$$– Provides ****the PID of the Bash shell itself.$1,$2,$3,… – Provides the number of positional parameters passed in the script.$0– Provides the name of the shell script.$n– Corresponds to the arguments with which a script was invoked.$?– Provides the ****exit status of the most recently executed command and check whether your Bash script is completed successfully or not.$_– Provides ****the absolute file name of the shell or Bash script, which is being executed as specified in the argument list.
Getting and Setting Exit Codes in a Shell Script
All processes in Linux exit with a specific code known as an exit code. Exit codes are integers that indicate the status of a process, typically if it was successful or failed somehow. In Bash, you can override these default exit codes and set your own.
Within a Bash script, you can both read exit codes and set custom ones as well. Let’s first read an exit code. To do that, read the value of the special variable $? by echoing out its value with the echo command.
In the following example, the cat command tries to get the contents of a file (myfile.txt) that doesn’t exist. The echo command then prints out the exit status of the cat command.
#!/bin/bash
# Returns the content of a text file named myfile.txt
cat myfile.txt
echo $? # Get the exit status of the command above
Below, you can see the returned error message saying that the myfile.txt file doesn’t exist, along with the exit code (1).

cat Command’s Exit Code Now, let’s see how to use the exit codes to tell whether the command ran successfully or not with a condition.
The code below tries to create a directory named mydir but with an invalid command. Since the command is invalid, the $? will not have a success exit code of 0. You can see that the if statement checks for an exit code and performs some action depending on the value within the $? special variable.
#!/bin/bash
mdkdhd mydir # Create a directory named mydir
if [ $? -eq 0 ] # Compare if the exit status of the previous command equates to 0
then
	# If the exit status is 0, then print this message below
  echo "Successfully created mydir directory"
  exit 0 # Sets the exit code 0 - no errors found
else
  # If the exit status is non-zero, then print this message below
  echo "Failed creating mydir directory"
  exit 127 # Sets the exit code 127 - command not found error
fi
You can see below that the script failed and returned an error message saying the “Failed creating mydir directory.”

mdkdhd Command is Not Found. Below are the other exit codes to specify when getting or changing an exit status:
1– Catches all the general errors2– Misuse of shell built-ins126– Command invoked cannot execute128– Invalid argument passed130– Script terminated by Control-C
Creating a Shell Function to Run Series of Commands
Now you know how to identify script errors with the exit status. Let’s create a function in your script without worrying you’ll run into errors.
Perhaps you realized that you’re duplicating commands over and over in a script. In that case, a shell function can help save time and increase your script efficiency. A function is a block of code that only executes when called from any parts of your shell script.
Below is the basic code block of a shell function. Notice that you first need to declare the function name and then write the series of commands in the curly braces.
function Name_of_the_function () {  # Declaring the function name
        Command 1 # Series of commands
        Command 2 .....
}
Now, let’s see a shell function in action.
Create a shell script called Shell_function_demo.sh in opt directory, then copy and paste the script below to the Shell_function_demo.sh file. Configure the script as executable and run it.
The script below calls a function that will print first and last name strings based on the substituted value by the positional parameters ($1 and $2).
#!/bin/bash
function newfunction()
{
 echo “My First Name is $1”
 echo “My Last Name is $2”
}
newfunction Adam Candy
After running the script, you’ll notice that the function printed two different echo statements with the substituted positional parameters.

Viewing File Names and Size via a For Loop
Like the function in the previous section, a for loop is also a code block that performs specific tasks but is iterated over a set of items. For instance, the for loop will run until it reaches the last file in a directory.
Perhaps you need to check the size of each file in the working directory. If so, a short script with a for loop will suffice.
Let’s check out below an example of viewing each file’s size in the working directory. To do so, create a script file looping_over_file.sh, then copy and paste the below code to the looping_over_file.sh file. Configure the script as executable and run it.
The code below scans each file in the current directory and prints out its name and size in bytes until all files are scanned.
#!/bin/bash
for filename in * # Scans all files (*) in the current directory
do
	wc -c $filename # Outputs list of file names and byte-count on each newline
done
You can see below that each file size is listed, followed by the file name.

Requiring User Input in a Running Shell Script
So far, you’ve learned scripts that are focused on commands and variables. But with advanced-level projects, you would often require users to input data at runtime. The user input data could be anything, such as username and password in a program asking to fill in security information, for example.
Let’s cover how to require user input while the shell script is running.
Create a new script file under the ~/opt directory and name it user_input.sh, then copy and paste the code below to the user_input.sh file. Now configure the script as executable and run it.
The script below allows the user to input a username and password, then print a confirmation message.
#!/bin/Bash
# Prints a message asking the user to enter a username and password
echo Please enter your details below
# Requires a user input for a username stored to the uservar variable
# (-p) prompt
read -p 'Username: ' uservar
# Requires a user input for a password stored to the passvar variable
# (-sp) silent prompt, characters are not visible
read -sp 'Password: ' passvar
# Prints a 'thank you' message
echo Thank you $uservar for providing your login credentials
You can see below the input for the username is visible, while the input for the password is not.

Running Code While a Condition is True
Unlike the for loop, a while loop runs code while a certain condition is true. Perhaps you’re writing code to print a set of incrementing numbers. In that case, a while loop would be ideal for executing the code.
Let’s check out an example below and learn how while loop works.
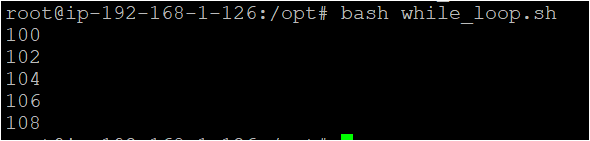
Create a script file first with your preferred text editor, and name it while_loop.sh. Save the code below to the script file, and run it to see how the while loop iterates, printing incrementing numbers.
The code below declares a variable (a) with an initial value of 100, then incrementing by two while the current value is less than 110.
#!/bin/bash
a=100 # Declaring initial value in a variable

# Sets condition to run the commands inside the while loop
# while the value is less than 110
while [ $a -lt 110 ]
do
   echo $a # Prints the current value
   a=`expr $a + 2`# Increments the value by two
done
After running the script, you can see below the numbers are printed and incremented by two. Notice that the printed numbers only reached 108 since the condition set to the while loop increases the value while less than 110 ([$a -lt 110]).
Printing Colored Output from a Shell Script
By now, you’ve learned a handful of scripts. But this time, let’s cover how to change the color of a script’s printed output.
Perhaps you need specific output such as username, password prompt, or errors to look different to recognize them quickly. Let’s check out how to change an output’s color with a shell script.
Copy and paste the code below to script file named colored_output.sh in the ~/opt directory. Be sure the file is configured as executable, and run it to see how you get colored outputs.
Notice in the script below that the string values start in \\e[0;00m format to set the color and end with the \\e[0m format to set the color back to default.
#!/bin/bash
# -e : enables interpretation of backslash
echo -e "\e[0;31m This is red text \e[0m"    # Prints a red-colored output
echo "Using the default color."              # Prints a default colored output
echo -e "\e[0;33m This is yellow text \e[0m" # Prints a yellow-colored output
echo -e "\e[0;34m This is blue text \e[0m"   # Prints a blue-colored output
After running the script, you can see below different colored outputs.

If the colors the tutorial used aren’t to your liking, you can always choose between different colors, as you can see below.
Colors are represented by color codes as follows:
Black        0;30     Dark Gray     1;30
Red          0;31     Light Red     1;31
Green        0;32     Light Green   1;32
Brown/Orange 0;33     Yellow        1;33
Blue         0;34     Light Blue    1;34
Purple       0;35     Light Purple  1;35
Cyan         0;36     Light Cyan    1;36
Light Gray   0;37     White         1;37
Escaping Characters
If you noticed in the previous scripts, string values were enclosed in double quotes (" "), single (' ') quotes, and left quotes (). These quotes play an important role while writing a shell script, but if incorrectly placed, the script will not work as intended.
Perhaps you want to include double quotation marks in your string output. Escaping a character with the backslash symbol in a string will do the trick. The contents inside quotes are considered a string except for the \\ or ! symbols and variables.
Let’s check out how to include double quotes in a string output.
Create a script file named doublequotes.sh in the ~/opt directory, then copy and paste the script below to the doublequotes.sh file. Configure the script as executable and run it.
The code below prints string values with the basic double-quoted string escaped double quotation marks and substituted value from a variable in the script below.
#!/bin/bash
# Declare a variable with a basic string value
str1="Hello this ATA Blog Site"
# Prints the string value from str1 variable
echo $str1

# Declare a string variable with escaped double quotation marks
str2="Hello this ATA  \"Blog Site\""
# Prints the string value from str2 variable
echo $str2

# Declare a variable named owner with a string value
owner="Adam"
# Declare a string variable with escaped double quotation marks
# and a substituted value from the owner variable
str3="Hello this ATA \"Blog Site\" by $owner"
# Prints the string value from str3 variable
echo $str3
You can see below that there are double quotes included in the second and third output.

Printing Special Characters in a String with Single Quotes
When you insert special characters in a string in double-quotes, Bash interprets those special characters and returns their value. But, what if you need to include special characters or quotes inside of a string? Use single-quotes.
Perhaps you need to include escape characters or variables in the string, declare them inside single quotes.
Let’s check how string values in single quotes work. Save the code below to a script file named single_quotes.sh file and run it.
Anything within the single quote is considered a string in the code below.
#!/bin/bash
# Declares a string variable named str1
str1='Hello this ATA Blog Site'
echo $str1 # Prints the string value from str1 variable

# Declares a string variable named str2
# including the escape character (\) as the string
str2='Hello this ATA  \"Blog Site\"'
echo $str2 # Prints the string value from str2 variable

# Declares a string variable named owner
owner="Adam"
# Declares a string variable named str3
# including the escape character (\) and the $owner variable as a string
str3='Hello this ATA \"Blog Site\" by $owner'
echo $str3 # Prints the string value from str3 variable
After running the script, you will notice that the $owner variable and escape character (\) are printed out as strings this time.

Running Command Inside a String with Left Quotes
Now that you know how to print out string values in double quotes and single quotes. Let’s look at how left quotes work. Unlike double and single quotes, left quotes focus only on declaring a command within a string.
Perhaps, you need to print out today’s date included in a string using the date command. In that case, using the left quotes is the ideal option to print the date regardless of which quotes enclose the string value. Let’s go over how to write the left quotes inside a string value.
Below, the code declares two variables with strings enclosed in single and double quotes where the date command is included in the script below.
str1='Todays date is `date`'
echo $str1
str2="Todays date is `date`"
echo $str1
You can see below that both string variables printed the same output.

Conclusion
You have now acquired rock-solid knowledge from this Linux shell scripting tutorial, from shell scripting basics to executing loops. You’ve also learned how shell scripts automate many tasks, which help save time and make developers’ lives much easier.
Now take your shell scripting skills up a notch, and start your own project by combining each script you created in this tutorial.


