

Does your business run multiple servers, each running its operating system at different locations? Worry no more, as virtualization is here to solve your problem. Virtualization allows you to run multiple operating systems in one physical machine, and there are two most common platforms you can pick, VMware and Hyper-V.
In this tutorial, you’ll explore and compare the two different virtualization technologies and their use cases.
Get ready, and start virtualizing!
Prerequisites
This tutorial is a hands-on demonstration in which you’d require the following:
- A computer running Windows Operating System with Hyper-V enabled – This tutorial uses Windows 10 Pro v21H2 build 19044.1889.
- VMware Workstation installed – This tutorial uses VMware Workstation 16 Pro v16.2.4 build 20089737.
- A Virtual Machine guest OS ISO image – This tutorial uses a Linux Mint ISO image.
Exploring the VMware Workstation
VMware virtualization technologies are based on a bare metal hypervisor (Type 1/Bare Metal hypervisor) known as ESX/ESXi that runs on x86 architecture. Virtualization platforms, like VMware, enable you to simulate multiple virtual instances over your computer hardware to utilize your system’s underlying resources fully.
VMware supports Windows, Linux, Unix, and macOS operating systems. And to better understand how VMware Workstation works, start by creating a VM you can manage in the following sections.
Creating a VM on VMware Workstation
Before jumping into VMware’s features, you’ll need a VM to manage when working on a virtualization platform. If you don’t have one yet, VMware lets you create a VM with a few clicks.
To create and set up a new VM:
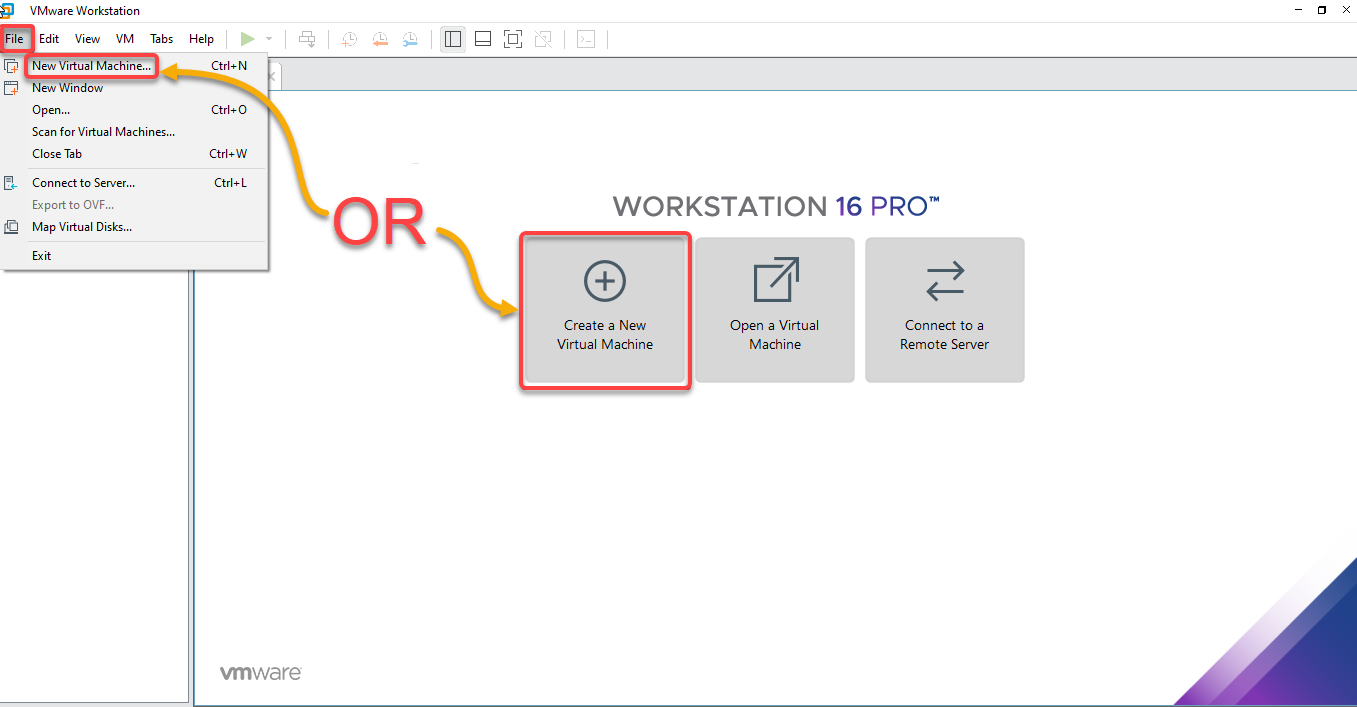
1. Launch VMware Workstation 16 Pro application on your Windows computer.
2. Next, click on the File menu (Ctrl+N), and choose New Virtual Machine (or Create a New Virtual Machine at the Home tab). The Virtual Machine Wizard appears (step three), where you can configure your VM.
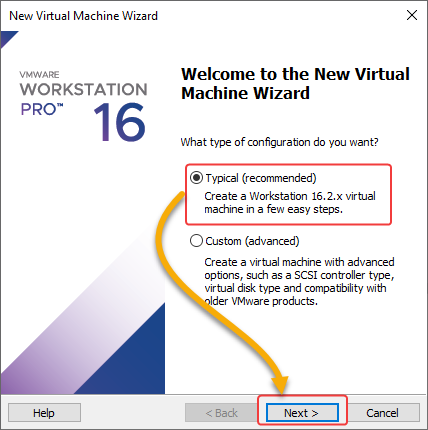
3. On the wizard, select a configuration type for your VM. But for this tutorial, choose Typical for simplicity, and click Next to continue.
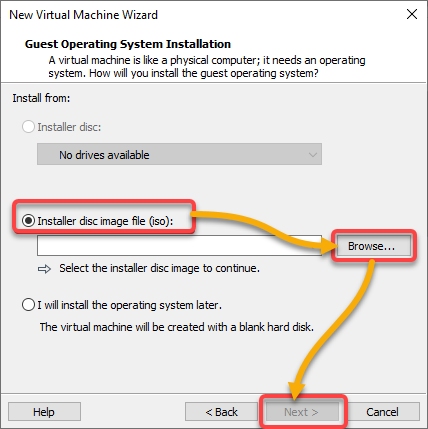
4. Now, select the Installer disc image file (iso) option, click Browse to choose the ISO image to install, and click Next.
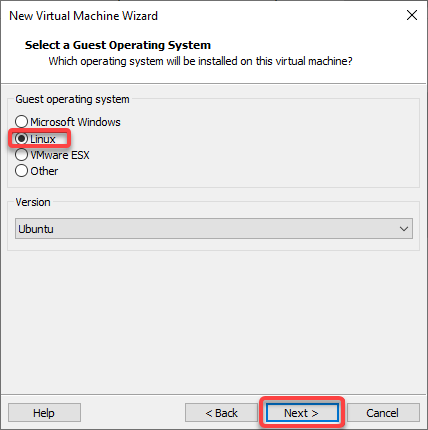
5. Choose Linux as your guest OS, and click Next to continue.
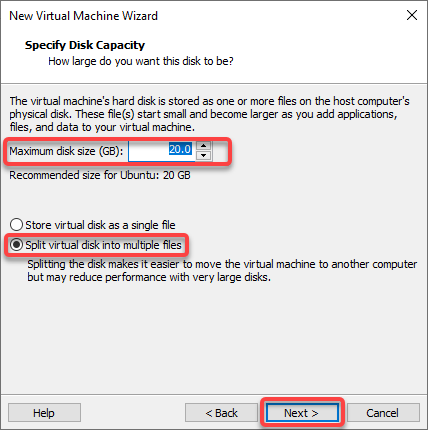
6. Next, configure your virtual disk with the following:
- Input the recommended size (or larger) for your virtual hard disk (VHD) in the Maximum disk size field.
- Choose the Split virtual disk into multiple files option for easier migrating your VM to another computer.
- Click Next to continue.
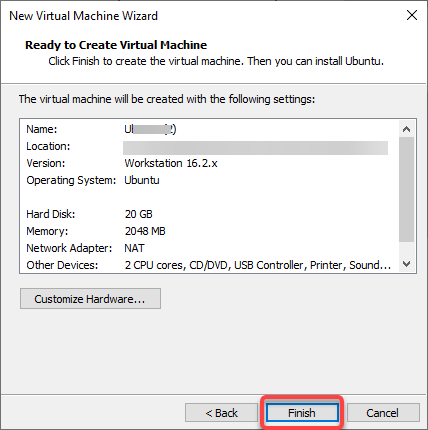
7. Finally, click Finish to complete setting up your VM.
Starting and Shutting Down a VM
You’ve just created your VM, but you still have to start your VM to see if it works and shut it down entirely later on.
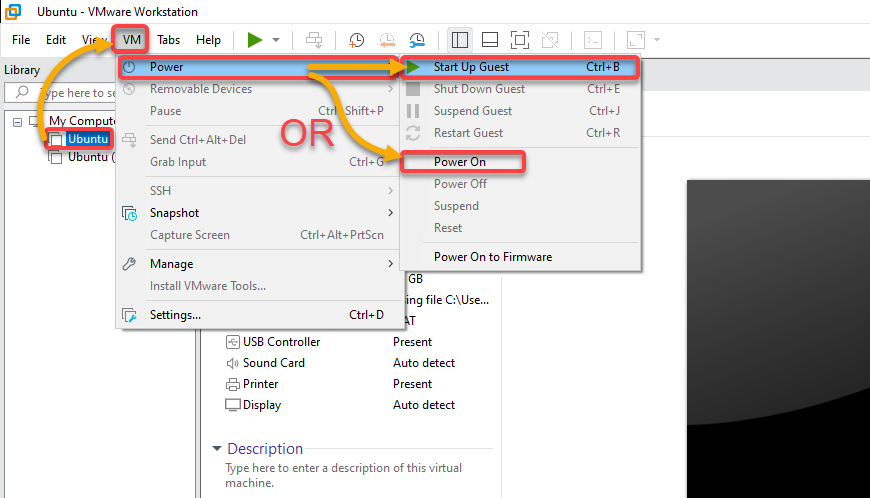
Select your VM in the left panel, click on the VM menu → Power, and choose Start Up Guest (Ctrl+B) or Power On to start your VM.
Always select your VM before making any changes or performing any actions.
If successful, you’ll see your OS launch on your VM, as shown below.

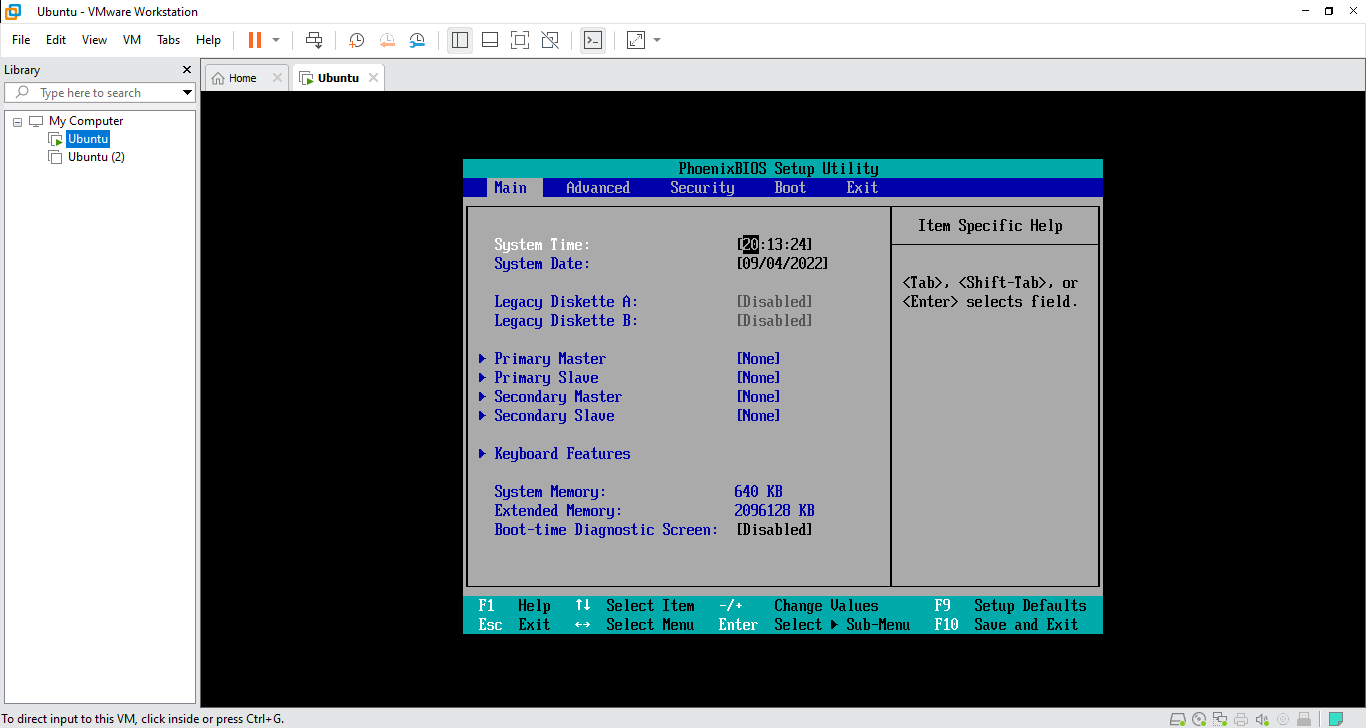
Perhaps you plan to look into the VM’s BIOS setup. If so, choose Power On to Firmware instead to access the BIOS, as shown below.
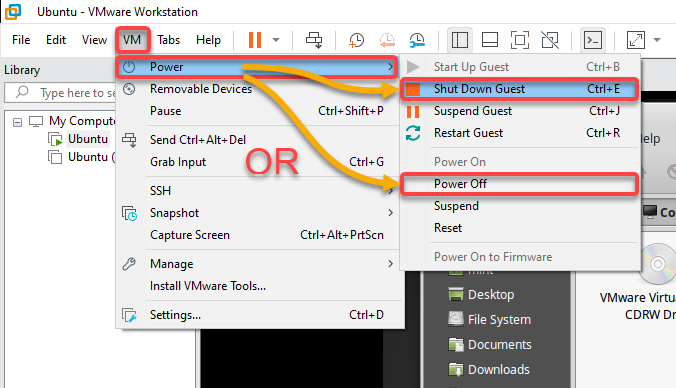
Now, click the VM menu → Power, and select either of the following:
- Power Off – Shuts down your VM abruptly without considering work in progress.
- Shut Down Guest (Ctrl+E) – Sends a shutdown signal to the guest OS.
Configuring a VM’s Network
You’ve just created and started your first VM in VMware and confirmed that it works fine. But still, you must ensure your VM has a good network connection by configuring your VM’s network.
To configure your VM’s network:
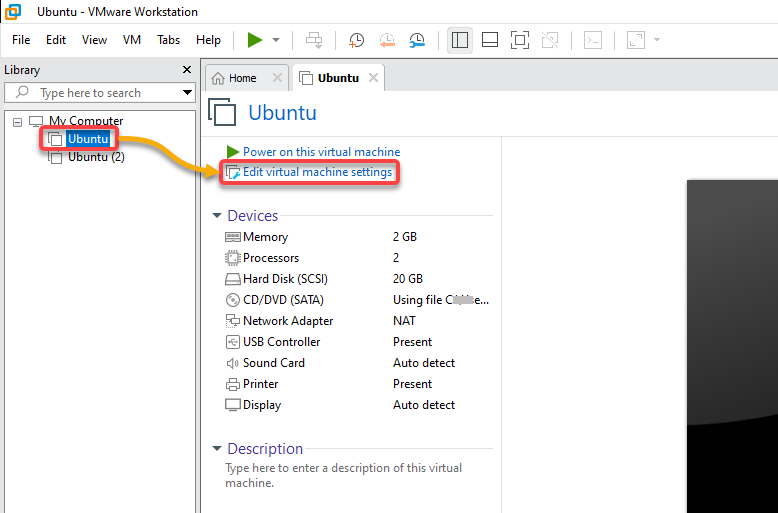
1. Select your VM, and click on Edit virtual machine to open the Virtual Machine Settings window (step two).
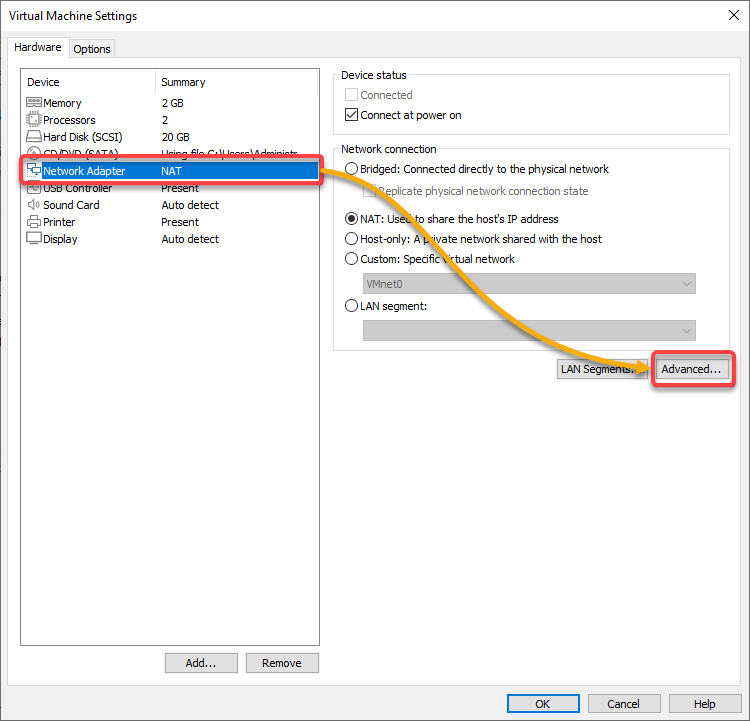
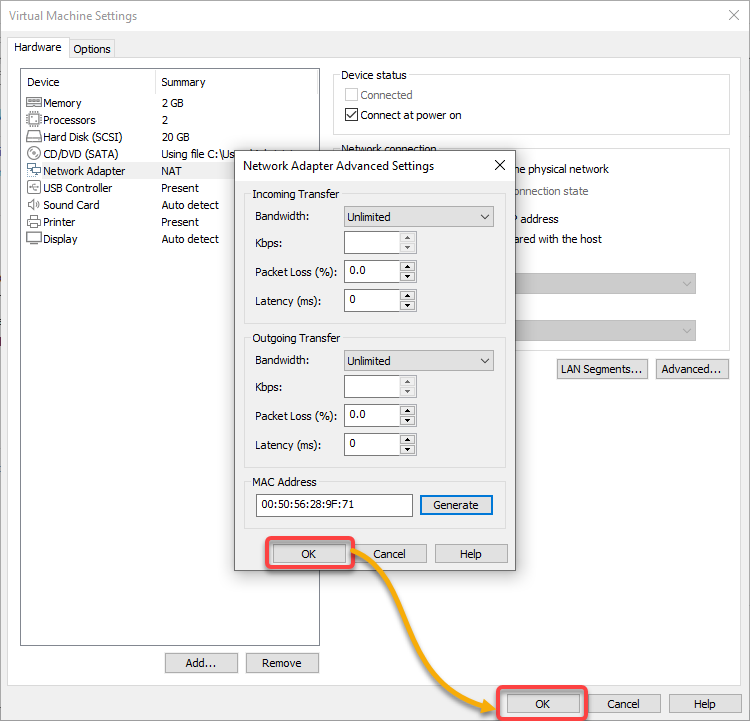
2. Next, select the Network Adapter (left panel), and click on Advanced to scale down your VM’s bandwidth usage.
3. Now, on the pop-up window, set the incoming and outgoing bandwidths accordingly.
Once set, click OK to close the Network Adapter Advanced Settings and Virtual Machine Settings windows.
Suspending and Resuming a VM
Perhaps you’ll be away from your computer but don’t want to shut it down yet. In that case, suspending your VM will do the trick. The suspend operation creates a VM suspended state (.vmss or .vmem) file in your VM disk files directory.
The suspended state file lets you resume the applications running with their content unchanged before you suspend your VM.
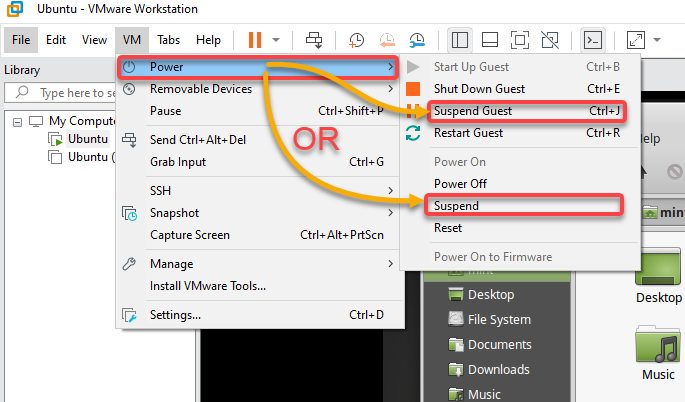
Click on the VM menu → Power, and choose either of the following to suspend your VM:
- Suspend – Suspends the VM and leaves it connected to the network.
- Suspend Guest (Ctrl+J) – Suspends the VM and disconnects it from the network.
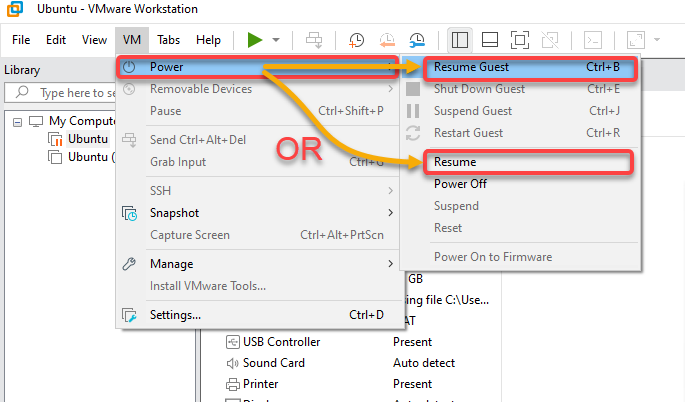
Now, click on the VM menu again → Power, and choose either of the following options to resume your suspended VM:
- Resume – Resumes your VM from the suspended state.
- Resume Guest (Ctrl+B) – Resumes your VM from the suspended state and reconnects it to the network.
Upon resuming a VM after you made changes or added contents, you can’t return to the state your VM was in when you suspended it. To repeatedly return to the same state, you’ll need to take a snapshot, which you’ll learn in the later sections of this tutorial.
Cloning an Existing VM
Perhaps you plan to add another VM that is the same as the existing one. In that case, VMware lets you clone a VM, its OS, network configuration, and all other settings.
1. Select your VM (left panel), click the VM menu → Manage → Clone to open the VM cloning wizard.
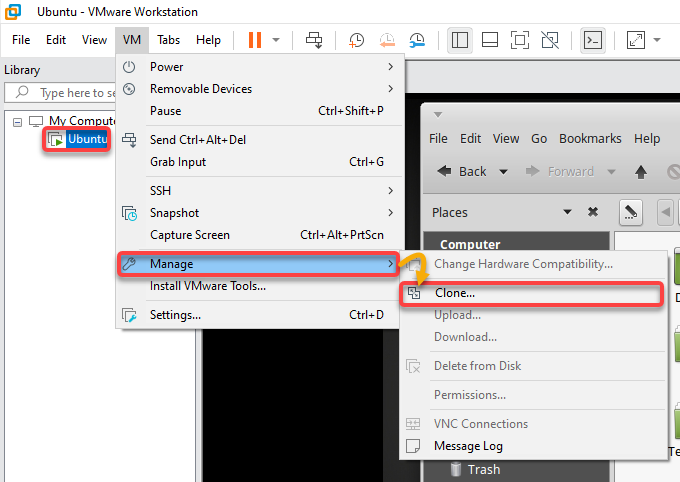
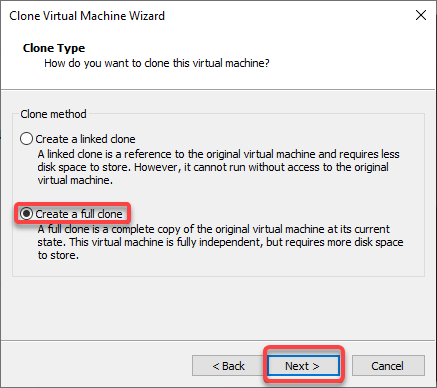
2. Next, choose the Create a full clone option to create a complete copy of the selected VM, and click Next.
3. Lastly, provide a name (Clone of Ubuntu), location to save the clone, and click Finish to clone the selected VM.
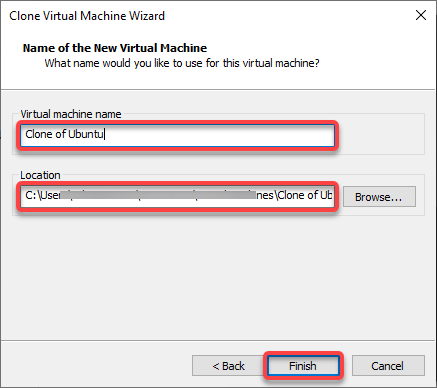
Once the cloning process is complete, you’ll see the cloned VM with the name you specified (Clone of Ubuntu).

Taking and Reverting to a VM Snapshot
Having a fail-safe helps in case your VM gets messed up. Taking a snapshot of your VM lets you revert to your VM’s good condition anytime.
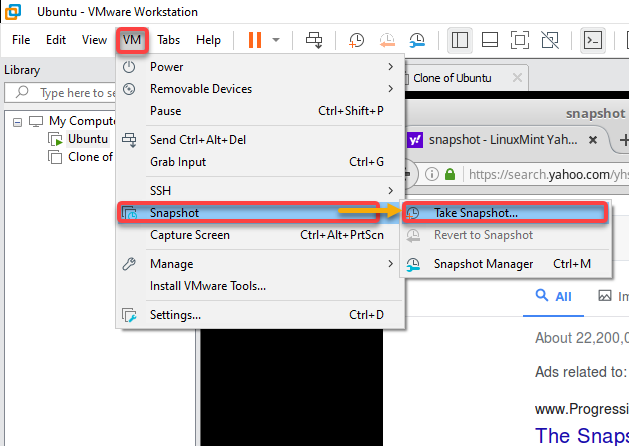
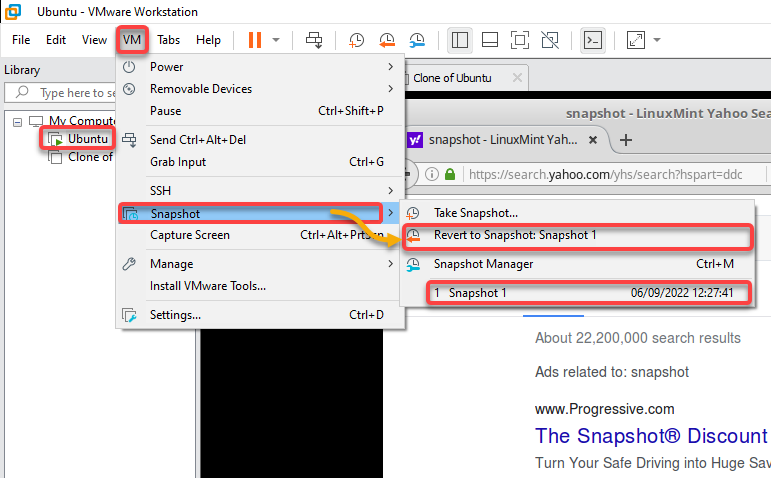
1. Select your VM, click on the VM → Snapshot → Take Snapshot to take a snapshot of your VM.
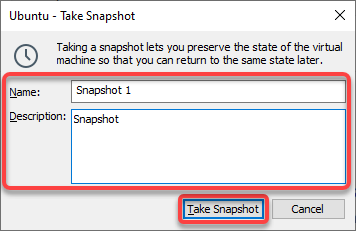
2. Next, provide a unique snapshot Name and a Description (optional), and click Take Snapshot to take a snapshot of the selected VM.
When you take a snapshot, the Workstation captures the entire state of the VM, and the snapshot is saved in your VM’s location.
3. Select your VM, click the VM menu → Snapshot → Revert to Snapshot <snapshot_name> to revert your VM to its previous state.
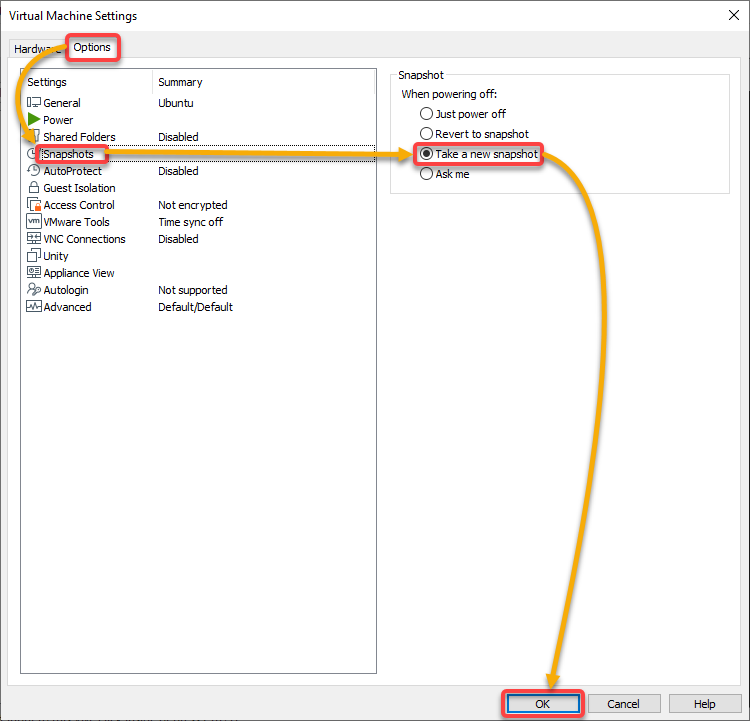
4. Now, select your VM, and click the VM menu → Settings to access your VM settings.
5. Finally, set a snapshot action VMware takes when you power off your VM with the following:
- On the Options tab, select Snapshots (left panel).
- Choose the Take a new snapshot option to make VMware take a new snapshot of your VM as it powers off.
- Click OK to save your changes.
Enabling the AutoProtect Feature to Keep a Range of Snapshots
Another feature that makes VMware stand out when it comes to snapshots is that you get to choose from different restore points. How? By enabling the AutoProtect feature, which lets you keep a range of snapshots.
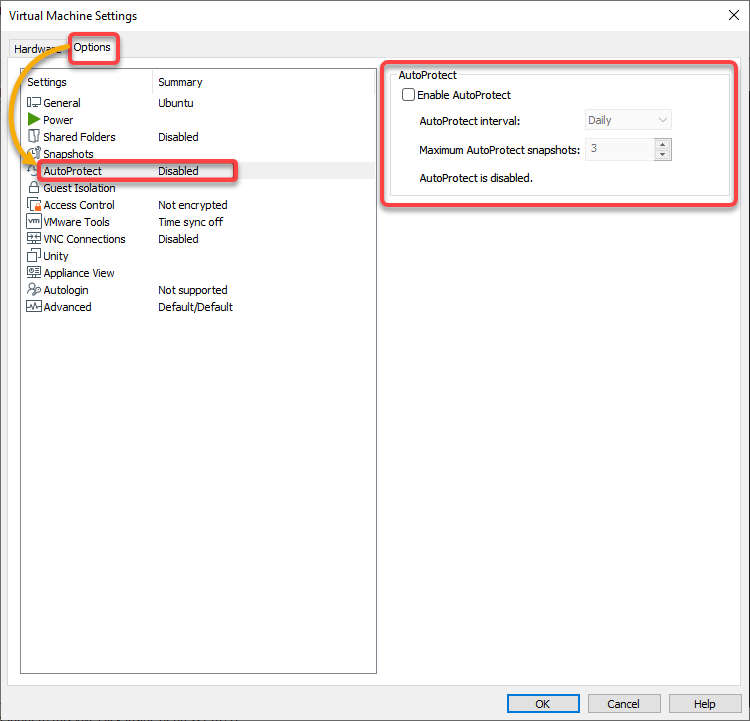
Navigate to the Options tab in the Virtual Machine Settings window, and select AutoProtect (left panel) to access the AutoProtect settings.
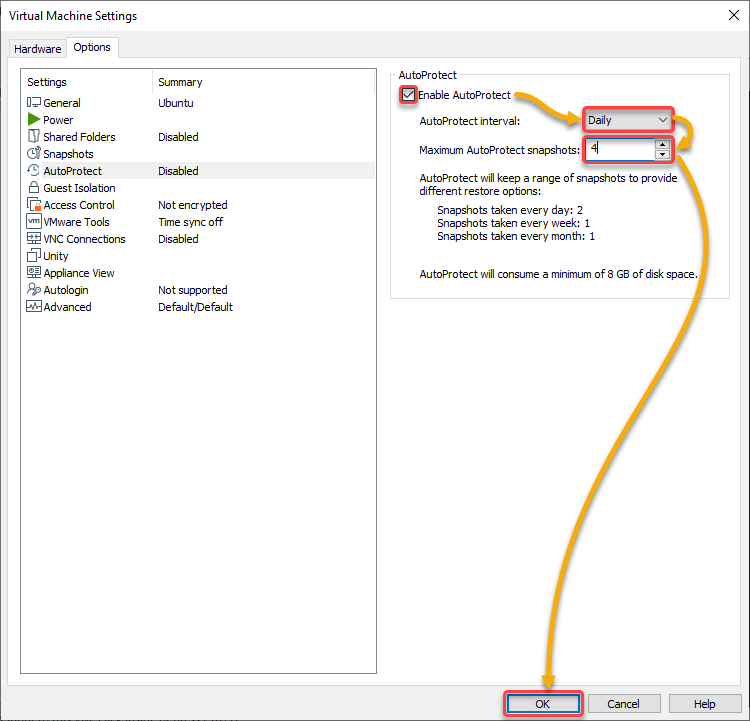
Now configure the AutoProtect settings with the following:
- Tick the Enable AutoProtect box to enable the feature.
- Select an interval between snapshots (i.e., Daily). This option preserves the state of a VM by taking snapshots at regular specified intervals.
- Select the maximum number of AutoProtect snapshots to retain.
- Click OK to save your changes.
Deleting a Snapshot
Having snapshots is undoubtedly helpful, but having too many snapshots can also be confusing, especially if you leave unused snapshots lying around. No worries, though. VMware lets you delete snapshots in a few clicks.
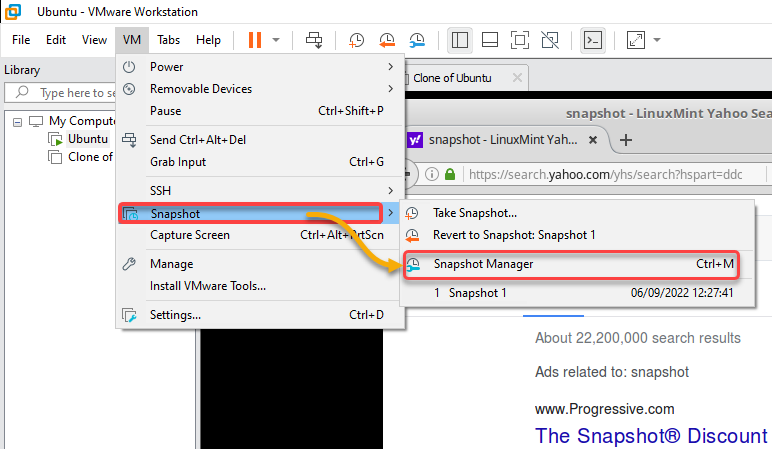
Select your VM, and click the VM menu → Snapshot → Snapshot Manager to access the Snapshot Manager.
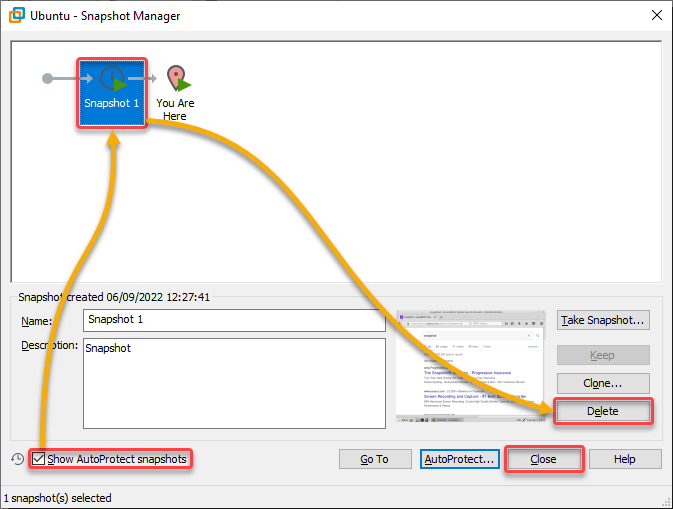
Now, delete a snapshot with the following:
- Tick the Show AutoProtect snapshots option to see the list of snapshots taken by the AutoProtect feature.
- Select the snapshot and click on the Delete button to delete the snapshot.
- Click Close to exit the Snapshot Manager.
Take caution when deleting a snapshot. Doing so removes the previously preserved VM state, and you can never return to that state again.
Keeping VMs Running in the Background
Perhaps you want to avoid restarting your VMs when you accidentally close VMware. If so, keeping them running in the background will do the trick.
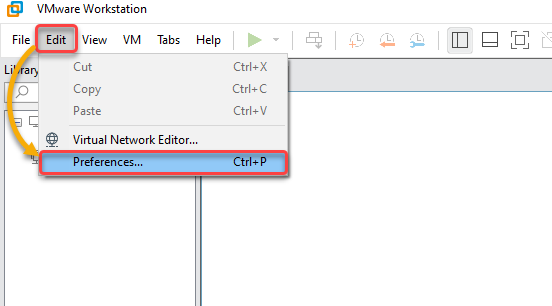
Click the Edit menu, and choose Preferences to access VMware preferences for VMs.
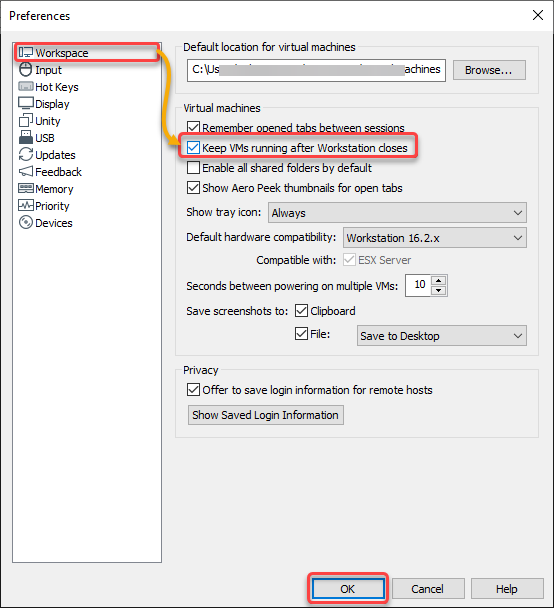
Next, select Workspace (left panel), tick the Keep VMs running after Workstation closes box and click OK to save your changes.
Enabling this feature ensures VMs always run in the background, and you are not prompted to select an action when you close powered-on VMs.
Virtualizing Machines in Hyper-V Manager
Perhaps uncomfortable using third-party software like VMware. In that case, Hyper-V, another virtualization platform, may pique your interest. Hyper-V is a Microsoft Corporation virtualization product that allows you to create and run VMs, which is also a bare-metal hypervisor.
Hyper-V supports Windows, Linux, and FreeBSD operating systems. And like what you did in VMware, you’ll create a VM you can manage in Hyper-V in the following sections.
Creating a VM in Hyper-V
Creating a VM in Hyper-V is similar to VMware, but the steps are different between the two platforms.
Instead of creating a VM, you can also import a VM on Hyper-V. Hyper-V supports exporting and importing VMs, the equivalent of cloning an existing VM.
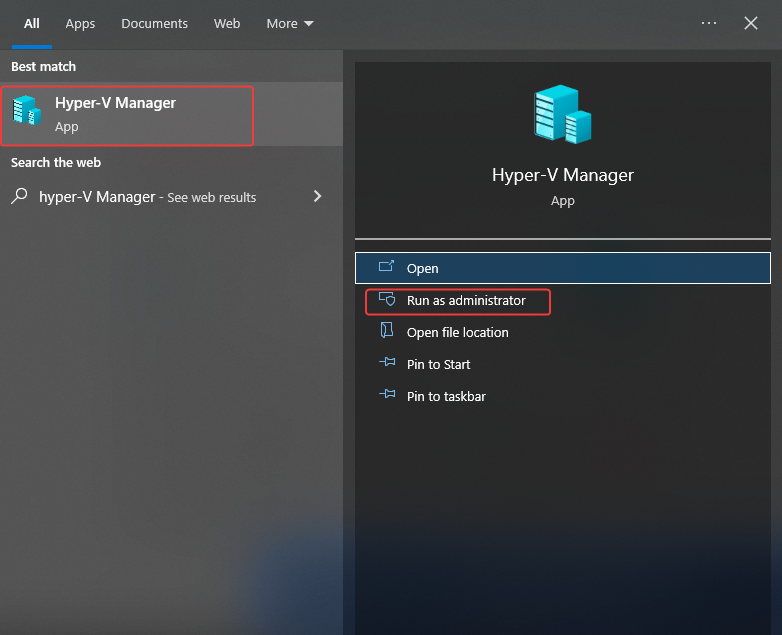
1. Launch the Hyper-V Manager as administrator from your Desktop or the Start menu.
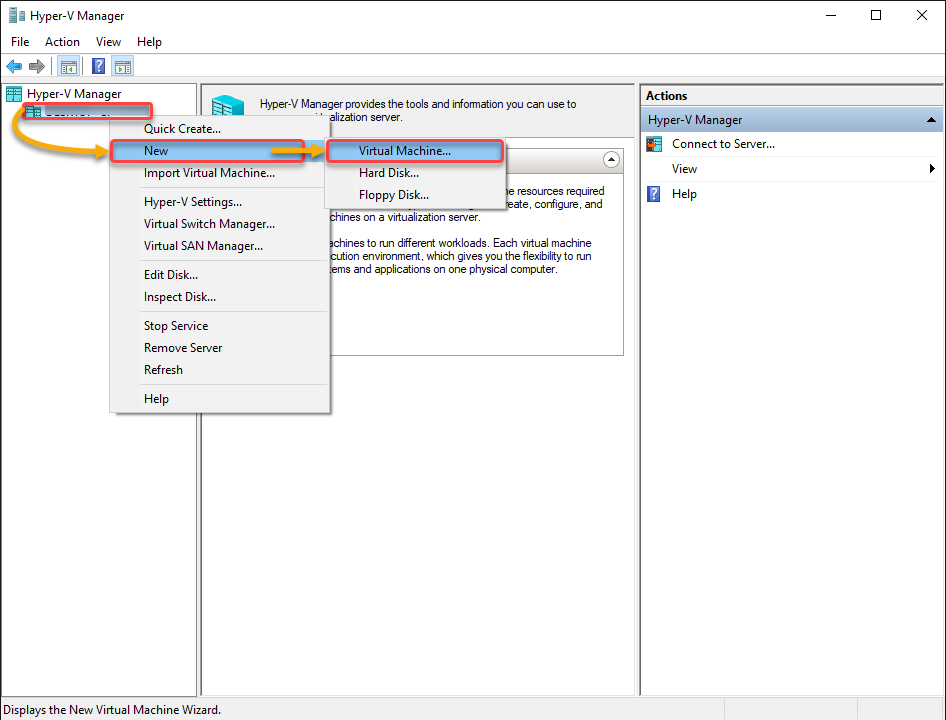
2. Next, right-click on your device (left panel), and select New in the context menu → Virtual Machine to initiate creating a new VM.
A New Virtual Machine Wizard opens where you can configure your new VM (step three).
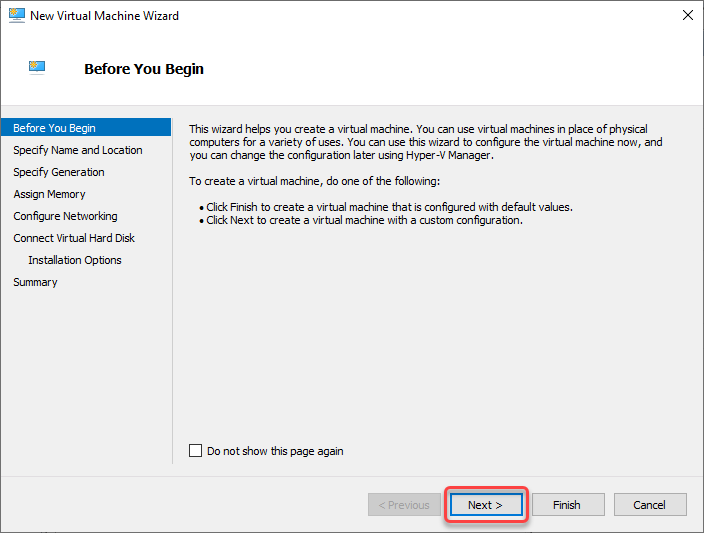
3. Click Next when you see the Before You Begin page since it is just introductory.
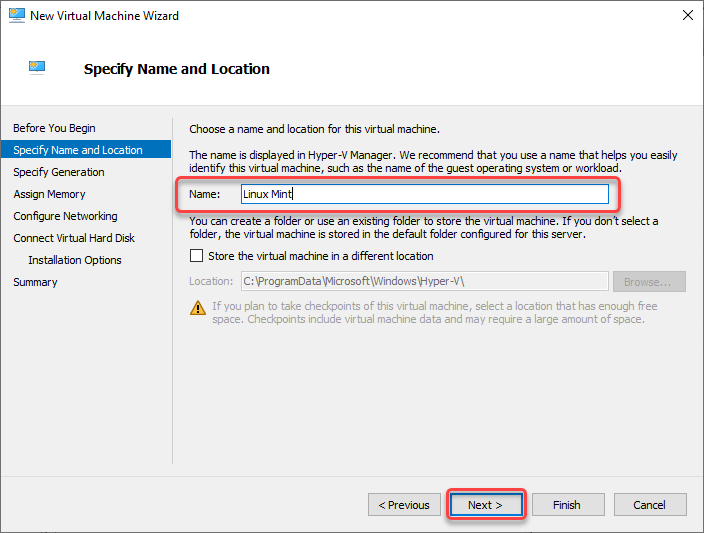
4. Now, specify a Name for your new VM, and click Next.
Perhaps you have a different VM location in mind. In that case, tick the Store the virtual machine in a different location box, and click Browse to set the location.
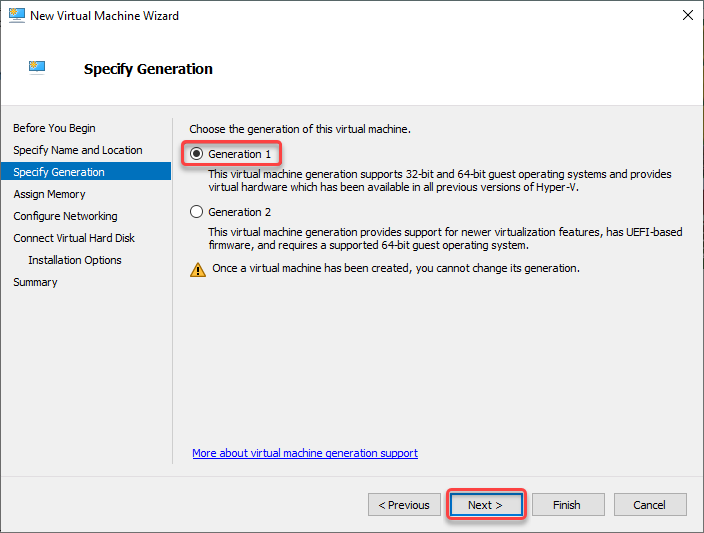
5. Specify the generation depending on the purpose of your new VM, as follows, and click Next:
- Generation 1 – for legacy and new programs run on 32-bit and 64-bit OS versions, respectively.
- Generation 2 – for advanced programs that support only 64-bit systems.
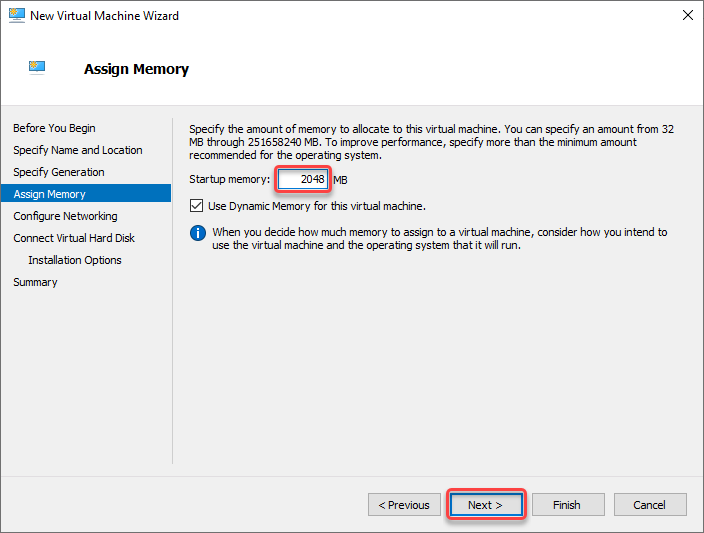
6. Next, check the minimum memory requirements of the guest OS you wish to install and allocate enough memory for better performance, and click Next.
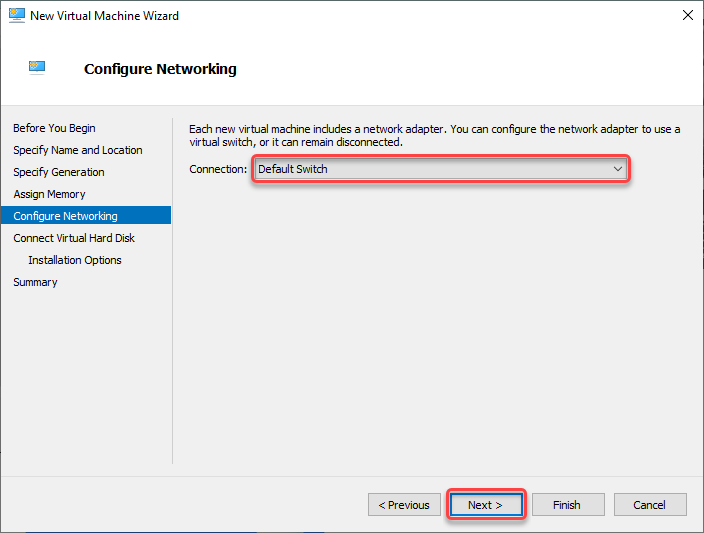
7. Choose the Default Switch option in the dropdown field to configure the VM network access, and click Next.
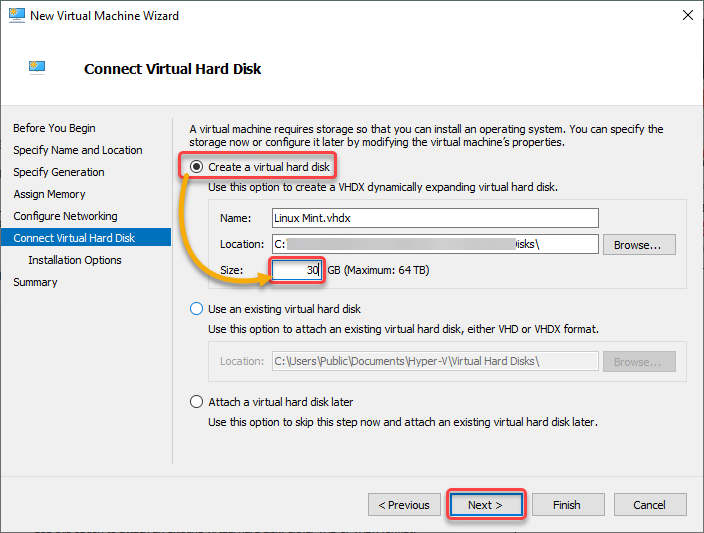
8. Next, choose the Create a virtual hard disk option, specify enough storage space (30) for the virtual disk where the guest OS will be installed, and click Next.
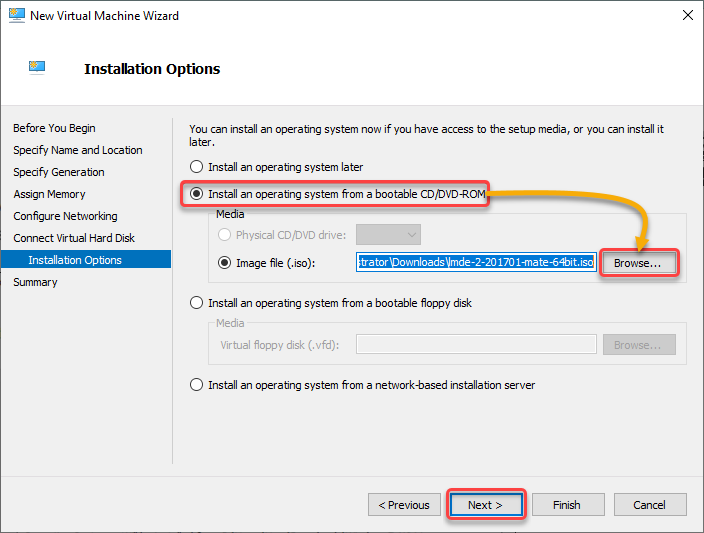
9. Choose the Install an operating system from a bootable CD/DVD-ROM option, click Browse to locate your ISO, and click Next.
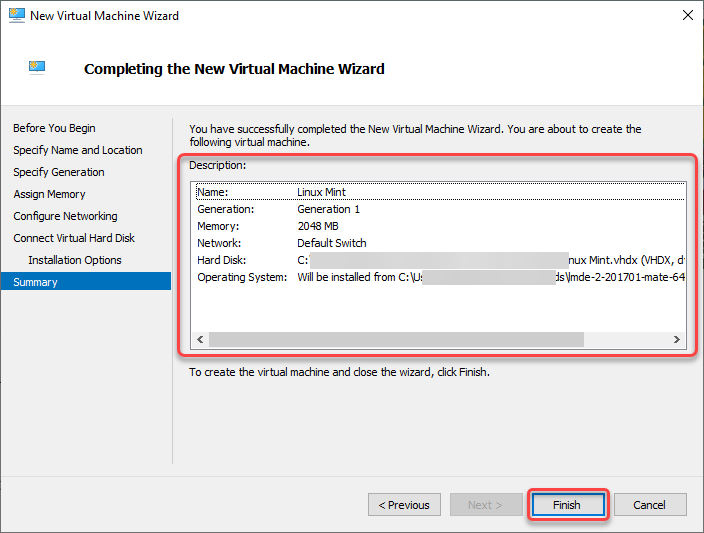
10. Finally, review your VM configuration, and click Finish to create the new VM.
Running and Shutting Down a VM
Like VMware, the actions to perform to your VM in Hyper-V are already laid out in a separate pane (rightmost) labeled as Actions.
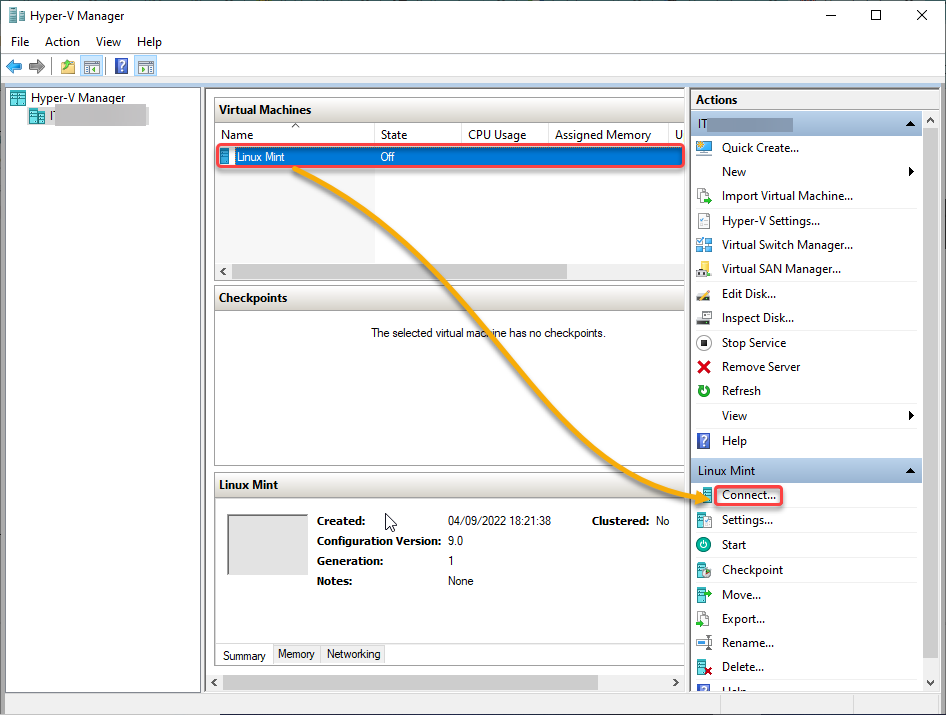
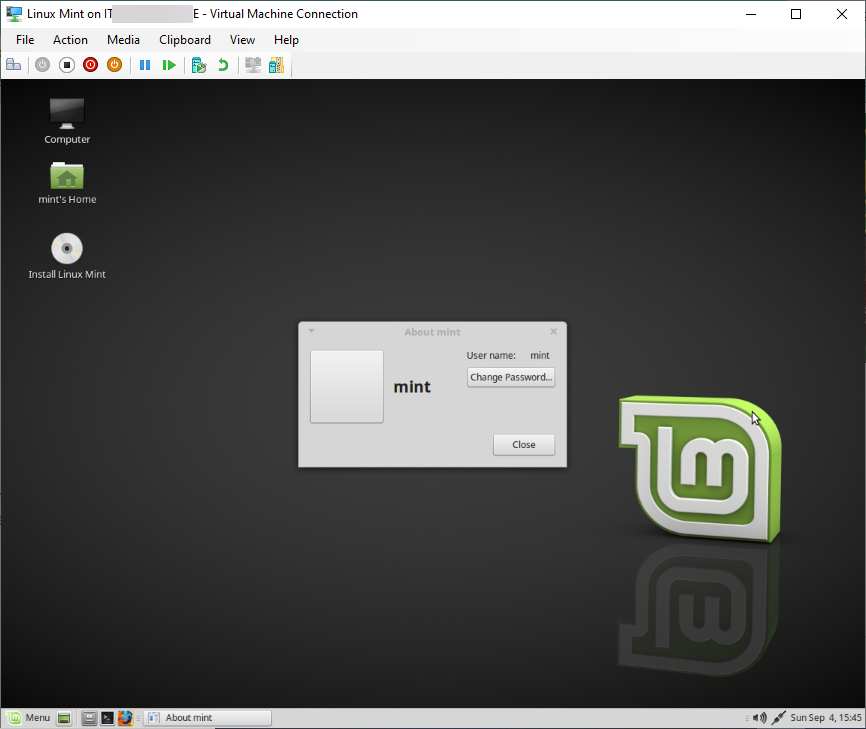
1. Select your newly-created VM from the list, and click Connect (right pane) under your guest OS section (Linux Mint) to run the VM. A separate console opens where you can access your guest OS.
2. Next, click Start to begin the installation of the OS on your VM.
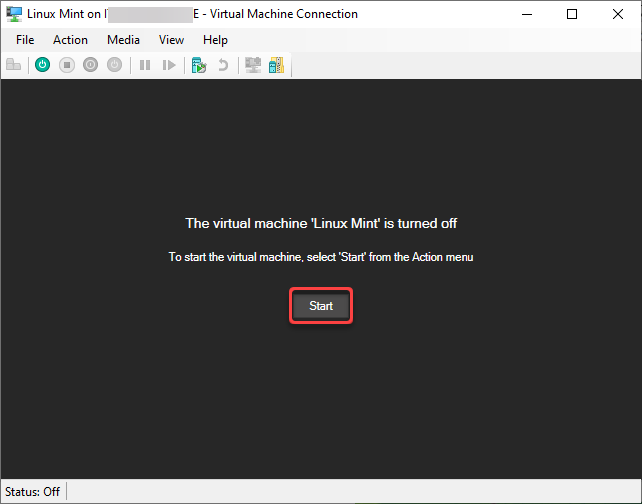
Once installed, your guest OS boots on your VM, as shown below.
3. Now, right-click on your VM and choose either of the following options to power down your VM:
- Turn Off – The virtual equivalent of removing power to a physical computer.
- Shut Down – Instructs the guest OS to perform an orderly shutdown.

Pausing and Resuming a VM
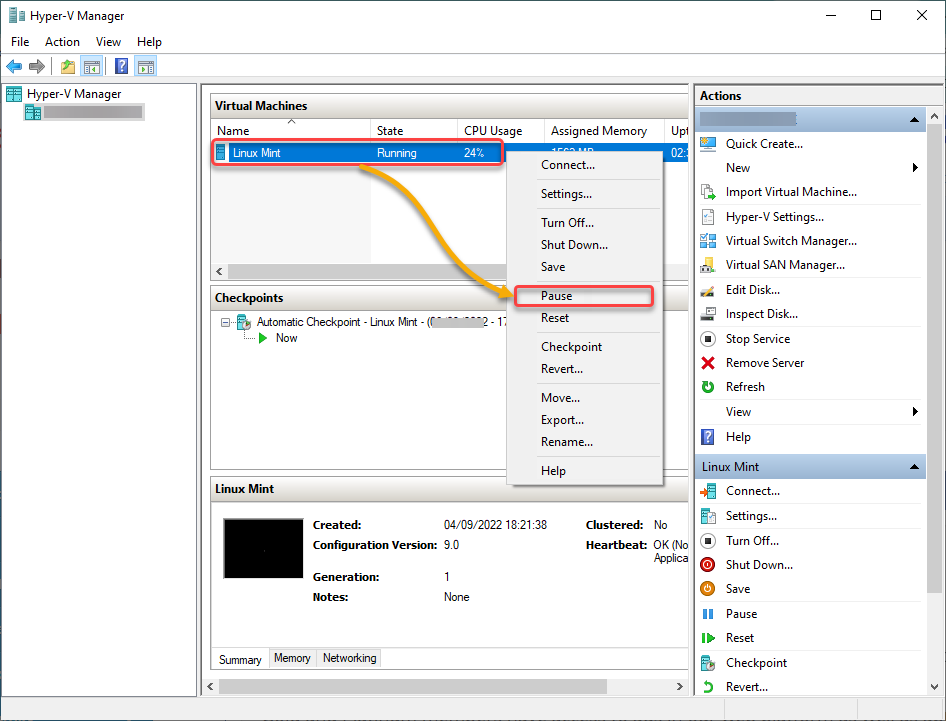
Pausing a VM in Hyper-V is similar to suspending VM in VMware, freezing the VM temporarily. But note that pausing a VM does not release its allocated memory. As a result, memory is not available to start other VMs.
Select and right-click your VM from the list, and choose Pause in the context menu to pause the selected VM.
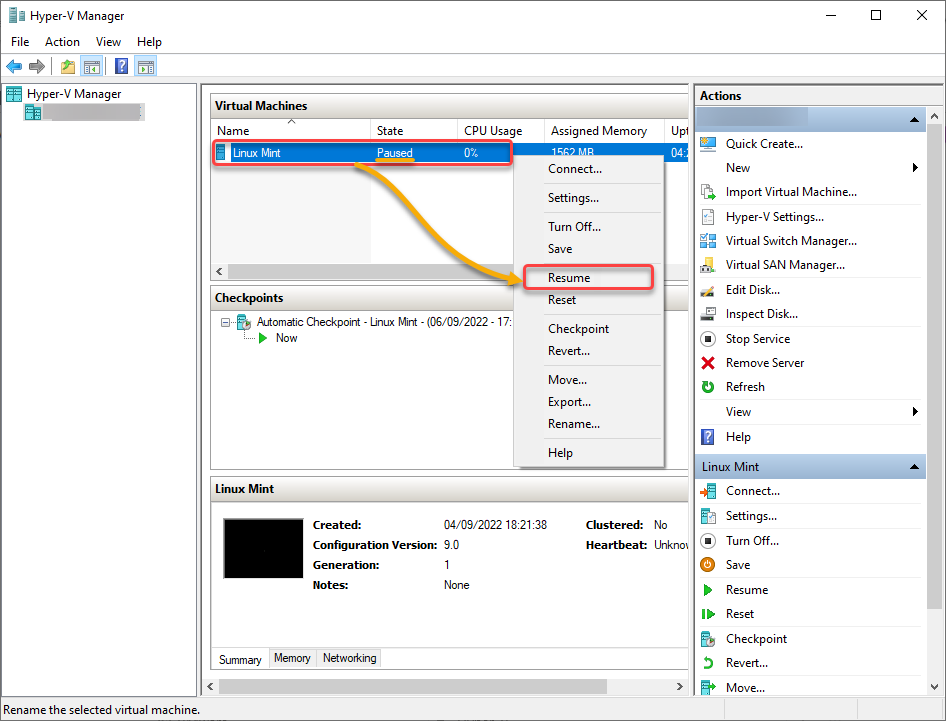
Now, right-click on your paused VM, and choose resume in the context menu to resume your VM.
Configuring Network in a Hyper-V Workstation
You can’t leave your VM as it is without configuring its network. With Hyper-V, configuring your VM’s network is similar to VMware but with different steps and features.
Note that you can only add or remove a virtual adapter while the VM is off. But most of the settings can be changed while the VM is online.
To configure your VM’s network:
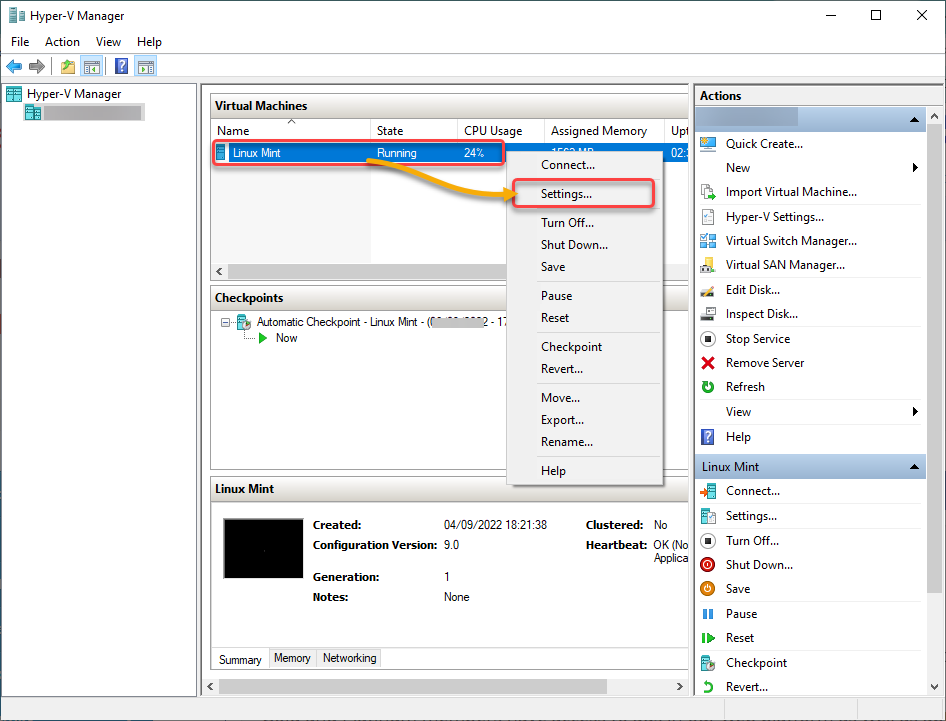
Right click on your VM, and choose Settings to access the VM settings.
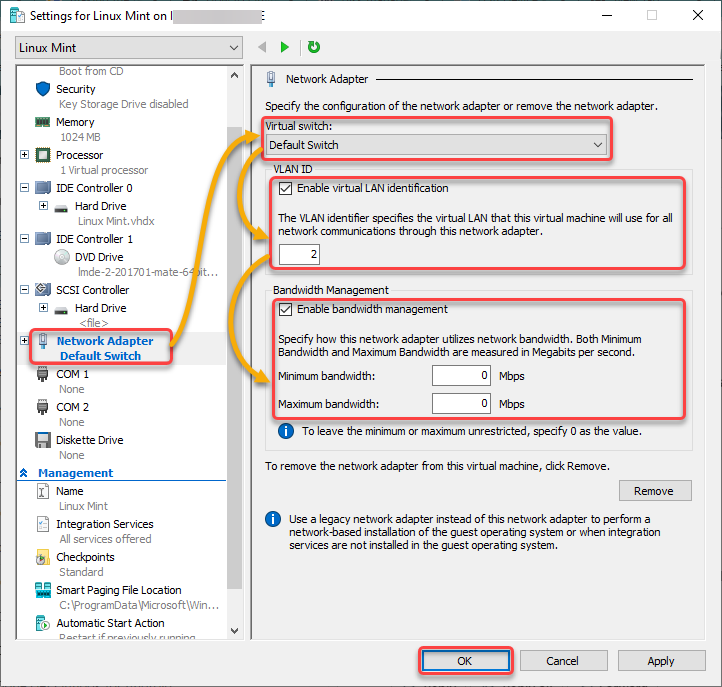
Now, configure the network for your VM with the following:
- Select Network Adapter in the left panel to access your VM’s network adapter configuration.
- Choose the Default Switch option from the Virtual switch dropdown.
- Tick the Enable Virtual LAN identification box to place the virtual adapter in a specific Virtual LAN (VLAN).
- Tick the Enable bandwidth management box, and adjust the Minimum and Maximum bandwidth to shape the traffic characteristics of your virtual adapter.
- Click OK to save your VM’s network configuration.
Saving and Reverting to a Checkpoint
Checkpoints allow you to save the VM state at a particular time, like the snapshots in VMware. These checkpoints are helpful when you plan to adopt some new changes to the system. If an unexpected error occurs, you can always revert a VM to a previous state, discarding all the changes made.
To save a checkpoint for your VM:
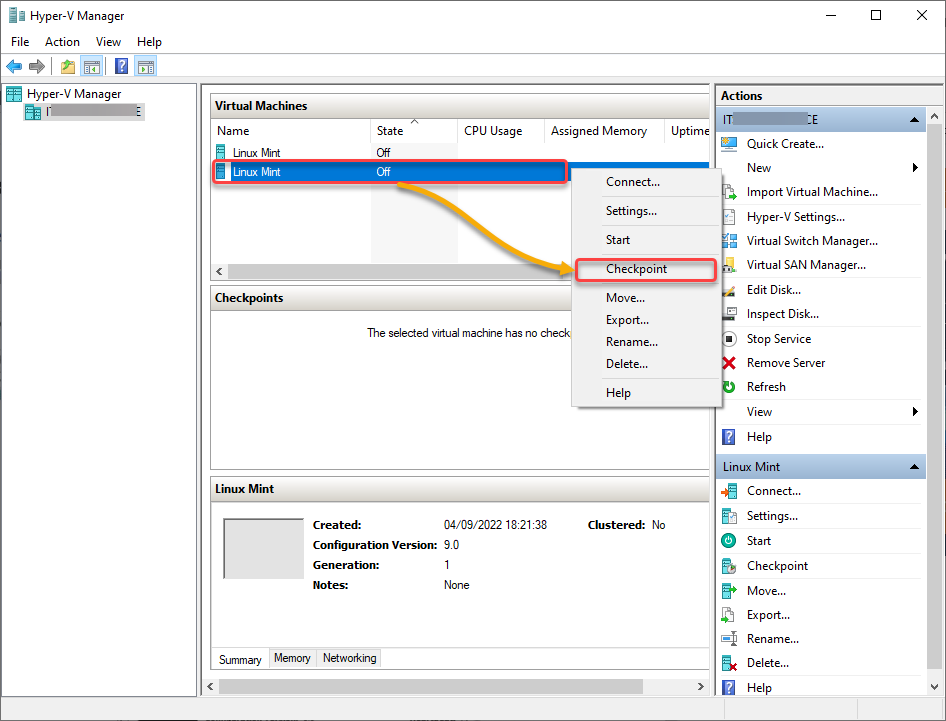
1. Select, and right-click the VM to create a checkpoint, and select Checkpoint in the context menu to initiate creating a checkpoint.
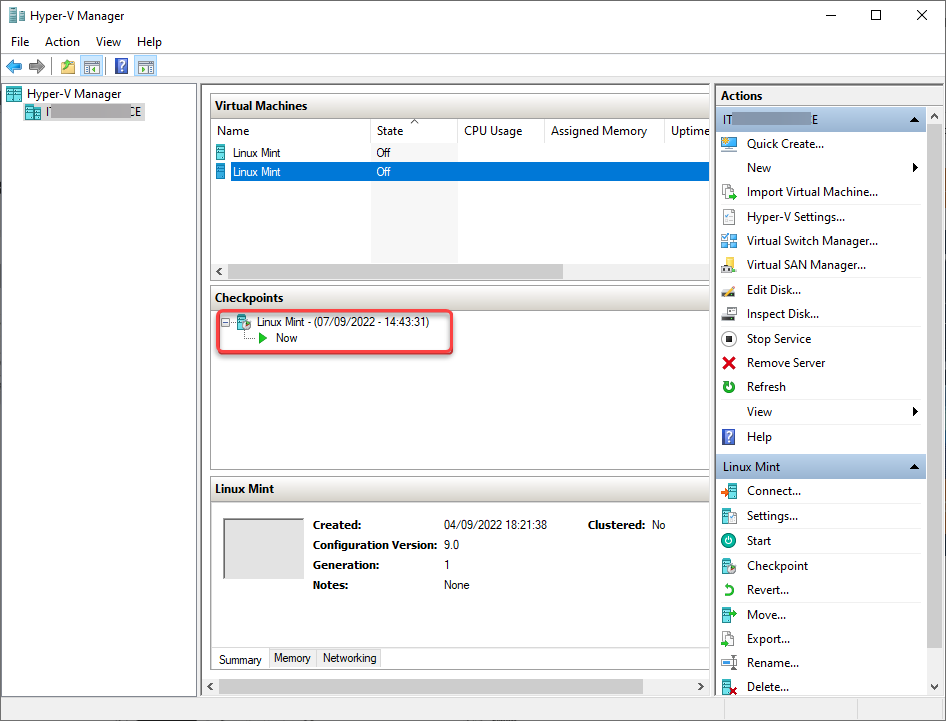
As shown below, the checkpoint is created and can be accessed in the Checkpoints section.
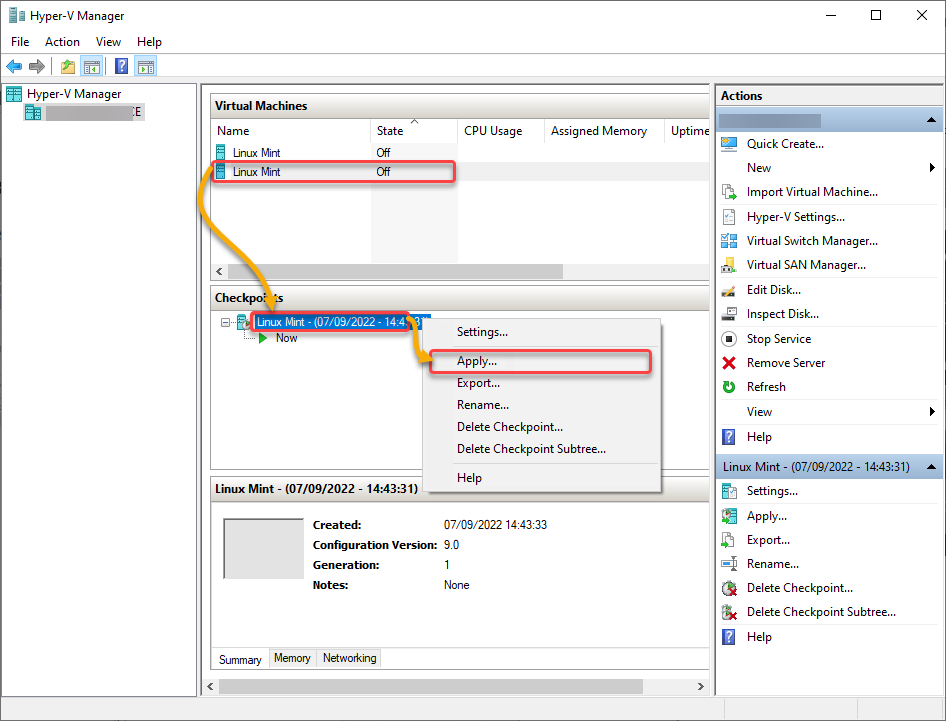
2. Select your VM, right-click on the checkpoint to revert to, and select Apply to revert to the selected checkpoint.
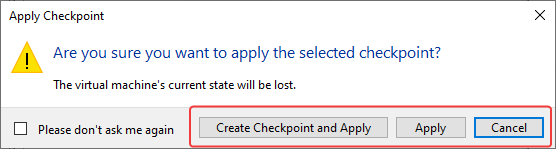
3. Now, choose an option in the dialog box shown below, where the options function as follows:
- Create Checkpoint and Apply – Before the chosen checkpoint is applied, a new checkpoint of the VM is created.
- Apply – Only the chosen checkpoint is applied. Note that this action cannot be undone.
- Cancel – The dialog box will be closed without applying any changes.
Setting a VM’s Automatic Stop Action
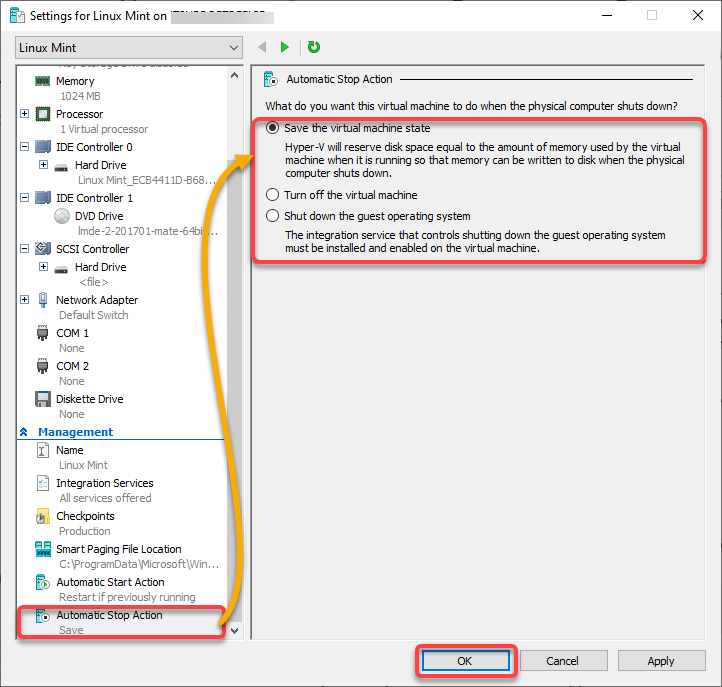
A machine tends to shut down unexpectedly at some point, which causes you to lose your work on your VM. As a resolution, you may want to change the Automatic Stop Action set on your VM, which is Hyper-V’s behavior towards your VM when your computer shuts down.
Set your Automatic Stop Action with the following:
- On your VM’s Settings window, navigate to Automatic Stop Action (left panel).
- Choose the Save the virtual machine state option to reserve, and save your VM’s state as your computer shuts down or restarts. This option tells Hyper-V to start your VM running before a shutdown or restart automatically at the next startup.
- Click OK to save the changes.
Conclusion
Throughout this tutorial, you’ve learned how to create and manage multiple virtual instances of the physical hardware devices via VMware Workstation or Hyper-V.
At this point, you can confidently set up and run your VMs efficiently with minimal effort and cost. Maximize the benefit of either virtualization platform covered in this tutorial, depending on your preferences and specific business needs!


