


Do you manage Hyper-V virtual machines (VM) and want to put in place a disaster recovery plan? You can get started with Hyper-V replication. Things can go wrong, and they probably will. And if you only have one copy of your virtual machines, then you’re preparing yourself for a world of pain.
Not a reader? Watch this related video tutorial!Having one or more replicas of your VMs, especially the critical ones, doesn’t need to be complex and expensive. Microsoft baked a built-in replication feature into Hyper-V, which you can set up without the complication of introducing third-party software or appliance into your infrastructure.
If you’re ready to learn how to enable Hyper-V replication and be ready to prevent possible catastrophic data loss, then let’s get started!
Prerequisites
This tutorial will be a hands-on demonstration. If you’d like to follow along, be sure you have the following:
Two Hyper-V host servers. These two hosts can be in an Active Directory (AD) domain or a workgroup. This tutorial will be using two servers with the following details.
| Hostname | IP Address | Designation | Location | Operating System |
| hyperv-ny | 10.1.0.4 | Primary Server | Primary Site | Windows Server 2019 Datacenter (version 1809) |
| hyperv-wa | 10.0.0.4 | Replica Server | Secondary Site | Windows Server 2019 Datacenter (version 1809) |
The primary Hyper-V host must have at least one guest virtual machine to replicate. In this tutorial, the primary host will have one guest VM named webserver.
For more details on Hyper-V system requirements, refer to System requirements for Hyper-V on Windows Server.
Preparing the Hosts for Hyper-V Replication
Assuming that you already have the prerequisites in place, don’t think about starting the Hyper-V replication yet. Before replicating virtual machines, there are still several preparations to do. Below are the general items that you need to check off before everything is ready.
Allowing Hyper-V Replication Traffic
This section only applies if you’re using Windows Firewall on your Hyper-V hosts. If not, you can skip to the next part.
Or, if you’re currently using Windows Firewall and want to disable it altogether, read How to Disable or Turn Off the Windows Firewall (All the Ways).
When you install the Hyper-V role on the server, Windows creates two additional inbound rules in the Windows Firewall. These two rules control whether to allow Hyper-V replication traffic, and they are:
- Hyper-V Replica HTTP Listener (TCP-In) – Inbound rule for Hyper-V Replica listener to accept HTTP connection for replication (via port 80, not encrypted).
- Hyper-V Replica HTTPS Listener (TCP-In) – Inbound rule for Hyper-V Replica listener to accept HTTPS connection for replication (via port 443, encrypted with certificate).
By default, these Windows Firewalls are disabled, effectively blocking Hyper-V replication traffic to the host. But the focus of this tutorial is to set up Hyper-V replication via HTTPS only and not HTTP.
To enable the Hyper-V replication firewall rule, follow these steps.
1. Log in to the replica server and open PowerShell as admin.
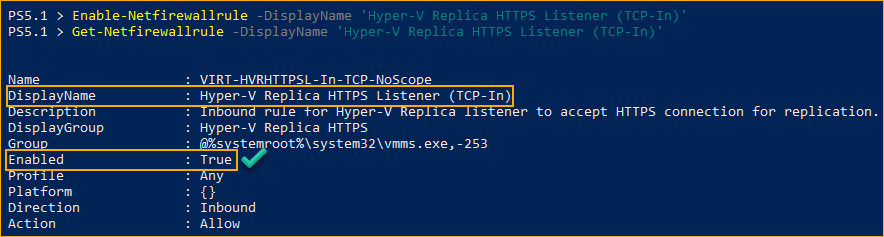
2. Run the Enable-Netfirewallrule command below in PowerShell to enable the rule.
# Enable Hyper-V HTTPS replication traffic firewall rule.
Enable-Netfirewallrule -DisplayName 'Hyper-V Replica HTTPS Listener (TCP-In)'
3. Lastly, to confirm that you’ve successfully enabled the firewall rules, run the command below.
Get-Netfirewallrule -DisplayName 'Hyper-V Replica HTTPS Listener (TCP-In)'If everything went well, you should see a result similar to the screenshot below.
Setting Up the Hyper-V Host Records
If your Hyper-V hosts can resolve each other’s names through DNS lookup, you can skip this section.
When it is time to enable Hyper-V replication, you will specify the replica server’s name during the configuration. Whether Hyper-V can find the secondary server by name depends on proper name resolution.
To ensure that the Hyper-V nodes can find each other’s names in the network, you’ll need to edit the hosts file on both servers and add their respective names and IP addresses. To do so, proceed as follows.
- On the primary server, open PowerShell as admin.
2. Run the command below to open the hosts file in notepad.exe for editing.
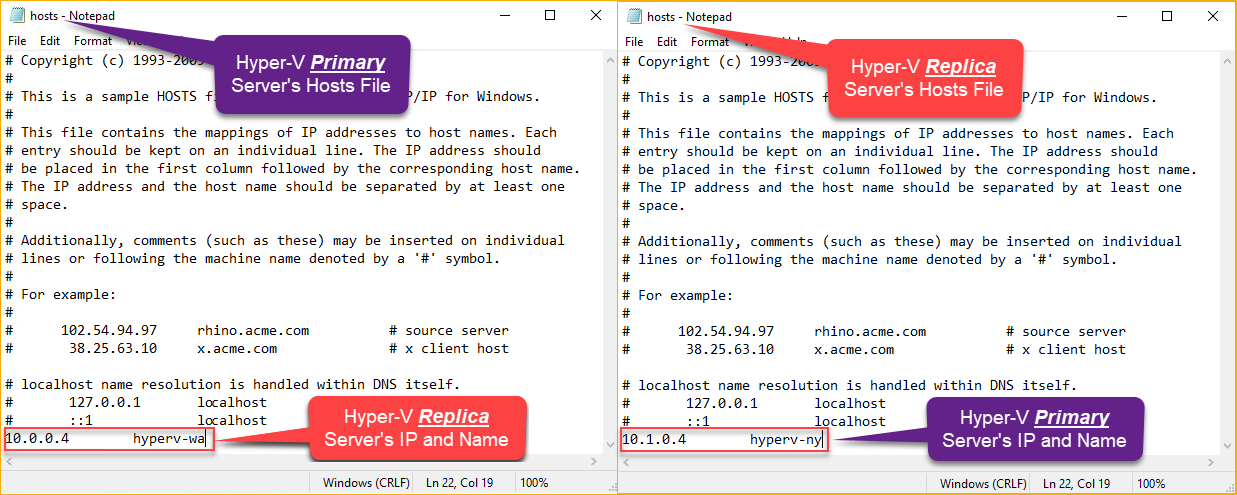
notepad.exe "$env:windir\system32\drivers\etc\hosts"3. Once the hosts file is open, scroll down to the bottom of the text editor and add the replica server’s IP address and name as follows.
Make sure to use your IP address and server name instead.
10.1.0.4 hyperv-wa4. After editing the file, press CTRL+S or click File —> Save to save the changes.
5. Repeat the same steps on the replica server and add the primary server’s name and IP address to the replica server’s hosts file. The screenshot below shows the side-by-side end state of both server’s hosts files.
Creating Self-Signed Certificates
This section only applies if your Hyper-V replication will use certificate-based authentication (HTTPS). If the Hyper-V hosts are domain-joined and will use Kerberos authentication (HTTP), you can skip this section.
Hyper-V replication via HTTPS requires that both the primary and replica hosts use a certificate issued by a common issuer. Hyper-V uses these certificates to authenticate the primary server to the replica server.
Instead of buying certificates from an external certificate provider, like DigiCert or NameCheap, you can generate self-signed certificates for use with Hyper-V replication for free.
For certificate-based authentication between two Hyper-V hosts, you will need three certificates. A root certificate and a server certificate for each host. Follow the below steps to generate these certificates.
1. On the primary host server, open PowerShell as admin.
2. Next, define the following variables by running the commands below in PowerShell. Refer to the inline comments to understand each variable and replace their values as necessary.
# Setup the Certificates Variables

## Specify the name of the new Root CA certificate.
$rootCA_Name = 'Hyper-V Root CA'

## Specify the Hyper-V server names.
$hostnames = @('hyperv-ny','hyperv-wa')

## What is the password for the exported PFX certificates.
$CertPassword = 'this is a strong password' | ConvertTo-SecureString -Force -AsPlainText

## Where to export the PFX certificate after creating. Make sure that this folder exists.
$CertFolder = 'C:\HPVCerts'
3. After defining the certificate variables, run the command below to generate the root certificate. This command creates a self-signed root certificate using the New-SelfSignedCertificate cmdlet in the server’s Personal Certificate store.
## Create and save the Root CA certificate into the 'Personal' certificates store.
## Valid for 10 years.
$rootCA = New-SelfSignedCertificate `
-Subject $rootCA_Name  `
-FriendlyName $rootCA_Name `
-KeyExportPolicy Exportable  `
-KeyUsage CertSign  `
-KeyLength 2048  `
-KeyUsageProperty All  `
-KeyAlgorithm 'RSA'  `
-HashAlgorithm 'SHA256'  `
-Provider "Microsoft Enhanced RSA and AES Cryptographic Provider"  `
-NotAfter (Get-Date).AddYears(10)
4. To make the server trust the root certificate itself, copy the root certificate to the Trusted Root Certification Authorities Certificate Store by executing the command below.
## Copy the Root CA from the 'Personal' store to the 'Trusted Root Certification Authorities' store.
$rootStore = [System.Security.Cryptography.X509Certificates.X509Store]::new("Root","LocalMachine")
$rootStore.Open("ReadWrite")
$rootStore.Add($rootCA)
$rootStore.Close()
5. Next, run the command below to export the root certificate to a file using the Export-PfxCertificate cmdlet. You need to export the certificate so that you can copy it to the replica server later on.
## Export the Root CA
$rootCA | Export-PfxCertificate -FilePath "$CertFolder\$($rootCA_Name).pfx" -Password $CertPassword -Force
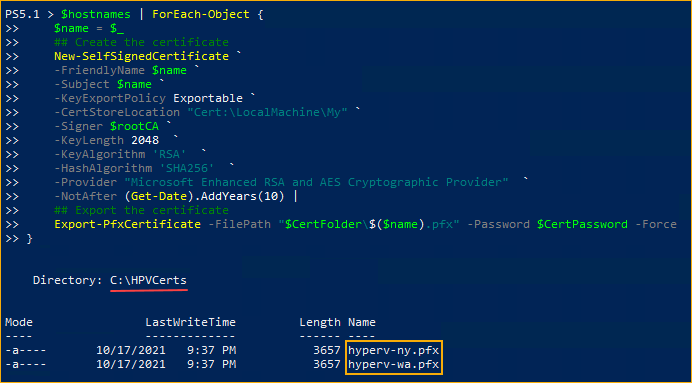
6. Now, generate the server certificates signed by the root certificate you have created. Run the command below to create the server certificates for each Hyper-V host and export each certificate to a file.
$hostnames | ForEach-Object {
	$name = $_
	## Create the certificate
	New-SelfSignedCertificate `
	-FriendlyName $name `
	-Subject $name `
	-KeyExportPolicy Exportable `
	-CertStoreLocation "Cert:\LocalMachine\My" `
	-Signer $rootCA `
	-KeyLength 2048  `
	-KeyAlgorithm 'RSA'  `
	-HashAlgorithm 'SHA256'  `
	-Provider "Microsoft Enhanced RSA and AES Cryptographic Provider"  `
	-NotAfter (Get-Date).AddYears(10) |
	## Export the certificate
	Export-PfxCertificate -FilePath "$CertFolder\$($name).pfx" -Password $CertPassword -Force
}
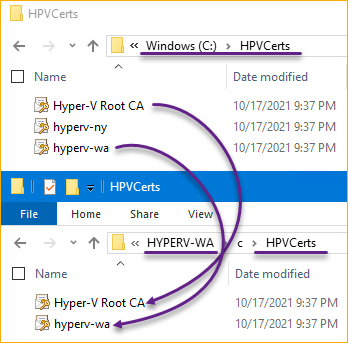
7. Finally, copy the root certificate file (Hyper-V Root CA.pfx) and the replica server certificate file (hyperv-wa.pfx) to the replica server.
Installing the Certificates on the Replica Host
To make the certificate-based authentication work between the two Hyper-V hosts, the same root certificate and server certificate need to be present in the replica host, too. Follow the steps below to install the root and server certificates.
1. On the replica host, open PowerShell as admin.
To install the root certificate into the Trusted Root Certification Authorities store, run the Import- PfxCertificate command below. Make sure to change the variable values as necessary.
## Specify the name of the Root CA certificate.
$rootCA_Name = 'Hyper-V Root CA'

## Where to find the PFX certificate files.
$CertFolder = 'C:\HPVCerts'

## What is the password for the exported PFX certificates.
$CertPassword = 'this is a strong password' | ConvertTo-SecureString -Force -AsPlainText

## Import the Root CA
Import-PfxCertificate  "$CertFolder\$($rootCA_Name).pfx" -CertStoreLocation Cert:\LocalMachine\Root -Password $CertPassword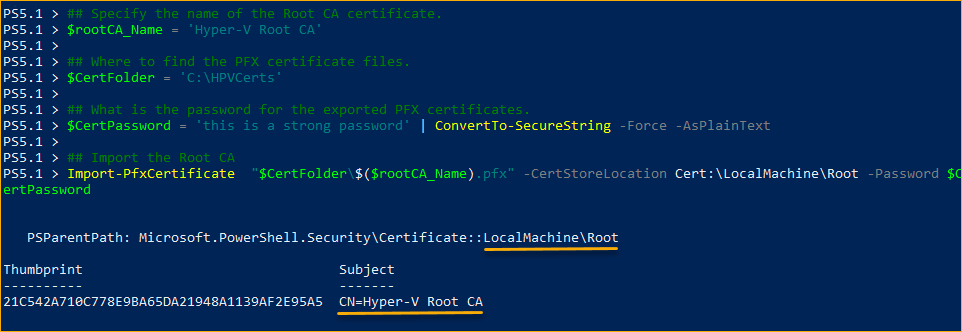
3. To install the server certificate into the Personal Certificate store, run the command below.
## Import the Server Certificate
Import-PfxCertificate  "$CertFolder\$($env:COMPUTERNAME).pfx" -CertStoreLocation Cert:\LocalMachine\My -Password $CertPassword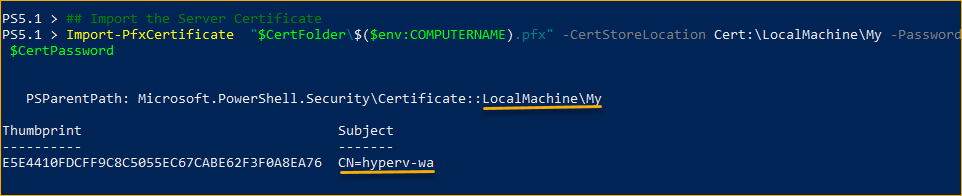
4. Lastly, configure the Hyper-V registry to disable the checking for certificate revocation. Doing so, Hyper-V will not try to check the certificate’s revocation details – which does not exist in the self-signed certificate. Run the following New-ItemProperty PowerShell command.
## Disable Hyper-V Certificate Revocation Check.
New-ItemProperty -Path "HKLM:\SOFTWARE\Microsoft\Windows NT\CurrentVersion\Virtualization\Replication" -Name "DisableCertRevocationCheck" -Value 1 -PropertyType DWORD -ForceConfiguring Hyper-V Replication
You have now finished preparing your Hyper-V hosts. Now you can start enabling Hyper-V replication and start replicating VMs.
Enabling the Host as a Replica Server
Before a Hyper-V host can host VM replicas, the host must be enabled as a replica server first. To do so, proceed as follows.
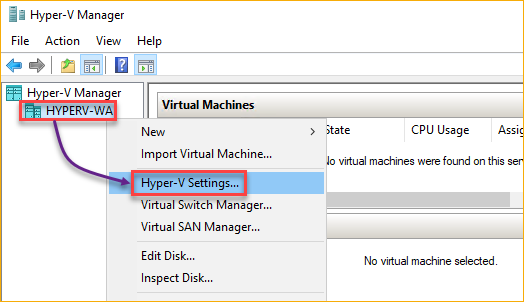
- On the replica host, open the Hyper-V Manager. To do so, run the
virtmgmt.msccommand in PowerShell. - While in the Hyper-V Manager window, right-click the replica server name and click Hyper-V settings.
3. Next, on the Hyper-V settings window, click Replication Configuration on the left pane.
On the right pane, check the box that says Enable this computer as a Replica server. Doing so will enable all the other configuration options below.
Under the Authentication and ports section, check the User certificate-based Authentication (HTTPS) box. Leave the port number value as 443.
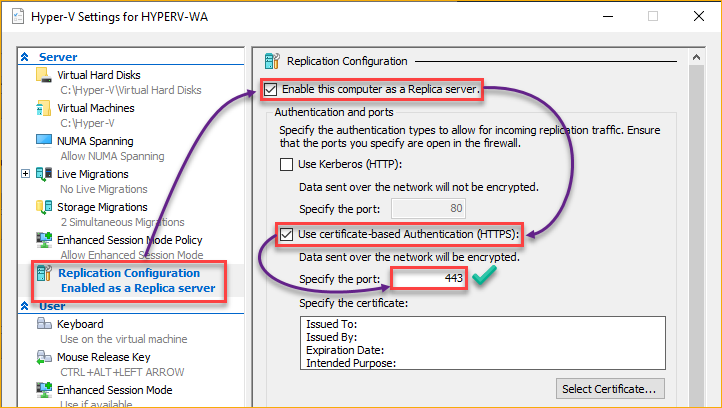
4. Under the Authentication and ports section, click Select Certificate. On the Windows Security pop-up box, confirm that the certificate is correct and click OK.
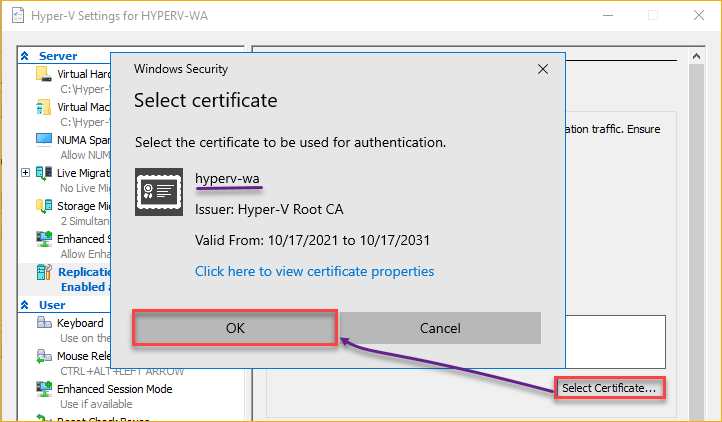
After selecting the certificate, you should see that the Specify the certificate box now shows the certificate details.

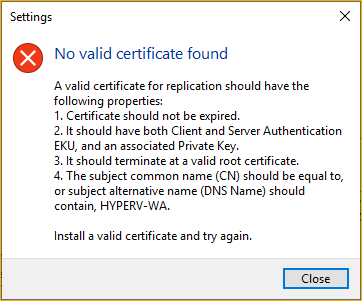
Note: If there is no valid certificate or you have not installed the certificate correctly, you will see an error similar to the image below. In which case, you’ll need to go back and install the certificate.
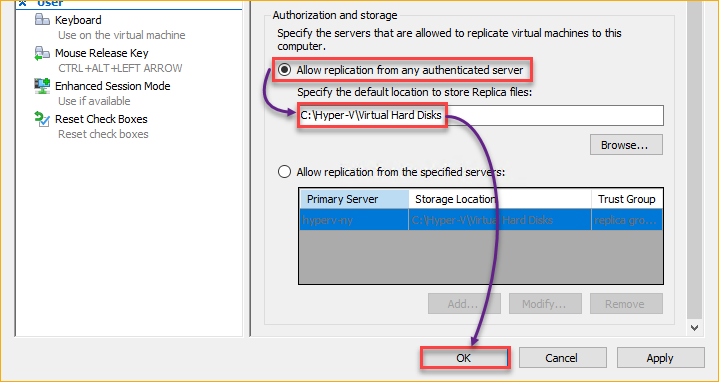
5. Next, under Authorization and storage, select Allow replication from any authenticated server. Doing so allows any Hyper-V server to replicate VMs to this server as long as the certificate-based authentication is successful.
To allow only specific servers for replication, select Allow replication from the specified servers option and add each server details instead.
Type in or browse the location where to store the replica files. In this example, the storage location is C:\Hyper-V\Virtual Hard Disks. Make sure to choose a location with sufficient storage space to accommodate the VM replica files.
Finally, click OK to save the changes.
Enabling Virtual Machine Replication
So far, you have enabled the replica host to accept incoming Hyper-V replication for VMs. At this point, you’re ready to enable a VM to replicate. Follow the below steps to proceed.
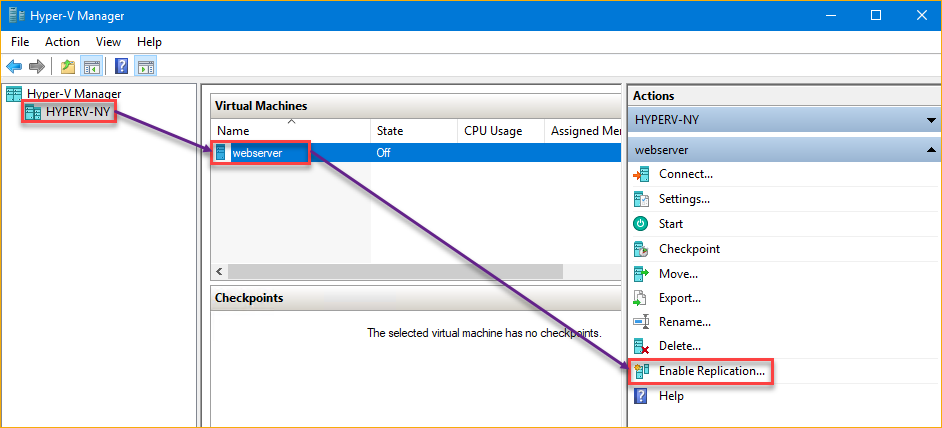
1. On the primary host, open the Hyper-V Manager window.
2. Next, click the Hyper-V server on the left pane. Under the list of VMs, click the VM you intend to replicate and click Enable replication under the Actions pane.
3. On the Enable Replication for <VM name> windows that popped up, click Next on the Before you begin page.
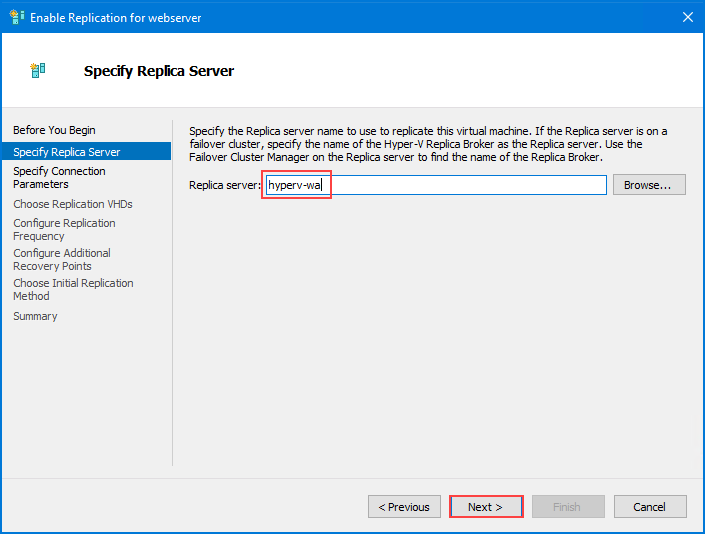
4. On the Specify Replica Server page, type the replica server’s hostname in the Replica server box, and click Next.
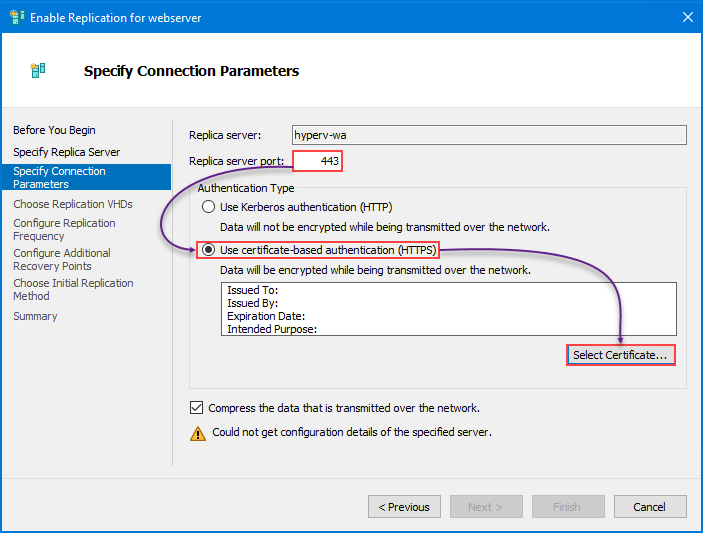
5. Now, on the Specify Connection Parameters page, change the Replica server port number to 443.
Under the Authentication Type options, click to select User certificate-based authentication (HTTPS).
You’ll notice that the certificate information at this point is empty. To choose a certificate, click Select Certificate.
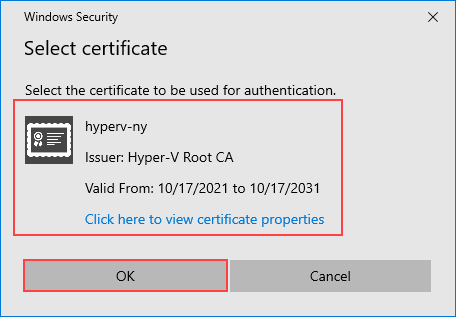
6. Next, on the Select certificate dialog box, click to select the certificate you previously generated that bears the primary host’s server name. After selecting the certificate, click OK.
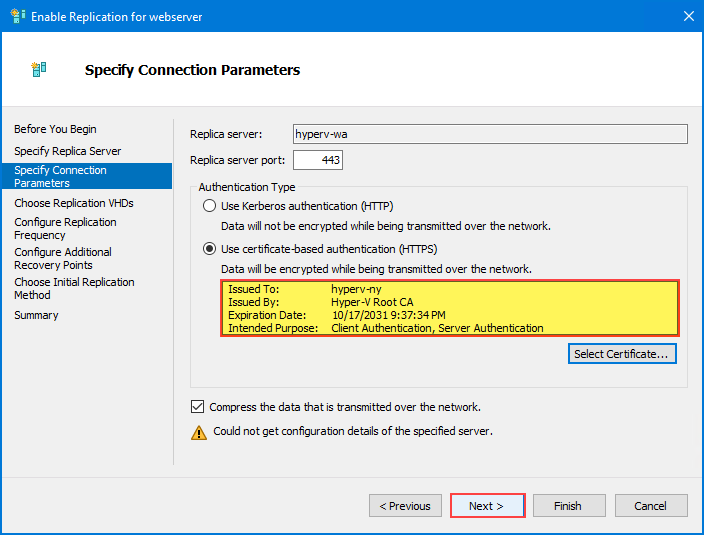
7. After you’ve selected the certificate, you should now see the certificate information, as you can see below. Click Next to proceed.
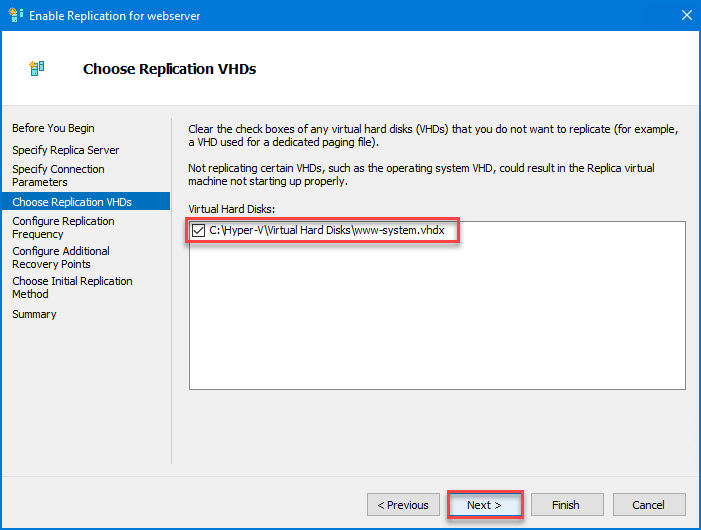
8. Next, select which Virtual Hard Disks (VHD) to include in the replication. If there is more than one VHD, make sure to select the VHD containing the VM’s operating system. The example below only has one VHD. After making your selection, click Next.
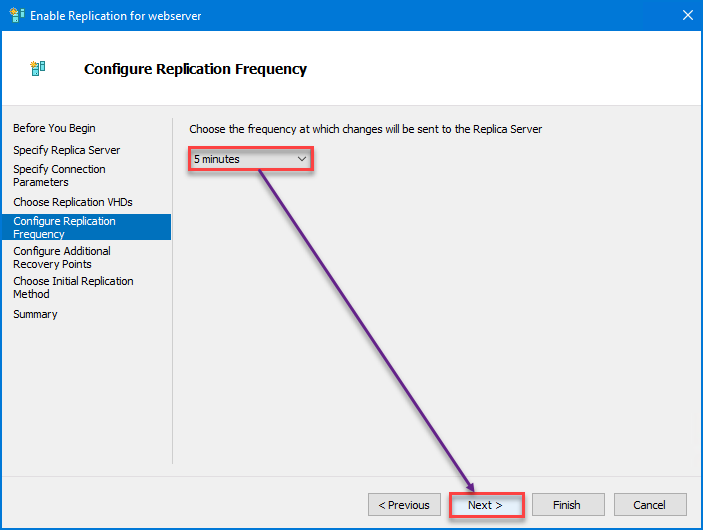
9. On the next page, choose the replication interval from the dropdown list. This value determines how frequently Hyper-V sends changes to the replica server. The default interval is 5 minutes. Other available options are 30 seconds and 15 minutes. Click Next.
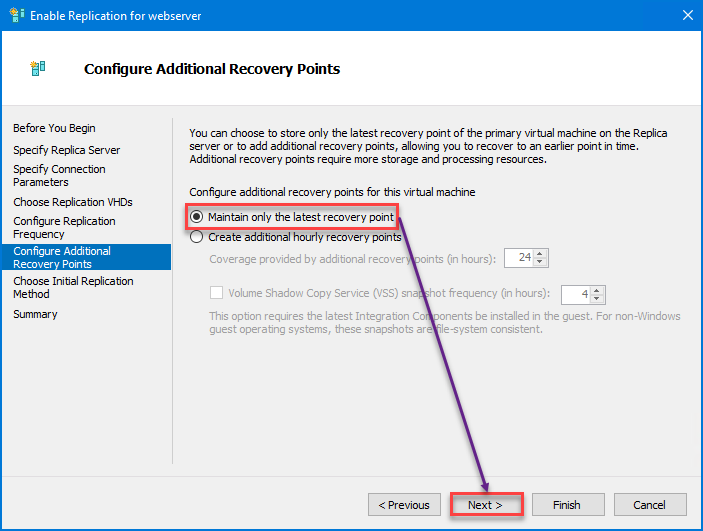
10. On the Configure Additional Recovery Points page, click the option to Maintain only the latest recovery point.
Choosing this option, Hyper-V will only maintain the VM’s latest recovery point or state on the replica server. This option uses the least storage space but only enables a single point in time recovery. Click Next to proceed.
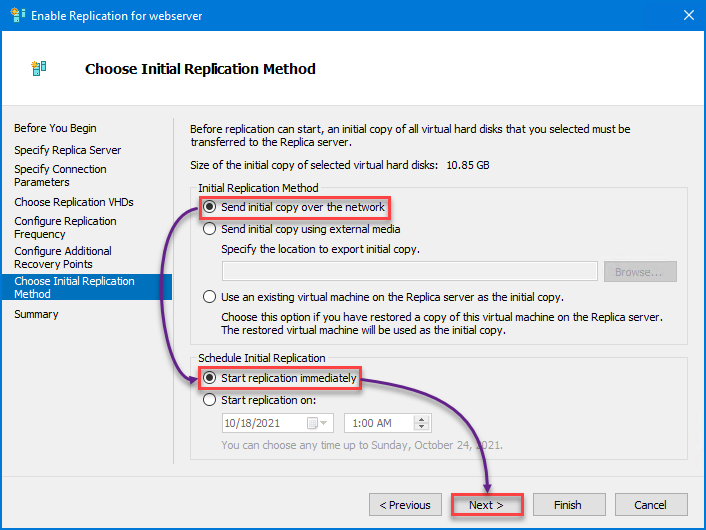
11. On the Choose Initial Replication Method, there are three options on how you want to send the initial copy of the VHD to the replica server:
- Send initial copy over the network. This option copies the VHD through the network.
- Send initial copy using external media. Choosing this option allows you to save the VHD copy to external storage, such as an external hard drive. You can then physically transport the storage and attach it to the replica server for copying.
- Use an existing virtual machine on the Replica server as the initial copy. This option is applicable only if you’ve already restored a copy of the VM to the replica server.
Whichever option you choose in real life depends on your assessment. But for this tutorial, select Send initial copy over the network.
Next, select Start replication immediately to kickstart the replication process as soon as you’ve finished configuring.
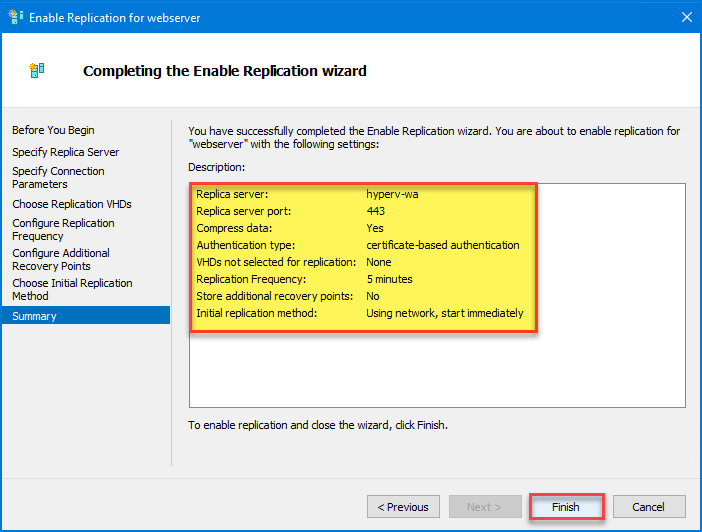
12. On the Summary page, review the replication configuration, and click Finish to finalize.
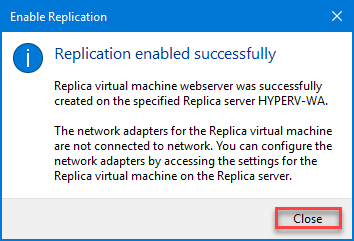
13. Wait for the confirmation message saying that the Replication enabled successfully. Click Close to go back to the Hyper-V Manager window.
Hyper-V replication replicates the virtual machine, its configuration, and VHDs. But the resulting replica on the replica server is not connected. As you can see below, you still need to configure the replica VM’s network connection.
Checking Replication Health
So you’ve enabled the Hyper-V replication for your selected VM. How do you know whether the Hyper-V replication is still in progress, completed, or has it failed? Fortunately, Hyper-V gives you the convenience to check the replication health right inside the Hyper-V Manager.
To check the VM replication health, proceed as follows.
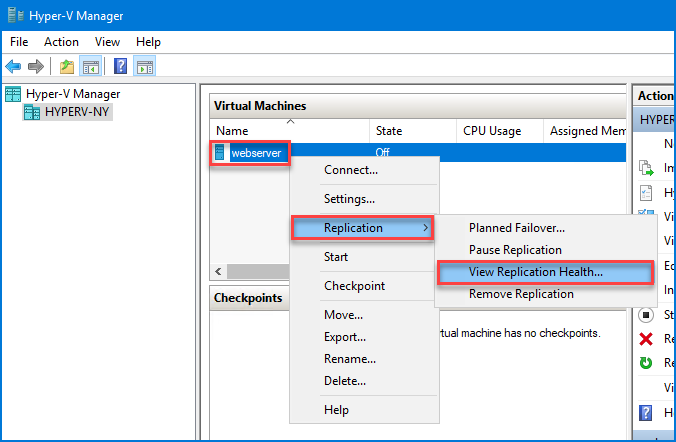
Right click the VM name on the primary host Hyper-V Manager window —> Replication —> View Replication Health.
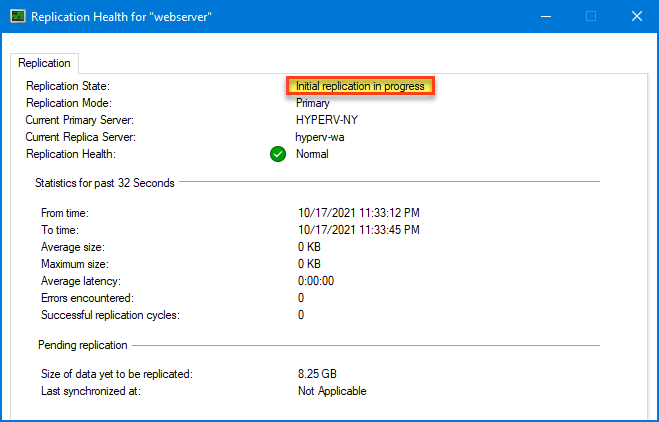
Initially, you will see a Replication State message like the screenshot below shows, which indicates that replication is still in progress.
And when Hyper-V replication has finished, you should see a message similar to the one below.
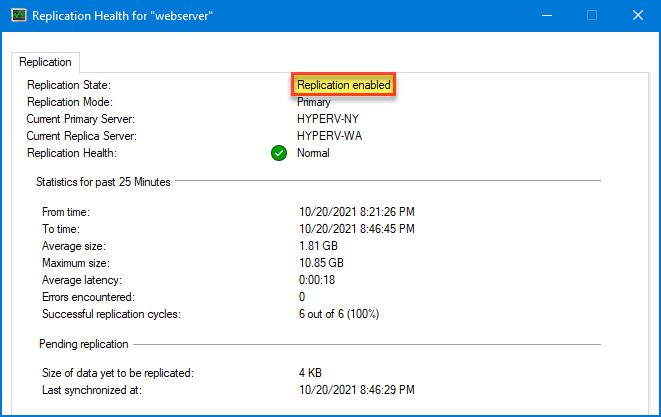
And that’s it! You’ve successfully set up Hyper-V replication for your VM.
Conclusion
In the end, setting up Hyper-V replication is something that system admins should consider when planning and implementing disaster recovery. Doing so can be less expensive than losing data or extended service downtimes. Imagine if your payroll server goes offline?
Have you used Hyper-V replication? What did you think? Would you recommend it to others, or is there any reason you believe organizations should stay away from it?


