


“Why would you disable or turn off the Windows Firewall?”
Not a reader? Watch this related video tutorial!There are many reasons one would disable the firewall in Windows. Not every reason is sound, of course, but there are legitimate ones.
In this article, you will learn the many ways to disable the Windows firewall. Whether you’re in a single-machine setup, home network, or a corporate environment, this article is for you.
You’re going to learn how to turn off the software firewall in Windows in just about every way possible!
- Using the Windows firewall management console
- The command-line (cmd.exe)
- PowerShell
- Group policy
- Even Azure Custom Script extension if you’re on an Azure virtual machines
Let’s dig in!
Prerequisites
Since this article is a how-to, there are some requirements that you need to follow along with the instructions. Some examples involve domain and non-domain environment.
For a Non-Domain Environment
- One or more computers that are running on Windows 10. You can do the examples here in just one computer, but some instructions are specific to remoting.
- And you must have administrator permissions on those Windows 10 computers.
For a Domain Environment
- A Windows 2019 server that is also a domain controller. A Windows 2016 server should also work.
- One or more Windows 10 computers in the same network and joined to the domain.
Using the GUI
Probably the quickest way to disable the firewall is using the included GUI tools in Windows. Using the GUI is probably the easiest way to turn off the Windows firewall for home users.
Using the Windows Security App
The first GUI tool to manage is the Windows Security App. The Windows Security app is available on Windows 10, version 1703, and later.
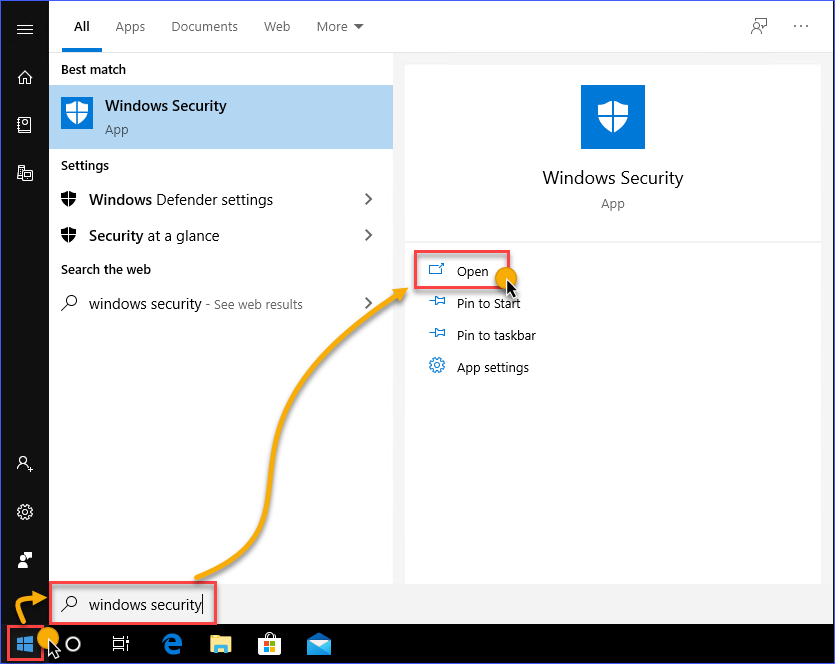
- Launch the Windows Security app by clicking on the Start button, and start typing Windows Security. The search result would show the Windows Security app, click on Open.
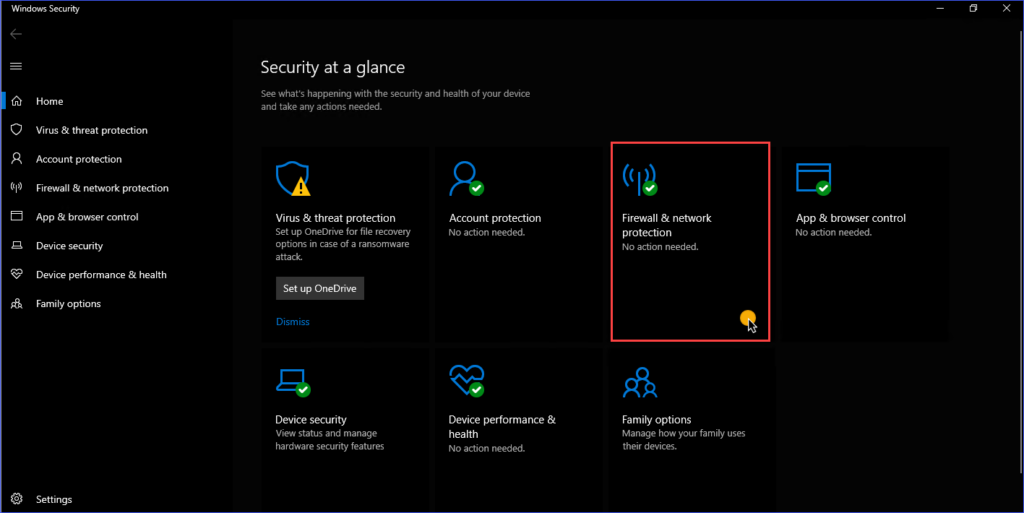
2. You will see different menu items in the Windows Security app home. Look for Firewall & network protection and click to open it.
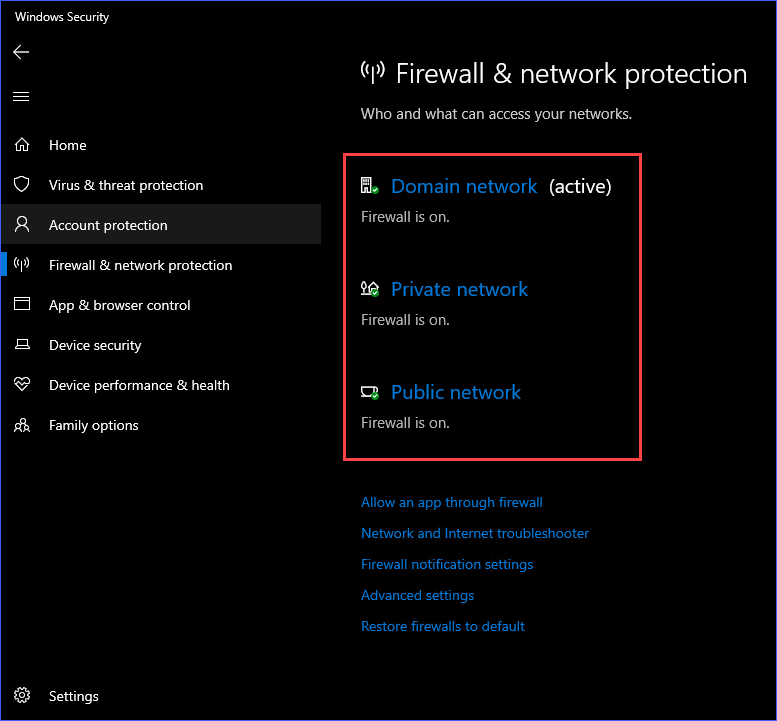
3. On the Firewall & network protection page, you should see the different network profiles listed. These network profiles are Domain Network, Private Network, and Public Network. You can turn off the firewall for each of these network connection locations individually. In this example, you need to select the Private Network profile.
4. In this example, the Private Network profile is selected. Once inside the Private Network settings, click on the switch to turn off the Windows Defender Firewall.

Repeat the same steps for the other network profiles if you prefer.
Disable Windows Firewall Using the Windows Defender Firewall Control Panel
Another GUI tool is the Windows Defender Firewall Control Panel. As opposed to the Windows Security App which has the modern interface of a Windows 10 App, the Windows Defender Firewall Control Panel sports the same look of classic control panel items.
Below are several ways to launch the Windows Defender Firewall Control Panel
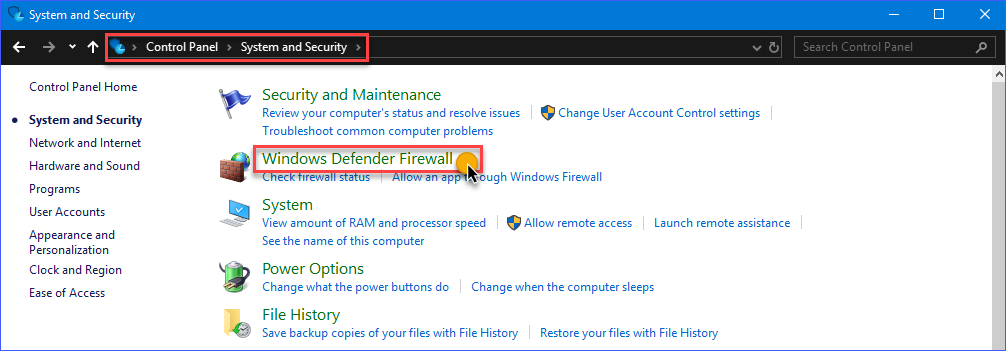
Method 1: Go to Control Panel —> System and Security —> Windows Defender Firewall.
Method 2: Open the Start menu and type windows defender firewall. Click on the Windows Defender Firewall link.

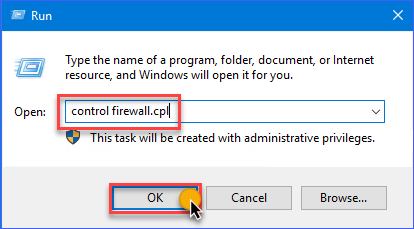
Method 3: Open the Run dialog box and type in the command control firewall.cpl and click OK.
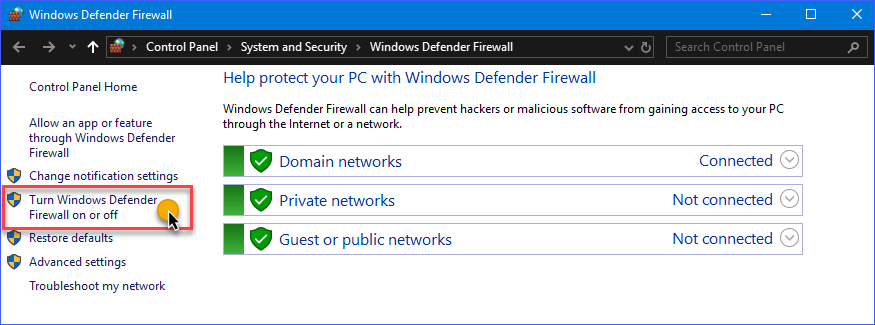
In the Windows Defender Firewall Control Panel, you should see a familiar list of network profiles; Domain networks, Private networks, and Guest or public networks. On the left-hand side, click on the Turn Windows Defender on or off link.
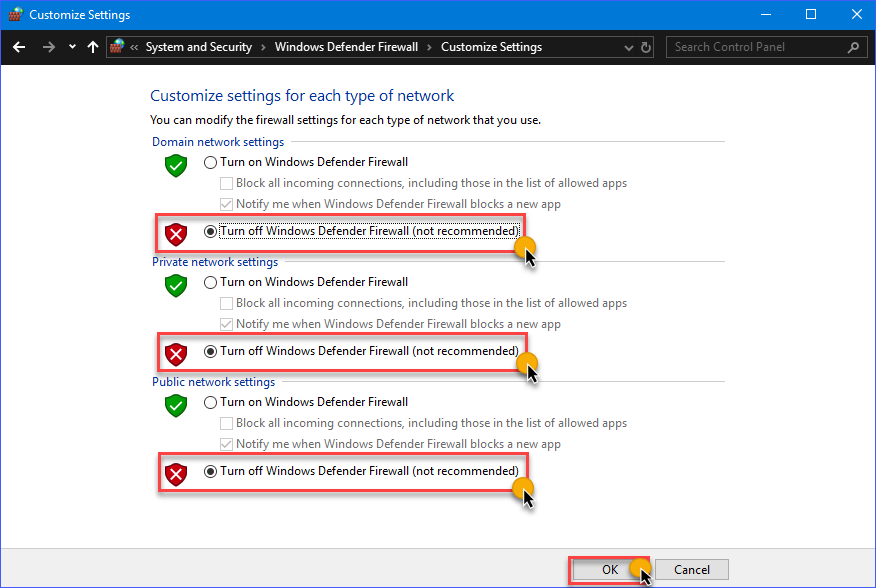
On the Customize Settings page, you’ll have the option to disable the Windows firewall for each network profile. In the example below, the Windows Firewall is turned off on all network profiles.
Using the Command-Line
As you may already know, most, if not all, of the GUI operations in Windows, have a command-line counterpart. Using the command-line is at times quicker, as opposed to going to different windows location when using the GUI options.
Additionally, the command-line options enable users to script or automate the task.
Turning off the Windows Firewall with the NETSH Command
An old but useful handy utility called netsh s ready for use to manage network configurations on a computer, or in this case, to disable the Windows Firewall.
Using netsh advfirewall set c you can disable the Windows Firewall individually on each location or all network profiles.
netsh advfirewall set currentprofile state off– this command will disable the firewall for the current network profile that is active or connected. For example, suppose the currently active network profile is Domain network. In that case, this command will the Firewall for that network profile.netsh advfirewall set domainprofile state off– disables on the Domain network profile only.netsh advfirewall set privateprofile state off– disables on the Private network profile only.netsh advfirewall set publicprofile state off– this command will disable on the Public network profile only.netsh advfirewall set allprofiles state off– this command will disable on all network profiles at once.
The demonstration below shows each of the commands above in action.

Learn more about Netsh Command Syntax, Contexts, and Formatting
Using the Set-NetFirewallProfile PowerShell Cmdlet
The NetSecurity PowerShell module is built-in to Windows 10, as well as Windows Server 2012, and above. This NetSecurity PowerShell module contains cmdlets related to network and network security configuration. One of these cmdlets is the Set-NetFirewallProfile which can be used to disable Windows Firewall.
The Set-NetFirewallProfile syntax is shown below.
# Disable Windows Firewall for each specified network profile
Set-NetFirewallProfile -Profile <PROFILE NAME> -Enabled False

# Disable Windows Firewall for ALL network profiles
Set-NetFirewallProfile -All -Enabled False
The command below will turn off the firewall on the Public, Private, and Domain network profiles.
Set-NetFirewallProfile -Profile Domain,Private,Public -Enabled False
The demonstration below shows how the Set-NetFirewallProfile works to disable Windows Firewall using the command above.

Without specifying any profile names, the example below shows how to disable Windows Firewall on all network profiles by using the -All parameter switch.

Turning off the Windows Firewall Remotely Using PowerShell
When you need to disable the firewall on many computers, it would be inefficient to manually login to each computer and run the commands. Especially in a network environment, you could disable remotely using PowerShell.
Note: This procedure requires that WinRM is already enabled on the target computer. In most cases, WinRM is already set up for domain-joined computers for remote management purposes.
Learn more: How to enable Windows Remote Shell
If you plan to disable Windows Firewall on one remote computer at a time, you can use the Enter-PsSession cmdlet to issue the commands to the remote computer.
In the example below, the command will be issued from the server named dc, and the remote computer name is desktop1. The command that will be used is shown below.
Enter-PsSession -ComputerName desktop1
Set-NetFirewallProfile -All -Enabled False
Running the code above in PowerShell would result in a similar output, as the demo below.

The above process is good only if you are working on a few remote computers. But, if you have a bulk of computers where you need to disable it, you will need an approach that is more adapted to scripting. For that, you can use the Invoke-Command cmdlet.
$computers = @('desktop1')
$computers | ForEach-Object {
	Invoke-Command -ComputerName $_ {
		Set-NetFirewallProfile -All -Enabled False
	}
}
As you can see from the above code, the name of the remote computers is stored in the $computers variable as an array. Then, PowerShell loops through each of the remote computers to run the Invoke-Command cmdlet and issue the Set-NetFirewallProfile -All -Enabled False command. Refer to the demo below for the expected result.

Using Group Policy
By deploying a GPO, systems admins can turn off the Windows Firewall for selected or all computers in the domain. Once deployed, disabling Windows Firewall will be automated as the configuration enforces it via policy on all computers that are in scope.
Creating the GPO
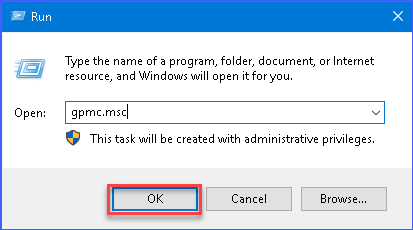
To create a GPO, you need to launch the Group Policy Management Console on the server. To do so, run gpmc.msc command in the Run dialog.
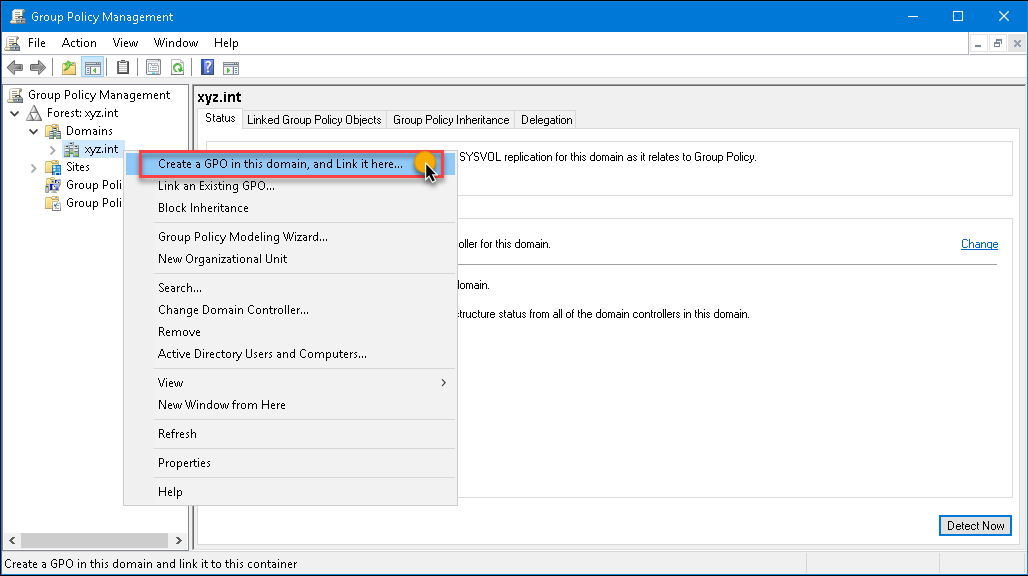
gpmc.msc command in the Run dialogIn the Group Policy Management console, expand the forest and then select the domain where you will create the GPO. In the image below, the GPO is created in the xyz.int domain. Right-click on the domain and click Create a GPO in this domain, and Link it here…
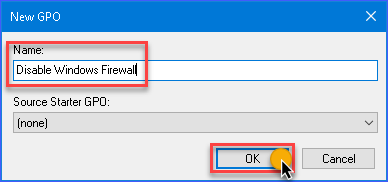
The New GPO dialog box will pop up. Type in Disable Windows Firewall in the Name box, then click on the OK button.
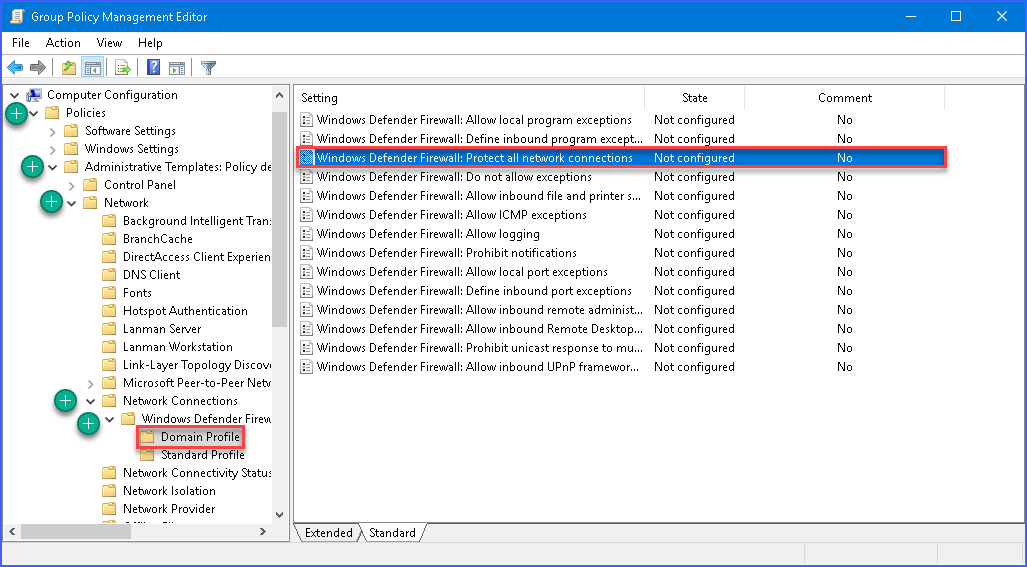
Next, right-click on the new GPO and click Edit. The GPO will open in the Group Policy Management Editor. Then, expand these folders Computer Configuration —> Policies —> Administrative Templates —> Network —> Network Connections —> Windows Defender —> Firewall —> Domain Profile.
In the settings list on the right pane, double-click on Windows Defender Firewall: Protect all network connections to open its properties.
Once the settings property is open, change the value by selecting Disabled, then click OK.
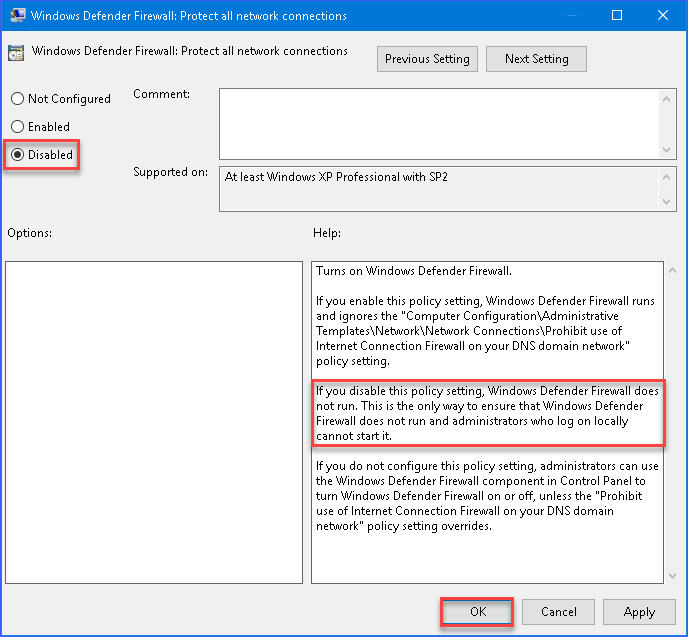
Repeat and apply the same option to the Standard Profile settings. Then, you can now exit the Group Policy Management Editor window.
Deploying the GPO to All Domain Computers
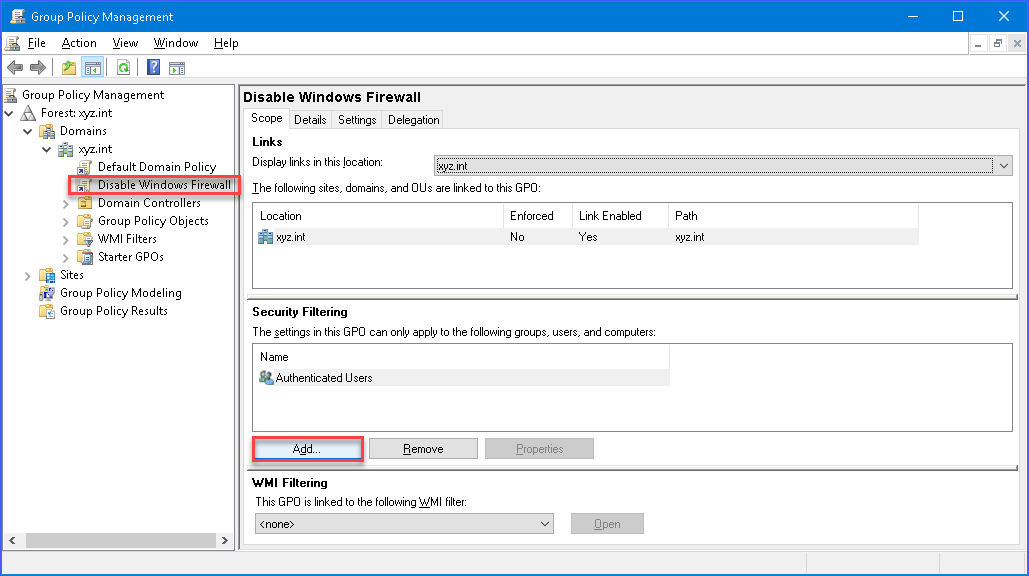
Now that you’ve created the GPO, you now need to deploy the GPO to the domain computers.
To apply the GPO, in the Group Policy Management, select the Disable Windows Firewall GPO. Then, in the Scope tab, click on Add button under the Security Filtering section.
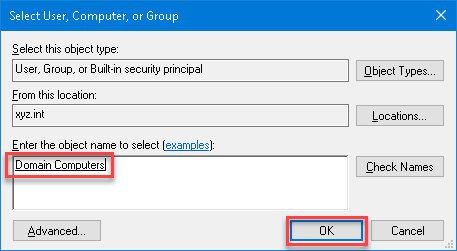
In the Select User, Computer, or Group dialog box, search for Domain Computers and click OK. Doing so will ensure that the GPO is applied to all computers that are members of the Domain Computers group.
And that’s it! The next time that the client computers get the policy update, the firewall will be turned off on those computers.
Now that the GPO has been created and deployed, you can test whether the GPO is working by forcing a policy update. Run the gpupdate /force on the client computer to test the policy update.

As you can see from the result above, as soon as the policy was applied on the client computer. The configuration to disable Windows Firewall was applied. Additionally, there is an information box saying that the settings are managed by the system administrator.

Note: The automatic update interval for Group Policy is every 90 minutes for regular users and computers. Additionally, Group Policy is also updated when the computer is started, or a user logs in.
Using The Custom Script Extension to Disable Windows Firewall on Azure Virtual Machines
If you have an Azure VM that you suddenly cannot access anymore because the Windows Firewall is blocking traffic, including RDP. Maybe you made changes to the Windows Firewall and inadvertently locked yourself out!
If you’ve tried all the ways previously discussed in this article and still no luck, there’s still hope. You can disable Windows Firewall inside an Azure VM’s guest OS by utilizing the Azure Custom Script Extension. The Azure Custom Script Extension works executing a script hosted in Azure Storage or GitHub against your Azure VM’s guest OS.
The high-level steps involve:
- Create a PowerShell script (*.PS1) containing commands to disable Windows Firewall.
- Install the Custom Script Extension on your Azure VM using the Azure Portal.
- Upload the PowerShell script to Azure Storage.
- The script will run automatically on the Azure VM’s guest OS one time only.
In this example, the test VM is named devmachine1 with the Windows Firewall in an enabled state.
Note: Before you proceed, make sure that you have the proper Azure RBAC role in your account.
Creating the Disable-Windows-Firewall.ps1 Script
In the previous sections, you’ve learned which commands are available to disable Windows Firewall. In this example, the netsh utility will be used.
Using the code or text editor of your choice, create a new file with name Disable-Windows-Firewall.ps1. Edit the script and add this line of code: netsh advfirewall set allprofiles state off. Save the script when done. Below is how to quickly do it in PowerShell.
'netsh advfirewall set allprofiles state off' | Out-File .\\Disable-Windows-Firewall.ps1
Installing the Custom Script Extension and Uploading the PowerShell Script
Now that your script is ready, the next step is to install the Custom Script Extension and upload the script to an Azure Storage location. And once the extension is installed, the script will automatically run against the Azure VM.
- First, log in to the Azure Portal and locate the Azure VM resource and open it. In this example, the Azure VM name is devmachine1. Then, go to the Extensions blade and click the Add button.
- In the New Resource page, locate and click on Custom Script Extension. Then, click on Create. In the Install extension page, click the Browse button next to the Script file (required) box.
- Select the Storage Account from the list. In this example, the storage account name is storagexyz01. Then a list of containers will be shown; click on the container where the script file will be uploaded. In this example, the container name is cont1.
Note: If you do not have an Azure storage account or container yet and need to create one, visit Create an Azure Storage account to learn how.
- After selecting the container, click on Upload and browse for the disable-windows-firewall.ps1 file that you created on your computer. Once you’ve selected the file, click the Upload button.
- You should see that disable-windows-firewall.ps1 file is now available inside the container. Click on disable-windows-firewall.ps1 from the list and click on Select. You will be brought back to the Install extension page, and you must click on OK to finally begin installing the extension.
At this point, you only need to wait for the extension to be deployed, which will also automatically execute the script that you uploaded. Refer to the demonstration below to see the whole process in action.

Summary
In this article, you’ve learned how to disable Windows Firewall using the built-in, available GUI tools in Windows. You’re also learned how to use commands using netsh and PowerShell to disable Windows Firewall locally or remotely.
Also, you’ve learned how to create and deploy a Group Policy Object that would disable Windows Firewall for domain computers. Lastly, you’ve learned how to use the Azure Custom Script Extension to disable Windows Firewall in Azure VM’s guest OS.
There surely are many different ways to disable Windows Firewall. Some of those methods were covered in this article. However, there are still other methods that you could explore on your own, such as using PsExec to remotely disable it.


