

If you’re using Microsoft’s Hyper-V virtualization platform to run virtual machines, you’re probably familiar with using the Hyper-V Manager. But did you know you can get more done in less time with the Hyper-V PowerShell module?
Not a reader? Watch this related video tutorial!In this tutorial, you’re going to learn how to manage Hyper-V VMs with PowerShell including creating, removing and you’ll also get into VM snapshots!
Prerequisites
For this tutorial, you will need the following listed below:
- A Windows client to connect to a remote Hyper-V host. This tutorial uses Windows 10 Pro.
- A Hyper-V host with PowerShell Remoting enabled. The tutorial’s Hyper-V host is named HYPER and is in a workgroup but an Active-Directory joined client and host will work as well.
- A user account on the Hyper-V host in the local administrators group or in the Hyper-V Administrators group. This tutorial will use an account called localadmin.
Connecting to a Remote Hyper-V Host
To work with Hyper-V on PowerShell, you must be able to communicate with the Hyper-V host somehow. You can either do that locally by running the Hyper-V PowerShell cmdlets providing the name of the Hyper-V host or you can use PowerShell Remoting to connect to the Hyper-V host itself.
In this tutorial, you will make a persistent connection to the Hyper-V host and run the commands on the Hyper-V host itself.
1. Open PowerShell on your local computer.
2. Run the Enter-PSSession cmdlet providing the hostname of your remote Hyper-V host for the ComputerName parameter. This action creates an interactive session and allows you to run commands interactively on the remote Hyper-V host.
Enter-PSSession -ComputerName HYPER -Credential (Get-Credential)If your client and Hyper-V host are a member of the same Active Directory domain, you do not have to use the
Credentialparameter.
3. You will then be prompted for a username and password to connect to the Hyper-V host. This username and password will be a local administrative user on the remote host. Once connected, you should see your PowerShell prompt has changed to show the hostname of the Hyper-V host.
You are now ready to start running commands!
Creating Hyper-V VMs with PowerShell
Assuming you’re now connected to your Hyper-V host using PowerShell Remoting, let’s start running commands by creating a Hyper-V VM.
Creating a Simple VM
While in your PSRemoting session connected to the remote Hyper-V host:
Run the New-VM cmdlet to create a new VM. When creating a VM with the New-VM cmdlet, you have many different options to choose from on how to create it.
1. In this example below, the tutorial is creating a VM with:
- A name of MyVM (
HYPER) - 512MB of RAM (
MemoryStartupBytes)
New-VM -Name "HYPER" -MemoryStartupBytes 512MB
Creating a VM Based on Other VM Attributes
Sometimes you need to create a VM with similar attributes to another VM. You can do that but assign various VM attributes to variables and then use those variables when creating the new VM. As an example:
1. Run Get-VM to query attributes of an existing VM assigning the output to a variable as shown below.
$VMold = Get-VM "HYPER_old"2. Run the Get-VMMemory cmdlet providing the name of the VM to gather attributes from (in this case, memory), and assign the memory value to a variable.
$memory = (Get-VMMemory -VMName $VMold.name).Startup3. Next, create a new VM with the New-VM cmdlet providing the Name, VM generation (Generation) using the Generation property from the other VM, and amount of memory from the value obtained from the other VM.
New-VM -Name "newVM" -Generation $VMold.Generation -MemoryStartupBytes $memory
Listing Existing VMs with PowerShell
Now that you have at least two VMs created on the Hyper-V host let’s explore how to enumerate created VMs. To do that:
1. Run the Get-VM cmdlet by itself. When you run with no parameters, Get-VM queries the Hyper-V host for all existing VMs. Get-VM
Get-VM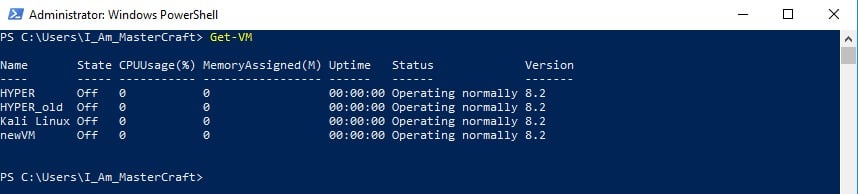
2. Perhaps you’d like to only look for a single VM. In that case, use the -Name parameter. The below code command is querying Hyper-V for the VM created earlier named HYPER_old. Get-VM -Name HYPER_old
Get-VM -Name HYPER_old
Next, maybe you need to find all VMs that are in a specific State. No problem. To do that, run Get-VM, which queries all VMs but pipe the output to the Where-Object cmdlet.
In the example below, the Pipe ‘|’ limits Get-VM‘s output to only those VM objects with a State of Running. Get-VM -VMName HYPER_old | Where-Object {$_.State -eq 'Running'}
Get-VM -VMName HYPER_old | Where-Object {$_.State -eq 'Running'}
Starting and Stopping VMs
At this time, the VM created earlier is probably stopped. Let’s change that by starting it and then learning how to stop VMs also.
In the remote Hyper-V host’s PowerShell session:
1. Run the Start-VM cmdlet providing it the name (Name) of the VM created earlier with the -Name parameter
Start-VM -Name NewVM
Now that the VM is started, stop it by using the Stop-VM cmdlet providing the name of the VM with the Name parameter.
Stop-VM -Name HYPER_oldAs soon as you run the command above, you will see the VM shutting down as seen in the screenshot below;

Modifying Hyper-V VMs
VMs don’t always stay the same. Maybe you need to increase the CPU resources, or the VM is consistently running out of memory. In that case, the Set-VM cmdlet is your friend.
As an example of modifying existing VMs, in the remote Hyper-V host’s PowerShell session:
Run the Set-VM cmdlet to automatically shutdown the HYPER_old VM that is currently running. Use the Name parameter to specify the VM you want to set and specify Shutdown as the value for the AutomaticStopAction parameter to ensure the VM is automatically shut down properly when the Hyper-V host is shut down.
Set-VM -Name HYPER_old -AutomaticStopAction ShutdownSaving Hyper-V VMs
In the remote Hyper-V host’s PowerShell session, you may need to save the VM you create to preserve the state of the VM’s memory for later use. To do this, use the Save-VM cmdlet with the Name parameter specifying the name of the VM that you want to save.
Note that, the VM that you want to save must be in a Running state.
Save-VM -Name HYPER_old
Managing Hyper-V VM Checkpoints
If you need to save the existing state of a VM before making changes or revert VM changes, you should learn about checkpoints. Checkpoints are a handy way to quickly save the disk and memory state of any Hyper-V VM.
While on your Hyper-V host, run the Checkpoint-VM cmdlet, providing the VM’s name to save and a name for the checkpoint.
The parameter name,
SnapshotNamestill references the old terminology used in Hyper-V 2012. A snapshot is the same thing as a checkpoint.
Checkpoint-VM -Name HYPER_old -SnapshotName MyVMSnapshot
Once you have a checkpoint created, you can then use the Get-VMSnapshot cmdlet to retrieve all of the snapshots stored on the Hyper-V host. You can see below the VM HYPER_old has three checkpoints.
Get-VMSnapshot -VMName HYPER_old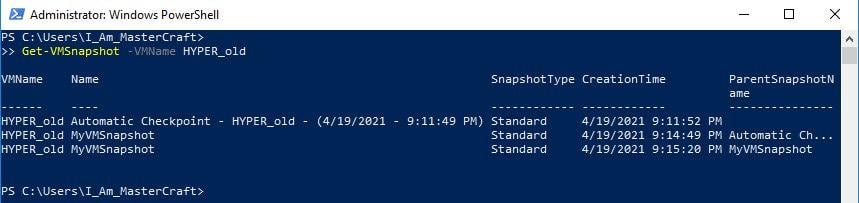
Conclusion
If you’ve worked through all of the demos in this tutorial, you are well on your way to managing Hyper-V VMs with PowerShell. You should now have the knowledge required to manage 1, 10, or even 100 VMs!
What kind of tasks do you think you can now automate with PowerShell and Hyper-V?


