


Whether you are an IT professional, or a technology enthusiast, you might need a place to run or test different configurations on various operating systems. One way to build an environment where you can run multiple operating systems easily is on a single host with Microsoft’s Hyper-V service. However, when you want to connect to a Hyper-V host is in an Active Directory (AD) domain and your client computer is in a workgroup, it’s not quite simple to get this setup working.
Not a reader? Watch this related video tutorial!Unfortunately, you’ll typically encounter various security-related and authentication issues when trying to reach a domain computer from an outside domain or via a workgroup computer. But, you can still get things working with a handful of PowerShell commands to configure the client machine to communicate to Hyper-V Host joined to a domain on the same network.
In this article, you’re going to learn how to configure a workgroup Windows 10 client to communicate with a domain-joined Hyper-V host.
If you’re more of a visual learner, please watch this article’s companion video below:
Prerequisites
This article follows a how-to approach. If you choose to follow along some requirements must be in place.
- A Windows 10 Pro or Enterprise 1903/1909 client not joined to a domain but on the same network as the Hyper-V host.
- Hyper-V Manager – Be sure to install Hyper-V Manager on Windows Client using this link if you don’t already have this installed. Whenver you install Hyper-V on Windows 10, you’ll get the Hyper-V manager GUI application and the PowerShell module, which you’ll need.
- An Active Directory environment with the Windows Server host as a member.
The Typical Connection Error You’ll Face
You might be reading this article right now because you already attempted to connect a non-domain joined client to a domain-joined Hyper-V host. If so, you’ve probably run into the error below when attempting to connect to the host with Hyper-V Manager.
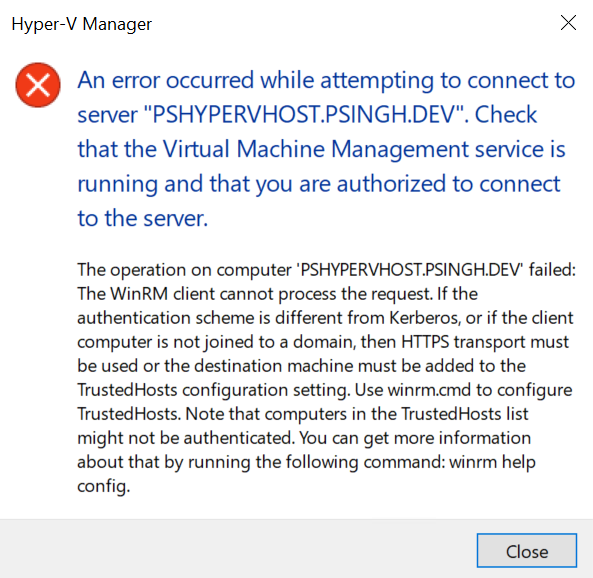
If you have encountered the error above, you’re in luck. Let’s fix that!
Adding the Hyper-V Host to the Hosts File
To get started, the first step is ensuring your Windows 10 client can resolve the name of the Hyper-V host over the network.
To help with hostname resolution, Windows has a file called C:\Windows\System32\hosts. This hosts file is a plain-text file that defines hostnames and the IP addresses those hostnames should resolve to. When DNS resolution is not available, Windows will revert back to the hosts file. Since your Windows 10 client is not in a domain, chances are, it’s probably not pointing to the same DNS server that contains the DNS record to resolve the Hyper-V host’s name.
You can see what the default hosts file looks like in the following code snippet.
WIN10PS> Get-Content -Path "C:\Windows\System32\drivers\etc\hosts"
# Copyright (c) 1993-2009 Microsoft Corp.
#
# This is a sample HOSTS file used by Microsoft TCP/IP for Windows.
#
# This file contains the mappings of IP addresses to host names. Each
# entry should be kept on an individual line. The IP address should
# be placed in the first column followed by the corresponding host name.
# The IP address and the host name should be separated by at least one
# space.
#
# Additionally, comments (such as these) may be inserted on individual
# lines or following the machine name denoted by a '#' symbol.
#
# For example:
#
#      102.54.94.97     rhino.acme.com          # source server
#       38.25.63.10     x.acme.com              # x client host

# localhost name resolution is handled within DNS itself.
#	127.0.0.1       localhost
#	::1             localhost
To ensure Windows 10 can resolve the name of the Hyper-V host, create a new line in the hosts file with the IP address of the Hyper-V host and the hostname. You could use a text editor to edit this file but this article is all about PowerShell so let’s automate this process.
If you don’t see the host IP already, use the Add-Content cmdlet to create a new line. The Add-Content cmdlet appends a row to the hosts file. To do so, run Add-Content specifying the path of the hosts file and the line you’d like to add as shown below.
The example below assumes the Hyper-V host’s hostname is hypervhost.example.com and it’s IP address is 10.10.10.10.
WIN10PS> Add-Content -Path "C:\Windows\System32\drivers\etc\hosts" -Value "10.10.10.10 hypervhost.example.com"Once you’ve added the line, you can then validate the hosts file using Get-Content.
WIN10PS> Get-Content -Path "C:\Windows\System32\drivers\etc\hosts"
# Copyright (c) 1993-2009 Microsoft Corp.
#
# This is a sample HOSTS file used by Microsoft TCP/IP for Windows.
#
# This file contains the mappings of IP addresses to host names. Each
# entry should be kept on an individual line. The IP address should
# be placed in the first column followed by the corresponding host name.
# The IP address and the host name should be separated by at least one
# space.
#
# Additionally, comments (such as these) may be inserted on individual
# lines or following the machine name denoted by a '#' symbol.
#
# For example:
#
#      102.54.94.97     rhino.acme.com          # source server
#       38.25.63.10     x.acme.com              # x client host

# localhost name resolution is handled within DNS itself.
#	127.0.0.1       localhost
#	::1             localhost
10.10.10.10       hypervhost.example.com
Setting the Windows Network Profile
Another major cause of no-communication could be an incorrect connection profile defined on the Hyper-V hosts’s Windows firewall. To ensure the Hyper-V host’s Windows firewall will allow a connection from your Windows 10 client, you must make sure the network profile is set to Private. To do that, run Get-NetConnectionProfile to check your network type of the client.
Below you’ll see that this Hyper-V host’s network connection profile is set to Private as indicated by the NetworkCategory property.
HYPERVPS> Get-NetConnectionProfile
Name             : Network
InterfaceAlias   : Ethernet
InterfaceIndex   : 6
NetworkCategory  : Private
IPv4Connectivity : Internet
IPv6Connectivity : NoTraffic
If you see Public associated with NetworkCategory, that’s likely one of the reasons for blocked communication. If you see the NetworkCategory is not set to Private, go ahead and set it to Private using the Set-NetConnectionProfile cmdlet and validate the profile category again using Get-NetConnectionProfile command.
HYPERVPS> Set-NetConnection -InterfaceAlias "Ethernet" -NetworkCategory Private
HYPERVPS> Get-NetConnectionProfile
Name             : Network
InterfaceAlias   : Ethernet
InterfaceIndex   : 6
NetworkCategory  : Private
IPv4Connectivity : Internet
IPv6Connectivity : NoTraffic
Enabling PowerShell Remoting
Hyper-V uses PowerShell Remoting for lots of communication. You should have this enabled by default but if not, you can always run the Enable-PSRemoting cmdlet to ensure it’s enabled and all of the appropriate Windows firewall rules are added.
HYPERVPS> Enable-PSRemotingEnabling CredSSP
Next, let’s enable CredSSP. CredSSP is an authentication method that allows you to delegate permission to other computers. In this step, first ensure your client computer can delegate credentials for the Hyper-V host. To do that, run Get-WsManCredSSP.
WIN10PS> Get-WSManCredSSPIf you receive an error saying “The machine is not configured to allow delegating fresh credentials.“, follow along in the next step to whitelist the domain for delegation.
To enable CredSSP on your client computer and to delegate domain credentials, use the Enable-WSManCredSSP cmdlet. Below you can see how you can specify the Client as the role (since you’re on the client computer) and a wildcard to designate all computers in the example.com domain.
WIN10PS> PS C:\Users\singh> Enable-WSManCredSSP -Role Client -DelegateComputer "*.example.com"

cfg         : http://schemas.microsoft.com/wbem/wsman/1/config/client/auth
lang        : en-US
Basic       : true
Digest      : true
Kerberos    : true
Negotiate   : true
Certificate : true
CredSSP     : true
Once you’ve run Enable-WsManCredSSP, be sure to run Get-WSManCredSSP again to confirm you’ve properly added the delegation.
WIN10PS> Get-WSManCredSSP
The machine is configured to allow delegating fresh credentials to the following target(s): wsman/*.example.com
Adding the Hyper-V Host to Trusted Hosts
PowerShell Remoting has a security feature called TrustedHosts. This feature allows you to specify certain computers or groups of computers PowerShell Remoting will connect to under certain circumstances. Since the local client is not in a domain, you must add any host you’d like to connect to here so your client can “trust” the remote computer.
First, check the TrustedHosts list using Get-Item as shown below. you can see in this example a value of *. This means that the client computer is trusting all computers. This setting works but it’s a bit to permissive.
WIN10PS> Get-Item -Path WSMan:\localhost\Client\TrustedHosts
WSManConfig: Microsoft.WSMan.Management\WSMan::localhost\Client

Type            Name                           SourceOfValue   Value
----            ----                           -------------   -----
System.String   TrustedHosts                                   *
To ensure the local client trusts any computer you attempt to connect to in the remote domain, use the Set-Item cmdlet as below. If you check the TrustedHosts list again, you will see it’s been added.
#Add value to Trusted Host
WIN10PS> Set-Item -Path WSMan:\localhost\Client\TrustedHosts -Value "*.example.com"
#Validate the change
WIN10PS> Get-Item -Path WSMan:\localhost\Client\TrustedHosts
WSManConfig: Microsoft.WSMan.Management\WSMan::localhost\Client

Type            Name                           SourceOfValue   Value
----            ----                           -------------   -----
System.String   TrustedHosts                                   *.example.com
Adding the Hyper-V Connection Credentials to Credential Manager
Typically, when you connect to a Hyper-V host with a client computer in the same domain, Kerberos does the authentication work for you. But if one of the machines is not in a domain, you must specify credentials manually by creating a cached credential.
By creating a cached credential, the client can connect to the Hyper-V host using the connection manager.
To add the cached credential, use the cmdkey utility specifying the FQDN of the Hyper-V host along with the username and password of a local account on the host.
WIN10PS> cmdkey /add:hypervhost.example.com /user:Administrator /pass:P@ssw0rdFinally, run cmdkey again using the list parameter and you should see the cached credential has been created.
PS> cmdkey /list
Currently stored credentials:
    Target: Domain:target=hypervhost.example.com
    Type: Domain Password
    User: [email protected]
Validating the Connections
At this point, the hard work is done. Let’s see if you can connect with the Hyper-V Manager application and PowerShell.
Validating Hyper-V Manager Connection
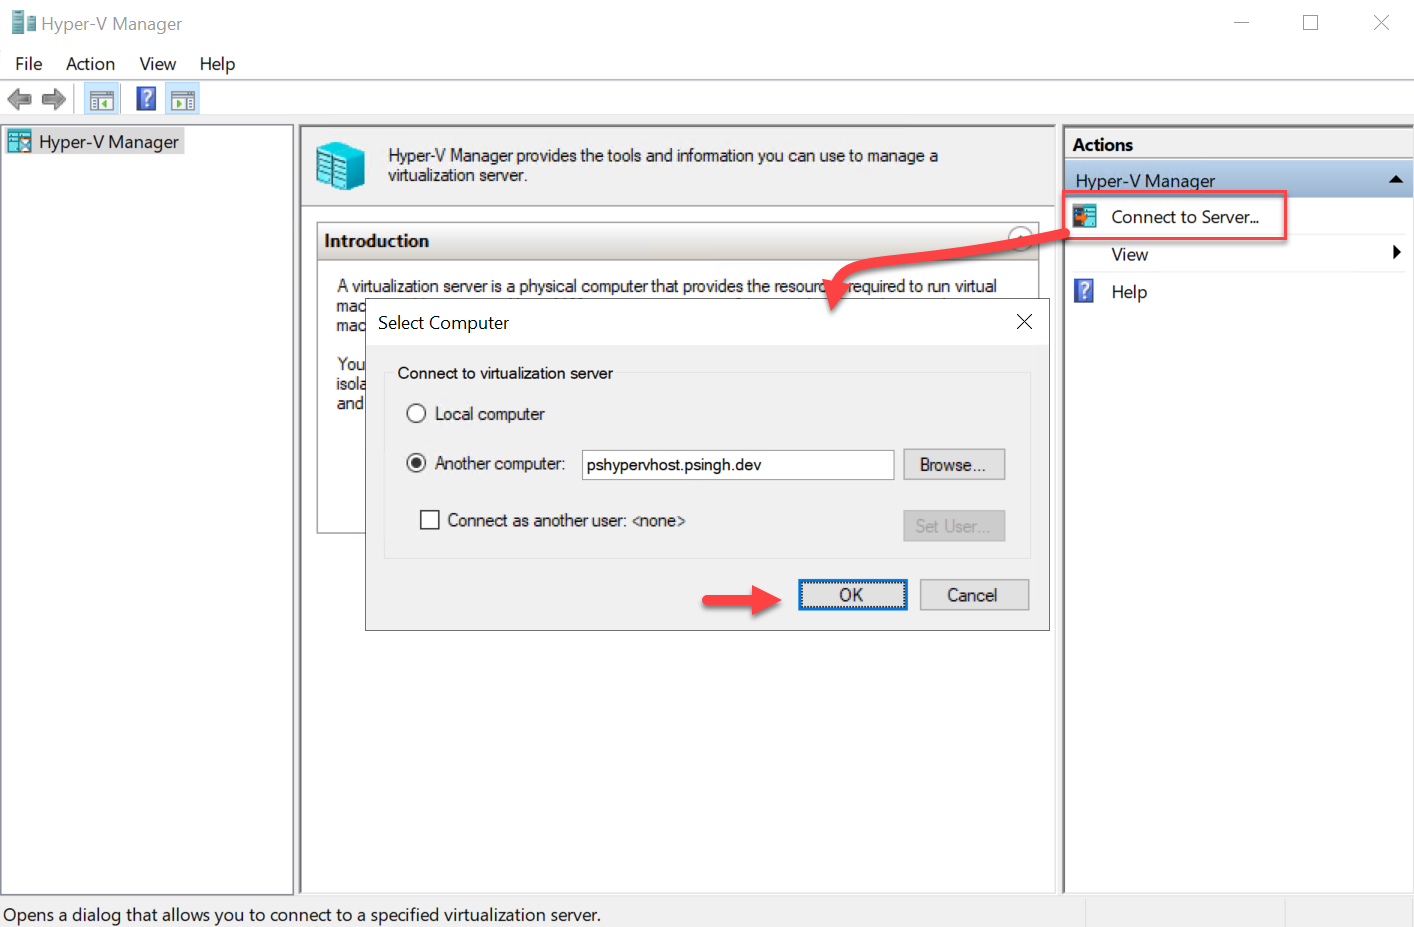
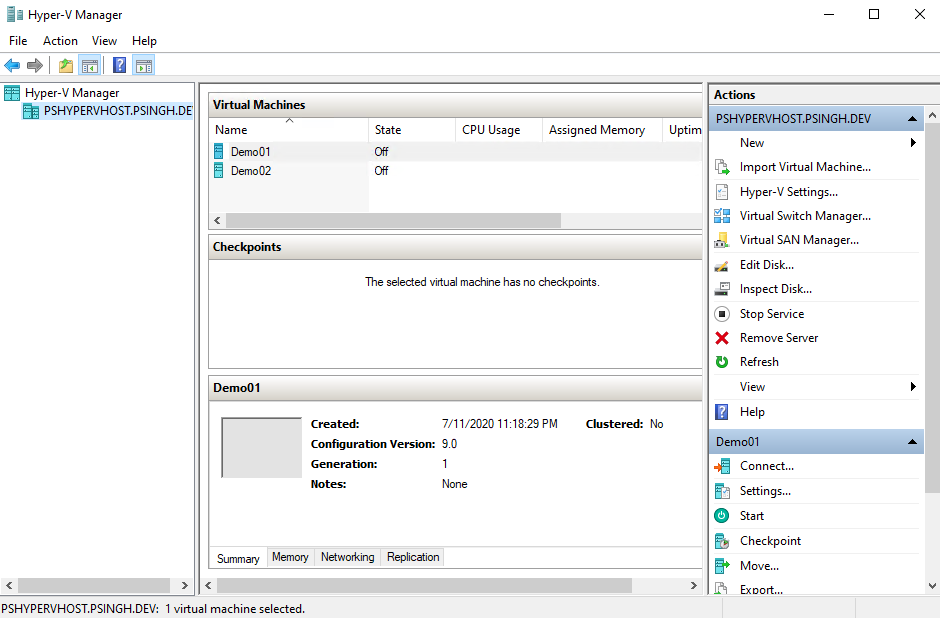
Open up Hyper-V Manager on the client computer and click on Connect To Server providing the host name and press OK. If all is well, your Hyper-V host should show up as shown below.
Validating PowerShell Command Execution
If you are seeing all the VM’s in Hyper-V Manager, you can likely connect to the host using PowerShell remote session as well. Let’s find out.
To test the PowerShell remoting connection, run the Invoke-Command cmdlet. This cmdlet will quickly connect to the Hyper-V host and run a few simple commands. Below you can see an example of connecting to the hypervhost.example.com host and running the whoami and hostname utilities on the remote host.
PS> Invoke-Command -ComputerName hypervhost.example.com -ScriptBlock {whoami; hostname}
example\administrator
hypervhost.example.com
Notice how you don’t have to use the
Credentialparameter. Since you created the cached credential earlier, theInvoke-Commandcommand uses that to authenticate to the remote Hyper-V host.


