


If you’re already running remote commands with PowerShell Remoting (PSRemoting), you know how convenient the feature is. You’re able to connect to one or more remote computers and manage them like they were local. PSRemoting depends on Windows Remote Management (WinRm) to make it happen, and if you’re not using WinRM over SSL, you might be opening yourself up to some security issues.
In this hands-on tutorial, you’re going to learn how to set up Windows on the client and server to use WinRM over HTTPS (SSL) and how to use certificates to authenticate when using WinRM over HTTPS.
Prerequisites
If you’d like to follow along with this tutorial walkthrough, be sure you have the following:
- A Windows 7+ or Server 2008 R2 machine to serve as the client machine. This tutorial will use Windows 10.
- A Windows 7+ or Server 2008 R2+ machine to serve as the server machine. This tutorial will use Windows Server 2019.
- Access to a local administrative account or an account with local administrative rights on both the client and server machines.
- An Active Directory Certificate Services (ADCS) Public Key Infrastructure (PKI) set up. It would help if you implemented ADCS for production implementations, but it is optional for this tutorial and testing. The tutorial will assume the PKI is set up as an enterprise or standalone CA.
Why Use WinRM over SSL?
PSRemoting, out of the box, uses WinRM and allows you to manage client machines remotely. Once PSRemoting establishes a session over WinRM, it then encrypts all communication from client to server. Also, the setup procedure to implement PSRemoting without HTTPS is fairly straightforward.
If PSRemoting already encrypts session communication, why go through the hassle of setting up something like ADCS and manage certificates when it’s already encrypted?
Because during the authentication process, credentials can be sent in insecure formats depending on the authentication type used.
One of the easiest ways to make PSRemoting more secure is using WinRM over HTTPS instead of HTTP. HTTPS encases your entire connection stream, including authentication within the layer of encryption WinRM already uses. HTTPS also simultaneously provides a way to validate the server you are connecting to is what you think it is.
Configuring WinRM with a Self-Signed Certificate
Let’s now jump into the demonstrations. For the first trick, you’re going to learn how to set up encrypt PSRemoting communication with WinRm over SSL via a self-signed certificate.
Using a self-signed certificate is a great way to set up a test environment without worrying about a PKI like ADCS. When you use a self-signed certificate, you generate a certificate that the server itself signs which basically vouches for itself.
Certificates exist to perform two tasks typically; authenticate a connection and encrypt it. Using a self-signed certificate only implements the latter. To validate a server’s identity, you must always use PKI-provided certificates. PKI-provided certificates provide a single source of trust vs. having to trust every self-signed certificate individually manually.
Configuring WinRM over SSL with a self-signed certificate requires four high-level steps:
- Creating the self-signed certificate on the destination machine.
- Configuring the server’s WinRM webserver (listener) to use the self-signed certificate for authentication.
- Opening the appropriate ports on the destination machine’s Windows firewall.
- Executing a command to initiate a remote connection on the client using a PowerShell cmdlet like
Enter-PSSession.
Let’s now go through each of step.
Creating a Self-Signed Certificate
The first step is generating a self-signed certificate on the server. When connecting, PSRemoting will use this certificate to encrypt all communication.
While on ServerB with a Windows PowerShell console open as administrator, run the New-SelfSignedCertificate cmdlet as shown below. Running the below command generates a certificate for ServerB.domain.com in the local machine’s personal certificate store.
New-SelfSignedCertificate -Subject 'CN=ServerB.domain.com' -TextExtension '2.5.29.37={text}1.3.6.1.5.5.7.3.1'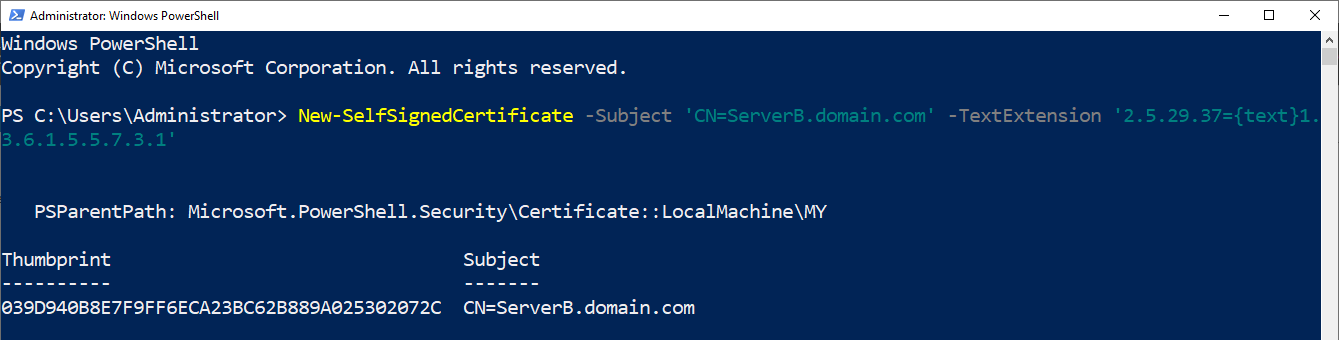
The Subject parameter should be the fully-qualified domain name of the server. WinRm uses the subject to validate the identity of the server.
Even if the server is in a workgroup, always provide a domain name, e.g., domain.com or lab.local. When connecting to the destination machine, the DNS name you connect to has to exactly match this Subject name, to the connection will fail.
The TextExtension allows you to define the certificate’s key usage (2.5.29.37), which defines what the certificate is allowed to be used for. Define key usage for Server Authentication ({text}1.3.6.1.5.5.7.3.1) to ensure the certificate can only be used to authenticate a server’s identity.
After
New-SelfSignedCertificatesruns, it will return the thumbprint of the certificate it generated. Save this as you will need it for the next command.
Configuring the WinRM Listener
Once you’ve created the self-signed certificate on the server, then configure the WinRm listener to begin using that certificate for authentication. To do that, use the winrm create command as shown below.
The Address=* in the command below informs the listener to listen on any IP address configured on the server. If the server has multiple IP addresses configured, you can define a specific IP address here.
Be sure to replace the
<cert thumbprint here>placeholder with the thumbprint returned in the last step.
winrm create winrm/config/Listener?Address=*+Transport=HTTPS '@{Hostname="ServerB.domain.com"; CertificateThumbprint="<cert thumbprint here>"}'
Opening the WinRM SSL Firewall Port
Next, if you use the Windows firewall, you will have to allow HTTPS traffic coming into the server over the default HTTPS port 5986.
Open the firewall port for WinRM over HTTPS by using PowerShell by running the below command.
$FirewallParam = @{
    DisplayName = 'Windows Remote Management (HTTPS-In)'
    Direction = 'Inbound'
    LocalPort = 5986
    Protocol = 'TCP'
    Action = 'Allow'
    Program = 'System'
}
New-NetFirewallRule @FirewallParam
Connecting to the Server over SSL
You’ve now configured the remote Windows Server to accept WinRM connections over SSL. At this time, come back to the client and initiate any PSRemoting commands you’d like to test out. For example, you could try the Enter-PSSession or Invoke-Command cmdlet. Only now, you connect a little bit different than with the default HTTP connection.
Connecting over HTTPS typically requires a single parameter UseSSL. This parameter tells the command to look for an HTTPS WinRM listener vs. an HTTP listener as it would by default. The UseSSL parameter is available on more PSRemoting commands.
For testing, run Enter-PSSession providing the FQDN of the server as defined by the self-signed certificate subject, a PSCredential object to define the username and password, and finally, the UseSSL switch parameter.
Enter-PSSession -ComputerName ServerB.domain.com -Credential (Get-Credential) -UseSSLIf you run the above command, you will receive an error message since you have configured the WinRM listener on the server to use a self-signed certificate. Whenever the PSRemoting client attempts to authenticate to the server, it will try to validate the certificate, and it can’t. A self-signed certificate doesn’t have a trust chain the command can follow and fails.

To connect to the server with a self-signed certificate, you must override the certificate trust check. You can do so by creating a PSSessionOption called SkipCACheck using the New-PSSessionOption cmdlet and passing it to the command as shown below.
$PSSessionOption = New-PSSessionOption -SkipCACheck
Enter-PSSession -ComputerName ServerB -Credential (Get-Credential) -SessionOption $PSSessionOption -UseSSL
You can define many different PSSessionOption objects to add options for your remote connection that aren’t included in the
Enter-PSSessioncmdlet directly.
Try to connect again and PowerShell should now prompt you for credentials. Once provided, you should now connect to the server with WinRM over SSL!
Configuring WinRM with a CA Signed Certificate
If you intend to use PSRemoting using WinRM in production and want to remain as secure as possible, you need to focus on WinRM over SSL using a certificate authority (CA)-signed certificate.
CA-signed certificates maintain a trust chain and are more secure than simple self-signed certificates because they validate a certificate issuer’s identity.
If you’re in an Active Directory environment, one of the most common ways to set up a CA is with ADCS. With ADCS, you can deploy certificates to devices and configure WinRM to use those certificates.
This tutorial is going to assume you already have ADCS set up and working in your environment.
For a quick set up you can follow Microsoft’s documentation, but for a production deployment, you should research the configuration heavily as a certificate authority is at the center of an organization’s encryption efforts.
Creating the Certificate Request
The first step in using a CA-issued certificate is creating the certificate. To create the certificate, you must first issue a certificate request using a certificate signing request (CSR). Once generated, this CSR can then be sent to the CA to issue the certificate.
This section’s steps will work on ADCS deployments when it is an enterprise CA or a standalone CA. If you are using an AD-integrated enterprise CA, you can expedite enrolling certificates without going through the steps in this section using certificate auto-enrollment or certificate templates.
While on the server (ServerB in this tutorial), create the CSR:
- Run certlm.msc to open the Windows certificate manager.
2. Right-click on the Personal store and select All Tasks —> Advanced Operations —> Create Custom Request.
3. For this tutorial, leave all fields as the default until you get to the Certificate Information page seen below. When you get here, click on the Details dropdown and select Properties.
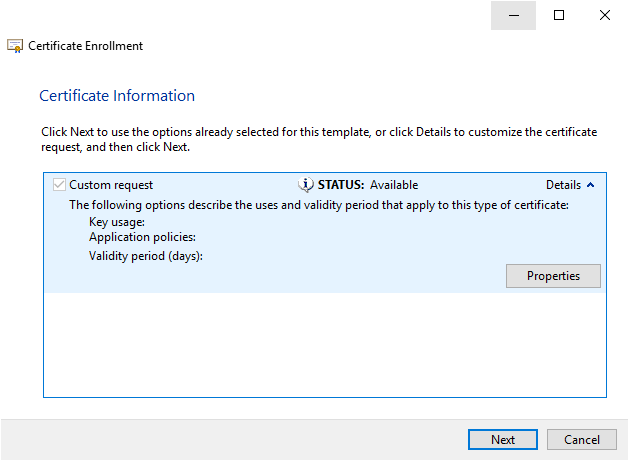
4. Click on the Subject tab and change the Type to Common name.
5. Now enter the server’s fully qualified domain name if it is joined to a domain or just the hostname if it is not and click Add.

Note that for use with a WinRM SSL listener, you have to use the common name. The other options in the list can be included but are not required for this deployment.
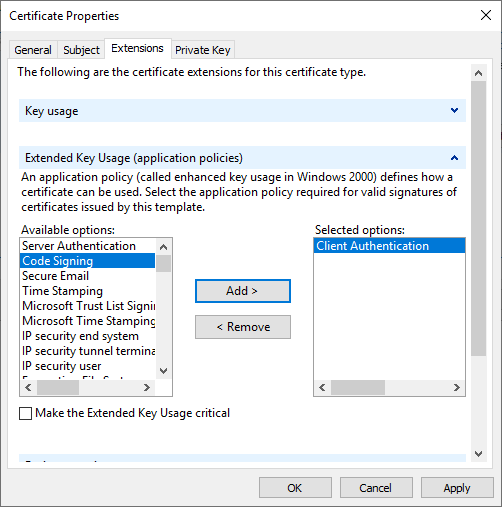
6. Click on the Extension tab.
7. If you’re not using certificate-based authentication which will be covered later, Expand the extended key usage header and add Server Authentication. This key usage type tells Windows that the certificate should be used for authenticating a server. Other options include Client Authentication, Code Signing, and Document Encryption.
8. If you’d like to set up certificate-based authentication, ensure you choose Client Authentication, as shown below.
9. Next, click on the Private Key tab and notice the Key options. Change the default key size from 1024 to at least 2048 to strengthen the key pair’s security.
There are also stronger cryptographic providers available in Windows, but you may face incompatibility with older software.
10. Close the Certificate Properties window and save your settings by clicking OK and click Next to continue with the prompts.
11. Now provide a path to output the certificate request where you can retrieve it later and click Finish.
Once complete, you should have a certificate request file.
Requesting a Certificate
Once you have the request created, you’ll now need to submit that request to your CA, which will generate the certificate. To do that:
- Navigate to your ADCS server at http://<server name FQDN>/certsrv/certrqxt.asp.
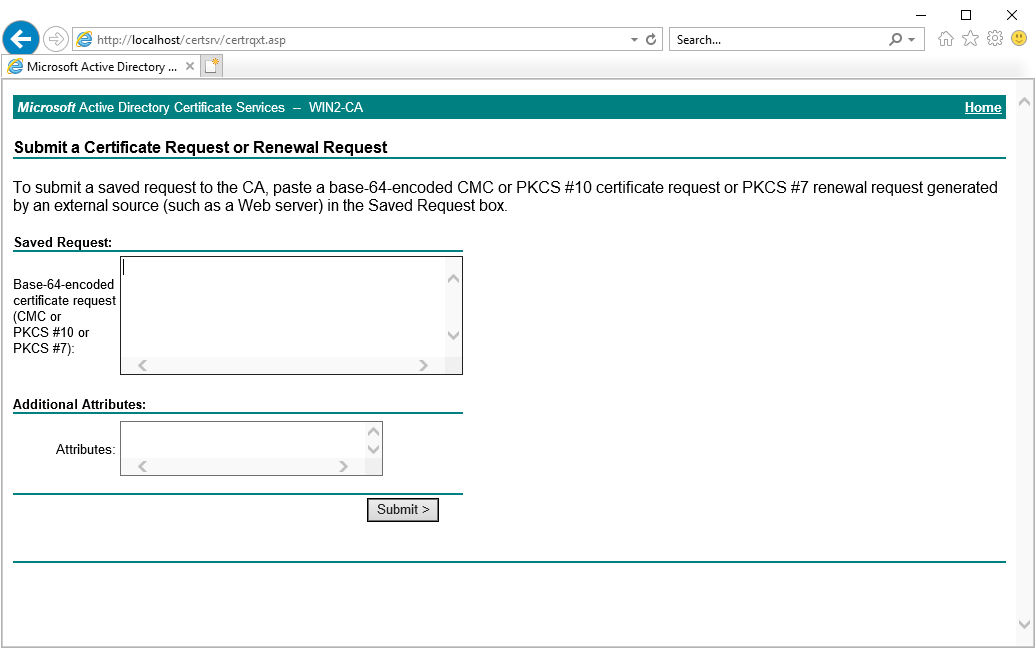
2. Open the certificate request file created earlier with notepad and copy the text from the certificate request file into the request box. Nothing is required for Additional Attributes for this certificate.
3. Click Submit. This will submit your request to the CA. It should then show you the request ID, which will be required later. Save this! You’ll need it later.
4. Now connect to the CA server that is a part of your ADCS environment using the Windows Certificate Manager on your local computer or via RDP by running certsrv.msc.
5. Click on Pending Requests.
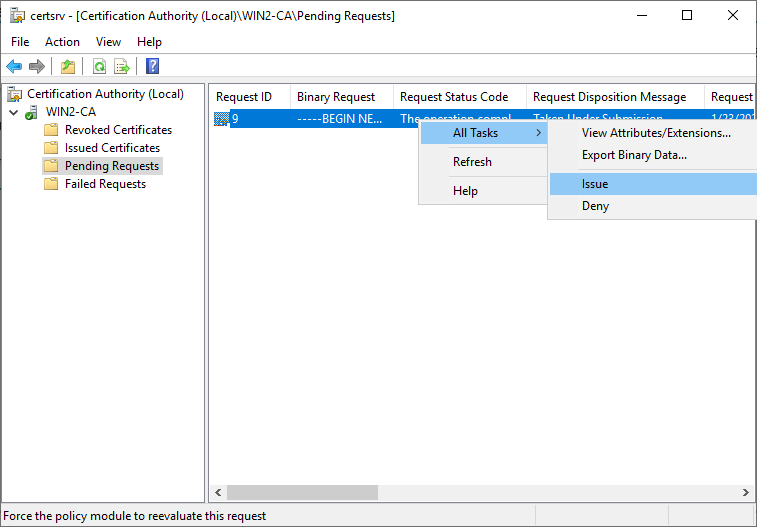
6. Right-click on the pending request, click on All Tasks, and click on Issue. This will approve the request that you just submitted based on the request ID from the earlier step.
Enrolling the Certificate
Now that you have issued a certificate on the CA, it’s time to enroll the certificate on the server you’re configuring WinRM on. To do that:
- From the server you’re setting up WinRM over SSL on, navigate to http://<server name FQDN>/certckpn.asp. You should see a single pending certificate request.
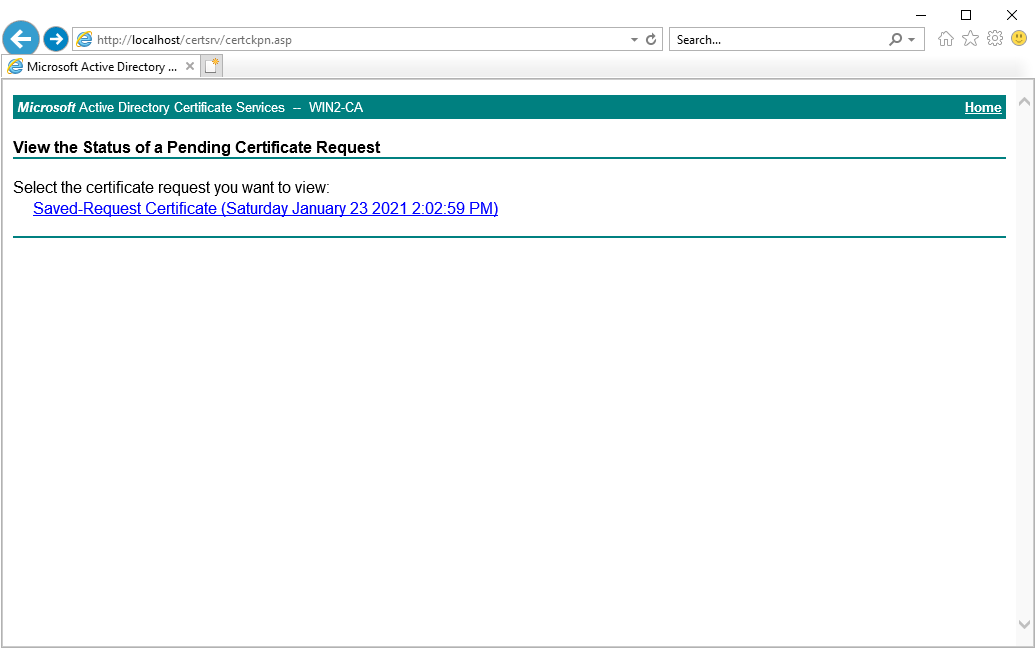
You can retrieve the public certificate from a different machine if needed, but starting from the server you are setting up for WinRM over HTTPS simplifies the process.
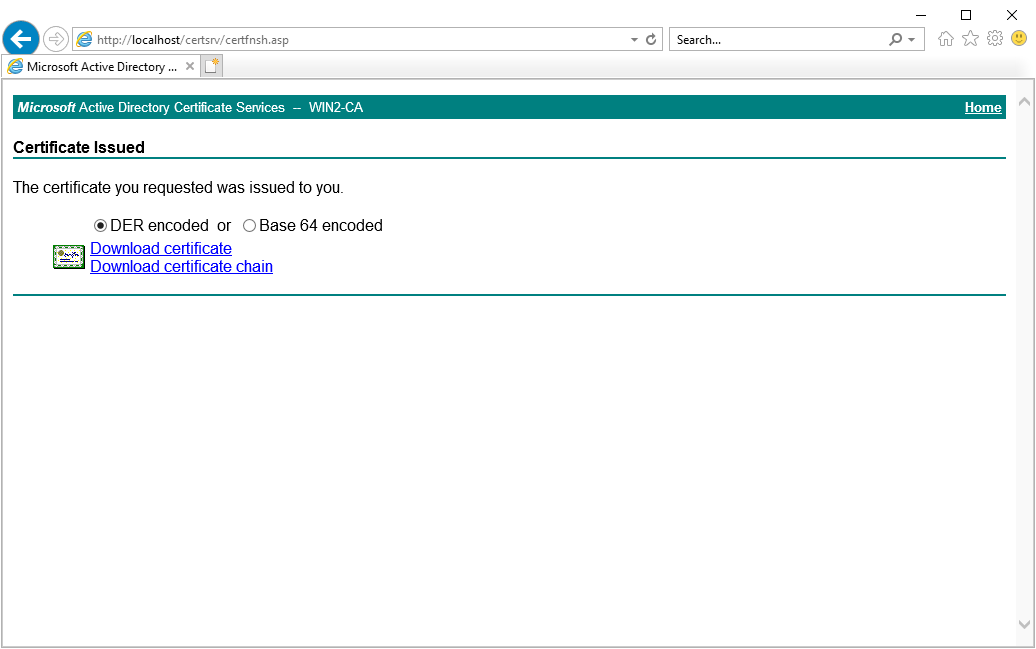
2. Select the request that you submitted from the list and download the certificate chain. You should download the entire certificate chain if the server you are configuring WinRM over HTTPS does have your CA as a root server.
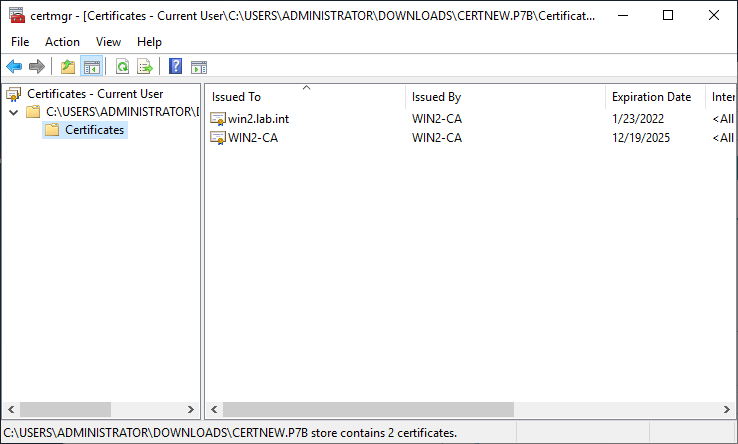
3. Open the certificate chain file. You should see a certificate for your server, and any certificate authority certificates higher in the chain. Below win2.lab.int is the requested certificate, and WIN2-CA is the certificate for the CA that issued the certificate for win2.lab.int.
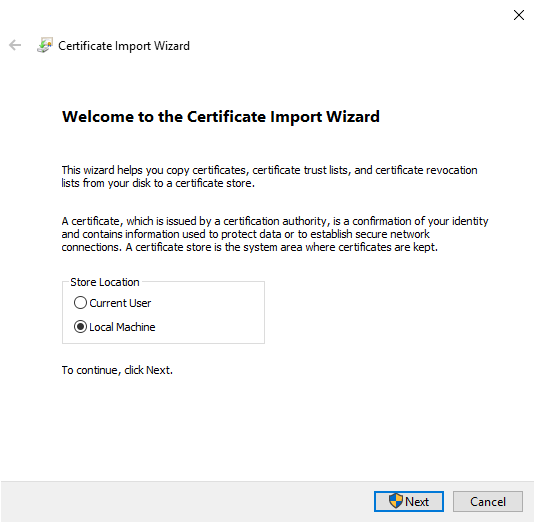
4. Double click on one of the certificates, and in the box that opens, click the Install Certificate button. Since this certificate will be used by the server and not by a specific user, change the option to Local Machine.
5. Continue through the prompt leaving everything as default. The defaults should place the certificate in Trusted Root Certifications Store.
6. Now repeat steps 3-5 for each of the other certificates in the list. If you have more than one certificate, ensure all other certificates are placed in the Intermediate Certificate Authorities store.
Create and Set Up the WinRM HTTPS Listener
Now that all of the certificates are installed, it’s time to configure WinRM on your server to use that certificate for the listener.
With PowerShell open on the WinRm server:
- Run the below command to set up the WinRm listener automatically. The
winrmcommand does this by searching the local machine certificate store for a certificate that matches the requirements for WinRM.
winrm quickconfig -transport:https2. The Windows Firewall will block the WinRM HTTPS port of 5986 by default. To ensure the firewall allows inbound port 5986, run the following PowerShell command:
$FirewallParam = @{
     DisplayName = 'Windows Remote Management (HTTPS-In)'
     Direction = 'Inbound'
     LocalPort = 5986
     Protocol = 'TCP'
     Action = 'Allow'
     Program = 'System'
 }
 New-NetFirewallRule @FirewallParam
Testing out the WinRM SSL Connection
At this point, you’re ready to connect. Using your favorite PSRemoting cmdlets like Invoke-Command or Enter-PSSession, connect to the server and use the UseSSL parameter.
Enter-PSSession -ComputerName ServerB.domain.com -UseSSL -Credential (Get-Credential)Always ensure the value for the
ComputerNameparameter exactly matches the common name provided during certificate creation. If you attempt to connect to a different hostname or perhaps the host’s IP address, you will receive a certificate mismatch error causing a connection failure.
Setting Up Certificate-Based Authentication
By now, you should already have a WinRM listener set up to use HTTPS. If so, you can also use a user authentication certificate to authenticate as a local user on the remote server. Using a user certificate is one of the most secure but it does take a while to set up. You’ll find that it’s also a lot of repeated work since each certificate is unique to the individual client machine.
Certificate-Based authentication only works with local user accounts and not domain users.
Assuming you requested a certificate for Client Authentication as covered in the Creating the Certificate Request section, read on:
Enabling Certificate-Authentication and Mapping the User on the Server
- On the server, run the
Set-Itemcommand to allow certificate-based authentication.
Set-Item WSMan:\localhost\Service\Auth\Certificate -Value $true2. Next, run Get-ChildItem to look at the Trusted Root Certification Authorities store to find the CA’s thumbprint that issued the client authentication certificate. To do this, filter certificates by the subject that contains the name of your CA.
Get-ChildItem Cert:\LocalMachine\Root | Where-Object {$_.Subject -like 'CA-Name'}3. Run the below command where the SubjectName is the subject of the user certificate that you provided when creating the certificate
The CAThumbprint is the CA’s thumbprint collected with the previous command, and then prompted for credentials are the username and password of the local user that will be used for the certificate-based authentication.
New-Item WSMan:\localhost\ClientCertificate -Subject SubjectName -URI * -Issuer CAThumbprint -Credential (Get-Credential)Testing Certificate-Based Authentication
Now that the certificate to user mapping is setup use the certificate on the client machine to authenticate without providing credentials.
On the client in PowerShell, get the client certificate’s thumbprint by looking in the Personal certificate store.
Get-ChildItem Cert:\CurrentUser\MyNow specify the thumbprint in the CertificateThumbprint parameter to a PSRemoting command like below.
Enter-PSSession -ComputerName ServerName -CertificateThumbprint <Thumbprint>Note that since certificate-based authentication is only usable with an HTTPS listener
-UseSSLis implied, unlike with other authentication methods where you need to specify to use SSL.
Next Steps
Now that you’ve learned how to set up WinRM over SSL, learn more about PSRemoting in our PowerShell Remoting: The Ultimate Guide post!
Want to learn more about PowerShell in general, including a lot about PSRemoting? Check out PowerShell for Sysadmins, the book!


