


Do you need an SSL certificate for website development or testing applications? Instead of buying expensive digital certificates from third-party providers, why not create a self-signed certificate yourself? Don’t worry; PowerShell got you covered with the New-SelfSignedCertificate cmdlet.
In this tutorial, you will learn how to create new self-signed certificates in PowerShell using various examples. By the end, you’ll have created self-signed certificates with different properties and for different purposes. Let’s get started!
Prerequisites
If you’d like to follow this tutorial hand-on, make sure you have the following requirements.
- A Windows computer with Windows PowerShell 5.1 or the latest PowerShell 7 (v7.1.3 as of this writing). This tutorial will be using Windows 10 version 2004 and Windows PowerShell 5.1.
- Your user account must have administrator rights on the local machine.
- Throughout this article, you will be using an elevated PowerShell session (run as admin) and assumes that you already have one opened.
Creating A Certificate With a Single Subject
When you need to create self-signed certificates in PowerShell, the New-SelfSignedCertificate cmdlet is your friend. This cmdlet will help you create certificates for different purposes, such as code-signing, server authentication, and document encryption, to name a few.
To create a self-signed certificate with only one subject, like a single website URL or one server FQDN, the New-SelfSignedCertificate cmdlet only requires the Subject parameter. You can think of the subject as a unique label for the certificate that differentiates it from other certificates.
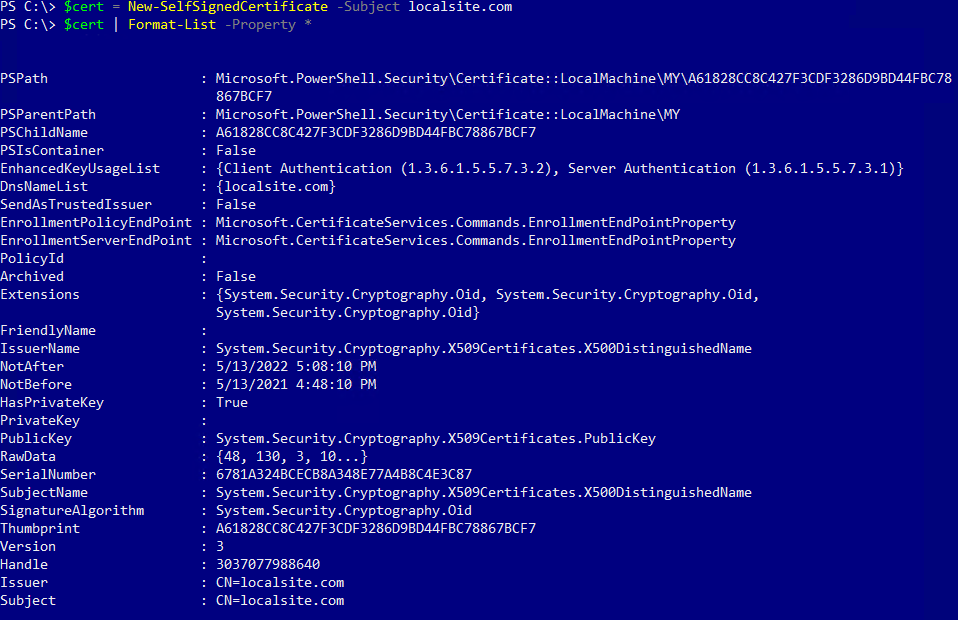
For example, run the command below in PowerShell to create a self-signed certificate for a website called LocalSite.com. This example will create the certificate in the local machine personal certificate store for server authentication. For web services, it’s common to use the URL of the website a certificate will be protecting as the subject name.
The certificates in the local machine certificate store are globally available to all users on the local computer. In comparison, the certificates in the current user certificate store are only available to the current user.
# Create a self-signed certificate in the local machine personal certificate store and store the result in the $cert variable.
$cert = New-SelfSignedCertificate -Subject localsite.com
# Display the new certificate properties
$cert | Format-List -Property *
To create the new certificate in the current user personal certificate store (
Cert:\CurrentUser\My), add the-Certstorelocation Cert:\CurrentUser\Myparameter or in the trusted root certification authority store useCert:\LocalMachine\Root.
The screenshot below shows the expected result after creating the certificate and displaying all of its properties. You can see that the selfsignedcertificate cmdlet automatically adds the CN= prefix to the subject name.
Creating A Subject Alternative Name (SAN) Certificate
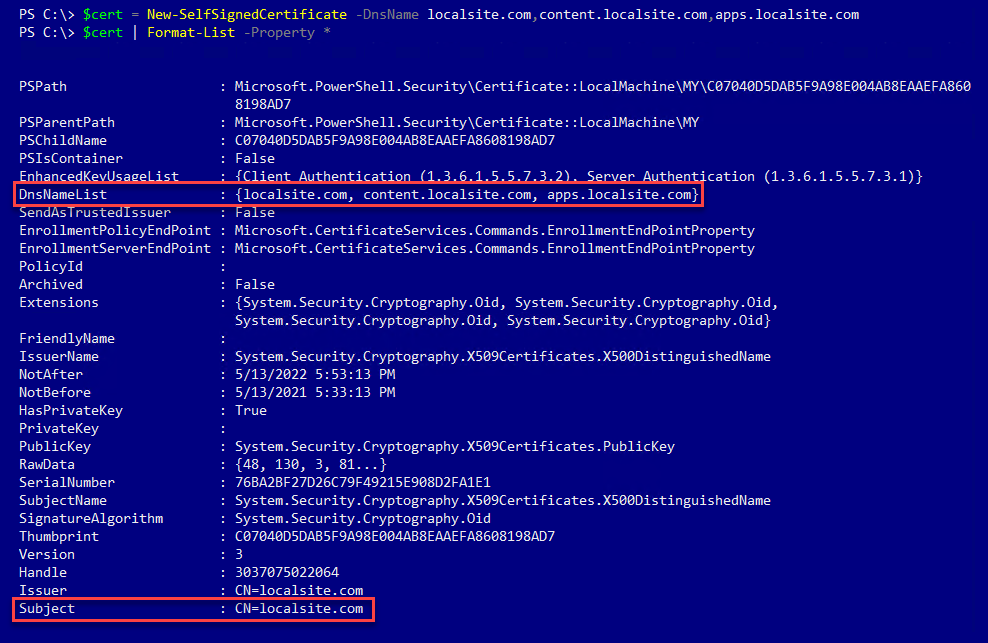
You’ve created a certificate with a single subject name, which is good if you’re deploying it to one website. But what if you have multiple websites like localsite.com, content.localsite.com, and apps.localsite.com.
Instead of creating a self-signed certificate for each website, you can create one certificate with multiple subject alternative names (SAN). This type of certificate is called a SAN certificate.
To create a SAN certificate, run the New-SelfSignedCertificate with the DnsName parameter. The DnsName parameter accepts one or more subject names that you want to include in the certificate.
When you provide multiple values to the
DnsNameparameter, the first string in theDnsNameparameter will appear as the certificate’s primary subject name. The other names will be the alternative names. Whichever subject name is primary does not affect the certificate’s usability and will function the same.
For example, to create the SAN certificate for localsite.com, content.localsite.com, and apps.localsite.com, run the command below in PowerShell.
# Create a self-signed SAN certificate in the local machine personal certificate store and store the result in the $cert variable.
$cert = New-SelfSignedCertificate -DnsName localsite.com,content.localsite.com,apps.localsite.com
# Display the new certificate properties
$cert | Format-List -Property *
As you can see below, the cmdlet created a new certificate with multiple subject names, as shown in the DnsNameList property.
Creating A Certificate With A Specific Validity Period
By default, self-signed certificates are valid for one year, which could be enough for most use cases. But if you need to specify a specific validity period when creating a self-signed certificate, you can add the NotBefore and NotAfter parameters.
For example, to create a self-signed certificate valid NotBefore today and NotAfter 24 months from now, run the command below in PowerShell.
# Create a self-signed certificate in the local machine personal certificate store valid for 24 months and store the result in the $cert variable.
$cert = New-SelfSignedCertificate -DnsName localsite.com -NotAfter (Get-Date).AddMonths(24)
To confirm the new certificate, run the command below to display the certificate’s select properties, including the start and expiration dates.
$cert | Select-Object -Property Subject,Thumbprint,NotBefore,NotAfterYou can see from the result that you now have a self-signed certificate with a 24-month validity.

Cloning An Existing Self-Signed Certificate
Suppose your self-signed certificate is about to expire. If you still need the certificate, then the logical action is to renew it. But there’s no direct way to renew the certificate. What do you do? Either create a new self-signed certificate from scratch or clone the existing certificate.
Cloning the old certificate makes the new certificate inherit the old certificate’s properties, excluding the public key, thumbprint, serial number, and expiration date. For this reason, cloning the old certificate is the quicker option.
To clone a certificate, add the CloneCert parameter to the New-SelfSignedCertificate command. Follow the steps below:
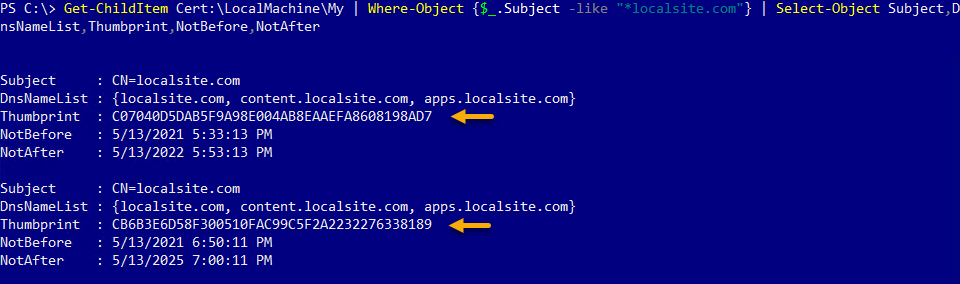
1. First, find the certificate you want to clone. To do that, run the Get-ChildItem command to list the existing certificates in the certificate store. In the below snippet, PowerShell is searching the local machine’s certificate store looking for all certificates with a subject ending with the string localsite.com and returning a few certificate attributes.
# Get all certificates whose Subject name is like localsite.com.
 Get-ChildItem Cert:\LocalMachine\My | Where-Object {$_.Subject -like "*localsite.com"} | Select-Object Subject,DnsNameList,Thumbprint,NotBefore,NotAfter
As you can see below, there could be more than one certificate matching the subject name you search for. In which case, inspect the list of certificates to determine which certificate to clone. After you’ve decided, copy the certificate’s thumbprint.
2. Now that you’ve determined the certificate to clone and copied its thumbprint, run the command below to retrieve the old certificate. Make sure to change the Thumbprint value to the thumbprint you copied in the previous step.
# Get the certificate and store it in the $certToClone variable
 $certToClone = Get-Item Cert:\LocalMachine\My\
3. Next, create a new certificate by cloning the original by running New-SelfSignedCertificate with the CloneCert parameter.
# Create cloned self-signed certificate
 $cert = New-SelfSignedCertificate -CloneCert $certToClone
Without specifying the NotBefore and NotAfter parameters, the new certificate will have the same validity period as the old certificate (i.e., two years). The NotBefore value will be the current date and time minus ten minutes.
Alternatively, to give the new certificate a different validity period, run the same command but add the NotAfter parameter. For example, to make the certificate valid for four years, run the command below.
# Create cloned self-signed certificate valid for four years
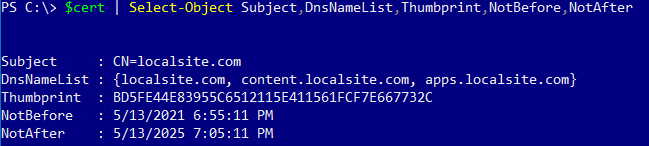
$cert = New-SelfSignedCertificate -CloneCert $certToClone -NotAfter (Get-Date).AddYears(4)4. Finally, run the command below to verify the new certificate you’ve created.
# Display the cloned certificate properties
 $cert | Select-Object Subject,DnsNameList,Thumbprint,NotBefore,NotAfter
As you can see below, you have now cloned the self-signed certificate with the same subject and alternative names as the original. The thumbprint, start date, and expiration date are new.
Creating A Code-Signing Certificate
To ensure that your script or code bears a digital signature, you must sign your scripts using a code-signing certificate. The New-SelfSignedCertificate cmdlet is capable of creating code-signing certificates, too.
To create a self-signed code-signing certificate, run the New-SelfSignedCertificate command below in PowerShell. The Type parameter specifies to create a CodeSigningCert certificate type. The certificate will be valid for 24 months. Note that assigning a specific validity period is optional with the NotAfter parameter.
# Create a self-signed code signing certificate valid for 24 months.
$cert = New-SelfSignedCertificate -Subject CodeSigningCert -NotAfter (Get-Date).AddMonths(24) -Type CodeSigningCert
After generating the code-signing certificate, run the command below to confirm that the EnhancedKeyUsageList value shows the certificate’s valid key usage is Code Signing.
$cert | Select-Object Subject,EnhancedKeyUsageList
Creating A Document Encryption Certificate
When you have contents you want to protect from prying eyes like documents or emails, encryption is one way of protecting them. But first, you need a type of certificate for document encryption, which you can also create using the New-SelfSignedCertificate cmdlet.
To create a document encryption certificate, the New-SelfSignedCertificate cmdlet requires a specific set of KeyUsage values. These values are:
- DataEncipherment – The certificate will be valid for encrypting data.
- KeyEncipherment – The certificate will be valid for encrypting secret/private keys.
- KeyAgreement – The certificate will be valid for deriving cryptographic keys, such as in Elliptic Curve Cryptography.
Also, the Type parameter value must be DocumentEncryptionCert.
Run the command below to create a self-signed certificate for document encryption. The certificate will be valid for two years. To keep the command more readable, the code below uses splatting to define the parameter values.
Because encrypting content is typically for personal use, creating the document encryption certificate in the current user personal certificate store is appropriate. Doing so restricts the certificate to the current user (you) to encrypt and decrypt contents.
# Define the certificate parameter values
$certSplat = @{
	DnsName = 'DocEncCert'
	KeyUsage = @('KeyEncipherment','DataEncipherment','KeyAgreement')
	Type = 'DocumentEncryptionCert'
	CertStoreLocation = 'Cert:\\CurrentUser\\My'
	NotAfter = (Get-Date).AddYears(2)
}
# Create the self-signed document encryption certificate
$cert = New-SelfSignedCertificate @certSplat
Next, to verify the self-signed certificate is valid for code signing, run the command below to get the certificate’s EnhancedKeyUsageList value.
$cert | Select-Object Subject,EnhancedKeyUsageListAs you can see from the result below, the certificate lists Document Encryption, which means that the certificate is valid to use for document encryption.

Now that you have a document encryption certificate, you can encrypt and decrypt contents using the Protect-CmsMessage and Unprotect-CmsMessage cmdlets.
Conclusion
This article aimed to teach you how you can quickly acquire self-signed certificates for your testing and development needs. You learned how to create self-signed certificates using different parameters and for different purposes.
There are more parameters that you can explore that this article did not cover. How about creating a S/MIME certificate for securing emails or certificates with stronger algorithms? You’d probably want to learn how to export and import those certificates too. Good luck!


