


Do you manage Ubuntu servers but aren’t fans of doing everything in the command line? Maybe you’re more comfortable managing servers via remote desktop (and that’s perfectly alright). Lucky for you, there’s a way to access your systems remotely by setting up an Ubuntu VNC server.
Prerequisites
This tutorial will be a hands-on demonstration. If you’d like to follow along, be sure you have the following.
- You need an Ubuntu server. This tutorial uses Ubuntu Server 20.04.
- You have installed a Desktop Environment on the server. This tutorial will be using the XFCE desktop on Ubuntu.
- You’ll need an SSH client for logging in to the server remotely.
- You must have a non-root user account with sudo privileges.
- You also need a VNC client such as the VNC Viewer, which this tutorial will use.
Installing the Ubuntu VNC Server
By default, Ubuntu does not have a VNC server installed. You will need to install the Ubuntu VNC server first before you can access your server’s remote desktop.
TightVNC is a popular VNC server known for its low resource requirements and fast performance. As such, TightVNC is a good Ubuntu VNC server choice for smooth and stable VNC sessions, even on slow internet connections.
Follow the below steps to install TightVNC.
1. First, open your SSH client and log in to the Ubuntu server.
2. Run the command below to ensure that your Ubuntu server has the latest package lists.
sudo apt update -y3. Now, install the TightVNC server by running the below command. sudo apt install tightvncserver -y
sudo apt install tightvncserver -yWait for the installation to complete, and you should get a result similar to the screenshot below.

4. After installing, the VNC server does not start automatically. To manually start the VNC server, run the below command.
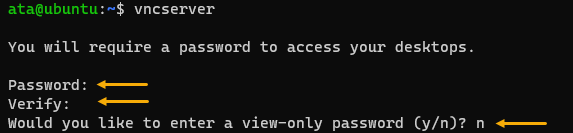
vncserver5. The first time you start a VNC instance, the server will ask you to create a password. Type in the new secured password and press Enter. You will need this password to remotely connect to your VNC server from another machine.
The password must be within six and eight characters long. Passwords longer than eight characters will be truncated to fit the maximum of eight characters long.
After creating a password, vncserver asks you to set a View-only password. This option allows users to view your VNC session without the ability to control it. Do not set a View-only password at this time. Input n and press Enter.
If you need to change the VNC password later, you can do so by running the
vncpasswdcommand.
6. Once you press Enter, vncserver will start and you will see the following output. vncserver creates a startup script named .vnc/xstartup under your home directory.
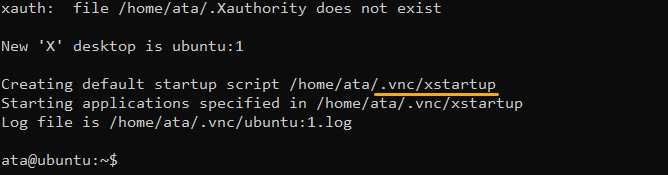
5901 is the default VNC port, also called the display port. The last digit represents the VNC server instance number. If you need to start another VNC server instance, run the
vncservercommand and append the instance number.For example, to start a VNC server instance on port 5902 (instance 2), run the command
vncserver :2.
Configuring the Ubuntu VNC Server Desktop Manager
At this point, you have a running Ubuntu VNC server. But before you can start using it, you need to tell your VNC server the default desktop environment to launch when you log in.
1. Before making any changes, kill the default VNC server instance running on port 5901 by running the following command. vncserver -kill :1  Stopping the Ubuntu VNC server instance
vncserver -kill :1In case you have more than one VNC server instance running, you can kill them with
vncserver -kill :2andvncserver -kill :3, and so on.
2. Make a backup of the default VNC server configuration file by running the following command. You should back up the file if you need to revert the changes.
mv ~/.vnc/xstartup ~/.vnc/xstartup.bak3. Now, open the ~/.vnc/xstartup file for editing. This example uses nano as the text editor.
nano ~/.vnc/xstartup4. Populate the file with the following code. To better understand the code, below are a brief explanation of each line.
#! /bin/bash: This line tells the system what interpreter to use to execute the succeeding commands. In this case, the Bash interpreter.xrdb $HOME/.Xresources: This line tells the VNC server to read the user’s.Xresourcesfile (if exists). This file contains settings that modify the look and feel of the graphical desktop, like graphical colors and font rendering.startxfce4 &: This line starts the XFCE desktop environment. You can substitute this line withstartkdeorstartgnomeif you are using KDE or GNOME desktop environments, respectively. The&symbol at the end tells the command to run in the background
#!/bin/bash
xrdb $HOME/.Xresources
startxfce4 &
Your file should look similar to the screenshot below. 

& symbol at the end tells the command to run in the background5. Next, make the xstartup file executable. The below command tells the system to give the file owner (you) execute permission for the file.
chmod +x ~/.vnc/xstartupSecuring Ubuntu VNC Server Access
By default, the VNC server accepts incoming connections from any host. This default setting leaves your Ubuntu VNC server open to anyone who knows your IP address – which can be a security risk.
You can secure your VNC connection by using an SSH tunnel. The SSH tunnel will create a secure connection between your local computer and the Ubuntu VNC server. This way, you would not need to open new ports on your firewall to allow connectivity to your VNC server instances.
1. First, start a VNC server instance on your server by running the command below. The -localhost parameter binds the VNC server instance to the server’s loopback interface. This VNC instance will only accept connections locally and effectively lock down access from anywhere else.
vncserver -localhost2. Once you’re started a VNC server instance, open a new terminal window on your computer and establish an SSH tunnel to the remote Ubuntu VNC server by running the below ssh command line. To better understand the command, refer to the inline comments.
# Create an SSH Tunnel to the Ubuntu VNC Server
## -L : creates a secure tunnel from the local port (59000) to the remote port (5901) on the VNC server.
## -C : compress all data sent through the tunnel to optimize bandwidth usage.
## -N : tells ssh not to execute any remote commands, and you will not get a shell.
## -l : to specify the username to log in. Do not use a root account here.
## SSHServer : replace this with your Ubuntu VNC server’s IP address, FQDN, or hostname.
ssh -L 59000:localhost:5901 -C -N -l username SSHServer
If you’re connecting to the server for the first time, ssh will ask you to confirm the host’s fingerprint. Type yes and press Enter.
Type in the user account password at the password prompt and press Enter. At this point, the SSH tunnel is now open. Do not close the terminal, or the SSH tunnel will terminate, too.

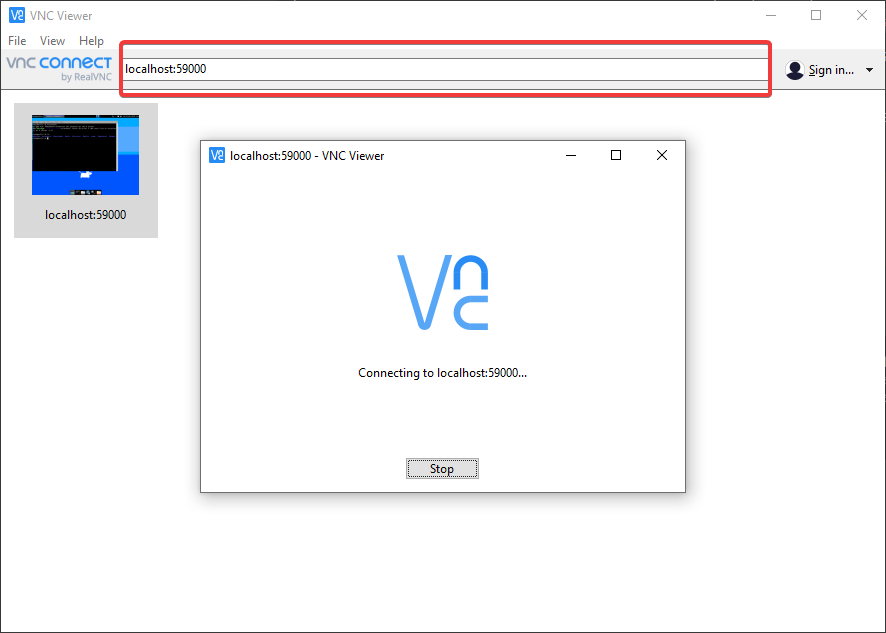
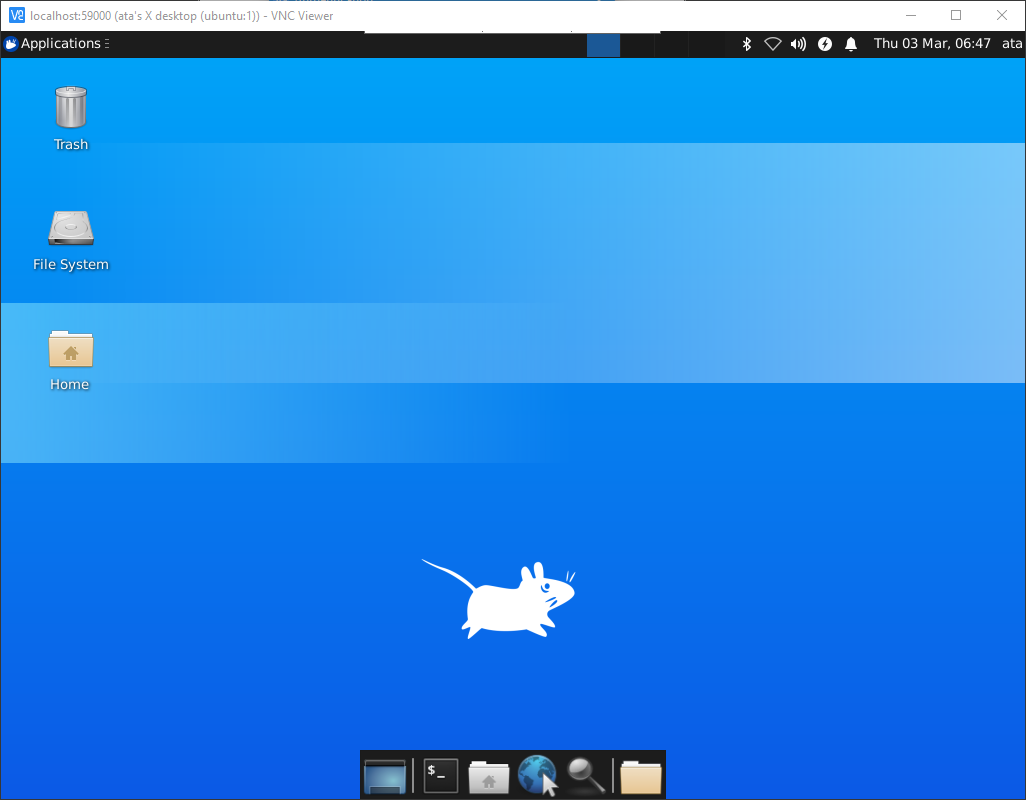
3. Now, open your preferred VNC viewer on your computer. Type localhost:59000 in the address text box at the top and press Enter.
4. Type in your VNC password into the authentication prompt and click OK.
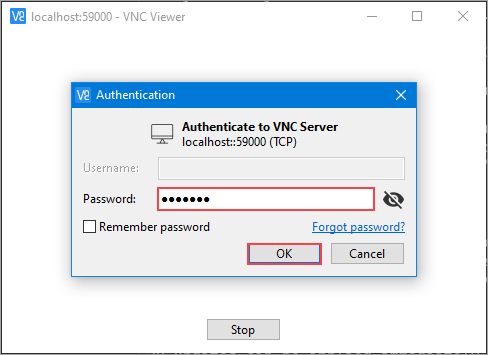
You will now have a secure connection to your VNC desktop, as shown below.
Setting Up Ubuntu VNC Server as a Service
The VNC server installs without a built-in daemon. This situation means that by default, you’ll need to start the VNC server instance manually every time you need to access the remote desktop.
But you can work around that limitation by turning the VNC server into a service – which runs automatically at startup. And below are the steps to enable the Ubuntu VNC server to autostart.
1. First, kill the running VNC server instance.
vncserver -kill :12. Run the below command to create a new systemd unit file and open it in nano for editing. The unit name can be anything you want. In this example, the name would be atavncserver.service.
sudo nano /etc/systemd/system/atavncserver.serviceNext, copy the code below and paste it into your text editor.
Make sure to replace every instance of the word USERNAME with your username.
To adjust the color depth and screen resolution, modify the -depth and -geometry parameter values, respectively. In this example, the color depth is 24 (bit), and the resolution is 1280x800.
[Unit]
Description=VNC Server
After=syslog.target network.target
[Service]
Type=forking
User=USERNAME
Group=USERNAME
WorkingDirectory=/home/USERNAME
PIDFile=/home/USERNAME/.vnc/%H:1.pid
ExecStartPre=-/usr/bin/vncserver -kill :1 > /dev/null 2>&1
ExecStart=/usr/bin/vncserver -depth 24 -geometry 1280x800 -localhost :1
ExecStop=/usr/bin/vncserver -kill :1
[Install]
WantedBy=multi-user.target
Save the file by pressing Ctrl+O → Enter → Ctrl+X.
4. Next, run the below reload the systemd service manager configuration. This step essentially adds the service you created to the available service list. sudo systemctl daemon-reload
sudo systemctl daemon-reload5. Now that the system recognizes the new atavncserver service run the below command to enable that service.
sudo systemctl enable atavncserver.service6. Start the VNC server instance as a service by running this command.
sudo systemctl start atavncserver7. To find out if the service has started, run the below command to check the service status. sudo systemctl status atavncserver
sudo systemctl status atavncserverYou should see a similar to the screenshot below showing that the service status is active (running).
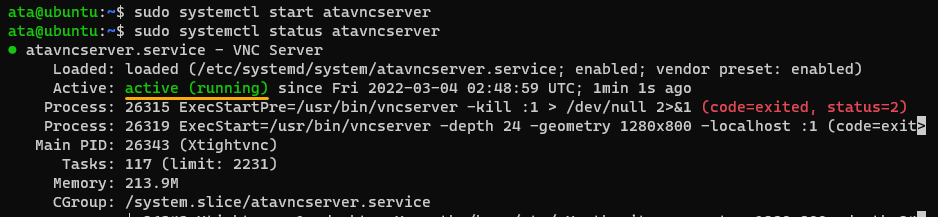
You now have a Ubuntu VNC server service that runs at startup automatically. And being a service, you can now perform the start, stop, reload, and restart with the systemctl command.
Conclusion
In this tutorial, you have learned how to install and configure an Ubuntu VNC server. You have also learned to secure your VNC connection with an SSH tunnel. At this point, you should be able to connect to your VNC desktop from any computer or device securely and easily.
Perhaps you could try setting up VNC Connect on Raspberry Pi devices next with this newfound knowledge? Thank you for reading, and happy learning!


