

Grappling with the intricacies of managing certificates, routing, and securing your applications is a common struggle and can be a real headache. The good news is that there is a way to navigate these complexities — Traefik and LetsEncrypt with k3s Kubernetes.
In this tutorial, you will learn how this trio can help streamline operations and ensure secure communication while managing certificates effortlessly.
Read on and start creating a robust foundation for secure and efficient operations!
Prerequisites
Before you dive deeper, ensure you have the necessary components and information in place to follow along in this tutorial:
- A ready domain name you want your cluster accessed over HTTPS – This tutorial uses thriveread.site.
- A domain DNS A record pointing to your IP address.
- A working remote server – This guide uses Ubuntu 22.00 LTS, but you can use AWS EC2 to create a K3s cluster.
Installing a k3s Cluster
Coming off the back of your prerequisites checklist, it is time to dive into the heart of the matter — installing a k3s cluster. This process is crucial to leveraging the power of Traefik and Let’s Encrypt effectively.
Engineering k3s production access with valid TLS certificates creates trust in whoever is accessing your services by enhancing SSL/TLS from your k3s installation.
To install a k3s cluster, carry out these steps:
Open a terminal on your server, and run the below command to perform the following:
- Download (
curl) the latest k3s binaries from thehttps://get.k3s.ioURL silently and follow redirects if necessary (-sfL).
- Set an environment variable (
INSTALL_K3S_EXEC), specifying the SERVER_IP address for which TSL certificates should be generated (--tls-san). Thus, ensure you replaceSERVER_IPwith your server’s IP address.
This way, your server IP address is added as Subject Alternative Name (SAN), so k3s can securely communicate over TLS using your server IP address. - Execute shell commands (
sh) that make the shell read commands from the standard input (-s) and specify the permissions mode for the generated kubeconfig file (--write-kubeconfig-mode).
In this case, the shell command sets the mode to644, which sets the file to be readable and writable by the owner and readable only by others.
In summary, this command immediately installs and starts a k3s cluster.
curl -sfL https://get.k3s.io | INSTALL_K3S_EXEC="--tls-san SERVER_IP" sh -s - --write-kubeconfig-mode 644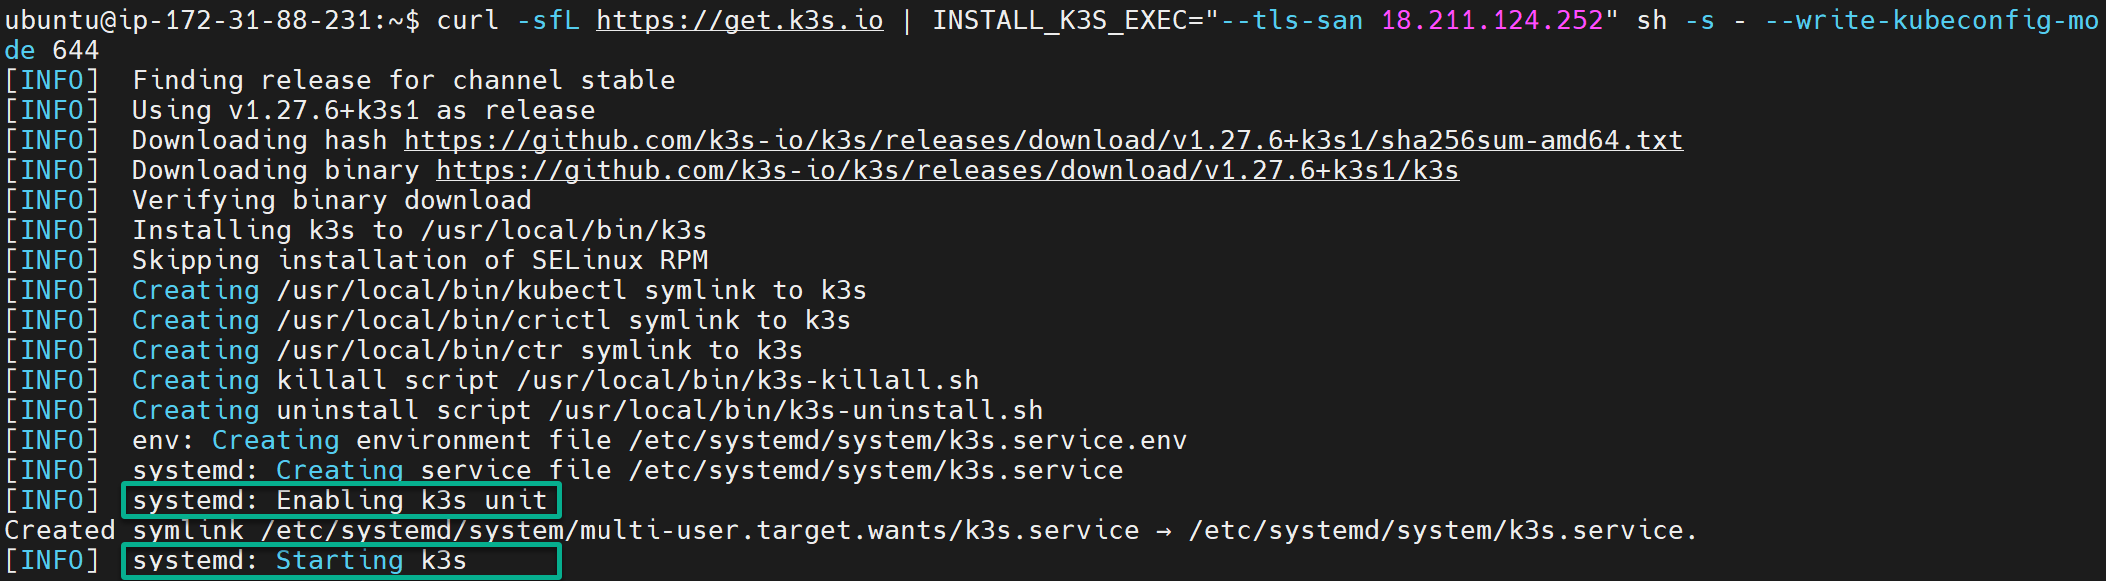
Next, run each kubectl command below to get all nodes in your cluster and an overview of your cluster’s configuration.
# List all nodes in the cluster
kubectl get nodes
# View the cluster's configuration
kubectl cluster-info
The following output, where you see a master node in Ready status, confirms your k3s cluster is correctly installed and ready to run your workload.
At this point, your domain name sends traffic to your server.

Configuring a Cert-Manager with k3s
With your k3s cluster running, it requires a way to handle certificates seamlessly. A cert-manager uses certificate issuers such as Let’s Encrypt to add certificates to your Kubernetes cluster.
Imagine your applications needing to communicate securely over the internet. In such cases, SSL certificates come into play.
To configure a cert-manager for secure connections, proceed with the following:
1. Execute the below command to create a Kubernetes namespace called cert-manager (arbitrary) you will use to manage any generated certificates.
If successful, creating a namespace does not produce output on the terminal, which applies throughout this tutorial.
kubectl create namespace cert-manager💡 Note that you can also get a cert-manager using Helm charts.
2. Next, run the kubectl apply command to create Custom Resource Definitions (CRDs) and deploy the cert-manager and its components to your k3s cluster.
kubectl apply -f https://github.com/cert-manager/cert-manager/releases/download/v1.13.1/cert-manager.yaml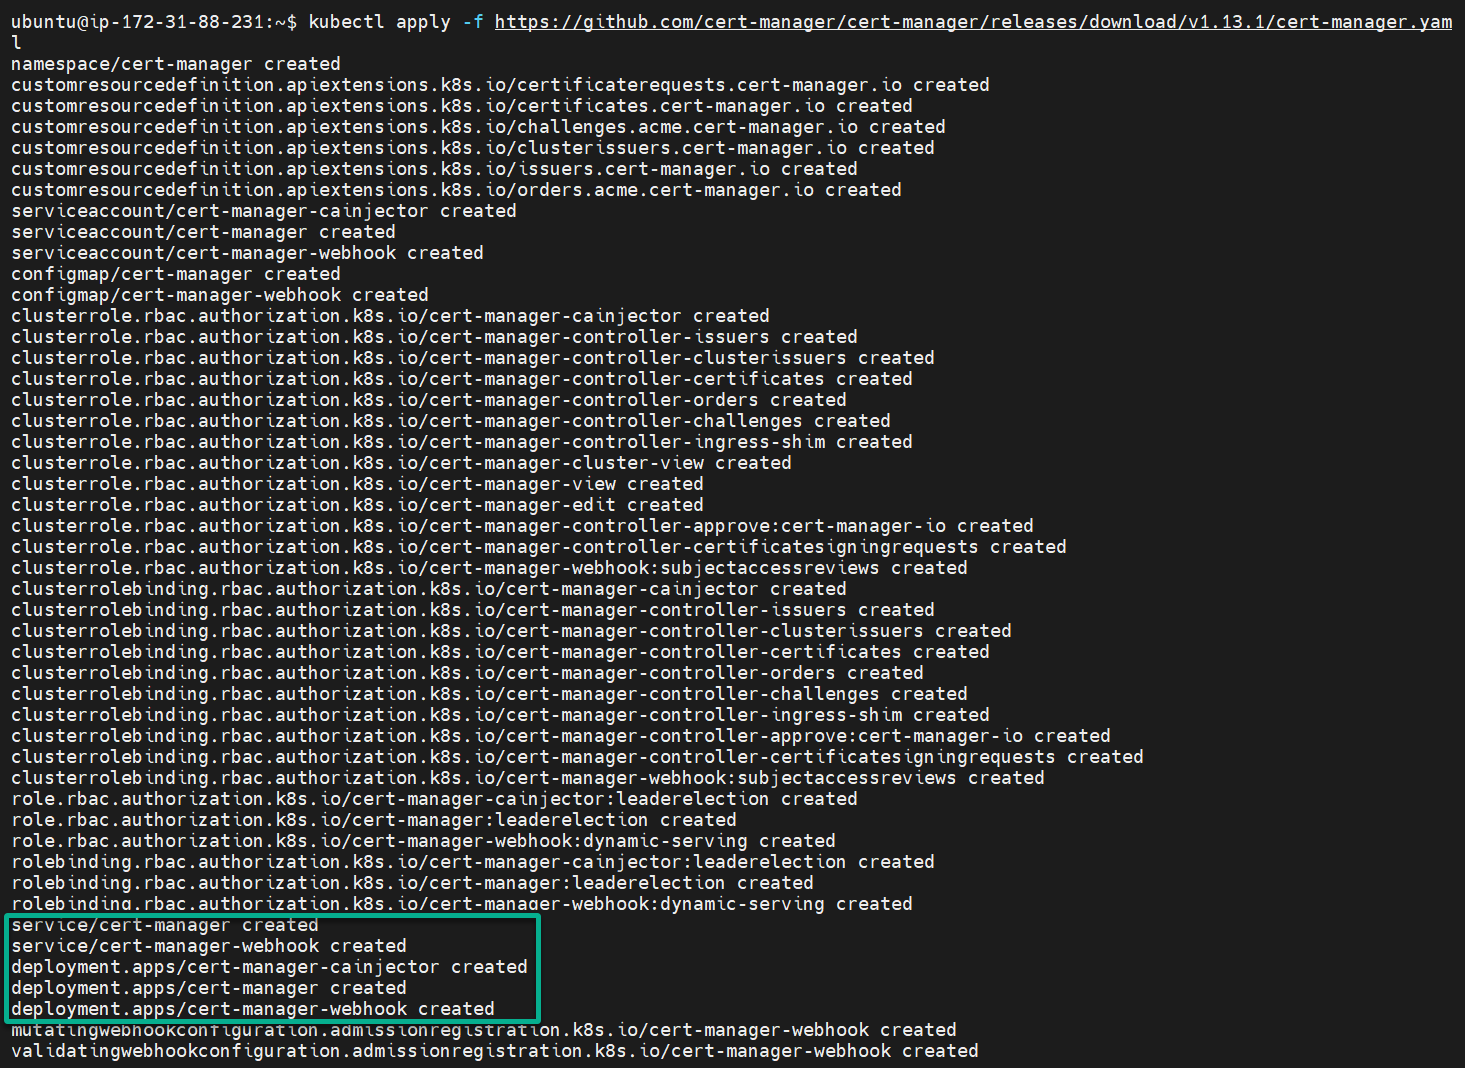
3. Finally, run the following command to query your k3s cluster and get a list of all the pods in the cert-manager namespace.
kubectl get pods --namespace cert-managerThe Running state below verifies your deployed cert-manager runs as expected.

Ensuring Seamless Certificate Renewals with a ClusterIssuer
After laying the foundation for secure communication with your cert-manager, you need a bridge between your cert-manager and your k3s cluster — a ClusterIssuer. This bridge ensures your certificates are issued and renewed seamlessly.
In this example, you use the ACME issuer server to generate cert-manager keys over HTTP01 (Ingress solver) challenge validation.
To ensure seamless certificate renewals, follow the steps below:
1. Create a certs.yml file with your preferred editor (i.e., Visual Studio Code), populate the following configuration, and save and close the file.
This configuration establishes a ClusterIssuer named letsencrypt-certificate associated with a Let’s Encrypt account.
Moreover, this configuration defines the settings for certificate issuance. These settings include how to handle challenges for validation through an Ingress controller (traefik).
apiVersion: cert-manager.io/v1
kind: ClusterIssuer
metadata:
  # Name your ClusterIssuer resource
  name: letsencrypt-certificate
  # Add the cert-manager namespace you created earlier
  namespace: cert-manager
spec:
  acme:
    # Let's Encrypt ACME server (The server URL)
    server: https://acme-v02.api.letsencrypt.org/directory
    # Replace this with your email to be associated with the Let's Encrypt account
    email: [email protected]
    privateKeySecretRef:
      # Name a secret key you'll use on Ingress to access ClusterIssuer
      # This key's name tells ClusterIssuer where the private key is stored
      name: example.letsencrypt.key.tls
    solvers:
    - selector: {}
      # Add http01 challenge for key validation
      http01:
        ingress:
          # Specify the Ingress controller that will use the HTTP01 challenges
          class: traefik
2. Next, execute the below kubectl apply command to deploy the ClusterIssuer resource in your certs.yml configuration file to your k3s cluster.
kubectl apply -f certs.yml
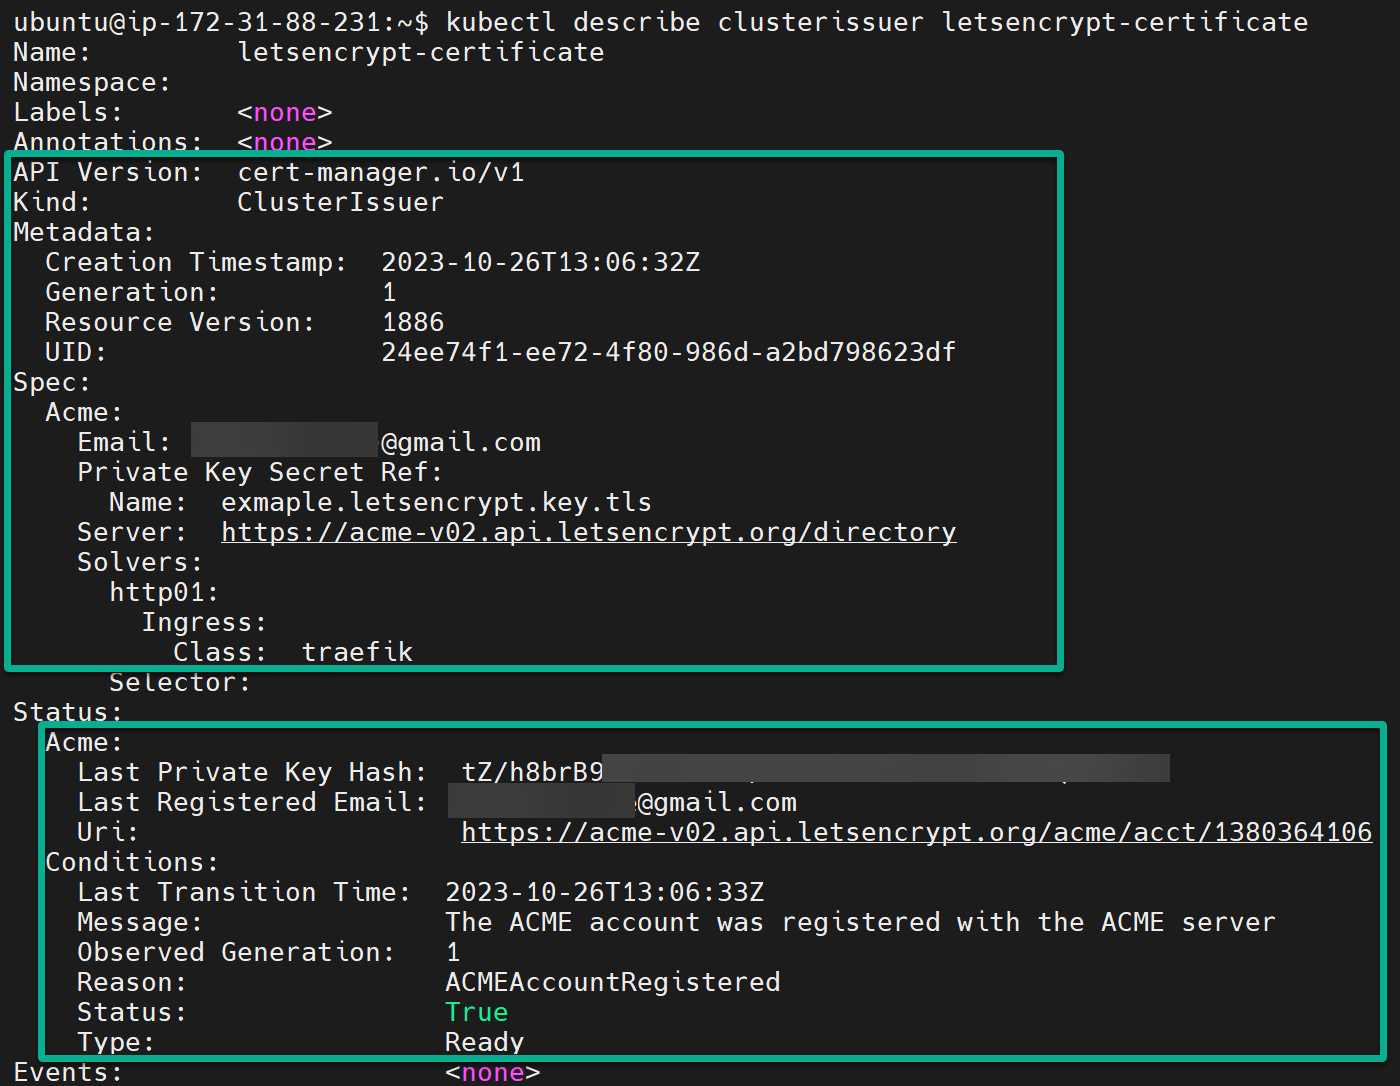
ClusterIssuer resource to the k2s cluster3. Once deployed, run the command below to retrieve (describe) detailed information about your ClusterIssuer resource (letsencrypt-certificate).
kubectl describe clusterissuer letsencrypt-certificateIf successfully deployed, your ClusterIssuer will have properly applied certificate keys and ACME server Ready, as shown below.
4. Now, run the following command to retrieve a list of CRDs related to the cert-manager.
kubectl get cert-managerThe output below demonstrates that the CRDs for cert-manager have been properly configured and are accessible within your k3s cluster. This configuration is an essential prerequisite for your cert-manager to manage TLS certificates correctly.

Configuring Your k3s Cluster with Traefik and Cert-Manager
Like deploying a ClusterIssuer for certificate renewals, seamless and secure certificate management is equally crucial. Configuring Traefik for routing and cert-manager is critical to a robust and secure Kubernetes setup.
By now, you have LetsEncrypt ready to expose your Ingress controller and deliver secure Kubernetes traffic to your cluster. But imagine having a perfectly orchestrated symphony of tools working harmoniously in your k3s cluster — sheer convenience!
To configure your k3s cluster with Traefik and cert-manager, you must create a deployment and a service for your application using NGINX as follows:
1. Execute the following command to create a namespace called deployment (arbitrary) for your application.
kubectl create namespace deployment2. Next, create a deployment.yml file, add the following configurations, save the file, and close the editor.
These configurations create a Deployment and a Service to run and expose your NGINX container.
# Define a Deployment resource
apiVersion: apps/v1
kind: Deployment
metadata:
  # Name of the Deployment resource
  name: nginx-dep
spec:
  # Create one replica of the pod
  replicas: 1
  selector:
    # Label used to select pods controlled by this Deployment
    matchLabels:
      app: nginx
  template:
    metadata:
      labels:
        # Label applied to pods created by this Deployment
        app: nginx
    spec:
      containers:
      - name: nginx
        # Use the latest NGINX image
        image: nginx:latest
        ports:
        - containerPort: 80

# Define a Service resource
---
apiVersion: v1
kind: Service
metadata:
  # Name of the Service resource
  name: nginx-srv
spec:
  selector:
    # Label used to select pods that this service applies to
    app: nginx
  ports:
    - protocol: TCP
      # Service listens on port 80
      port: 80
      # Forward traffic to pods on port 80
      targetPort: 80
  # Type of the Service (ClusterIP in this case)
  type: Cluster
3. Now, run the below command to apply the configurations defined in the deployment.yml file, which creates and exposes your NGINX container.
kubectl apply -f deployment.yml
4. Once created, invoke each command below to retrieve (get) information about your Kubernetes resources, which are deployment (nginx-dep) and service (nginx-srv).
kubectl get deployment nginx-dep
kubectl get service nginx-srv
The output below confirms your NGINX resources have been created successfully.

5. Create an ingress.yml file, populate the following configuration, save the file, and close the editor. This configuration adds Let’s Encrypt to the Traefik Ingress controller.
Ensure you replace the following with your own accordingly:
letsencrypt-certificate– The ClusterIssuer resource name.example.letsencrypt.key.tls– ThesecretNameadded asprivateKeySecretRefname in your ClusterIssuer.domain_name– The domain name you used to access your k3s server via IP address.nginx-srv– The service name for exposing your NGINX container.
apiVersion: networking.k8s.io/v1
kind: Ingress
metadata:
# Name the Ingress resource
  name: nginx-ingress
  annotations:
    # Use Traefik as the Ingress controller
    kubernetes.io/ingress.class: traefik
    # Add Cert-Manager SSL certificates as the name of the ClusterIssuer resource
    cert-manager.io/cluster-issuer: letsencrypt-certificate
spec:
  # TLS configuration for HTTPS
  tls:
    # TLS secretName used on ClusterIssuer
    - secretName: example.letsencrypt.key.tls
      hosts:
        # Replace with your domain name
        - domain_name
  # Create Ingress routing rules
  rules:
  # Replace with your domain name
  - host: domain_name
    http:
      paths:
      - path: /
        pathType: Prefix
        backend:
          service:
           # Name of your service resource
            name: nginx-srv
            port:
             # Port number to forward traffic to
              number: 80
6. Now, run the below command to apply the configurations defined in the ingress.yml file, which deploys the Ingress controller.
kubectl apply -f ingress.yml
7. Following the deployment, run the command below to retrieve (get) a list of ingress resources in your k3s cluster.
kubectl get ingressThe output below indicates that the Ingress resources have been successfully created.

8. Next, run the following command to view (describe) detailed information about the specified certificate resource.
This command is useful for inspecting the status and details of certificates within your k3s cluster.
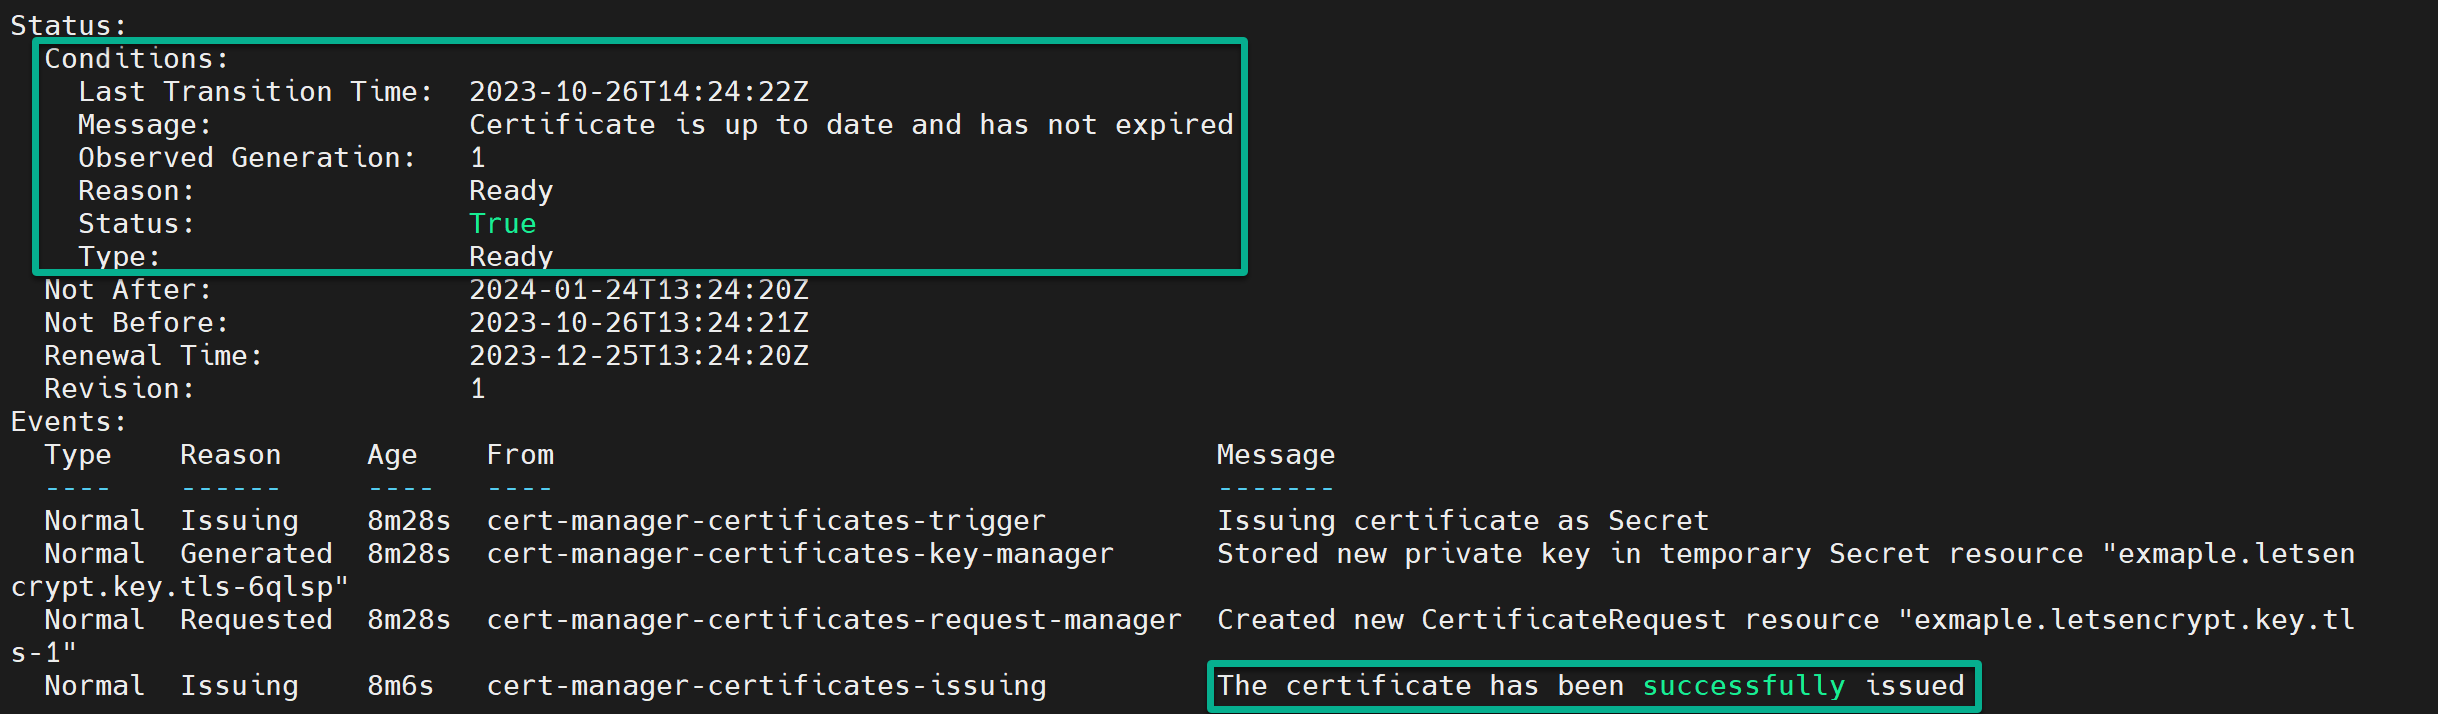
kubectl describe certificateAs shown below, Let’s Encrypt verifies that the TLS certificate has been successfully applied to your Ingress.
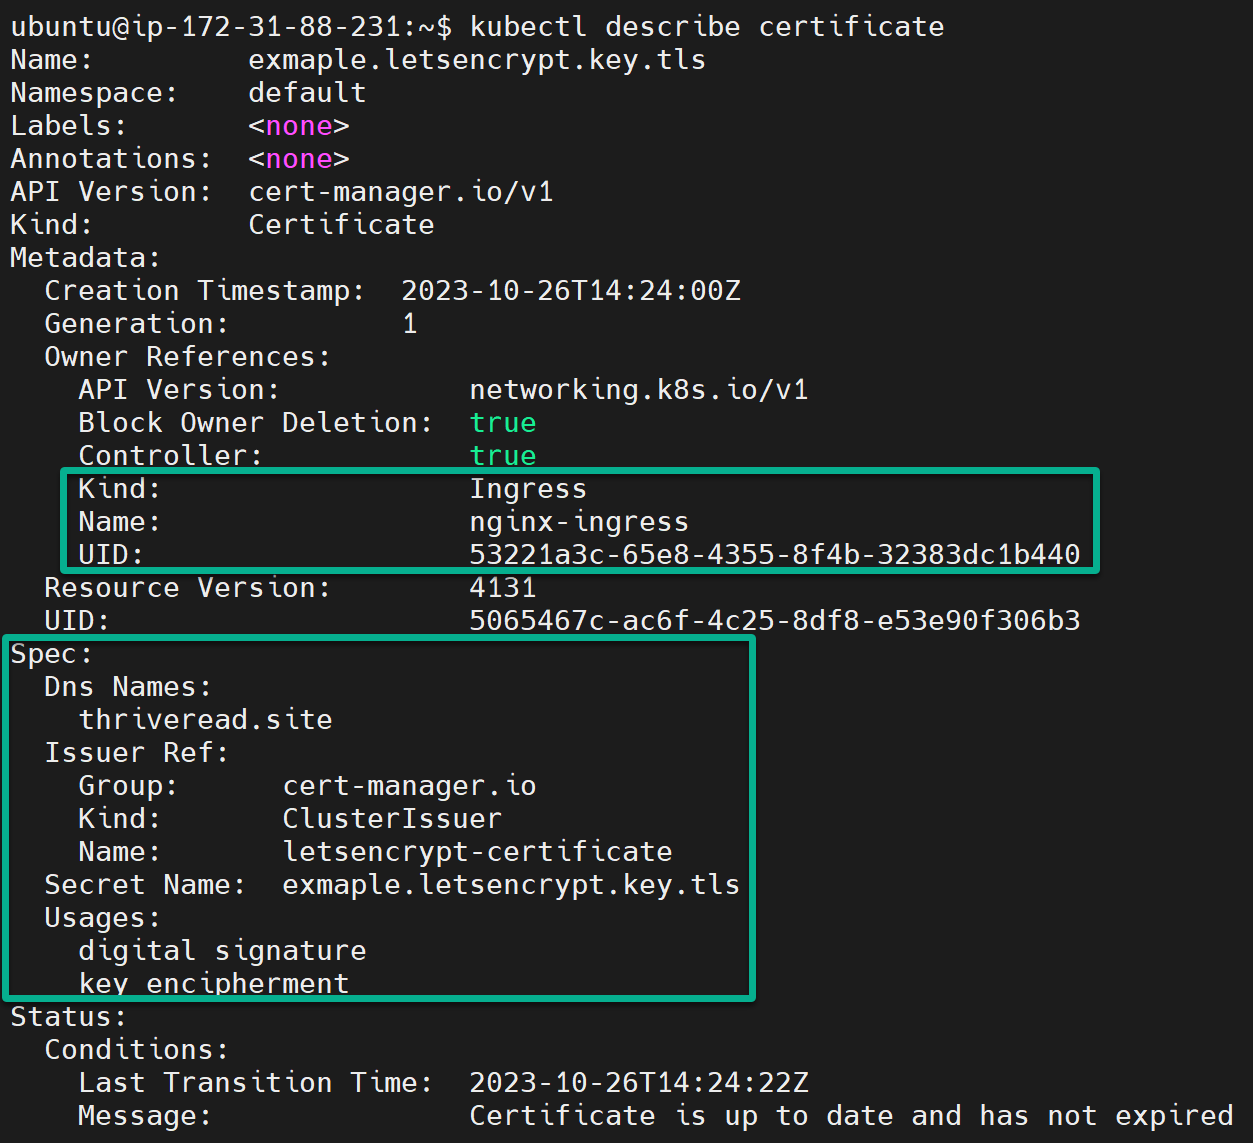
At the same time, the Status and Events sections confirm the cert-manager is successfully issued and ready to route traffic to your k3s cluster securely.
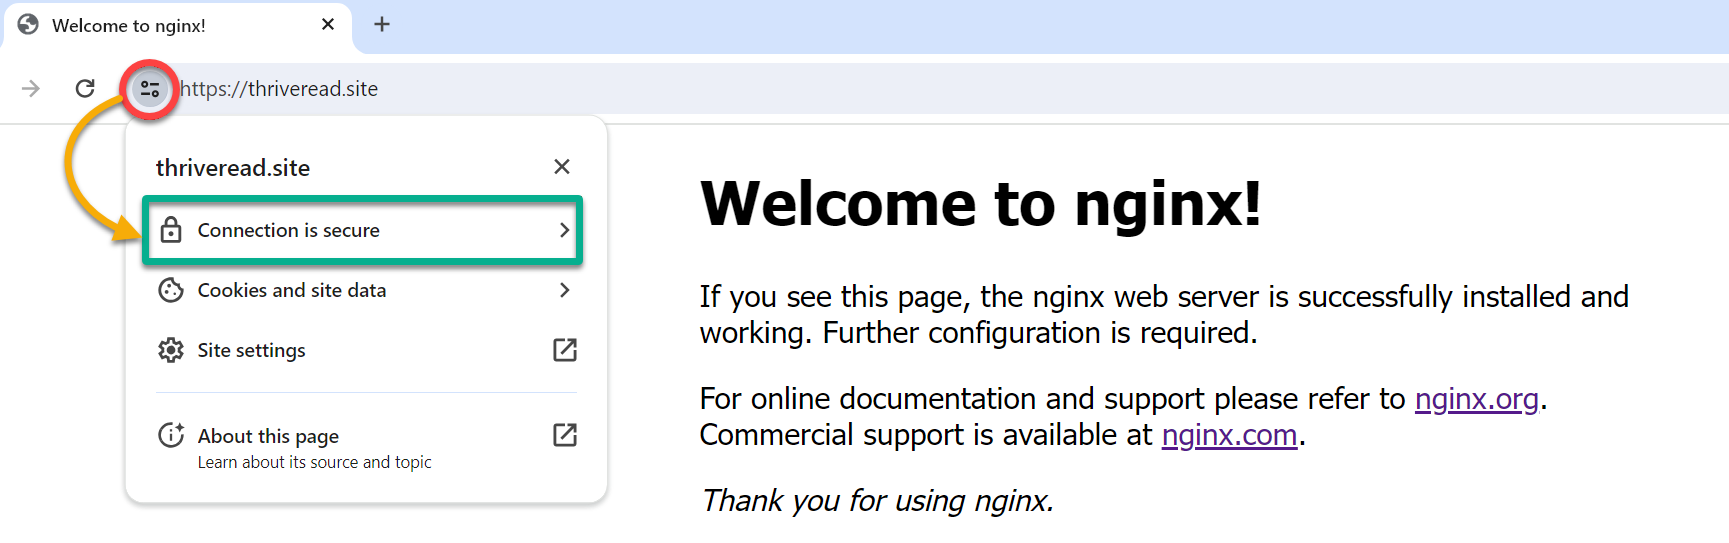
9. Head over to your domain name and verify if a valid certificate was deployed to your cluster.
If everything works well, you can access your cluster over secure HTTPS connections with a valid certificate by Let’s Encrypt, as shown below.
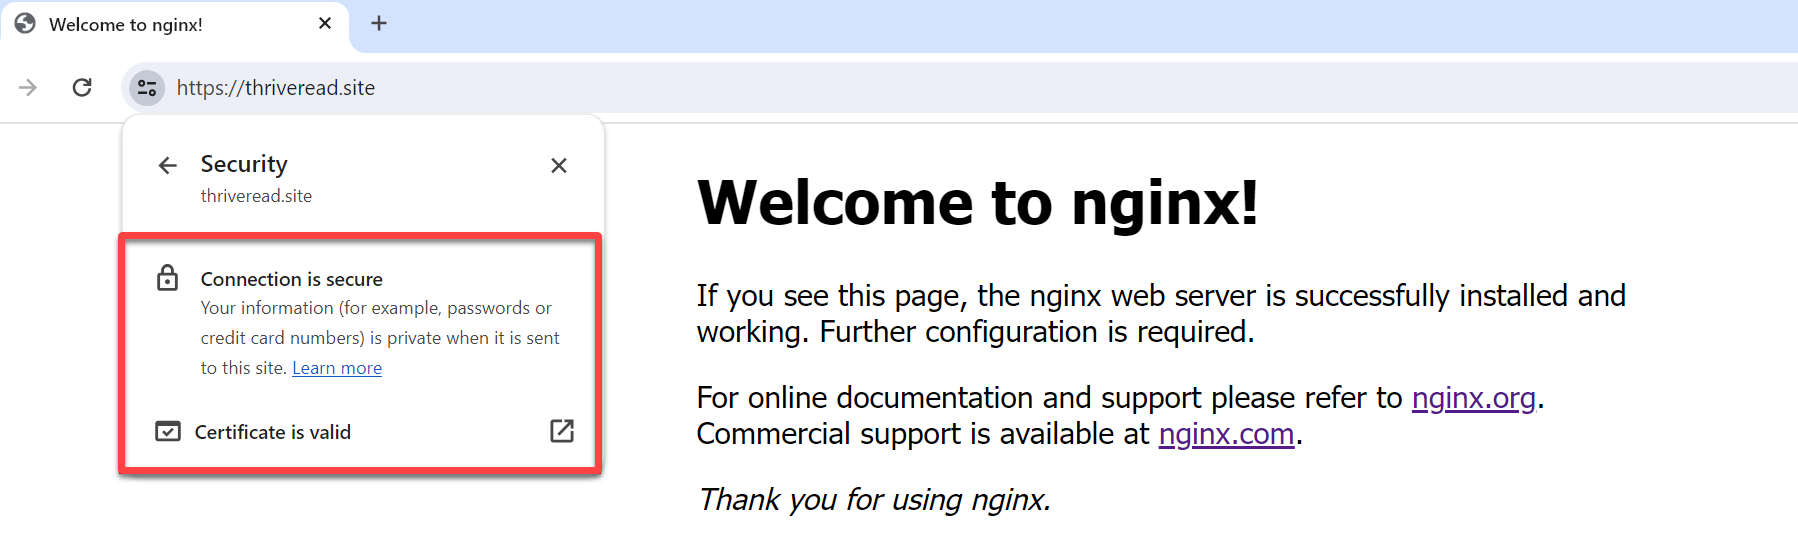
10. Finally, expand Connection is secure, and you can verify the certificate is valid as follows.
Conclusion
You have just completed an exhilarating journey through the intricacies of setting up a robust and secure Kubernetes environment with Traefik and Let’s Encrypt with k3s Kubernetes. From installing the k3s cluster to configuring a cert-manager and ensuring seamless certificate renewals with a ClusterIssuer.
Now, armed with this newfound knowledge, there are endless possibilities to explore. Why not consider fine-tuning your configurations to suit specific project requirements? Or dive deeper and elevate Kubernetes security by keeping Kubernetes Secrets Safe?
The sky’s the limit, and your newly acquired skills are the launchpad to even more exciting Kubernetes adventures!


