

When your application needs exposure on a network, you need a powerful container orchestration system that lets you deploy, manage, and scale your applications. Which one to turn to? Look no further than Kubernetes Services!
A Kubernetes Service provides a stable endpoint for accessing your application from within or outside the cluster. And in this tutorial, you will learn the basics of Kubernetes Services, how they work, and how to create and configure different types of services.
Stay tuned and get started building reliable and scalable applications!
Prerequisites
This tutorial comprises hands-on demonstrations. To follow along, be sure you have a Kubernetes cluster already running.
Creating Basic Kubernetes Services via Kubectl
Before diving deep into Kubernetes, there is no better way than starting with the basics. The most common and widely used service type is ClusterIP. You will create this type of service, which is usually the default type if a service type is not specified.
ClusterIP services are typically used for internal communication within a Kubernetes cluster and are not exposed to the external network. A ClusterIP service is ideal for applications that need to communicate with each other within a cluster but do not need to be accessed by external clients.
To create a basic Kubernetes Service, follow these steps:
1. Open a terminal, run the following commands to create an nginx deployment, and get a list of available deployments.
# Creates an NGINX deployment called "nginx-web-server"
kubectl create deploy nginx-web-server --image nginx

# View the lists of deployments available in the cluster
kubectl get deployments
2. Next, run each kubectl command below to create a service to expose your NGINX deployment (nginx-web-server) and get all available services.
# Create a Service to deploy the NGINX deployment
kubectl expose deploy nginx-web-server --port 80
# View the lists of all available services
kubectl get services
Note the IP address (10.128.202.35) and port (80) of the ClusterIP service type attached to the nginx-web-service service for later use.

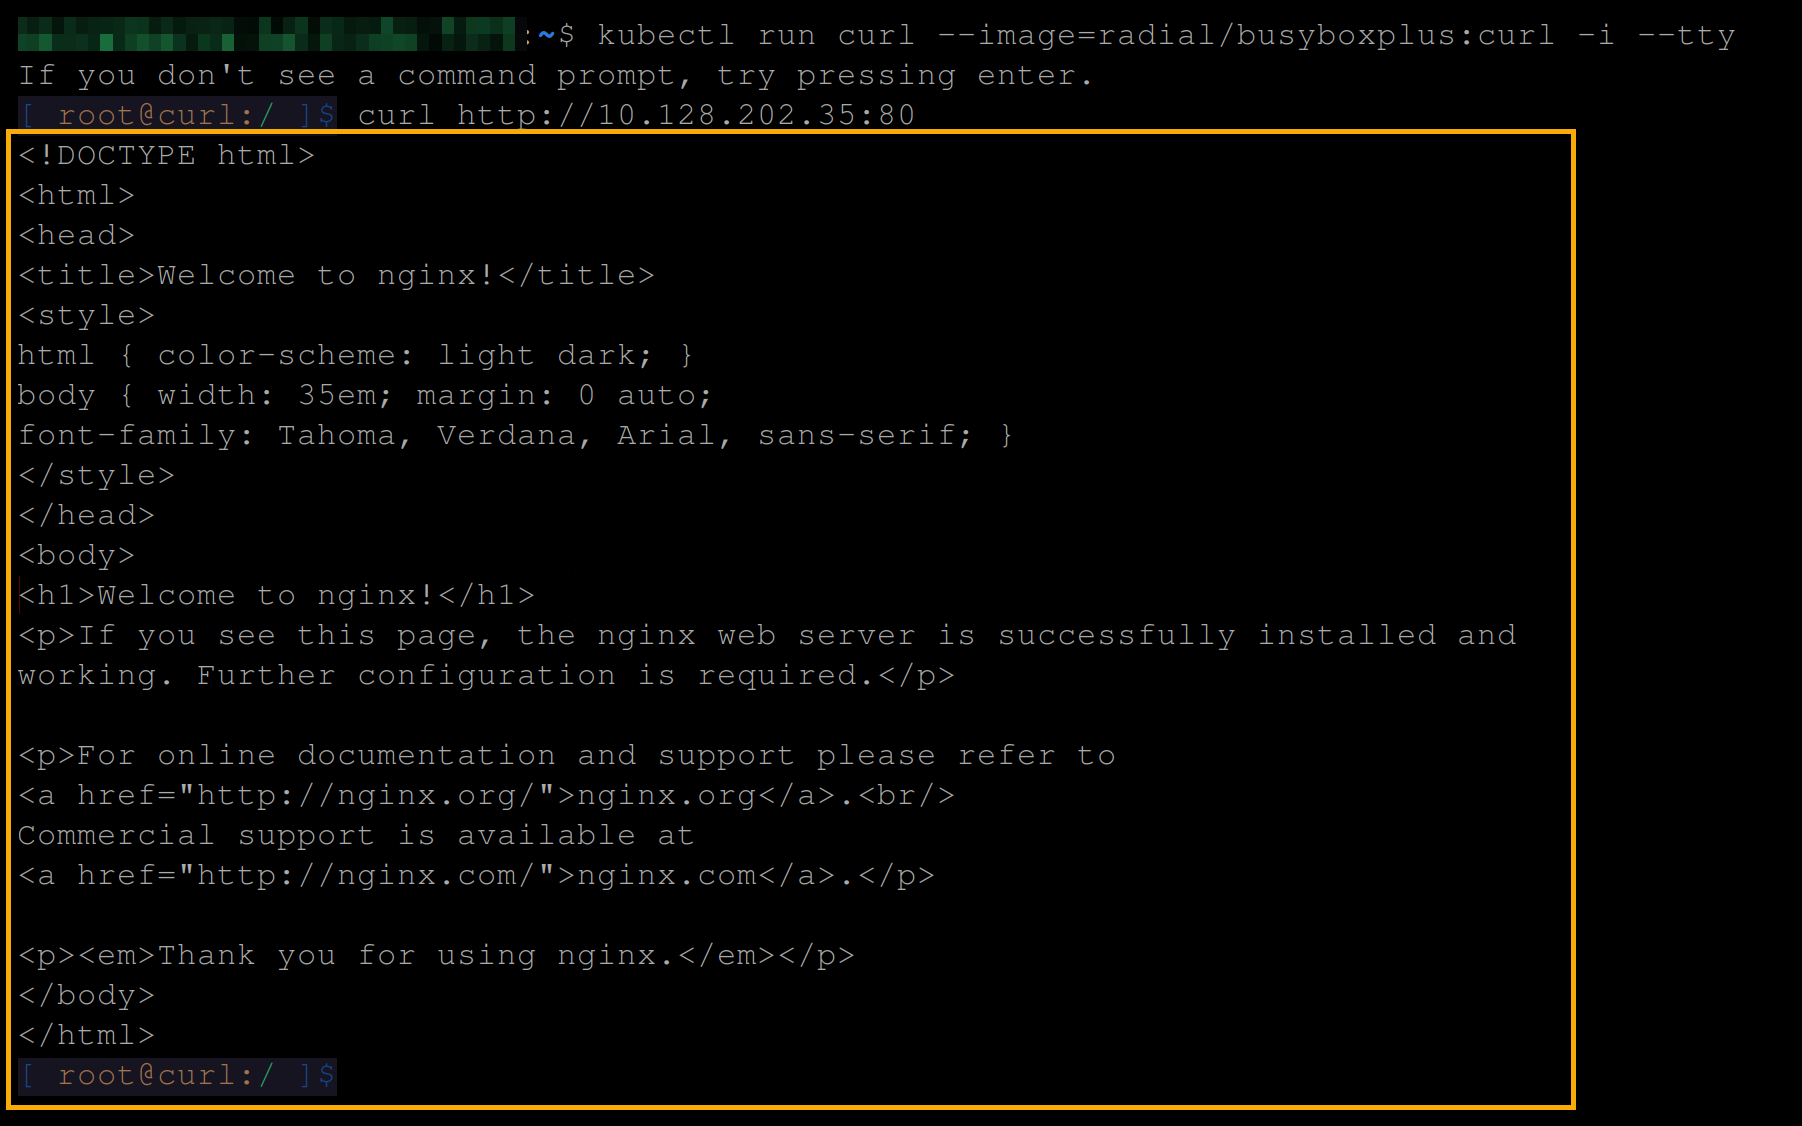
3. Run the below kubectl command to run a curl command within a pod in the same namespace as the service. This command checks if the service is accessible from inside the cluster.
kubectl run curl --image=radial/busyboxplus:curl -i --tty
4. Now, run either of the following curl commands to view the content of the nginx-web-server service of ClusterIP type. Ensure you replace <cluster-ip> and <port> with the IP address and port you noted in step two (i.e., http://10.128.202.35:80).
curl http://<cluster-ip>:<port>

# This command also works since the service only listens on a single port
curl http://<cluster-ip>
The image below shows the NGINX welcome page source code, which confirms the service has been exposed successfully.
5. Lastly, run the exit command below to exit the curl pod.
exit
Creating Multi-port Services
You now have a single NGINX service of ClusterIP running, which is a great start. But what if a pod runs multiple services or when a single service has multiple endpoints? How do you expose multiple ports on the same virtual IP address?
In this example, you will create a multi-port service that allows external clients to connect to multiple endpoints in a pod from within the cluster.
To create a multi-port service, you first have to deploy an app:
1. Run the below commands to create a deployment (deploy) in Kubernetes called node-app and use a Docker image to create the pods.
You can name the deployment differently and replace the mercybassey/node-multi-port-app image with your own, but it has to be a multi-port app/image.
kubectl create deploy node-app --image mercybassey/node-multi-port-app
kubectl get deployments
2. Next, create a file called mps. yaml in your preferred text editor, populate the following configuration, and save and close the file.
The configuration below creates a Service that allows internal communication between pods within the cluster using a service type of ClusterIP.
apiVersion: v1
kind: Service
metadata:
  # Set the name of the service
  name: my-app
spec:
  # Set the type of the service
  type: ClusterIP
  selector:
    app: node-app
  ports:
    # Define the name of the server listening on port 3000
    - name: server-one
      port: 3000
      targetPort: 3000
    # Define the name of the server listening on port 3001
    - name: server-two
      port: 3001
      targetPort: 3001
3. Run each command below to create a service (apply) against the configuration in the mps.yaml file and get all available services.
kubectl apply -f mps.yaml
kubectl get services
You can see below that the service listens on two different ports, port 3000 and port 3001. Note down the service IP address for later use.

4. Now, run the following command to attach to the existing Kubernetes pod named curl and interact with it.
kubectl attach curl -c curl -i -t
5. Lastly, run the following curl commands to view the contents of the my-app service from two different ports (3000 and 3001). Ensure you replace <service-ip> with the IP address you noted in step three.
# View the contents of the service from different ports
curl http://<service-ip>:3000
curl http://<service-ip>:3001
# Exit out of the curl pod
exit
Below, you can see the Hello World message from port 3000 and the Hello Kubernetes message from port 3001.

Creating Headless Services
When you need to access each pod individually and address them separately, creating a headless service works best. A headless service type does not have a cluster IP address assigned to it but instead allows direct access to the individual pods that are part of the service.
To create a headless service in Kubernetes:
1. Create a YAML file called hs.yaml (arbitrary), and populate the following configuration to the file, creating a headless nginx-web-server deployment service.
In the configuration below, the clusterIP is set to None to create a headless service.
apiVersion: v1
kind: Service
metadata:
# Name of the headless service
name: my-headless-service
spec:
# Indicates a headless service
clusterIP: None
selector:
# The pod or deployment to route traffic to
app: nginx-web-server
ports:
- name: http
port: 80
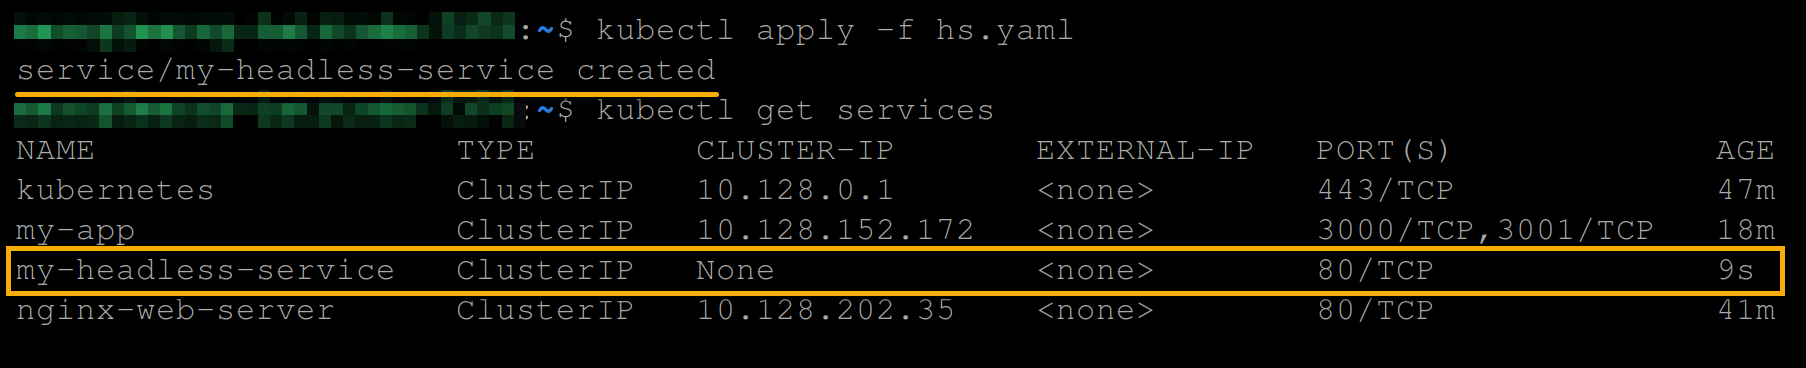
targetPort: 802. Next, run the below commands to create a service against the configuration in the hs.yaml file, and get all available services.
kubectl apply -f hs.yaml
kubectl get services
In the image below, you can see the my-headless-service service as a headless service.
3. Now, run the below commands to attach to the curl pod and access your headless service in the default namespace.
With a headless service, instead of having a cluster IP address assigned to it, Kubernetes sets up DNS records for the service that returns the IP addresses of the individual pods.
# Attach and interact with the existing Kubernetes pod named curl
kubectl attach curl -c curl -i -t
# Access your headless service via the default namespace
curl <http://my-headless-service.default.svc.cluster.local>
# Exit out of the curl pod
exit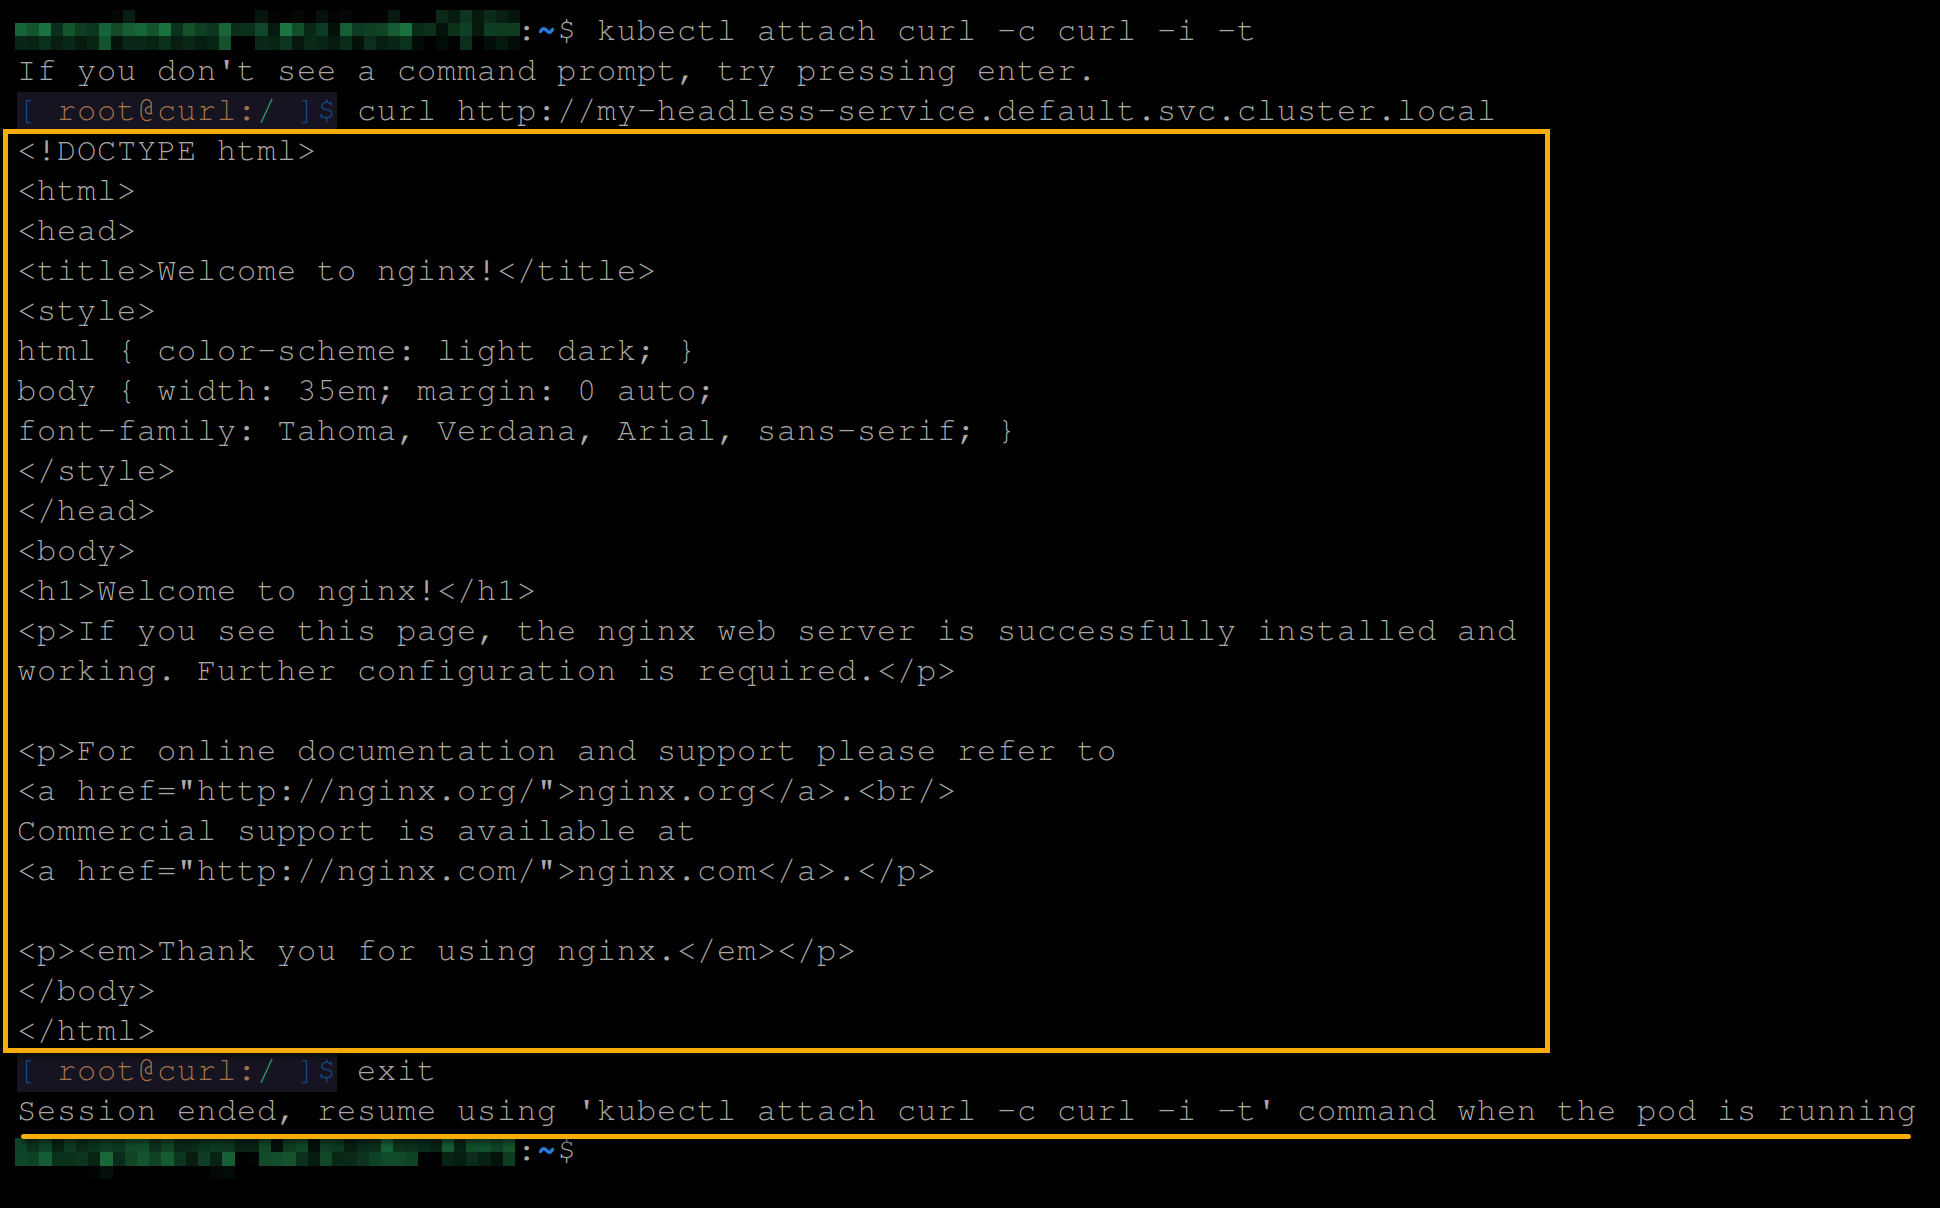
Perhaps you created the headless service in a different namespace. If so, you can access the service using via its DNS name. For example, the namespace in the command below is called
my-namespace:my-service.my-namespace.svc.cluster.local
When you need to access a specific pod, you can use its name as the hostname in your request. Suppose you have three pods named
nginx-web-server-1,nginx-web-server-2, andnginx-web-server-3.You can access these pods as shown below:
nginx-web-server-1.my-headless-service.default.svc.cluster.local
nginx-web-server-2.my-headless-service.default.svc.cluster.local
nginx-web-server-3.my-headless-service.default.svc.cluster.local
Creating a NodePort Service Type
You have exposed your service successfully but only within your network. When exposing services to outside users or other systems, the NodePort service will do the trick. This service type allows external traffic to be routed to the service.
To create a NodePort service, follow the steps below:
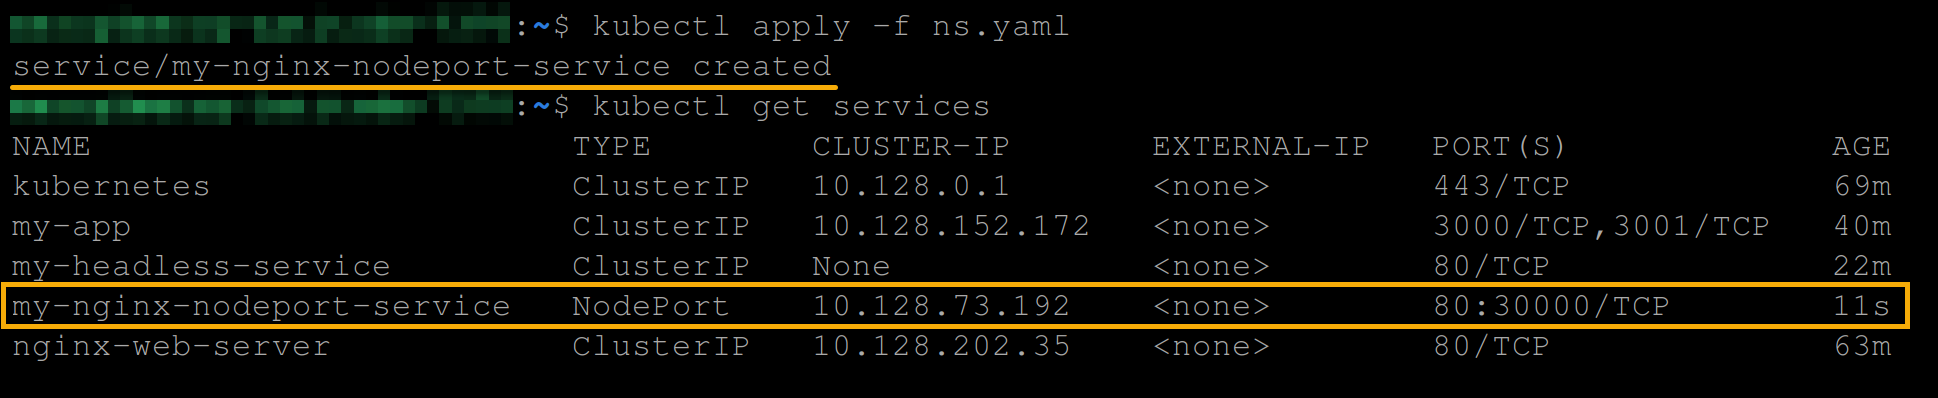
1. Create a YAML file called ns.yaml (arbitrary), and populate the following configuration:
This configuration creates a NodePort Service named my-nginx-nodeport-service that forwards incoming traffic to pods labeled app: nginx-web-server on port: 80.
apiVersion: v1
kind: Service
metadata:
  # Set the name of the service
  name: my-nginx-nodeport-service
spec:
  selector:
    # Specify the deployment to expose
    app: nginx-web-server
  type: NodePort
  ports:
    - name: http
      # Specify the port of the "nginx-web-server" deployment
      port: 80
      targetPort: 80
      # Specify the port of the NodePort
      nodePort: 30000
2. Next, run the following commands to create a NodePort service you specified in the ns.yaml file, and get all services available.
kubectl apply -f ns.yaml
kubectl get services
Note down the service’s IP address, and port, as you will need them later to access the service.
Alternatively, you can run the following command to create an
nginx-web-serverservice with aNodePorttype and expose port80on all the nodes in the cluster. This command allows you to access the service from outside the cluster by specifying the IP address of any node and the port number assigned by Kubernetes.
kubectl expose deploy nginx-web-server --port 80 --type NodePort
3. Now, open your favorite web browser, and visit the NodePort service (i.e., 10.128.73.192:3000).
http://<node-ip>:<node-port>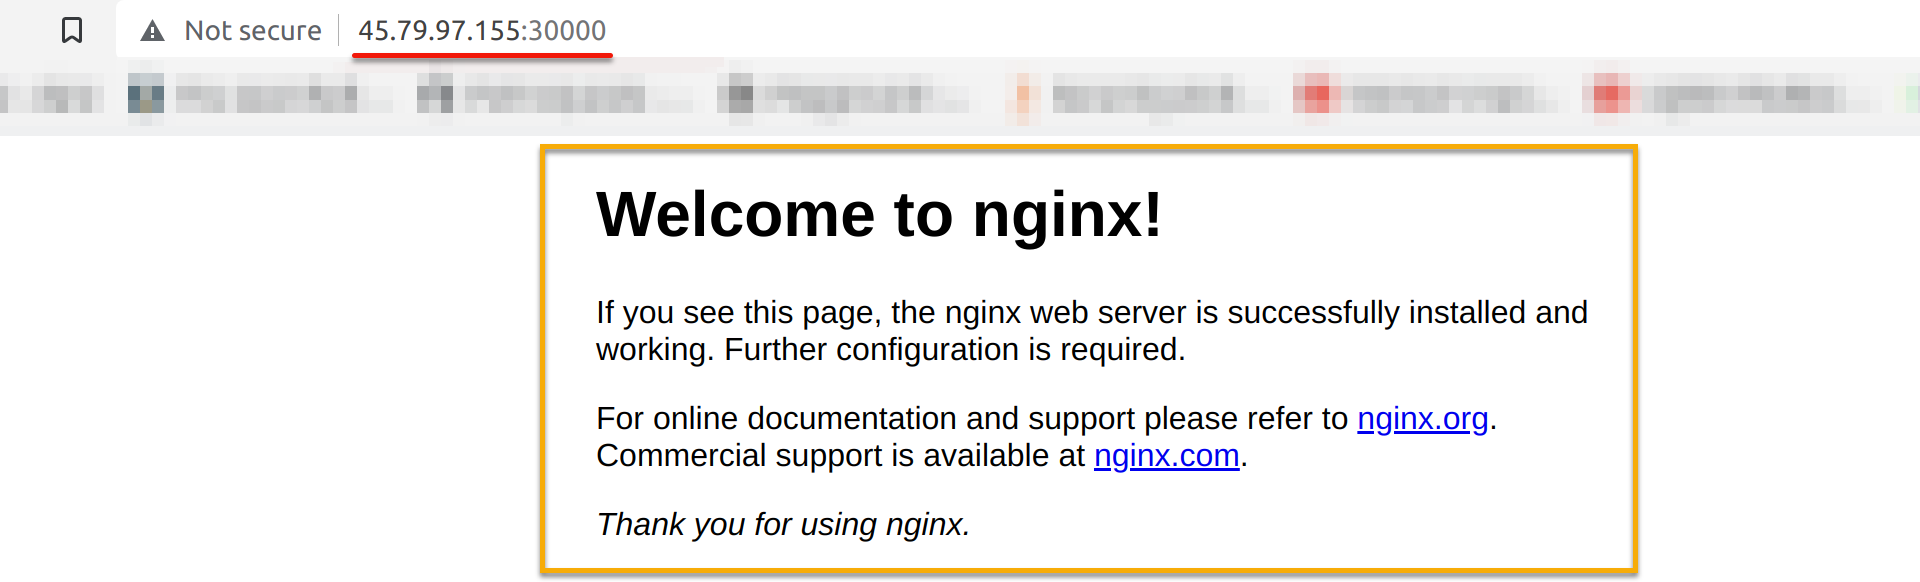
Or run the following commands to attach to the curl pod and access the NodePort service from within the cluster.
kubectl attach curl -c curl -i -t
curl http://<node-ip>:<node-port>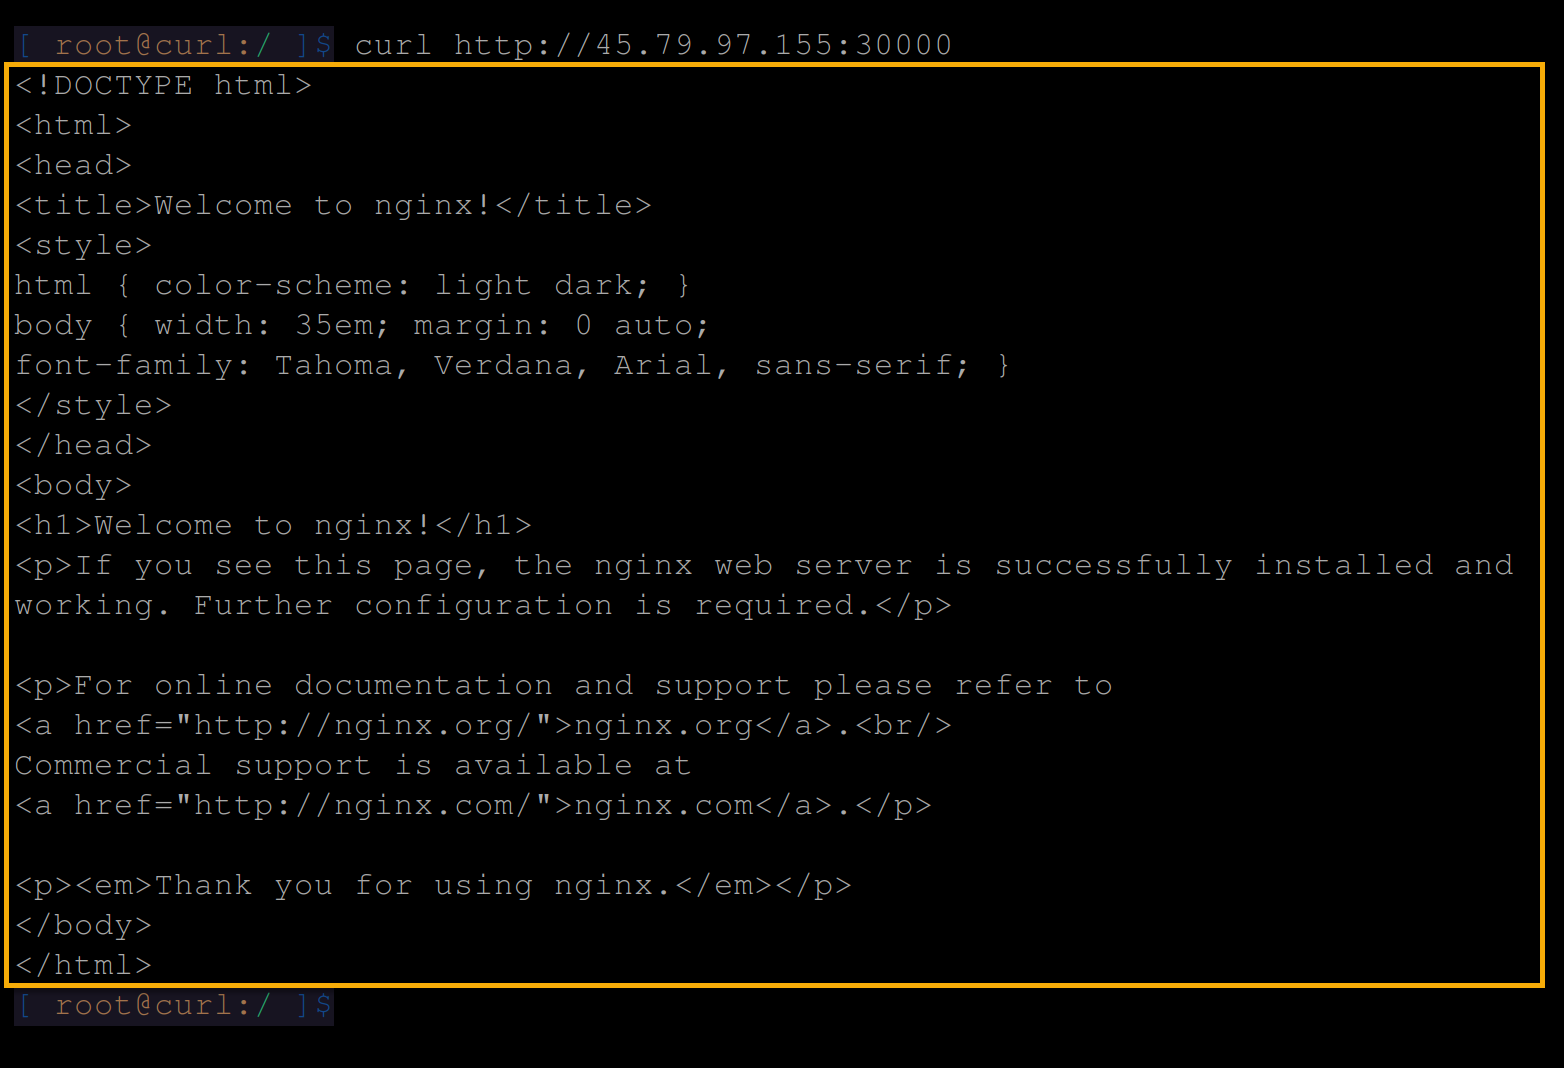
Creating a LoadBalancer Service Type
Unlike the NodePort service type that exposes the service on a port on each cluster node, the LoadBalancer service type in Kubernetes exposes a service outside the cluster and makes it available on a specific port.
The LoadBalancer service type automatically creates an external load balancer in the cloud environment (if the cloud provider supports it) and routes incoming traffic to the exposed service.
To create a LoadBalancer service type, follow these steps:
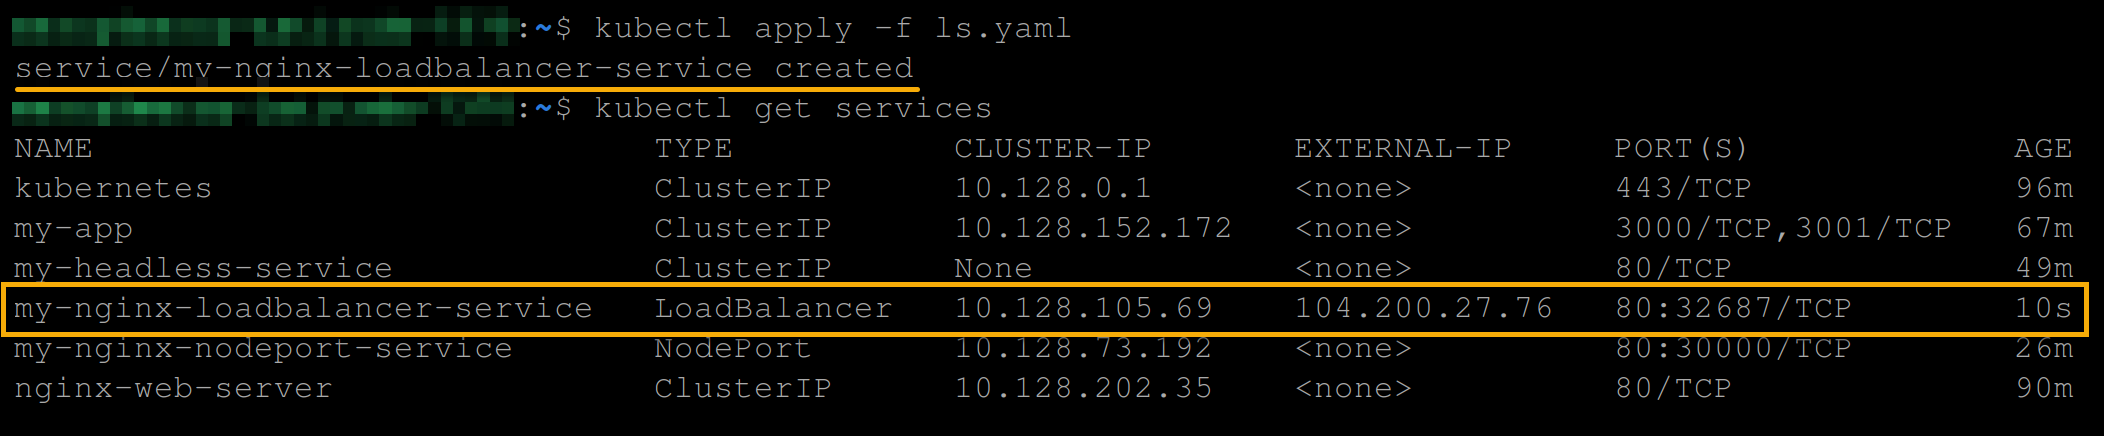
1. Create a YAML file called ls.yaml and add the following configuration.
This configuration creates a LoadBalancer service type and route traffic to the nginx-web-server deployment.
apiVersion: v1
kind: Service
metadata:
  name: my-nginx-loadbalancer-service
spec:
  selector:
    app: nginx-web-server
  ports:
    - name: http
      port: 80
      targetPort: 80
  type: LoadBalancer
2. Next, run each command below to create a LoadBalancer service type specified in the ls.yaml file, and get all services available.
kubectl apply -f ls.yaml
kubectl get services
Below, you can see the my-nginx-loadbalancer-service service of type LoadBalancer type is available with a CLUTER-IP and an EXTERNAL-IP.
Note down the service’s CLUSTER-IP to access the service later in the following step.
Alternatively, you can run the below command to create a LoadBalancer service type.
kubectl expose deployment nginx-web-server --port=80 --target-port=80 --type=LoadBalancer
3. Finally, visit either of the following external IP address to access your LoadBalancer service (my-nginx-loadbalancer-service) on your web browser.
http://<loadbalancer-external-ip>:<port>/
# OR
http://<loadbalancer-external-ip>/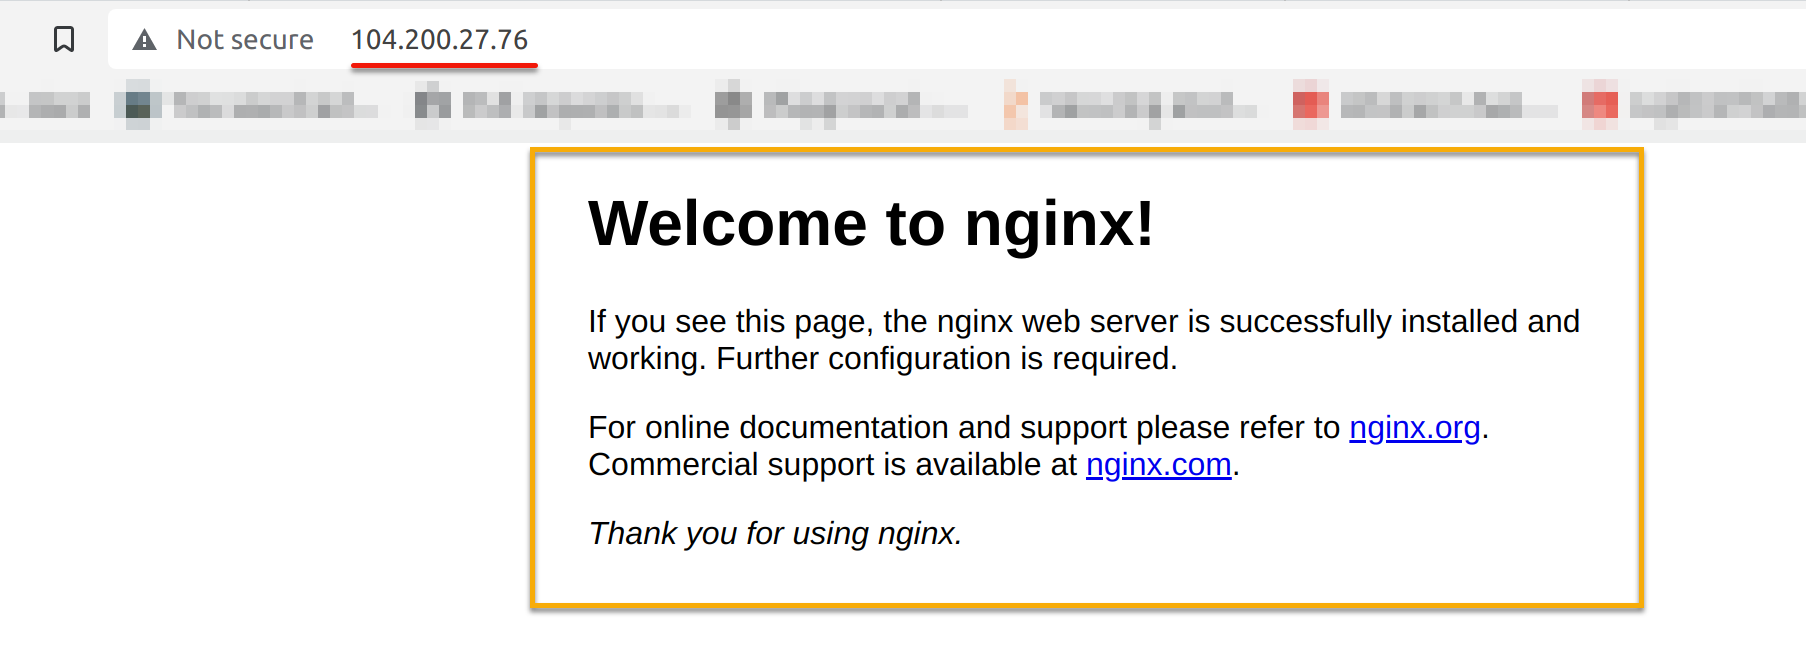
Alternatively, run the below commands to attach to the curl pod and access your LoadBalancer service from within the cluster.
# Attach to the curl pod
kubectl attach curl -c curl -i -t
# Access the LoadBalancer service from within the cluster
curl http://<loadbalancer-cluster-ip>:<port>
# OR
curl http://<loadbalancer-cluster-ip>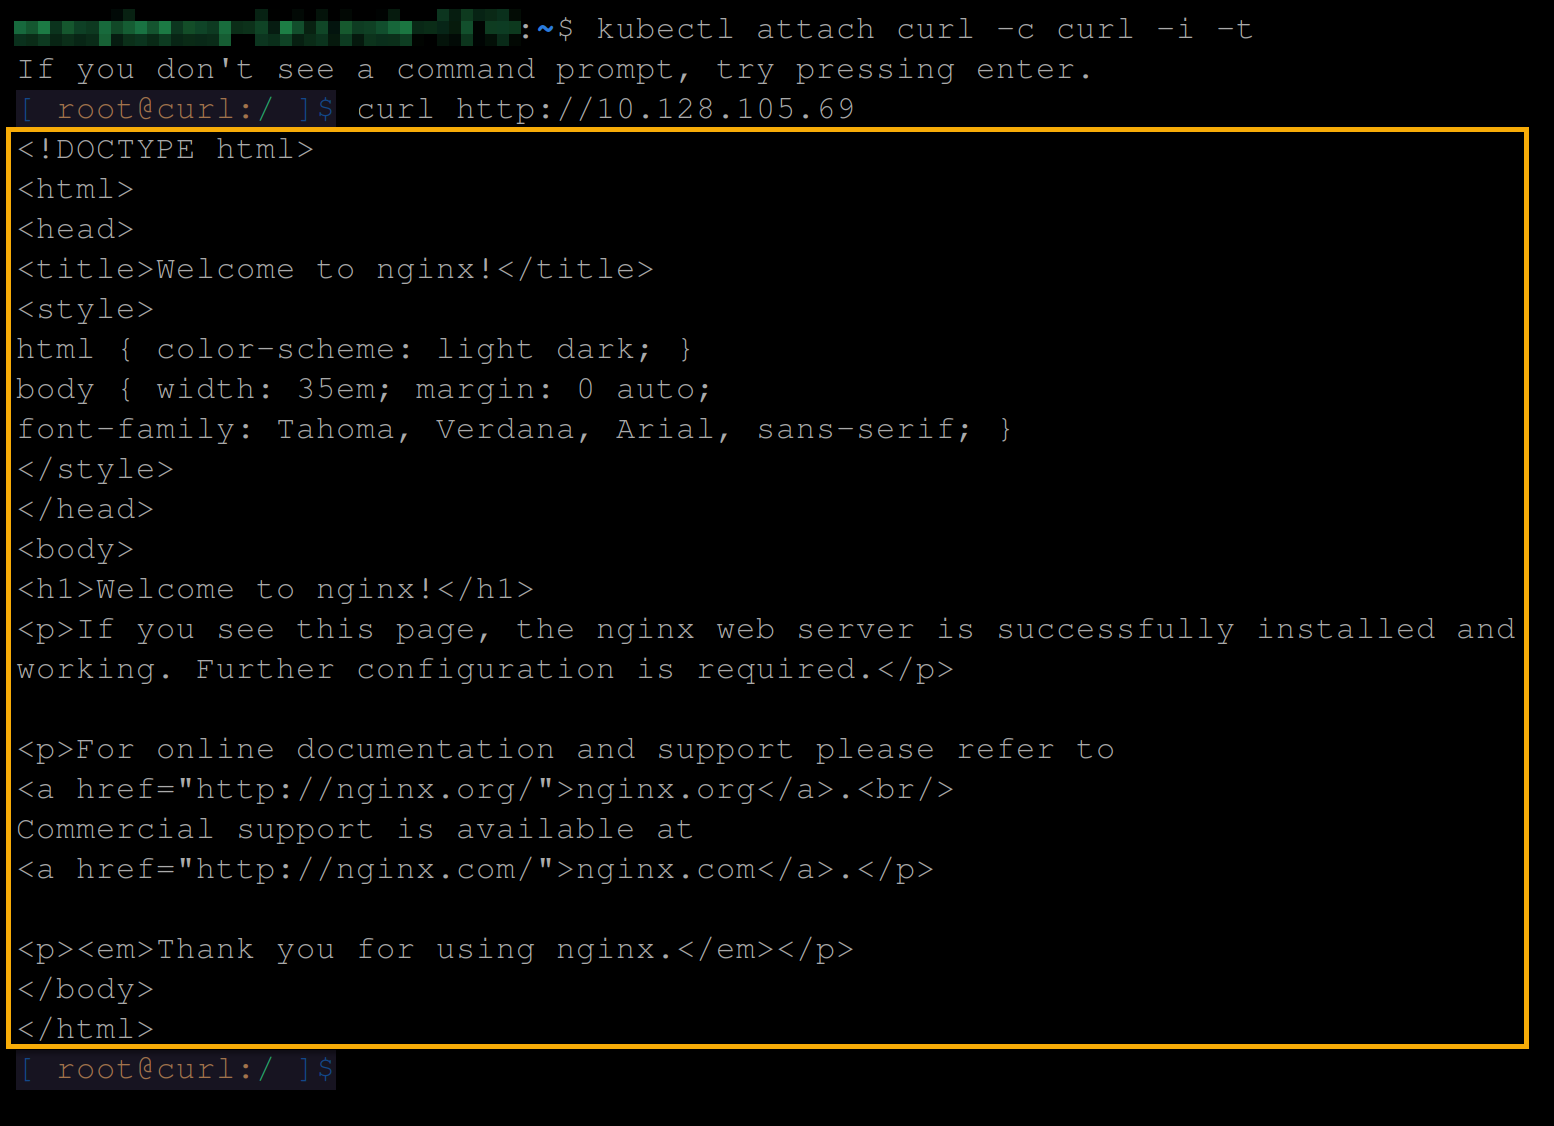
Conclusion
Throughout this tutorial, you have learned what Kubernetes Services are and how to create and use them in deployments. Moreover, you have known to expose different Kubernetes Services within your cluster or external network.
With the confidence to expose your applications in Kubernetes, how about further monitoring and observing your services with Grafana and Prometheus?


