


Have you been searching for a way to manage your resources effectively in Kubernetes? Why not consider Kubernetes Role-Based Access Control (RBAC)? With Kubernetes RBAC, you can securely manage containers.
Kubernetes RBAC allows administrators like yourself to define roles with specific permissions to access resources in a Kubernetes cluster. And in this tutorial, you will learn how to create a user and define roles with specific permissions.
Read on and improve security by limiting access to resources with Kubernetes RBAC!
Kubernetes RBAC is easier to apply when the platform fundamentals are fresh. If you want structured practice alongside this guide, compare Kubernetes and cloud security courses on Udemy before you buy.
Prerequisites
This tutorial comprises hands-on demonstrations. To follow along, be sure you have a Kubernetes cluster. This tutorial uses a cluster with one master and worker node.
Configuring Users in Kubernetes
The whole idea of RBAC in Kubernetes is to ensure people only have access to what they need in a Kubernetes cluster. As a cluster administrator, you can give access to only those who need it, alongside deciding their privileges.
Firstly, you will create and configure a user called billy (arbitrary) to grant access to some resources stored in the finance namespace in your Kubernetes cluster.
1. Open a terminal, and run the below kubectl command to create a finance namespace.
kubectl create ns finance
2. Next, run the following openssl command to create user billy’s private key. This command generates a 2048-bit RSA private key and saves it to a file called billy.key in the current directory using the OpenSSL command-line tool.
openssl genrsa -out billy.key 2048
3. Once you have the private key, run the command below to create a Certificate Signing Request (CSR) for user billy. This command does not provide an output but generates a new CSR using the private key generated in the previous step.
The CSR contains the identity information of the entity requesting a certificate from the Kubernetes Certificate Authority (CA). In this case, the CSR contains information about billy from the finance organization.
The -subj flag specifies the subject information for the CSR, which includes the Common Name (CN) and the Organization (O).
openssl req -new -key billy.key -out billy.csr -subj "/CN=billy/O=finance"4. Now, execute the below commands to perform the following:
- Copy (
scp) theca.crtandca.keyfiles from your master node (*/etc/kubernetes/pki/*) to the working directory (.) on your local machine (controlplane).These files are used to sign the CSR of a user and issue a trusted certificate to that user. The trusted certificate authenticates and authorizes access to Kubernetes resources.
- List (
ls) all contents of the current working directory to verify the files have been copied successfully.
scp controlplane:/etc/kubernetes/pki/ca.{crt,key} .
ls
5. Now run the following command to sign user billy’s CSR using the CA’s private (ca.key) and public key (ca.crt) and generates a certificate file named billy.crt.
The generated certificate is valid for 365 days, but you can adjust the validity by specifying the days you like.
openssl x509 -req -in billy.csr -CA ca.crt -CAkey ca.key -CAcreateserial -out billy.crt -days 365
6. Lastly, run the ls command below to list all working directory contents.
lsBelow, you can confirm user billy’s certificate has been created.

Granting a User Access to the Kubernetes Cluster
Since you have successfully created a user (billy), the next thing to work on is creating a kubeconfig file with the user’s certificate and private key. Doing so lets you grant user Billy access to your cluster.
To grant a user (billy) access to your Kubernetes cluster:
1. Execute the following command (does not provide output) to copy your Kubernetes configuration file (~/.kube/config) into a new file named billy.kubeconfig (arbitrary).
Since you are trying to create user billy’s kubeconfig file, starting from somewhere is better than starting from scratch.
cp ~/.kube/config billy.kubeconfig2. Next, run each cat command below to encode user billy’s certificate (billy.crt) and private key (billy.key). Encoding these files is required as you can only use these values in base64 format when creating user Billy’s kubeconfig file.
cat billy.crt | base64 -w0
cat billy.key | base64 -w0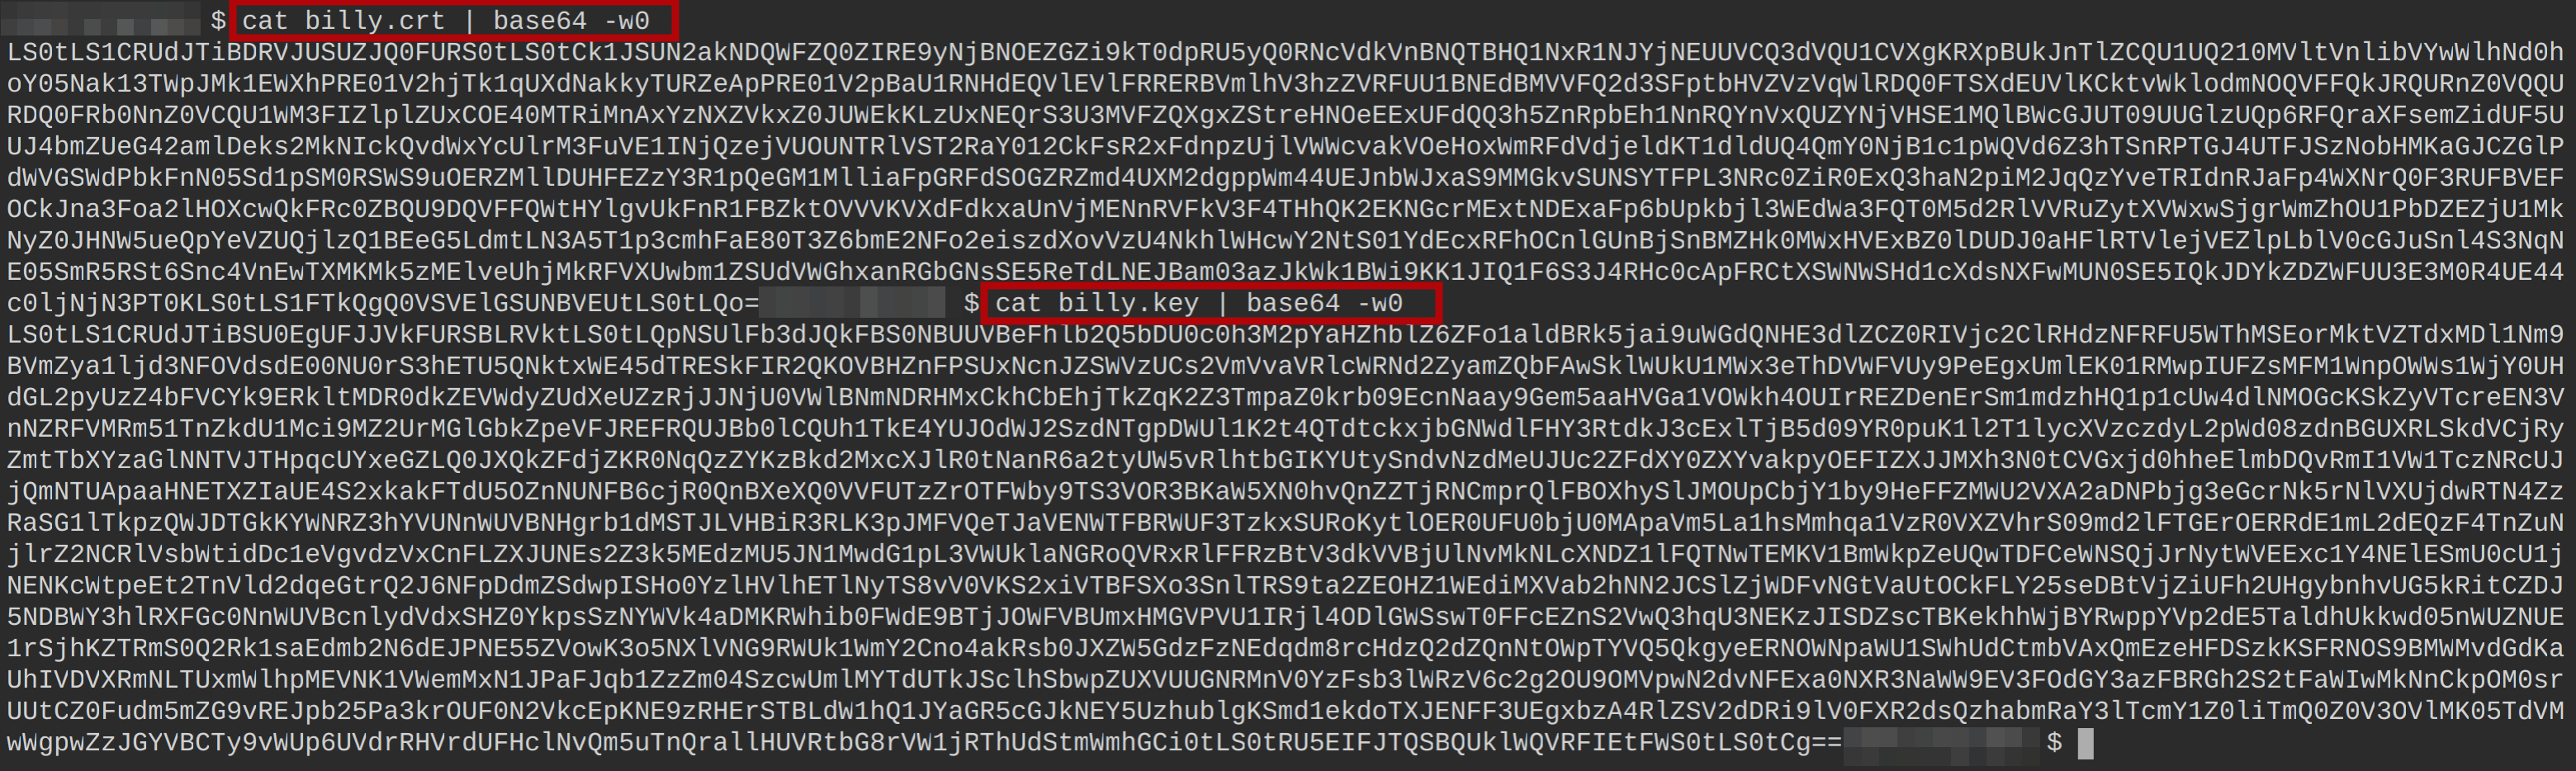
3. Launch another terminal, and open the billy.kubeconfig file with your preferred code editor (i.e., Visual Studio Code – VSCode), and edit the file to look like the following.
apiVersion: v1
clusters:
- cluster:
    # This should be left untouched
    certificate-authority-data: YOUR_KUBERNETES_CERTIFICATE_AUTHORITY_DATA
    server: YOUR_KUBERNETES_SERVER_IP_ADDRESS
  name: kubernetes
contexts:
- context:
    cluster: kubernetes
    # The user to authenticate with
    user: billy
    # The Kubernetes namespace that this context is scoped to
    namespace: finance
    # The name of the context being defined
  name: billy@kubernetes
current-context: billy@kubernetes
kind: Config
preferences: {}
users:
# The name of the user being defined
- name: billy
  user:
    # Specify the client certificate and key
    client-certificate-data: billy.crt_base64_encoded_value
    client-key-data: billy.key_base64_encoded_value
4. Now, send the file (bill.kubeconfig) to the user billy.
5. Finally, let user billy run the following command to get all available pods, testing the user’s authentication to your cluster.
kubectl --kubeconfig billy.kubeconfig get podsSince user billy has no permission to access your cluster resources, the Kubernetes API forbids the action, but the user is authenticated, as shown below.

Creating a Role and RoleBinding for a Single User
With a complete kubeconfig file, you can now grant the user permissions and privileges to resources in the finance namespace of your Kubernetes cluster. How? You will create a Role and a RoleBinding, which are Kubernetes objects that let you set user permissions.
To see how Role and RoleBinding work in setting user permissions, follow these steps:
1. Run the kubectl command below to create a role named billy-finance. This role grants permission to perform specific actions on resources within the cluster. Specifically, this role allows the user assigned to it to perform the following actions on pods, deployments, statefulsets, and services in the finance namespace:
get– Retrieve a specific resource or a collection of resources.list– List all resources of a particular type.watch– Watch for changes to a specific resource or a collection of resources.
kubectl create role billy-finance --verb=get,list,watch --resource=pods,deployments,statefulsets,services -n finance
If you would like a user or group of users to have access across the entire cluster and all namespaces, consider using a ClusterRole and ClusterRoleBinding.
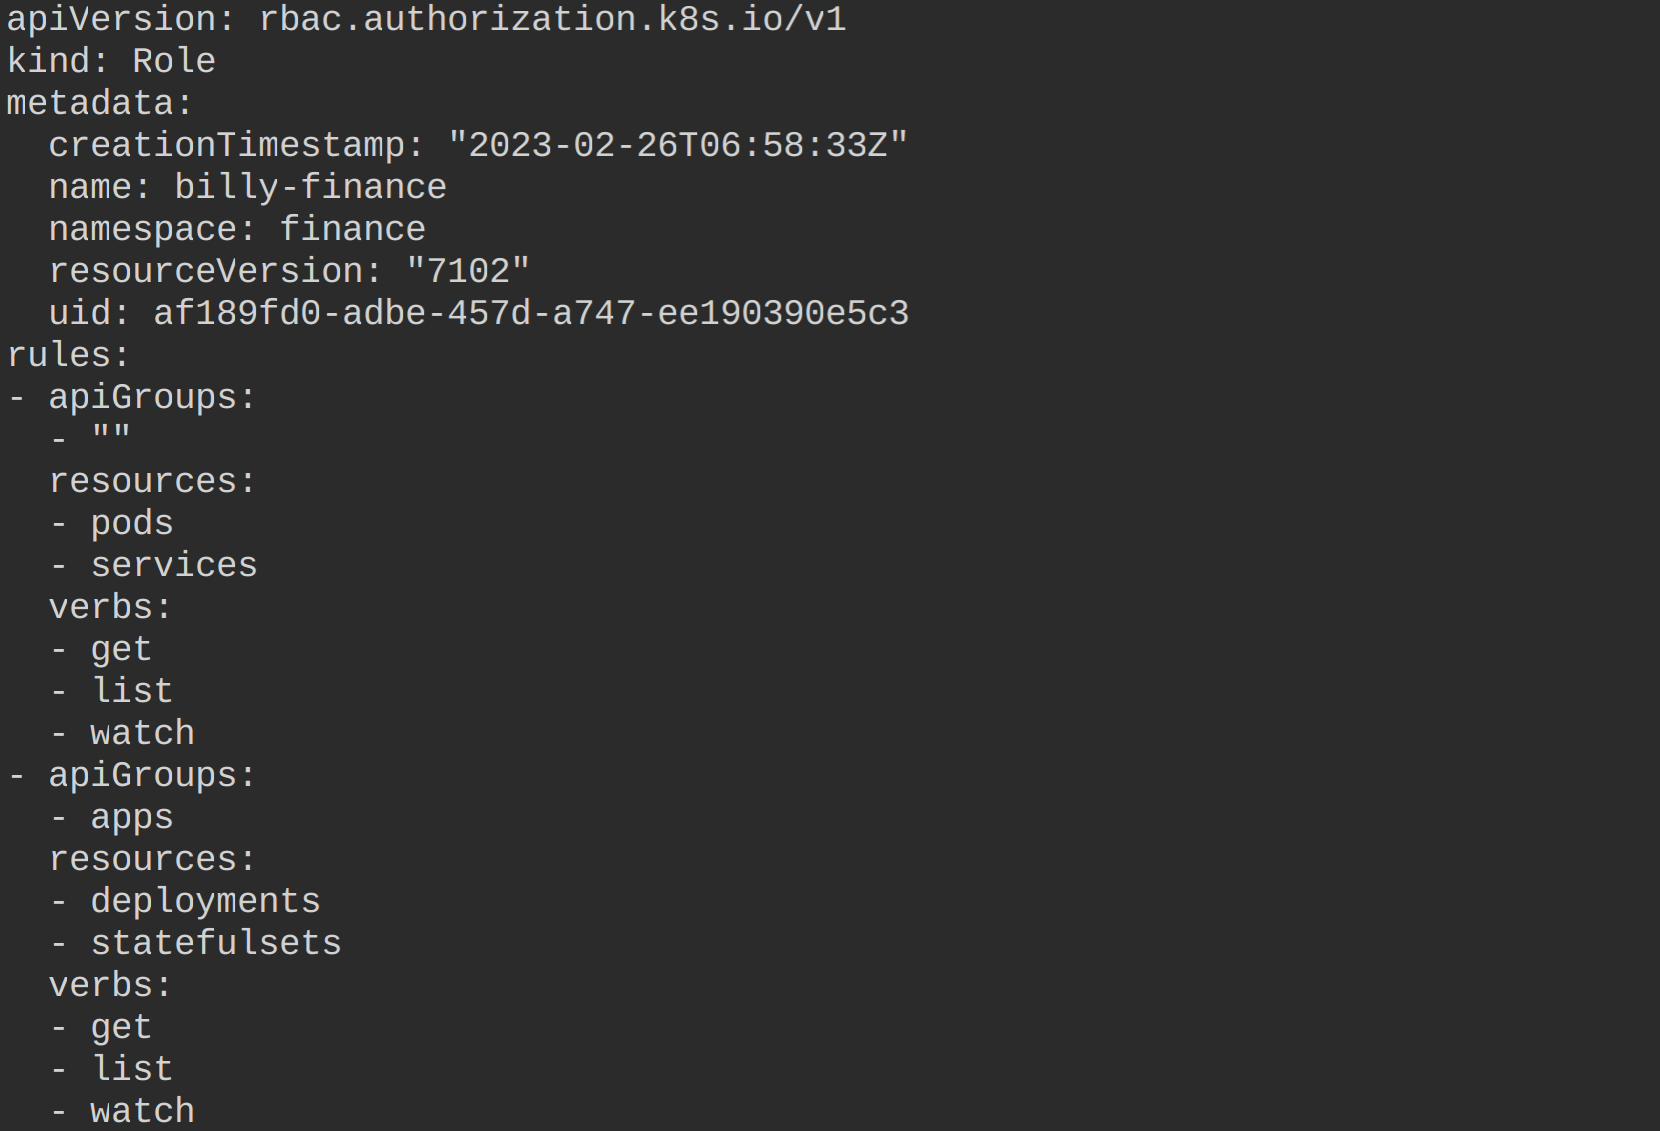
2. Next, run the below command to get and view the manifest file for the newly-created role (billy-finance) in YAML format.
kubectl get role billy-finance -o yaml -n financeThe manifest file shows that billy can only get, list, and watch pods, services, deployments, and statefulsets from the finance namespace in your Kubernetes cluster.
3. Run each command below to create a rolebinding called billy-finance-rolebinding for user billy, and attach the billy-finance role to the user.
A rolebinding is a way to grant permission to a specific user, group of users, or service account to access a specific Role or ClusterRole.
# Create a rolebinding for user billy
kubectl create rolebinding billy-finance-rolebinding --role=billy-finance --user=billy -n finance
# Get all available rolebinding objects in the finance namespace
kubectl get rolebinding -n finance
In a case of a ClusterRole, you will need to configure a ClusterRoleBinding. A ClusterRoleBinding binds a ClusterRole to a set of subjects (users, groups, or service accounts) at the cluster level. Doing so grants permissions across all namespaces in the cluster rather than just a specific namespace like a RoleBinding does.
4. Now, run the below command to get and view the manifest file for the rolebinding you created in step three (billy-finance-rolebinding).
kubectl get rolebinding billy-finance-rolebinding -o yaml -n finance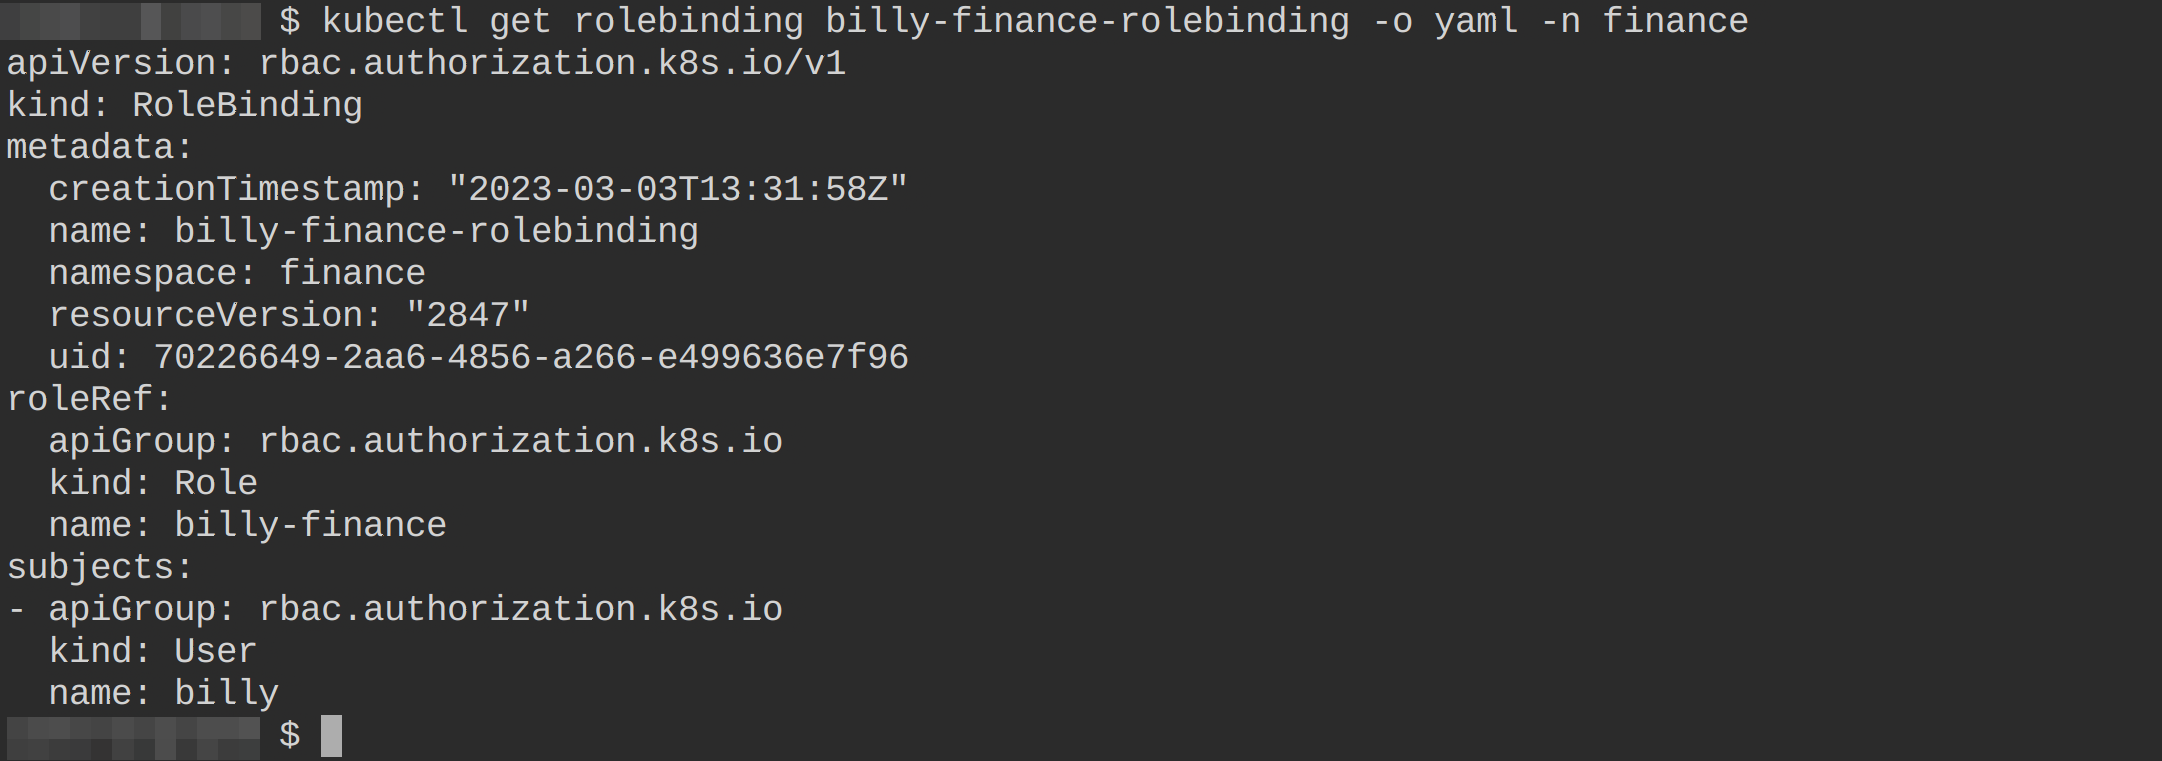
5. With the Role and RoleBinding created, user bill will run the following commands list (get) resources from the finance namespace.
# Retreive all pods in the finance namespace
kubectl --kubeconfig billy.kubeconfig get pods
# Retreive all deployments in the finance namespace
kubectl --kubeconfig billy.kubeconfig get deployments
# Retreive all services in the finance namespace
kubectl --kubeconfig billy.kubeconfig get services
The output below shows that billy now has permission to access the resources from the finance namespace in your Kubernetes cluster.

6. Lastly, run the following command to verify that user billy cannot access other resources (i.e., secrets) not permitted by the cluster admin.
kubectl --kubeconfig billy.kubeconfig get secrets You can see in the output below that user billy does not have access to secrets in the finance namespace. Why? Because you configured user billy’s role to have access to pods, deployments, services, and statefulsets only in the finance namespace.

Creating Role and RoleBinding for a Group of Users
So far, you have successfully created a user called billy with configured permissions, which is excellent. But what if you need to create other users with the same privileges as user billy?
The Role and RoleBinding objects are still at play in this case. But this time, you will create them for a group of users to provide access to the same namespace and resources.
To create a Role and RoleBinding for a group of users, follow the steps below:
1. Run the following commands, as you did for user billy, to create a new user called chris.
# Generates a private key for user chris
openssl genrsa -out chris.key 2048
# Creates a certificate signing request for user chris
openssl req -new -key chris.key -out chris.csr -subj "/CN=chris/O=finance"
# Creates a certificate for user chris
openssl x509 -req -in chris.csr -CA ca.crt -CAkey ca.key -CAcreateserial -out chris.crt -days 365
# List contents of the working directory
ls
2. Next, run each command below to create a kubeconfig file called chris.kubeconfig for user chris.
# Sets the Kubernetes cluster information, including the cluster name,
# the API server URL, and the certificate authority (CA) information
# for the specified kubeconfig file chris.kubeconfig
kubectl --kubeconfig chris.kubeconfig config set-cluster kubernetes --server <https://172.30.1.2:6443> --certificate-authority ca.crt
# Sets the user authentication credentials (client certificate and key) user chris
# for the specified kubeconfig file.
kubectl --kubeconfig chris.kubeconfig config set-credentials chris --client-certificate chris.crt --client-key chris.key
# Sets the context for the specified kubeconfig file.
kubectl --kubeconfig chris.kubeconfig config set-context chris@kubernetes --cluster kubernetes --namespace finance --user chris
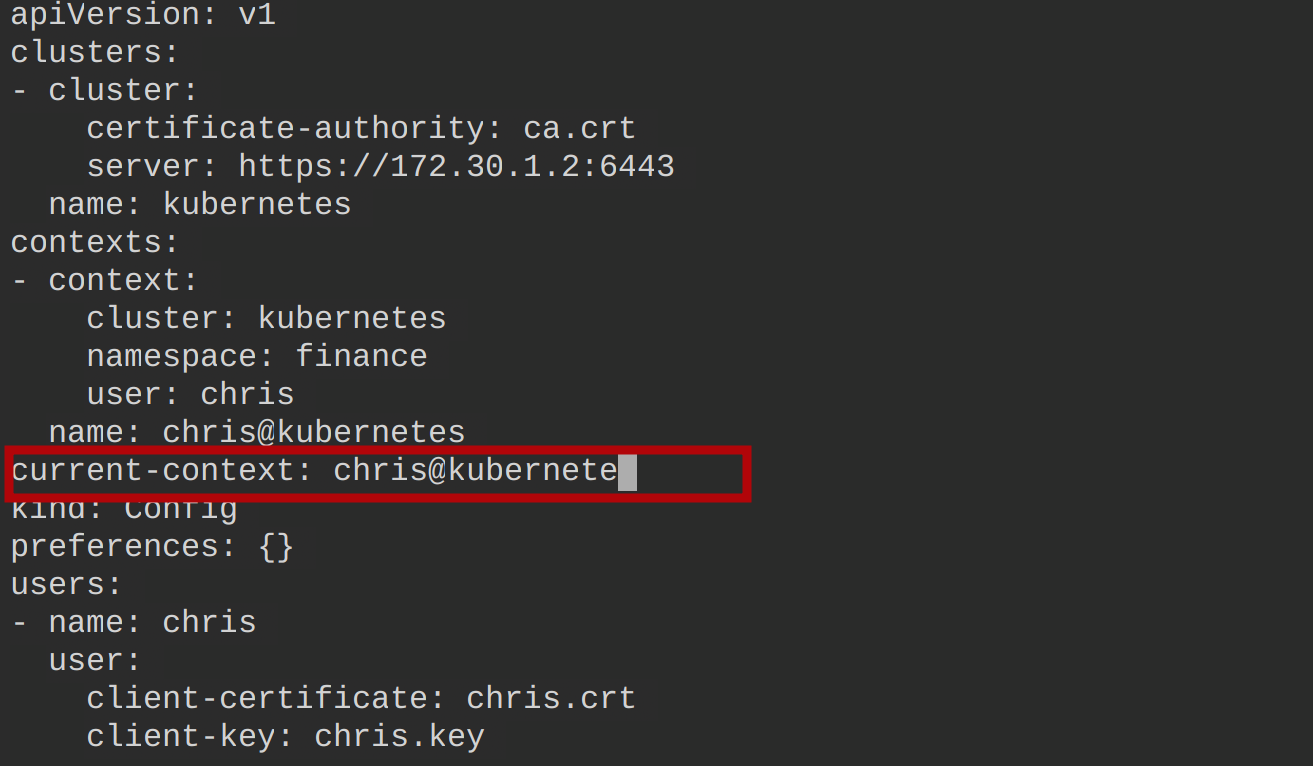
3. Open the chris.kubeconfig file and replace the current-context value with chris@kubernetes, as shown below, and save the changes.
4. Now, run the following commands to delete the existing rolebinding and recreate another. These commands let you adjust the rolebinding configuration. At this point, any user in the finance group will have the same privileges as user billy.
# Deletes the existing rolebinding configuration
kubectl delete rolebinding billy-finance-rolebinding -n finance
# Creates a rolebinding attached to the role billy-finance,
# allowing any user who belongs to the finance group to perform
# the specified role actions on the resources in the finance namespace.
kubectl create rolebinding finance-rolebinding --role=billy-finance --group=finance --namespace finance
# Get the newly-created rolebinding
kubectl get rolebinding finance-rolebinding -n finance
# View the newly-created rolebinding information in YAML format
kubectl get rolebinding finance-rolebinding -o yaml -n finance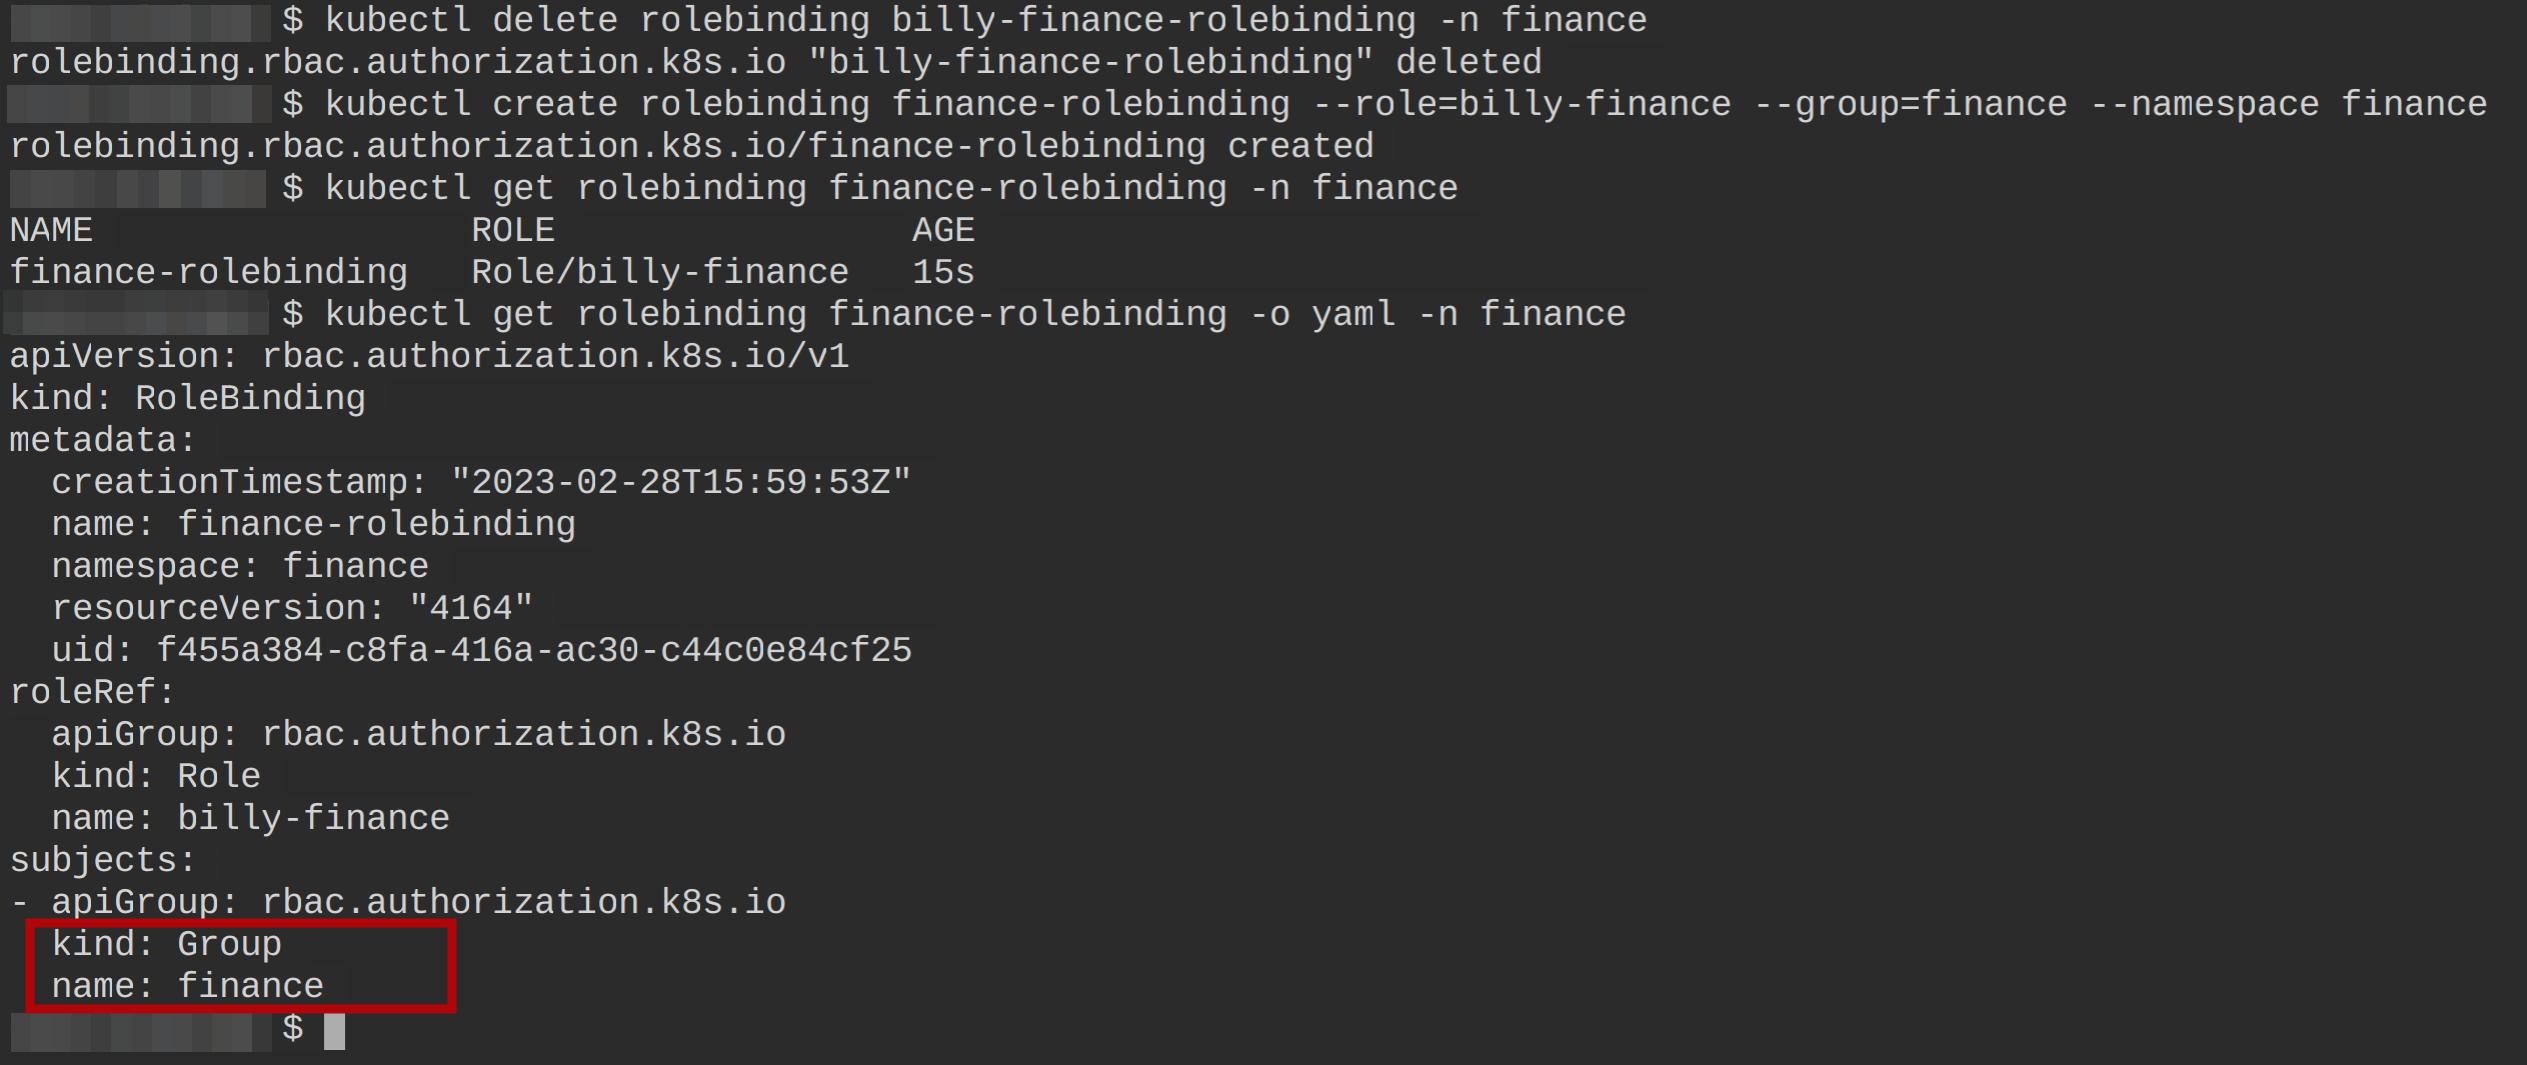
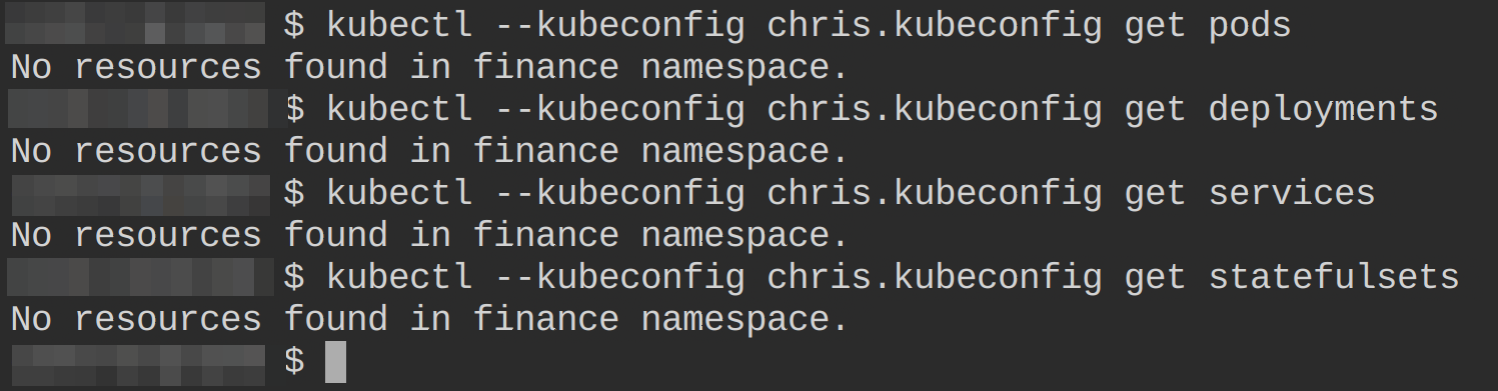
5. Finally, execute the following commands to test user chris’ privileges by retrieving (get) all pods, deployments, services, and statefulsets in the finance namespace.
kubectl --kubeconfig chris.kubeconfig get pods
kubectl --kubeconfig chris.kubeconfig get deployments
kubectl --kubeconfig chris.kubeconfig get services
kubectl --kubeconfig chris.kubeconfig get statefulsets
And as you can see below, user chris now has access to the same resources as user billy.
Conclusion
In this tutorial, you have learned how to manage access to your cluster resources with Kubernetes RBAC in Kubernetes. You have created a Role and a Rolebinding for a single user and a group of users to control which resources the users can access. At this point, you can confidently and securely manage containers.
From isolating resources like pods, deployments, and services, why not isolate the nodes using a ClusterRole and a ClusterRoleBinding?


