

If you’ve been using Kubernetes for a while and want to learn how to securely use your Kubernetes secrets while orchestrating, you’ve come to the right place.
This tutorial is unlike other Kubernetes tutorials that ignore the security aspect. You’ll immerse yourself in learning about securely utilizing your secrets. All while working in a Kubernetes environment.
Get ready to keep your secrets away from prying eyes!
Prerequisites
This tutorial will be a hands-on demonstration. If you’d like to follow along, be sure you have the following:
- Minikube node created and running on VirtualBox – This tutorial uses Minikube v1.25.2 and VirtualBox 6.1.
- A Linux machine – This tutorial uses Ubuntu 20.04.3 LTS.
- A Docker Hub account with a private image stored for use.
- Docker is installed on your Linux machine.
Creating and Loading Kubernetes Secrets
When working with Kubernetes, you may encounter an image that needs to use sensitive environment variables such as API keys and passwords.
For example, when using a MongoDB image, you’ll need credentials to authenticate. Those credentials need to be stored as secrets. A secret is a Kubernetes object used to handle data like TLS, API keys, tokens, and passwords.
To create and load Kubernetes secrets:
1. Create a new directory (mkdir) named secrets for your project (directory name is arbitrary), and switch (cd) to that directory.
mkdir secrets
cd secrets
2. Next, run the below kubectl create secret command to create a secret where:
generic sub-command - Indicates the default secret type.
mongo-secret - The secret’s name to be referenced.
--from-literal flag - Takes in the secrets as key/value pairs.
kubectl create secret generic mongo-secret --from-literal=MONGO_INITDB_ROOT_USERNAME=username --from-literal=MONGO_INITDB_ROOT_PASSWORD='hidden-password'
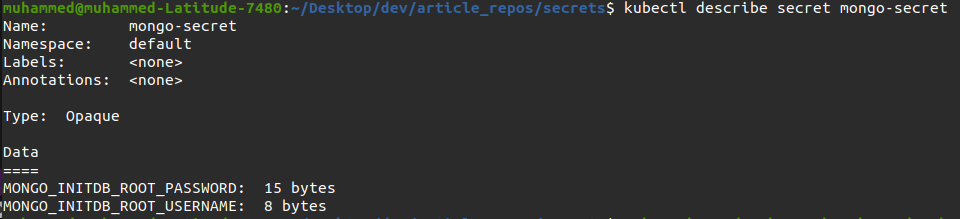
3. Next, run the following kubectl describe command to confirm you’ve successfully created the secret (mongo-secret).
kubectl describe secret mongo-secretAfter running the command, you’ll notice the values are concealed since Kubernetes encodes the values in base64.
4. Create a YAML file to the project directory (secrets) with your preferred text editor and paste the code below into the YAML file. Name the YAML file as you like, but this tutorial’s choice is mongo_deployment.yaml.
The code below creates a MongoDB container in a pod and uses environment variables from secrets.
apiVersion: apps/v1
kind: Deployment
metadata:
  name: mongo-deployment
  labels:
    app: mongodb
spec:
  replicas: 1  # State the number of replicas of the application you need.
  selector:
    matchLabels:
      app: mongodb
  template:
    metadata:
      labels:
        app: mongodb
    spec:
      containers:
			  # State the image's name on Docker Hub to build the container from.
      - name: mongodb
        image: mongo
        ports:
				# State container port for Solr server
        - containerPort: 27017
        env:
        - name: MONGO_INITDB_ROOT_USERNAME # required by mongodb image
          valueFrom:
            secretKeyRef:
              name: mongo-secret # name of secret
              key: MONGO_INITDB_ROOT_USERNAME
        - name: MONGO_INITDB_ROOT_PASSWORD
          valueFrom:
            secretKeyRef:
              name: mongo-secret
key: MONGO_INITDB_ROOT_PASSWORD 5. Now, run the kubectly apply command below to apply the configurations you set in the mongo_deployment.yaml file.
kubectl apply -f mongo_deployment.yaml
6. Finally, run the command below to get the list of all pods.
kubectl get podsBelow, you can verify the newly-created pod exists and is running.

Depending on the speed of your internet and your local machine, containers’ activation in the pods may take five to 10 minutes to complete.
Pulling Docker Images Using Secrets
When working with a Docker image in a private registry, you must authenticate before you can pull the image. The authentication can be handled by Kubernetes using Docker’s config.json.
Kubernetes converts Docker’s config.json into a secret, and from there, you can use it in your deployment file. The private registry you will use in this tutorial is Docker Hub.
Pull Docker images from a private registry using secrets with the following steps:
1. Run the docker login command below to log in to your Docker hub account. Be sure to replace username and password with your Docker Hub credentials.
This command generates a config.json file that holds your authorization token.
docker login -u username -p password
2. Next, run the following cat command to check if your authorization token has been generated.
cat ~/.docker/config.json
3. Run the below command to register your Docker auth token (~/.docker/config.json) into Kubernetes in serialized JSON format as a secret with the following:
- Set the name of the data item to .dockerconfigjson
- SSet the type to kubernetes.io/dockerconfigjson
- Set auth-token as the name that will be used to reference the secret.
But be sure to change /home/muhammed/.docker/config.json with the path to your own Docker config.json file.
kubectl create secret generic auth-token \
    --from-file=.dockerconfigjson=/home/muhammed/.docker/config.json \
    --type=kubernetes.io/dockerconfigjson
4. Create a new YAML file in your project directory (secrets) and populate the code below into the YAML file. Name the YAML file as you like, but the YAML file is named private_deployment.yaml for this tutorial.
The code below creates a pod with a specified private Docker image. So be sure to replace khabdrick/sample:v1 with your own private Docker image.
apiVersion: v1
kind: Pod
metadata:
  name: private-deployment # name of the pod
spec:
  containers:
  - name: example-container
    image: khabdrick/sample:v1 # a private image in Docker Hub
    ports:
      - containerPort: 5000
  imagePullSecrets:
- name: auth-token5. Now, run the command below to apply the configurations you set in the private_deployment.yaml file.
kubectl apply -f private_deployment.yaml
6. Finally, run the command below to see if the pod was created and running as expected.
kubectl get pods
Limiting Secret Usage
You now have a secret, and you’re one step closer to keeping it safe. As you know, the concept of a secret is keeping it, well, a secret. So limit the secret usage to yourself. How? Set your secrets within a namespace. When a user is in a particular namespace, that user cannot access secrets from another namespace.
If namespaces are not set, Kubernetes creates one with the name default, so all the secrets you created are in default namespace.
To create secrets that only specific users can access, create a new namespace before creating the secrets:
1. Create a new YAML file called new-namespace.yaml and add the code below to the YAML file.
The code below creates a namespace called new-namespace, but you change the name as you like.
apiVersion: v1
kind: Namespace
metadata:
  name: new-namespace # this could be any name of your choice
2. Next, run the kubectl create command to create the namespace by the configuration you set in the new-namespace.yml file.
kubectl create -f new-namespace.yaml
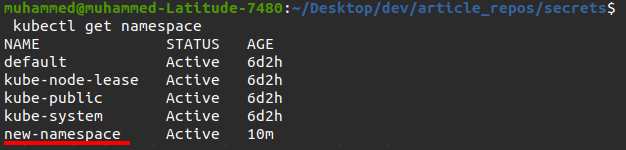
3. Run the command below to list all namespaces available.
kubectl get namespaceBelow, you can verify that the namespace (new-namespace) was created successfully.
4. Now, run the following command to create a new secret for username and password. But this time, you’ll attach a –namespace tag and define the namespace (new-namespace) where you want to store the new secret.
kubectl create secret generic new-secret --from-literal=USERNAME=username --from-literal=PASSWORD='password' --namespace=new-namespace
5. Run the kubectl get secrets command below to try and view all the secrets.
kubectl get secretsYou’ll notice below that the newly-created secret is not on the list since you’re not in the right namespace to access it.

6. Finally, run the same kubectl get secrets command. But this time, append the –namespace tag along with the namespace’s name (new-namespace).
kubectl get secrets --namespace=new-namespaceAs you can see below, the newly-created secret (new-secret) now shows in the list since you’re in the correct namespace (new-namespace)

Conclusion
In this tutorial, you’ve learned the best practices of keeping secrets safe while working in a Kubernetes environment using a MongoDB image as the use case. You went through using Kubernetes to authenticate your Docker registry and fetch a private image.
Now anytime, you can limit secret usage to specific users using namespaces. So spare yourself worrying about your secrets and keep them safe.
Curious to know how to apply your newly-acquired knowledge? Perhaps storing your API keys as secrets instead of env files?


