

If you’re looking for information on how to install Docker on Ubuntu, you’re in the right place. Not only that, but as a bonus, this tutorial will also teach show you how to run through the basic Docker commands to run and manage containers.
Using the handy features of Visual Studio (VS) Code, you’ll also learn how to power up your SSH skills. Let’s get started!
Related: A Windows Guy in a Linux World: VS Code and Remote SSH
Prerequisites
If you’d like to follow along step-by-step, in this tutorial, ensure you have the following:
- A fresh install of Ubuntu Server LTS with SSH Enabled (This guide will be using Ubuntu Server LTS 20.04.1)
- A Windows Machine with VSCode installed (This guide will be using Visual Studio Code 1.52.1)
- The VSCode official SSH extension installed and connected to your Ubuntu Server LTS Installation
Installing Docker on Ubuntu
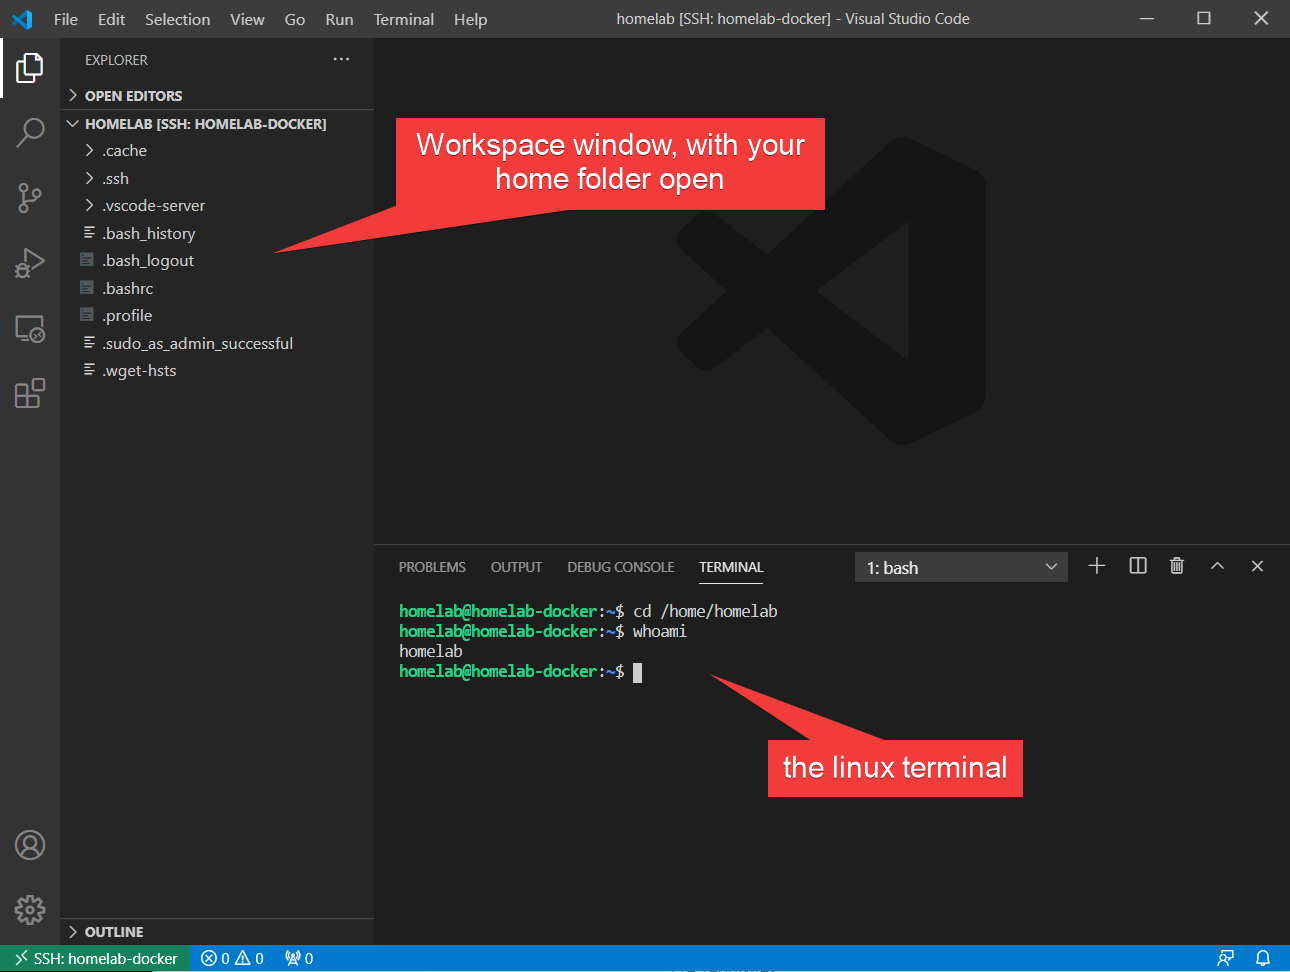
Let’s get started by first installing Docker on Ubuntu. At this point, the tutorial assumes that you’re on your local Windows computer with VS Code open connected to your Ubuntu Server via SSH. Learn how to set up this handy environment in the latest article on using VS Code and SSH.
In the below example, VSCode is remotely connected to Ubuntu with the home folder (in this case, /home/homelab) opened as a workspace:
The actual process of getting Docker installed in Ubuntu Server is two commands away. Ubuntu makes Docker available as an installation option in the default package manager that ships with Ubuntu known as apt.
In the SSH terminal window of VS Code, run the following two commands to install Docker:
sudo apt update -y
sudo apt install docker.io -y
During the Ubuntu Server installation, you may have been offered the option to install Docker as a snap. If you have done so, remove the snap package first by running
sudo snap remove docker
You can watch the installation of docker in the below animation:
Ubuntu is nice enough to automatically enable and set the service to start on boot for you, so you are all set to start using Docker!
Creating and Running a Docker Container on Ubuntu
Now that you have Docker installed, what can you do with it? Let’s start with creating a Docker container. This tutorial will set up a static web server as a good example of a Docker container. In this section, you’ll:
- Set up a new container from the Docker Hub Image Repository to run a HTTP service
- Use Port Mapping to map the HTTP port within the container to your Ubuntu host
- Set up Bind Mounts to map important data from within the container to your Ubuntu host
- Set up persistence through reboots for your container
If any of the above steps sound confusing, don’t worry, we’ll cover each step, one at a time to help you understand the process.
Downloading the Docker Image
The first question you have to ask is, where will this container come from? Lets have a look at the Docker Hub.
A large part of Docker is understanding image repositories. Rather than being distributed like packages, services in Docker get distributed as Docker Images.
A Docker Image is a snapshot of the software that the publisher wants to distribute and the entire filing system! This is analogous to creating .wim image of Windows.
This filesystem capture makes Docker so popular: the software is captured along with the entire operating environment. Doing so eliminates the problems introduced by differences between server environments.
One of the most popular repositories (and the default) for images is the Docker Hub also known as the official Docker repository. The image repository is where you can download thousands of pre-created Docker images to run as containers.
Since this tutorial is setting up a static web server, you need to download a web server image. The two most popular web servers out there are Apache httpd and Nginx but to change things up a bit and potentially introduce you to a new web server, let’s use one called Caddy.
Caddy is a web server known for its simplicity. Many valid server configurations can be deployed using a single line in a file. Simple is good and also makes a good base example.
- First, you’ll need to find the Docker image. On your Windows machine, navigate to https://hub.docker.com.
- Perform a search for caddy in the upper left corner of the page. You should see a page similar to the following:
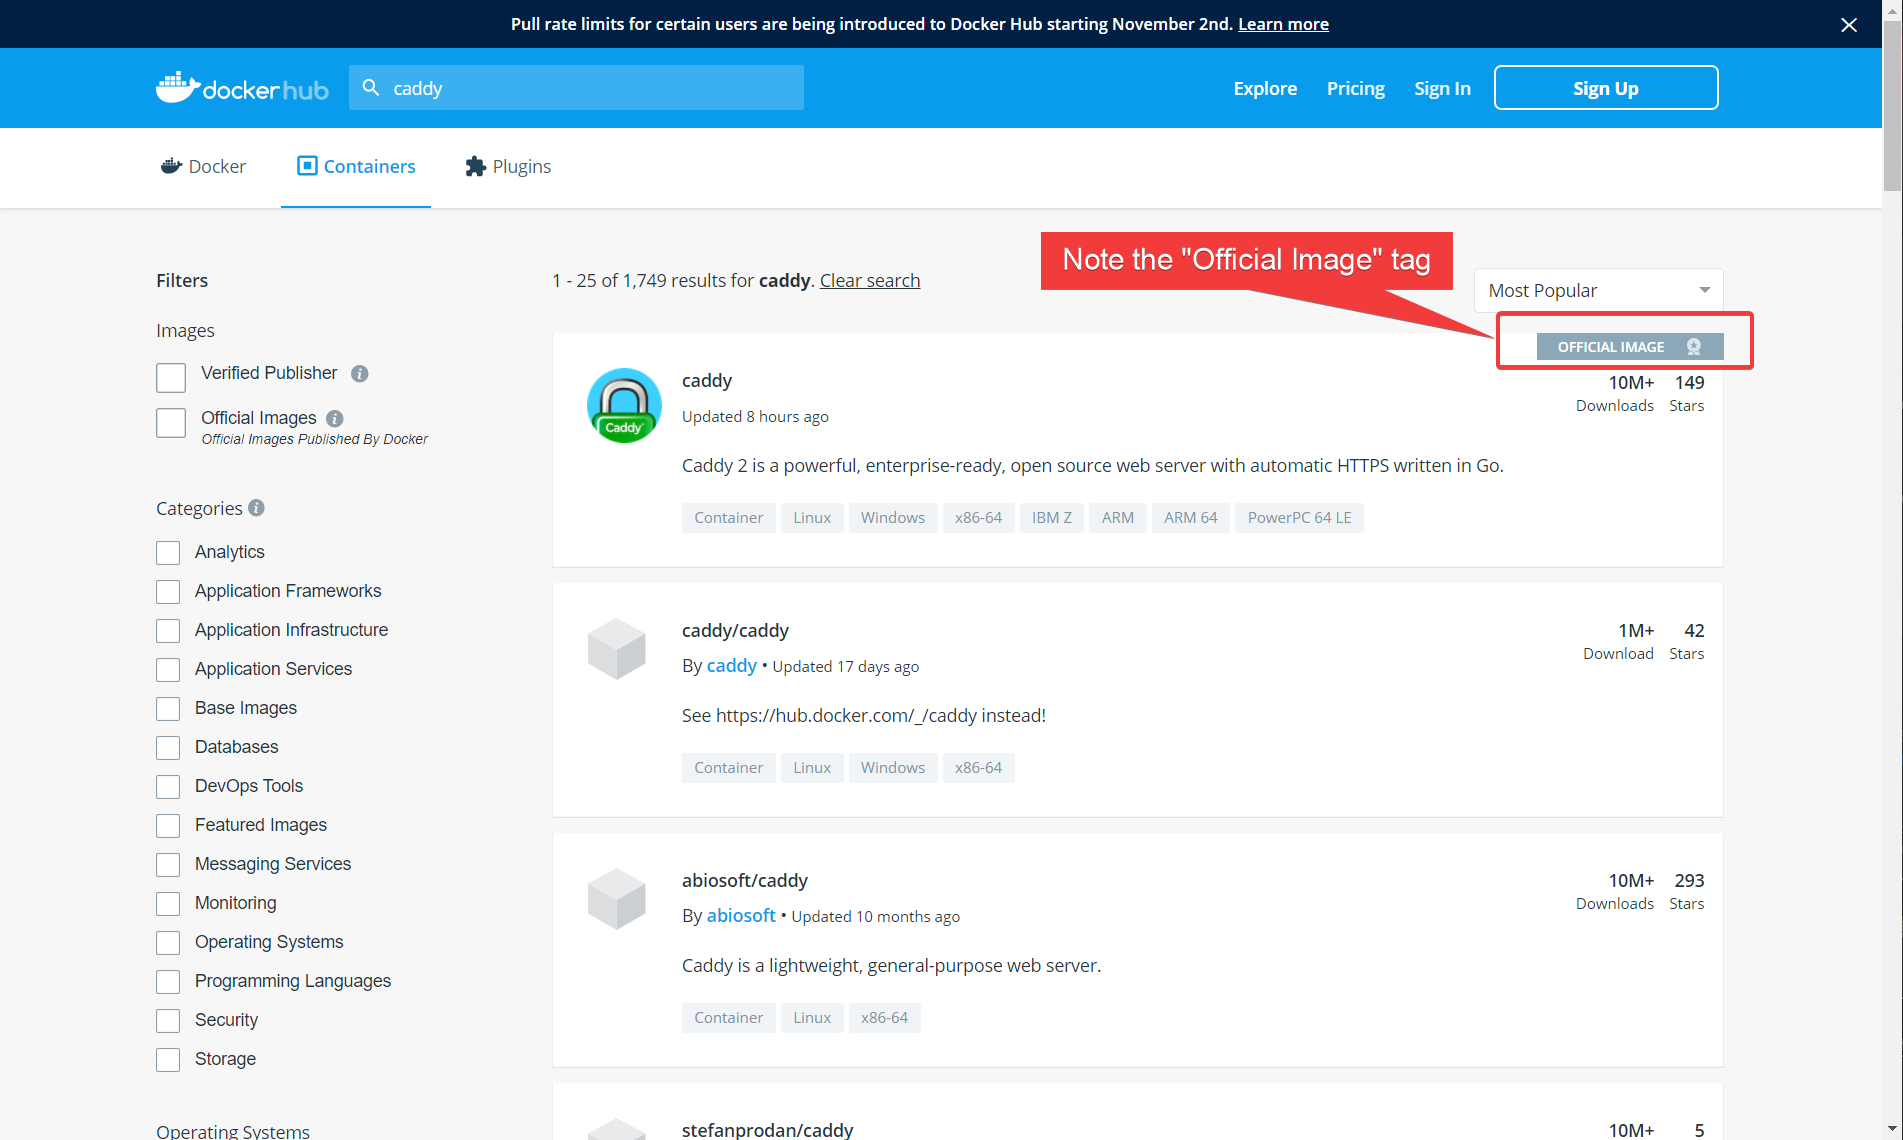
A benefit (and downside) of Docker Hub is that anyone, even you, can create and upload Docker Images to the site.
You must be careful to ensure that the image you choose is coming from a trusted source. Anybody can place malware in an image if they choose and upload their version to the Docker Hub.
3. Note the name of the image. In the the screenshot above, the name is caddy exactly. You’ll need this name to specify the image name in the next steps.
Running a Container with Docker on Ubuntu
Once you know the name of the image you’d like to download, it’s time to download it and create a container from it.
Starting up a container from an image requires a single command. In your SSH terminal connected to your Ubuntu Server, run the following docker run command.
The command below checks for the caddy image on the local machine. If it doesn’t exist, it downloads the image from Docker Hub, creates a container and starts it up. The command below is using the -p switch to map the Ubuntu Server’s listening port 80 to the container’s port 80. This feature is called port mapping.
sudo docker run -p 80:80 caddyMost Docker Hub Images follow a naming convention of <user>/<image name>. However, images branded as “official” by Docker do not have a <user> in front of them (like caddy above).
Running the above command outputs like the following, with the log information of caddy being displayed directly in the terminal:
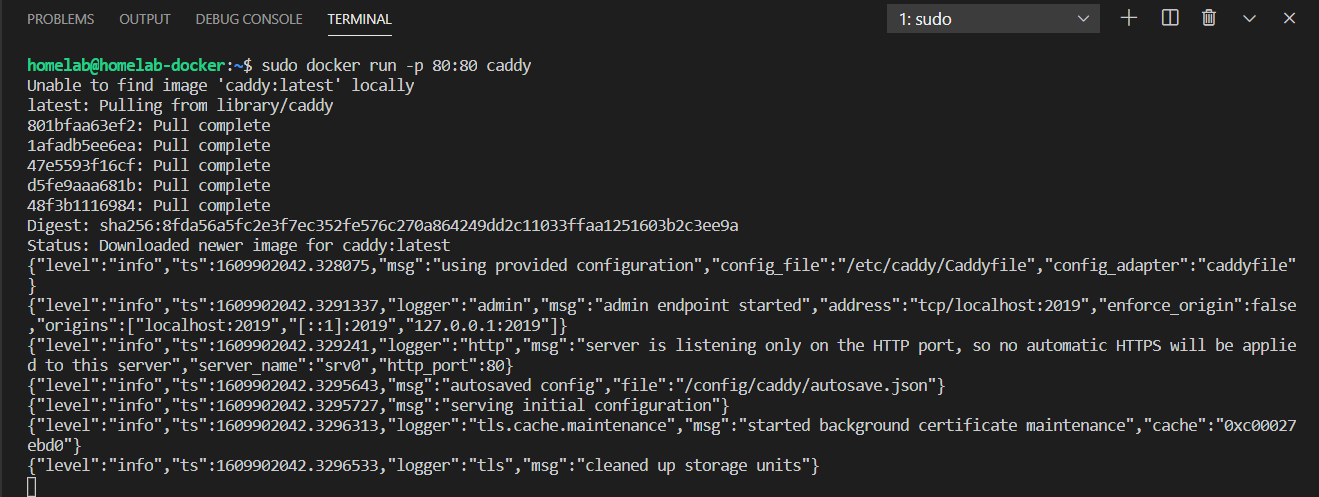
You may notice that almost all docker commands are prefaced with
sudo, to force the commands to run as administrator. By default, the docker service runs asroot, and all changes you make to containers or images must be done as an administrator.
And… you’re up and running! That’s all there is to it. Aren’t you glad you’ve installed Docker on Ubuntu?
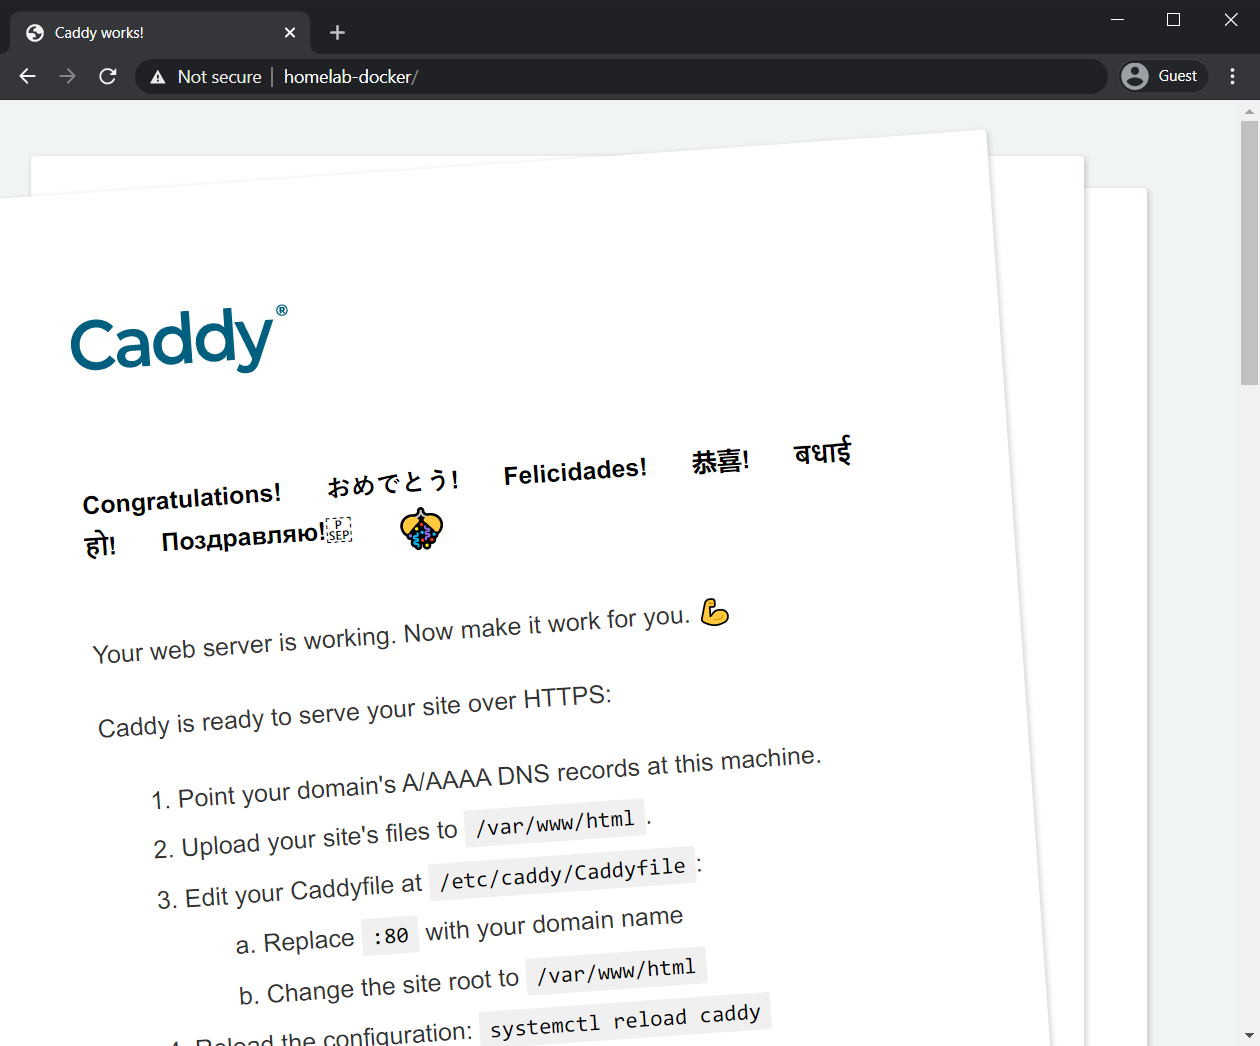
Now navigate to http://<your-ip> on your Windows computer and you should see a landing page for Caddy. You can see that below (the IP of this guide is replaced with http://homelab-docker):
The caddy container is running now but you might have noticed a problem. Running that docker command takes over your command line. You cannot run any more commands, and if the session ends, the running container stops. Let’s resolve that problem by running the container in the background (also known as detaching the container).
Running Docker Containers in the Background
You now have a running container but your command-line is hung up. You can’t do anything else. You need a better way of starting up a container by running it in the background like a service. To do that:
- Stop the current container by pressing control+c in the command line. This should give you back your command line.
- Now, rerun the same command as previous only with the
-dparameter this time as shown below. You’ll see that Docker will return a container ID and pass the command line back to you.
sudo docker run -d -p 80:80 caddy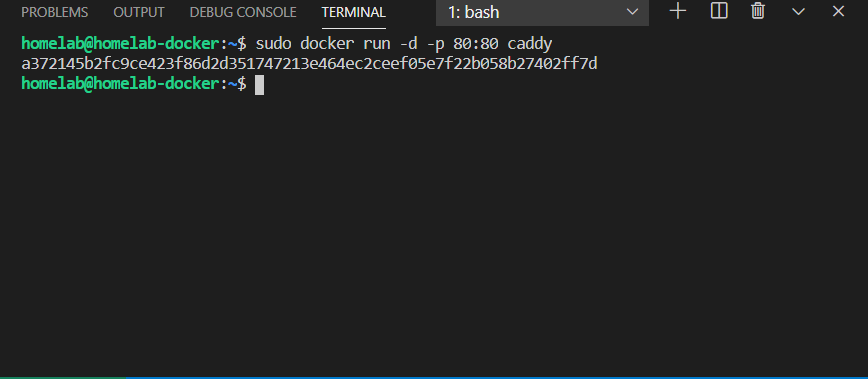
Managing Background Containers with Docker Commands
Once you have one or more background Dockers running, you’ll need to manage them somehow. Docker provides you with a few different commands to do so using docker container commands.
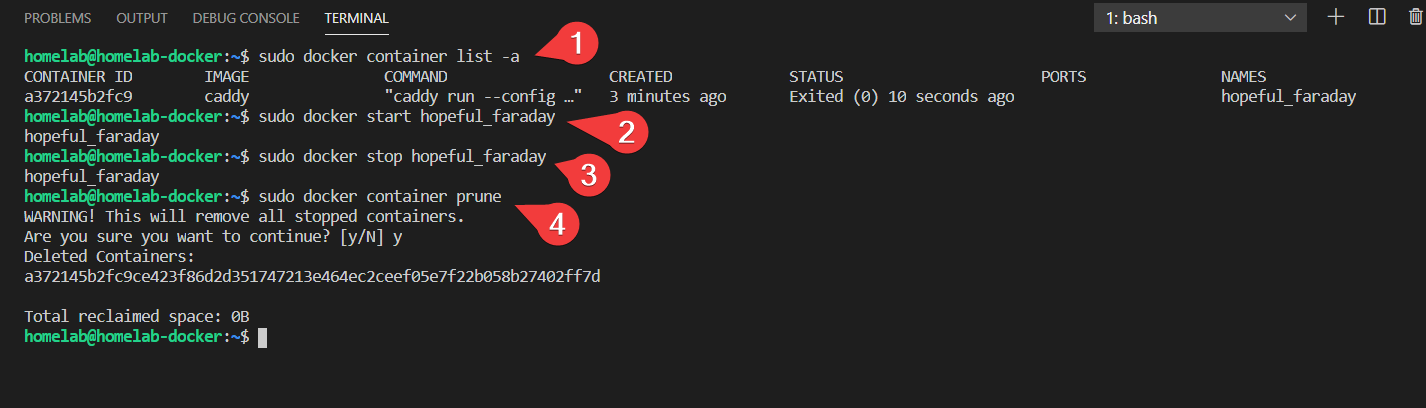
sudo docker container list -a: Lists all of the containers (both running and stopped) and their statussudo docker container stop <name>: stop a docker container by their name (or by their ID)sudo docker container start <name>: start a docker container by their name (or by their ID)sudo docker container prune: destroy and remove all stopped containers
You can see all of the above commands used in context in the below screenshot:
There are many other docker container commands to view, change, inspect, or even remote into containers on your server. You can view them all by running
sudo docker container --help.
Even though you’ve now deployed a web server in a container running in the background, you still have no way to host your custom content. As-is, Caddy is just serving up the default webpage.
Let’s now take a look at how you can use Docker images with a concept called bind mounts to deploy containers with meaningful data.
Storing Container Data with Bind Mounts
Docker works on the concept of images (and the containers they generate) as being throwaway or transient. If there is an update to the Caddy software, you do not update the service, you throw away the entire baby with the bathtub and use a completely fresh image from scratch.
The benefits of disposing and recreating containers like this are significant. Instabilities in software get introduced over time by continually updating a (potentially) years old software. By using a fresh image every time, Docker provides you a stable, reliable, (presumably) tested base on every update.
This concept is equivalent to using a fresh install of Windows every time you update your Windows application software. Not a fun idea on Windows, but extremely applicable in Docker.
The throwaway methodology has a clear problem though. You do not want essential data to get thrown out when your current service gets blown away. Docker solves this problem using a concept called bind mounts.
Let’s now explore how to create a bind mount for a container.
Creating the Folder Structure and Cleaning Up
Before you can use bind mounts, you need to create a location for this data to be stored. This tutorial will create a folder in your home directory. To do so in VS Code while still connected to your Ubuntu Server:
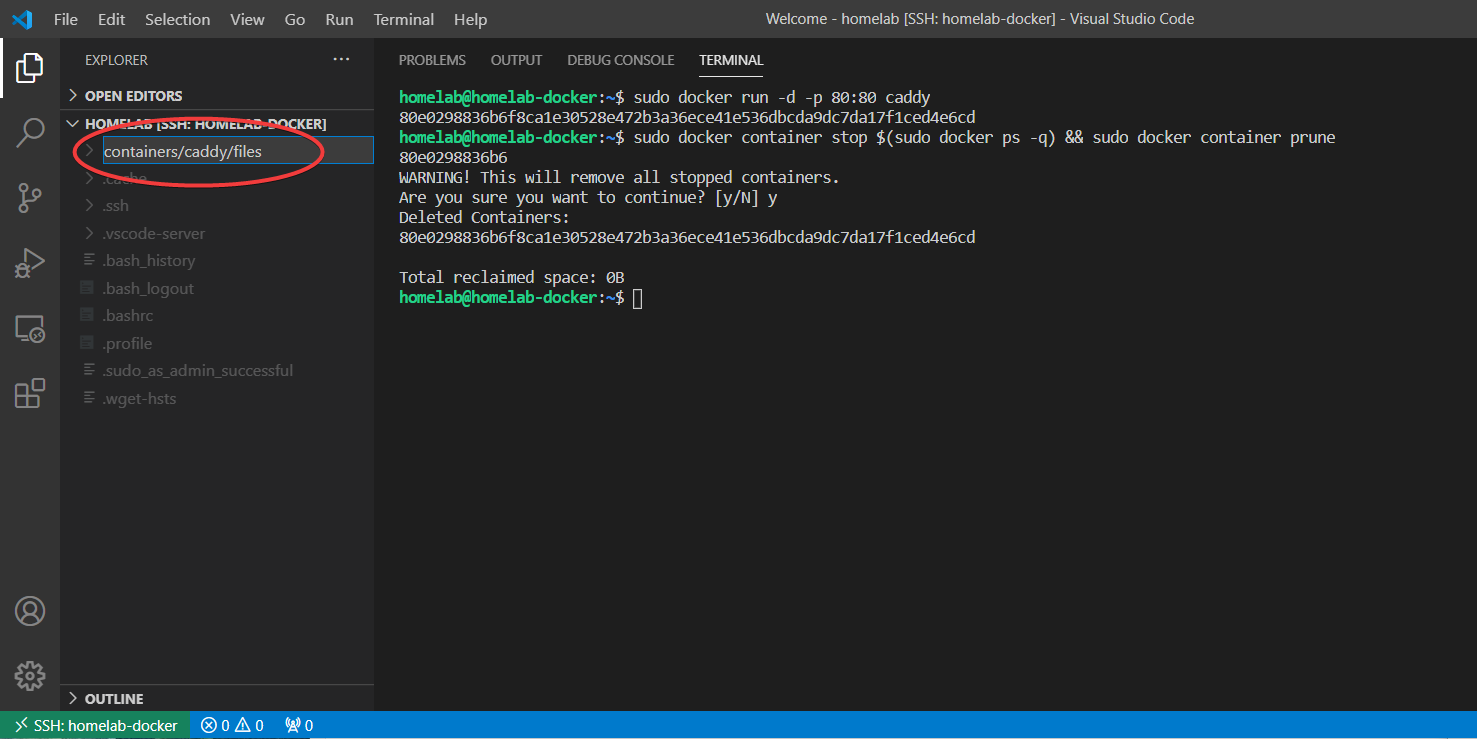
- Right-click in a blank area of the VS Code Explorer panel and choose new folder.
2. Name the new folder containers/caddy/files.
The folder names are up to you as long as they are defined correctly in the upcoming docker command. By using a forward slash, VS Code interprets this as creating three folders. The files folder is a subdirectory of caddy, and caddy is a subdirectory of containers. You do not have to use this folder structure, but the structure makes more sense when you have multiple containers on the same server.
If not done previously, stop and remove any containers you created previously with the following:
# stop and remove ALL currently running containers.
# The $(sudo docker ps -q) dynamically grabs all running container IDs
sudo docker container stop $(sudo docker ps -q)
sudo docker container prune
You can see this command in the screenshot below:
Deploying a Caddy Container with Bind Mounts
You now have the folder structure built on the Ubuntu Server. It’s time to create a Caddy container with bind mounts.
- Before you get too far, first figure out where the container you’re working with stores persistent data. That location will be different depending on who has created the Docker image and what purpose it serves.
Your best option to find where persistent data is stored is to check the documentation within the Docker Hub for the image in question. For Caddy, you can find the documentation here:
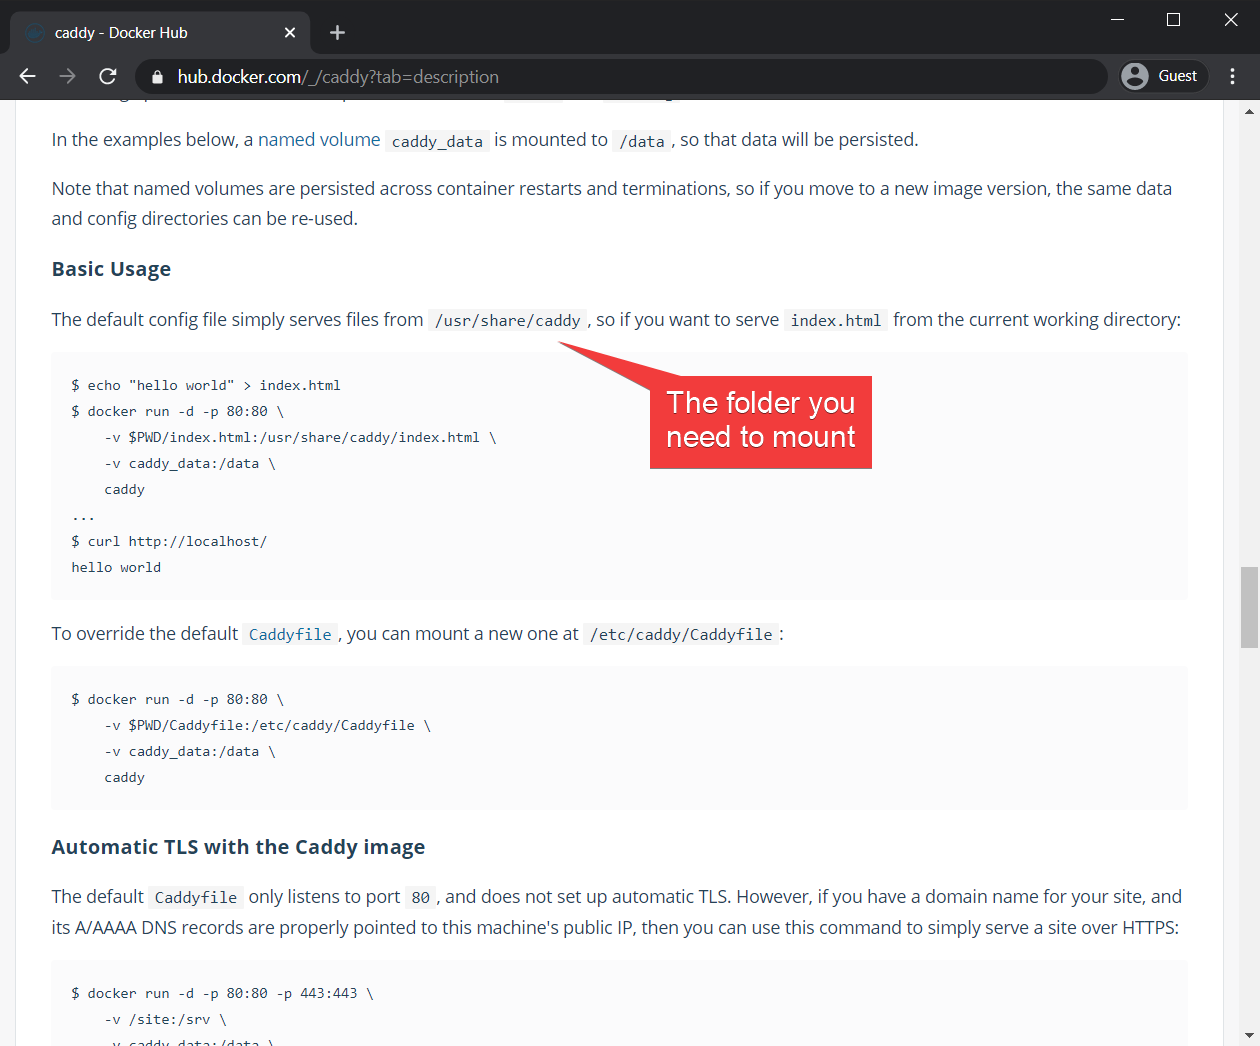
2. Start the container using the below command. the -v ~/containers/caddy/files:/usr/share/caddy parameter is mapping the path before the colon (~/containers/caddy/files) to the folder inside the container (/usr/share/caddy). This works extremely similarly to the port mapping command: Except you’re mapping a folder instead of a port. This type of command is called a Bind Mount.
# bind a folder on the host (the path before the colon) to
# /usr/share/caddy inside the container
sudo docker run -d -p 80:80 -v ~/containers/caddy/files:/usr/share/caddy caddy
the tilde (
~) in the above code refers to the home folder. For this article, that is equivalent to/home/homelab.
3. Open up a browser and navigate back to the http address of your server. You will notice that the server is now serving a 404 page. This is expected because you currently don’t have an index.html file in ~/containers/caddy/files.
4. Create an index.html file in ~/containers/caddy/files on the Ubuntu server in the VS Code Explorer window that looks like the following:
<body><h2>hello world!</h2></body>5. Navigate to the HTTP address of your server and confirm that the container is now serving your new index.html page.
You can see all of the above in the following animation:
Unlike the docker management commands, the files you are creating (like index.html) do not require administrative rights. This is because you own the content that the caddy server is serving, as they are in your home folder.
Validating the Bind Mount
Excellent! Not only are you using a completely fresh Docker container, but that container is serving content saved locally in your home folder! You can prove this by running the following:
- Stop and remove the running container. This step completely removes everything including that index.html file if you weren’t using bind mounts.
sudo docker container stop $(sudo docker ps -q)
sudo docker container prune
2. Create a brand new container.
sudo docker run -d -p 80:80 -v ~/containers/caddy/files:/usr/share/caddy caddy3. Verify that the new container is still serving the index.html file on the http://<your server> address.
Creating Persistent Docker Containers
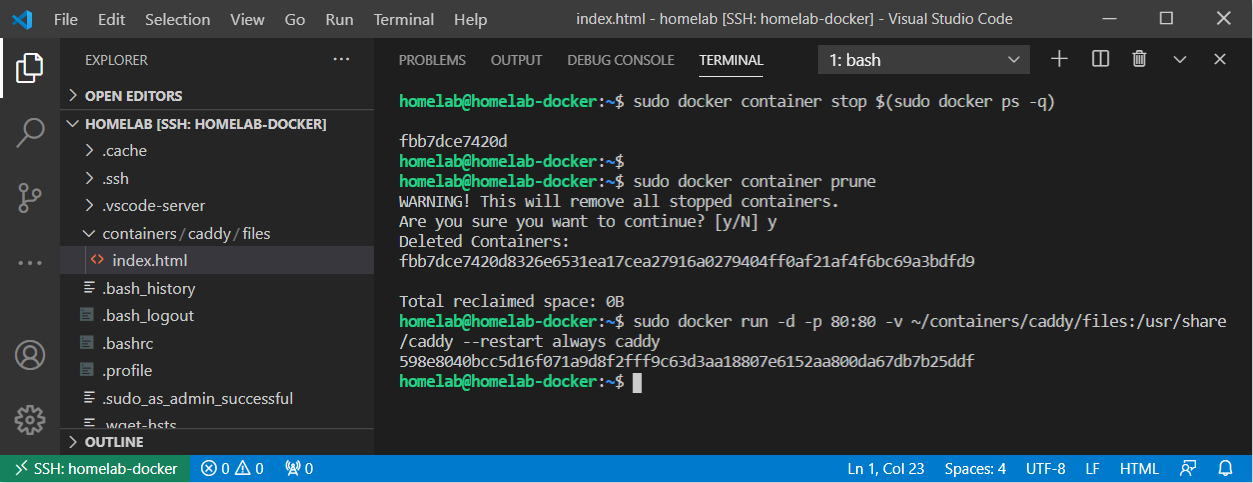
A container isn’t that useful if it stops when the server reboots. By default, that’s what is going to happen if you don’t make it happen. To prevent this, let’s generate a new caddy container again but this time once that restarts when the Docker host, Ubuntu in this case, restarts.
- Stop and remove all running containers.
# stop and remove ALL currently running containers
sudo docker container stop $(sudo docker ps -q)
sudo docker container prune
2. Restart the caddy container with the --restart always parameter, to set this new container to start with the host on reboot. With the --restart always flag in place, your container now behaves like a proper service: starting automatically on boot.
sudo docker run -d -p 80:80 -v ~/containers/caddy/files:/usr/share/caddy --restart always caddy3. Restart the server.
4. Now verify that the new container comes up and is still serving the index.html file on the http://<your server> address.
You can see the following commands applied below:
Moving on
At this stage, you should have a working Docker environment and a basic understanding of images and containers. You can pull, start, stop, and perform basic management of your containers. You have also successfully created a running web service container using bind mounts and port mapping.
There are still lots to cover regarding Docker: Stay tuned to this space, as the next article will go into advanced docker management using Docker Compose.


