
Application deployments in Kubernetes can be challenging, especially for stateful applications such as MongoDB to Kubernetes cluster. How do you ease up the deployment? Let the MongoDB Kubernetes Operator automatically deploy and manage stateful applications inside your Kubernetes cluster.
In this tutorial, you’ll learn how to deploy MongoDB to Kubernetes using the MongoDB Kubernetes Operator.
Read on and start automating your Kubernetes deployments!
Prerequisites
This tutorial will be a hands-on demonstration. To follow along, be sure you have the following requirements:
- A Kubernetes cluster – This demo uses the Kubernetes cluster v1.23.
- Kubectl installed on the local machine.
- MongoDB Compass installed on the local machine.
- Git installed on your machine.
- jq JSON Parser installed on the local machine.
Creating Namespace for MongoDB
When deploying applications to Kubernetes, creating a specific namespace for your projects is always recommended.
Namespaces make managing Kubernetes resources easier for administrators and prevent name collisions. At the same time, creating namespaces prevents incorrect resource usage in the Kubernetes environment.
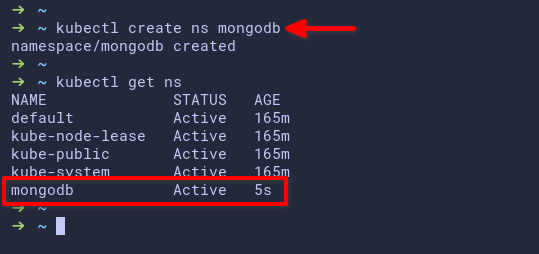
Open your terminal, and run the kubectl create command below to create a new namespace (ns) called mongodb on your Kubernetes cluster.
kubectl create ns mongodb
Now run the below kubectl get command to verify the list of namespaces on your Kubernetes cluster.
kubectl get ns
You’ll see a new namespace called mongodb available on your cluster, as shown below.
Downloading the MongoDB Kubernetes Operator
After creating a namespace, it’s time to download the MongoDB Kubernetes Operator. The MongoDB Kubernetes Operator is a set of Kubernetes operators. These Kubernetes operators offer automatic deployment, configuration, and management of MongoDB Community on the Kubernetes environment.
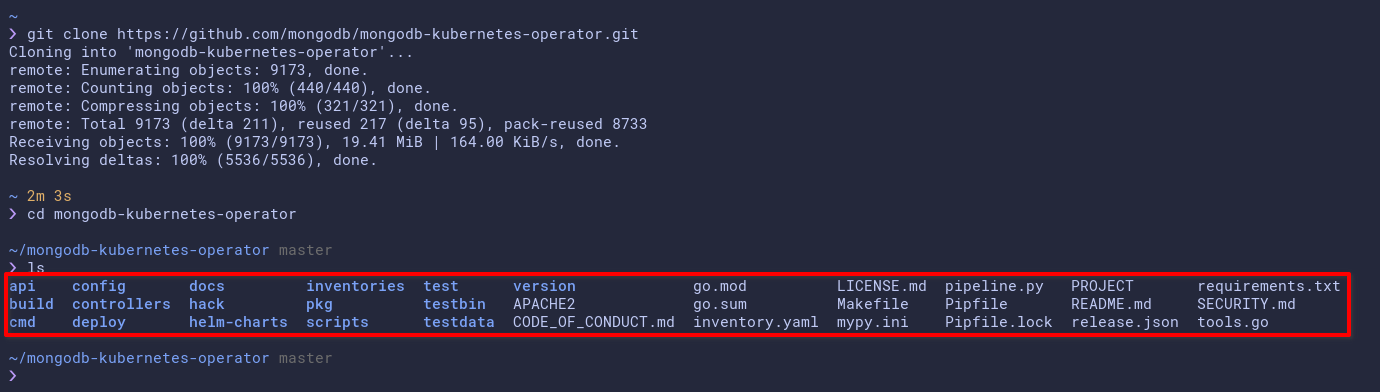
Run the git command below to clone the MongoDB Kubernetes Operator project to your local machine.
git clone <https://github.com/mongodb/mongodb-kubernetes-operator.git>
Now, run each command below to change your current working directory to mongodb-kubernetes-operator and list (ls) all available files and directories.
# Change the working directory to mongodb-kubernetes-operator
cd mongodb-kubernetes-operator/

# List files and directories
ls
You’ll see a subdirectory named config inside the ~/mongodb-kubernetes-operator project directory, as shown below. The config subdirectory contains examples of YAML files for deploying MongoDB to Kubernetes.
Deploying the MongoDB Operator
Now that your custom namespace and MongoDB Kubernetes Operator are set up, you’re ready to deploy the MongoDB Operator to your Kubernetes cluster. How? You’ll use the configuration inside the config directory.
The MongoDB Operator handles the lifecycle of your MongoDB deployment on the Kubernetes cluster. The operator will automatically create, manage, and scale the state of your MongoDB deployment.
To deploy the MongoDB operator, you must create a Kubernetes Custom Resources Definition (CRD) and the controller. The Kubernetes CRD is extensible to Kubernetes API, allowing you to create custom resources in Kubernetes.
1. Run the kubectl apply command below to create a new Kubernetes CRD for MongoDB deployment.
The Kubernetes operator replaced all human interaction to deploy an application on Kubernetes. The operator is a pod controller that automatically deploys and manages your stateful application on Kubernetes.
kubectl apply -f config/crd/bases/mongodbcommunity.mongodb.com_mongodbcommunity.yaml
2. Next, run the following kubectl get command to verify the list of available crd in your Kubernetes.
kubectl get crd/mongodbcommunity.mongodbcommunity.mongodb.comBelow, you can see the CRD with the name mongodbcommunity.mongodbcommunity.mongodb.org.

3. Run the below command to create a new custom Role-Based Access Control (RBAC) for the MongoDB Operator, and specify RBAC implementation to the namespace mongodb.
This command creates a new role, rolebinding, and serviceaccount for the MongoDB operator, which are custom permissions on your Kubernetes cluster. These custom permissions are required for automatically deploying and managing MongoDB.
kubectl apply -k config/rbac/ -n mongodb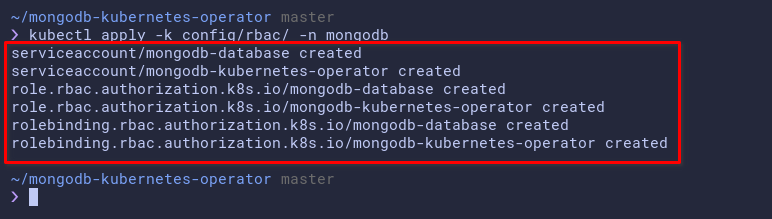
4. Now, run each kubectl command below to verify the role, rolebinding, and serviceaccount for the MongoDB operator.
# Checking list role
kubectl get role mongodb-kubernetes-operator -n mongodb

# Checking list rolebinding
kubectl get rolebinding mongodb-kubernetes-operator -n mongodb

# Checking serviceaccount
kubectl get serviceaccount mongodb-kubernetes-operator -n mongodb
The output below shows the role, rolebinding, and serviceaccount mongodb-kubernetes-operator is created on the mongodb namespace.

5. Once verification is complete, run the kubectl command below to deploy the MongoDB Operator to the mongodb namespace.
This command creates a new pod (mongodb-kubernetes-operator) with the base Docker image (quay.io/mongodb/mongodb-kubernetes-operator). This pod will act as the controller for automatically deploying MongoDB ReplicaSets on the Kubernetes cluster.
kubectl create -f config/manager/manager.yaml -n mongodbBelow, you can see that the MongoDB operator deployment is created, but the pod is still initializing.

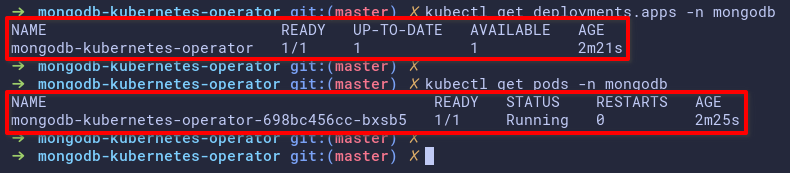
6. Finally, run the following commands to verify the deployment and pods on the mongodb namespace.
# Checking deployment on mongodb namespace
kubectl get deployment.apps -n mongodb

# Checking pods on mongodb namespace
kubectl get pods -n mongodb
As you can see below, the MongoDB Operator pod is running.
Deploying MongoDB ReplicaSet to Kubernetes
After your MongoDB deployment, you’ll deploy ReplicaSet to your Kubernetes to provide high availability and redundancy for your MongoDB deployment. You wouldn’t want downtime on your deployment.
MongoDB ReplicaSets deployment using MongoDB Kubernetes Operator is secure by default using the SCRAM authentication for users. At the same time, you can use TLS secure connection for users and applications connections and expose Prometheus metrics for monitoring resources.
Related: Getting Started with Grafana & Prometheus Kubernetes Cluster Monitoring
Inside the config/samples/ directory, you’ll see multiple samples of YAML files for the ReplicaSet deployment. Each file can be used on different deployment scenarios, but the default ReplicaSet deployment file is mongodb.com_v1_mongodbcommunity_cr.yaml.
1. Edit the YAML file for your deployment using your preferred editor. This this demo uses the /mongodb.com_v1_hostpath.yaml file for local deployment. This YAML file is located in the config/samples/arbitrary_statefulset_configuration/ directory.
If you’re deploying the MongoDB Kubernetes Operator on the cloud services such as GKE and AKS, use the YAML file mongodb.com_v1_mongodbcommunity_cr.yaml. But if you’re deploying locally inside Kind or Minikube, you can use the custom YAML file (arbitrary_statefulset_configuration/mongodb.com_v1_hostpath.yaml), which automatically creates custom PV and PVC for MongoDB ReplicaSet pods.
Below, change the number (members) of ReplicaSets you like to deploy depending on your environment, but the default is 3. For this tutorial, the number of ReplicaSets is set to 2.
spec:
  members: 2 # Number of replica sets to create
  security:
    authentication:
      modes:
      - SCRAM
  statefulSet:
Replace <your-password-here> with your strong password. You’ll use this password to log in to the MongoDB database, and by default, you use the SCRAM authentication.
Save the changes and close the editor once you’re satisfied with the password.
---
apiVersion: v1
kind: Secret
metadata:
  name: my-user-password
type: Opaque
stringData:
password: <your-password-here> # Set password for MongoDB admin2. Next, run the kubectl command below to deploy (apply) the MongoDB ReplicaSet using the mongodb.com_v1_hostpath.yaml to the mongodb namespace.
This command creates the following:
- A new custom resource (MongoDBCommunity) with the name mdb0 under the
mongodbcommunity.mongodb.com/v1CRD
- Kubernetes secrets for storing MongoDB user passwords. At the same time, some PVs and PVCs with the type as
hostPathfor the MongoDB Replica Set.
The deployment will take some time, depending on how big are the ReplicaSets to create and the Kubernetes cluster itself.
kubectl apply -f config/samples/arbitrary_statefulset_configuration/mongodb.com_v1_hostpath.yaml -n mongodb
3. After deployment, run each command below to verify the custom resources and pods on the mongodb namespace.
# Checking the mongodbcommunity crd
kubectl get mongodbcommunity -n mongodb

# Checking pods on the mongodb namespace
kubectl get pods -n mongodb
The output below shows the following:
- The custom resource MongoDBCommunity with the name mdb0 is running with MongoDB v4.4.0.
- The two MongoDB ReplicaSet pods are running with the name mdb0-0 and mdb0-1. Each pod contains two different containers, the mongod, and the mongodb-agent container.

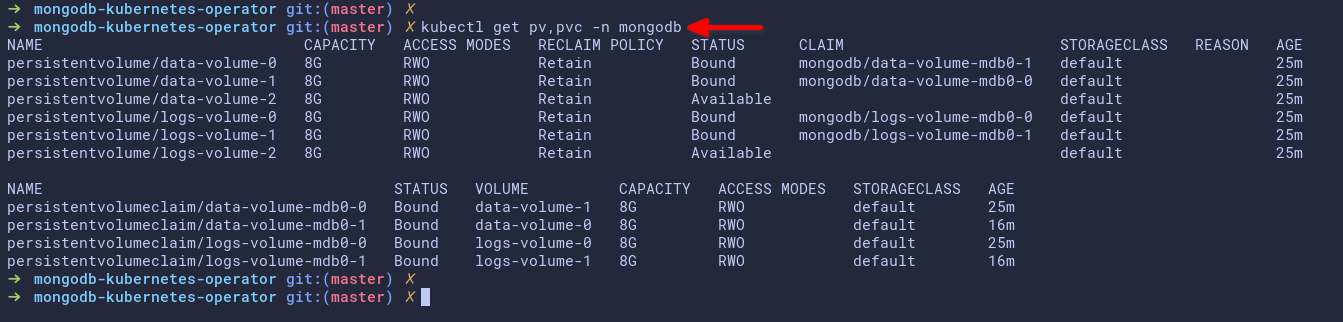
4. Lastly, run another kubectl command below to verify the pv and pvc on the mongodb namespace.
kubectl get pv,pvc -n mongodbThe output below shows you some pv and pvc used by the MongoDB ReplicaSet pods.
Creating a New User and Database for the MongoDB Deployment
You’ve completed the deployment of the MongoDB operator and ReplicaSets to your Kubernetes cluster at this point. The next step is to create a new MongoDB database and user for your application.
You’ll create a new Kubernetes secret for the new user, edit the custom resource of ReplicaSet deployment, and update the ReplicaSet to your cluster.
1. Create a new YAML file using your preferred editor and populate the following Kubernetes secret. You can name the YAML file as you like, but the file is named new-user.yaml in this tutorial.
This YAML file creates a new Kubernetes secret with the name as myappdata and the password as myapppassword.
---
apiVersion: v1
kind: Secret
metadata:
  name: myappdata # name of the secret meta.data
type: Opaque
stringData:
  password: myapppassword # password for the new user
2. Next, run the kubectl command below to execute the new-user.yaml configuration.
This command creates and applies (apply) a new Kubernetes secret to your cluster and applies this secret to the mongodb namespace.
kubectl apply -f new-user.yaml -n mongodb
3. Edit the YAML file of your ReplicaSet CRD configuration (mongodb.com_v1_hostpath.yaml) in the config/samples/arbitrary_statefulset_configuration directory
Add the following configuration to the mongodb.com_v1_hostpath.yaml file, which creates the database and user for MongoDB.
Be sure to replace scram-secret-myapp with your own scram credentials, save the changes to the file and close the editor.
    - name: appuser # New user appuser
      db: admin # Allows authentication to database admin
      passwordSecretRef:
        name: myappdata # The Kubernetes secret
      roles:
        - name: dbAdmin # Setup role dbAdmin
          db: appdb1 # to the appdb1
      scramCredentialsSecretName: scram-secret-myapp
4. Now, run the below command to apply the new changes you made in the mongodb.com_v1_hostpath.yaml file in step three.
kubectl apply -f config/samples/arbitrary_statefulset_configuration/mongodb.com_v1_hostpath.yaml -n mongodb
5. Lastly, run each command below to generate the detailed MongoDB connections for your application. These commands generate the detailed MongoDB connection for your applications in JSON output and parse the output using the jq command line.
Replace mdb0-admin-mongoadmin with your environment details as follows:
mdb0– The meta-data name of the MongoDB resources.
admin– The database to authenticate.
mongoadmin– The user you’ll be using to authenticate
# Reteive admin authentication details and connections
kubectl get secrets mdb0-admin-mongoadmin -n mongodb -o json | jq -r '.data | with_entries(.value |= @base64d)'

# Retrive appuser authentication details and connections
kubectl get secrets mdb0-admin-appuser -n mongodb -o json | jq -r '.data | with_entries(.value |= @base64d)'
The output below shows you can connect to MongoDB using the standard and standardSrv connections. You’ll also see the username and password of your MongoDB deployment.

Connecting to the MongoDB Deployment
You’ve completed deploying MongoDB on the Kubernetes cluster using the MongoDB Kubernetes operator. But how do you know the deployment works? You’ll verify your local machine’s database and user connection to MongoDB inside the Kubernetes cluster.
To verify the connection to your MongoDB deployment, you’ll use port-forwarding. Port-forwarding in Kubernetes allows you to create a forwarding port from any Kubernetes service to your local port.
1. Run the kubectl command below to get the list of services (svc) on the mongodb namespace (-n).
kubectl get svc -n mongodbBelow, you’ll see the service named mdb0-svc, which exposes port 27017 (default port of MongoDB).

2. Next, run the below command to create port-forwarding to the Kubernetes cluster.
This command creates a new port forwarding on the Kubernetes service (mdb0-svc) and forwards the local port 27017 to the Kubernetes service port 27017.
kubectl port-forward service/mdb0-svc -n mongodb 27017:27017
3. Finally, open your MongoDB Compass application on your local machine, add a new connection with the following format, and click Connect to connect to MongoDB.
Change the username and password field with your MongoDB user and password.
# Connect as mongoadmin
mongodb://mongoadmin:secretpassword@localhost:27017/admin?ssl=false
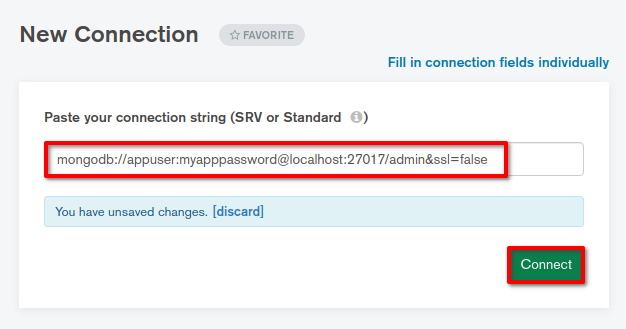
# Connect as appuser
mongodb://appuser:myapppassword@localhost:27017/admin?ssl=false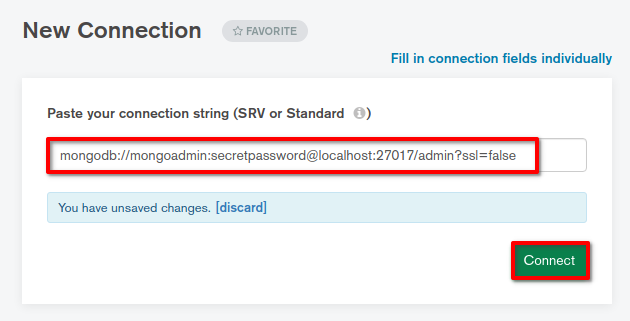
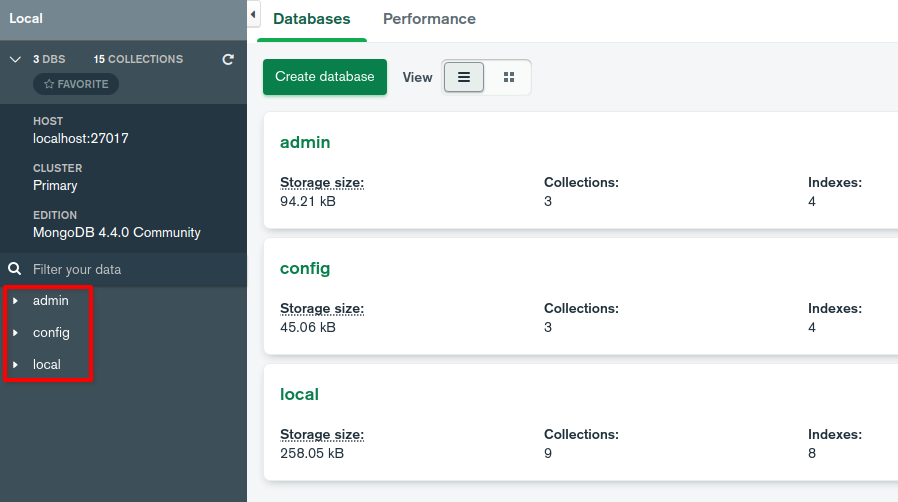
When the connection is successful, you’ll get the following window that confirms the MongoDB deployment to Kubernetes is working correctly.
For the mongoadmin user, you’ll see default databases (local, config, and admin).
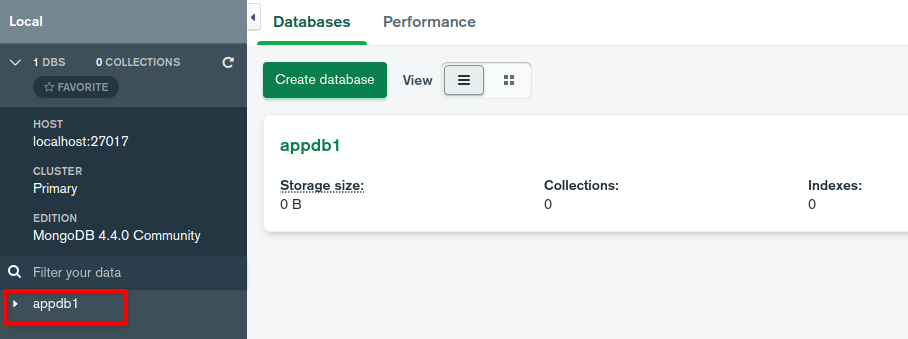
For the appuser, you’ll only see one privileges database named appdb1.
Conclusion
Throughout this tutorial, you’ve learned how to deploy the MongoDB to the Kubernetes cluster using the MongoDB Kubernetes Operator. You’ve also touched on the basic usage of the Kubernetes operator. And by now, you already have sound knowledge about automatically deploying and managing applications to Kubernetes.
Why not set up a TLS connection on your MongoDB deployment to build on this newfound knowledge? TLS connection secures connections between replica sets and secures client or app connections to MongoDB.


