


Server hacking and unauthorized access are genuine threats. These reasons are why you should implement a firewall as part of your overall network security strategy. Configuring a firewall with iptables rules is one way to mitigate such risks on Linux systems.
Lucky for you, this tutorial will teach you how to implement a firewall with basic iptables rules configuration that you can then customize based on your requirements. Ready to get your hands dirty? Time to dive in!
Prerequisites
This tutorial houses hands-on demonstrations. If you’d like to follow along, be sure you have an Linux server or desktop computer. This tutorial uses Ubuntu 14.04 for the examples but should work with other Linux distros and newer Ubuntu versions.
Installing the Iptables Persistent Firewall Service
As the name implies, the IPTables Persistent Firewall is a service that saves your rulesets and automatically applies IPTables rules on server restarts. But first, you will need to install the persistent firewall package.
To install the IPTables Persistent Firewall, proceed with the following steps.
1. Open a terminal session on your server either locally or via SSH.
2. Next, run the command below to update your server’s package source cache.
# Updating the package source cache
sudo apt update -y
3. Now, run the below command to install the IPTables Persistent Firewall.
# Installing the Persistent Firewall Package
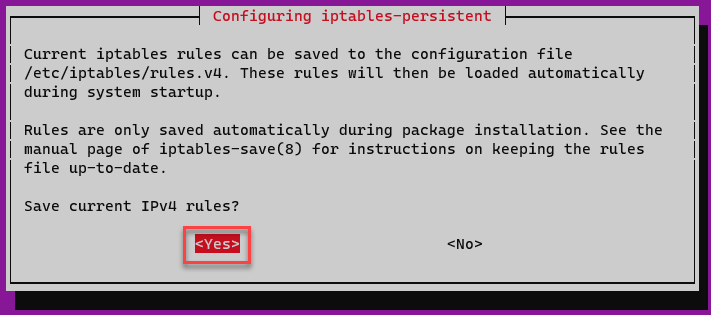
sudo apt install iptables-persistent -y4. To save current IPv4 rules, select Yes and press Enter on the prompt. The installer saves the IPv4 rules to the file /etc/iptables/rules.v4.
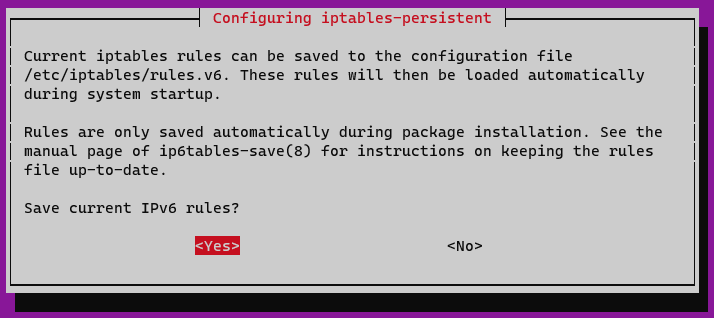
5. The next prompt asks you to Save current IPv6 rules, select Yes, and press Enter. The installer saves the IPv6 rules to the file /etc/iptables/rules.v6.
Lastly, confirm that the netfilter-persistent.service is active and enabled.
sudo systemctl status netfilter-persistent
Setting Up Basic Iptables Rules
In the basic firewall setup, you will construct an extensible framework that you can build on for configuring your firewall. Generally, you will set up a “deny all-accept all” policy, meaning that any incoming request from any IP will be denied, except your IP and SSH port 22 (for admin access).
Any ongoing connections from your server IP to the broader internet will be allowed; any incoming connections will be dropped (except for SSH). Afterward, you will create exceptions for the specific services and traffic types you need, gradually learning about later in this tutorial.
1. Open the /etc/iptables/rules.v4 file in a text editor. This example uses nano as the editor.
sudo nano /etc/iptables/rules.v4Next, delete all the content in the /etc/iptables/rules.v4 file and replace it with the following lines. Refer to the inline comments to understand what each line/section does.
Note: The firewall configuration below is what you may describe as strict and is only to create a basic firewall rule, which you may later customize.
*filter
# Setting up a "deny all-accept all" policy
# Allow all outgoing, but deny/drop all incoming and forwarding traffic
:INPUT DROP [0:0]
:FORWARD DROP [0:0]
:OUTPUT ACCEPT [0:0]

# Custom per-protocol chains
# Defining custom rules for UDP protocol.
:UDP - [0:0]
# Defining custom rules for TCP protocol.
:TCP - [0:0]
# Defining custom rules for ICMP protocol.
:ICMP - [0:0]

# Accept SSH UDP traffic
-A TCP -p udp --dport 22 -j ACCEPT
# Accept SSH TCP traffic
-A TCP -p tcp --dport 22 -j ACCEPT

# Acceptable ICMP traffic

# Boilerplate acceptance policy
# Allowing packets based on the CONNTRACK connection states of ESTABLISHED and RELATED
-A INPUT -m conntrack --ctstate ESTABLISHED,RELATED -j ACCEPT
# Allowing packets through the loopback interface, which is used for local connections
-A INPUT -i lo -j ACCEPT

# Packets that do not match any rules in the protocol-specific should be dropped.
-A INPUT -m conntrack --ctstate INVALID -j DROP
# Allowing new protocol-specific chains to process packets for UDP that have a NEW conntrack state.
-A INPUT -p udp -m conntrack --ctstate NEW -j UDP
# Allowing new protocol-specific chains to process packets for TCP that have a NEW conntrack state.
-A INPUT -p tcp --syn -m conntrack --ctstate NEW -j TCP
# Allowing new protocol-specific chains to process packets for ICMP that have a NEW conntrack state.
-A INPUT -p icmp -m conntrack --ctstate NEW -j ICMP

# Reject anything at this point. And print out rejection message with its specific protocol.
# Issuing an ICMP "port unreachable" message to any new incoming UDP packets, rejecting them.
-A INPUT -p udp -j REJECT --reject-with icmp-port-unreachable
# Issuing a "tcp-reset" message to any new incoming TCP packets, rejecting them.
-A INPUT -p tcp -j REJECT --reject-with tcp-reset
# Issuing an "icmp-proto-unreachable" message to any new incoming TCP packets, dropping all other incoming packets.
-A INPUT -j REJECT --reject-with icmp-proto-unreachable

# Commit the changes
COMMIT

*raw
# Allowing packets in the PREROUTING chain
:PREROUTING ACCEPT [0:0]
# Allows packets in the OUTPUT chain, which is used for locally generated packets
:OUTPUT ACCEPT [0:0]
# Commits the changes to the kernel
COMMIT
# NAT table is used to alter packets as they are routed through the system
*nat
:PREROUTING ACCEPT [0:0]
# Allowing packets in the INPUT chains for NAT
:INPUT ACCEPT [0:0]
# Allowing packets in the OUTPUT chains for NAT
:OUTPUT ACCEPT [0:0]
# Allowing packets in the POSTROUTING chains for NAT
:POSTROUTING ACCEPT [0:0]
# Commits the changes to the kernel
COMMIT

*security
# Allowing packets in the INPUT chains for security
:INPUT ACCEPT [0:0]
# Allowing packets in the FORWARD chains for security
:FORWARD ACCEPT [0:0]
# Allowing packets in the OUTPUT chains for security
:OUTPUT ACCEPT [0:0]
# Commits the changes to the kernel
COMMIT

*mangle
# Allowing packets in the PREROUTING chains for mangle
:PREROUTING ACCEPT [0:0]
# Allowing packets in the INPUT chains for mangle
:INPUT ACCEPT [0:0]
# Allowing packets in the FORWARD chains for mangle
:FORWARD ACCEPT [0:0]
# Allowing packets in the OUTPUT chains for mangle
:OUTPUT ACCEPT [0:0]
# Allowing packets in the POSTROUTING chains for mangle
:POSTROUTING ACCEPT [0:0]
# Commits the changes to the kernel
COMMIT
3. Save the file. In nano, press CTRL+X, Y, Enter.
4. Run the iptables-restore command below to validate or find any syntax errors. If there are no errors, the firewall will restart with the rules you defined in the file. If there are errors, the command will return a list of the errors and how to fix them.
sudo iptables-restore -t /etc/iptables/rules.v45. Next, edit the /etc/iptables/rules.v6 to implement your firewall policy and framework for IPv6.
sudo nano /etc/iptables/rules.v66. Replace the /etc/iptables/rules.v6 file with the following lines. Save and exit the /etc/iptables/rules.v6 by pressing CTRL+X, Y, Enter.
The iptables rules below will drop all the IPv6 traffic and assumes that there are no application or service on the server that relies on or use IPv6.
*filter
:INPUT DROP [0:0]
:FORWARD DROP [0:0]
:OUTPUT DROP [0:0]
COMMIT
7. Run the command below to find and fix any syntax errors.
sudo ip6tables-restore -t /etc/iptables/rules.v68. Now, reload the netfilter-persistent service for the iptables rules to take effect.
sudo service netfilter-persistent reload
9. Run the command below to save the new iptables rules.
sudo service netfilter-persistent save
10. Run the command below to list all the rules for IPv4 currently in use.
sudo iptables -S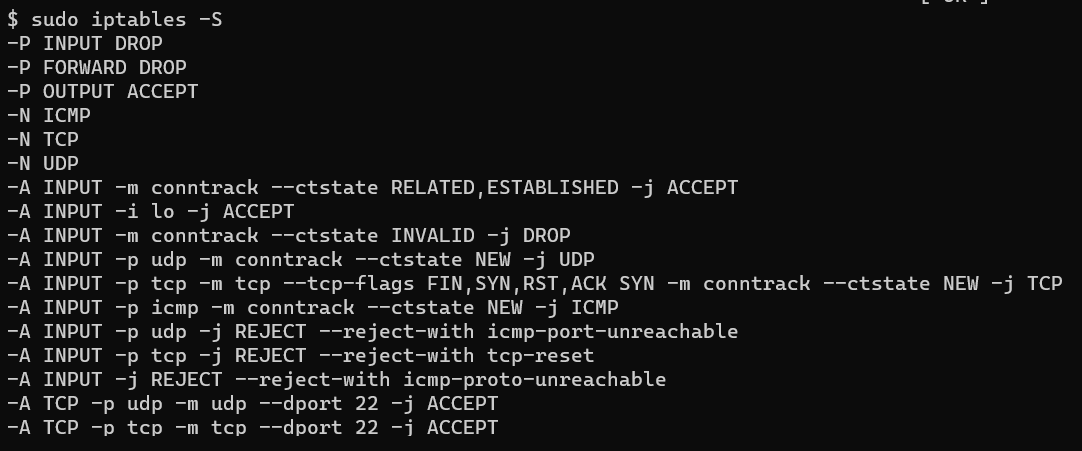
10. Finally, list the iptables rules for IPv6.
sudo ip6tables -S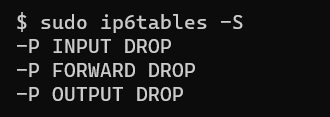
Changing Your Server’s DNS Server IP Address (Conditional)
Blocking all IPv6 traffic may result in unfavorable side effects, specifically if your server relies on IPv6 for name resolution.
In this example, the network configuration relies on IPv6 name servers (such as 2001:4860:4860::8888 and 2001:4860:4860::8844). Since the firewall is enforcing IPv4 traffic only, the system cannot look up name servers for IPv6.
For example, some of your APT repositories may not work if the firewall blocks all IPv6 traffic. If you try to rerun the sudo apt update command, you might get the following error.
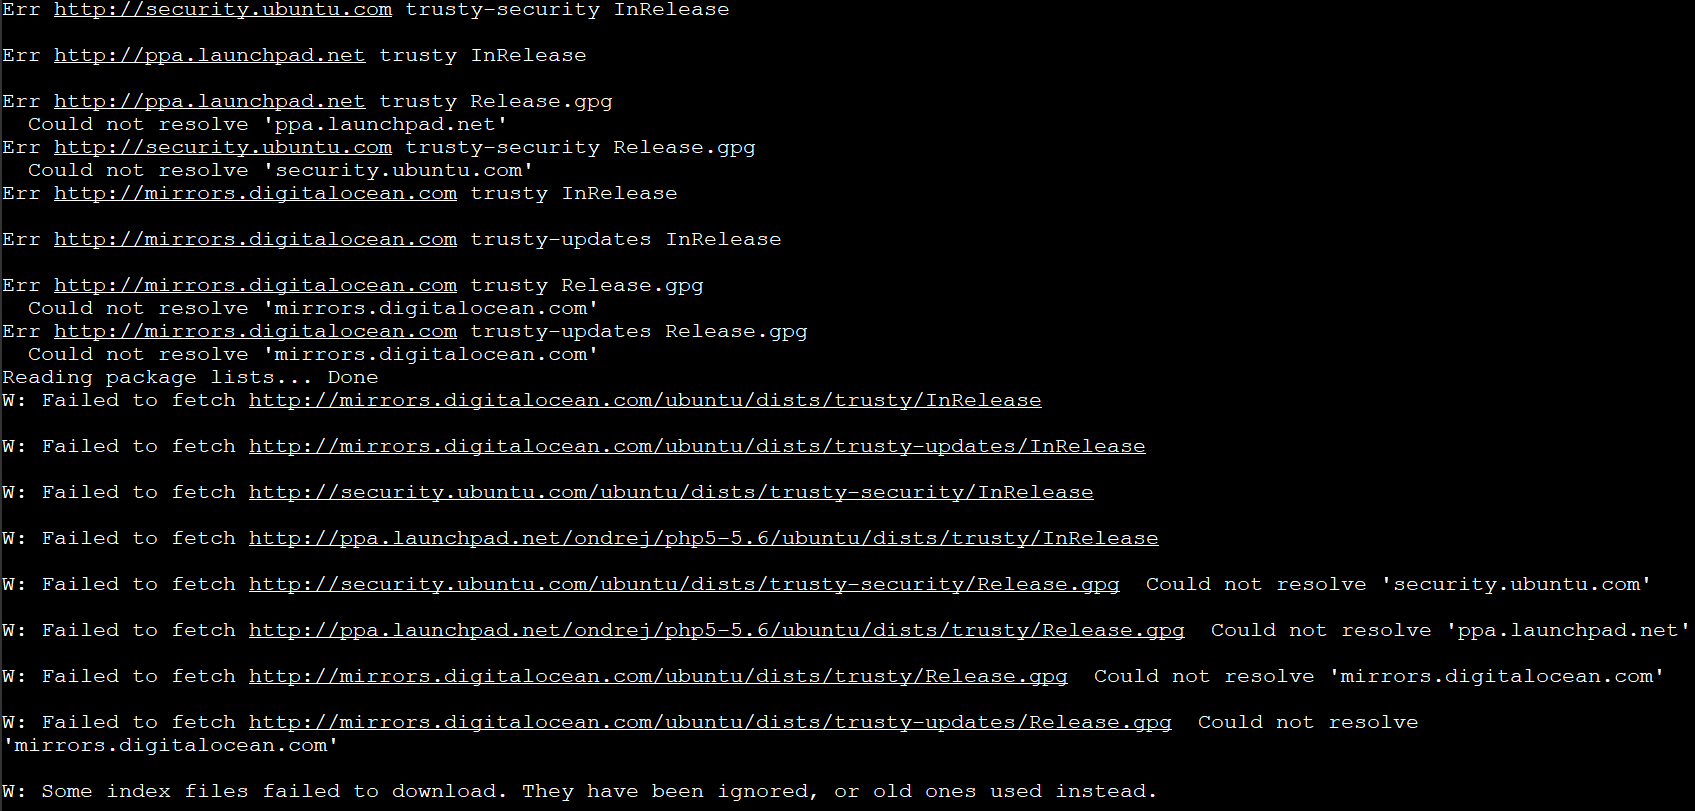
The solution is to update your network configuration file, preferring to use IPv4 name servers (such as 8.8.8.8 and 8.8.4.4).
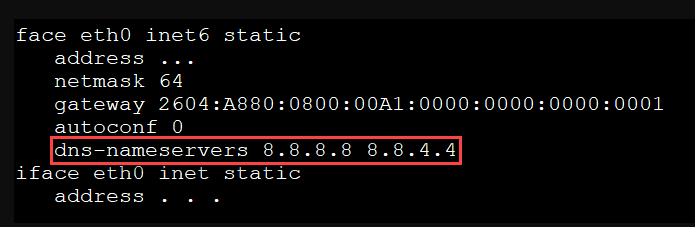
1. Open the /etc/network/interfaces file in a text editor.
The network interface configuration files may differ depending on the Linux distro or version. The example below is specifically for Ubuntu 14.04 LTS.
sudo nano /etc/network/interfaces2. Look for the dns-nameservers directive. Change this directive to dns-nameservers 8.8.8.8 8.8.4.4.
The 8.8.8.8 and 8.8.4.4 are public DNS servers run by Google. These public DNS servers are reliable and fast. Feel free to use other DNS servers, such as OpenDNS or and internal IPv4 DNS in your organization.
3. Run the command below to cycle your server’s network interface and use the new name servers.
sudo ifdown eth0 && sudo ifup eth04. Next, open the /etc/apt/apt.conf.d/99force-ipv4 in a text editor. This default configuration files what APT uses for persistent settings.
sudo nano /etc/apt/apt.conf.d/99force-ipv45. Populate the 99force-ipv4 file with the following line. This value will force APT to use IPv4 for name resolution. Save and exit the 99force-ipv4.
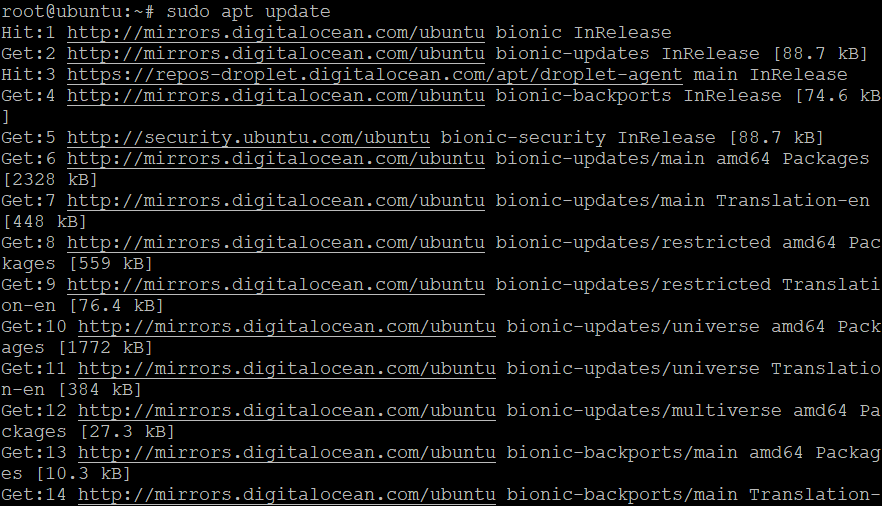
Acquire::ForceIPv4 "true";6. Log out and log back in your SSH session and rerun the sudo apt update command. You should no longer see the name resolution errors.
Adding Exemptions for Specific Services
Now that you have the working “allow all-deny all” iptables rules, you can now open specific ports for certain services as needed. For example, if your server hosts or will host a website, you’ll need to allow HTTP port 80 or HTTPS port 443 traffic. To do so, proceed as follows.
1. On the terminal, run the following command to open TCP port 80 for HTTP traffic and port 443 for HTTPS traffic.
- The
-Aparameter accepts which chain to append the rule. - The
-pparameter specifies the protocol type the rule applies. - The
--dportparameter value is the destination port number. - The
-jparameter directs which action to take when the rule matches.
sudo iptables -A TCP -p tcp --dport 80 -j ACCEPT
sudo iptables -A TCP -p tcp --dport 443 -j ACCEPT
2. Run the command below to verify that the new rules are now effective.
sudo iptables -L -vYou will see your two entries for HTTP and HTTPS, respectively.

3. Finally, run the command below to save your changes to the iptables rules.
sudo service netfilter-persistent saveAllowing Connections Based on Source
Iptables also allows you to create rules to allow traffic from specific sources, such as from one or more IP addresses. For example, your company may have three sites, each having its IP address (e.g., 192.168.1.20, 192.168.1.30, and 192.168.1.40).
You probably want to allow connections to your server from each site. To do so, you’ll create three separate rules with the -s to specify the specific source.
1. Run the following commands to allow the connections from three specific IP addresses.
The IP addresses below are only for example purposes and may not reflect a real-world scenario. Your sites’ IP addresses will be different.
# Allowing connection from 192.168.1.20
sudo iptables -A TCP -s 192.168.1.20 -j ACCEPT
# Allowing connection from 192.168.1.30
sudo iptables -A TCP -s 192.168.1.30 -j ACCEPT
# Allowing connection from 192.168.1.40
sudo iptables -A TCP -s 192.168.1.40 -j ACCEPT
2. Rerun the command below to verify that the new rules you’re added.
sudo iptables -L -vYou will see three entries for your three specific sources, allowing them to connect to your server.

3. Finally, don’t forget to save your iptables rules by running the command below.
sudo service netfilter-persistent saveResetting Iptables Rules
You’ve now successfully configured a firewal with iptables rules. But not everything goes to plan all the time. But what if you messed up and wanted to start fresh?
One option is to reset all your iptables rules. To do so, follow the below steps.
1. First, make a backup copy of your existing iptables rules. The command below copies the rules.v4 and rules.v6 files to your home directory.
sudo cp /etc/iptables/* ~/2. Next, flush out all your existing iptables rules by running the command below.
sudo service netfilter-persistent flush
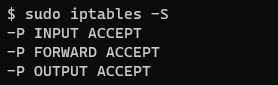
3. Confirm that the rules no longer exist.
sudo iptables -SAs you can see below, only the default iptables rules remain, allowing all. This behavior ensures that resetting the rules will not cause an admin access lockout scenario.
Conclusion
Throughout this tutorial, you’ve learned how to secure your Linux firewall with iptables rules and how to configure exemptions.
Some Linux admins may argue that iptables is outdated to configure the Linux firewall. But many applications still rely on iptables, which could mean that it will remain a mainstay for many more years.
What do you think of using persistent iptables rules? Will you consider implementing it or move on to newer options like the uncomplicated firewall (UFW)?


