


If you are a Windows admin, you’re probably in an Active Directory (AD) domain and seamlessly connect to multiple SMB file shares every day without much thought. This is because AD provides the single sign-on (SSO) capabilities to pass your logged-in credentials to the share. But what about Azure Files shares?
Not a reader? Watch this related video tutorial!The Azure Files service allows you to create SMB shares in the cloud backed by an Azure storage account. By default, Azure file shares are set up to authenticate users based on Azure Active Directory (AAD). But perhaps you don’t use AAD and would rather authenticate users based on your existing on-prem AD.
In this tutorial, you’ll learn how to set up an Azure file share backed by a storage account that can authenticate user access to the share based on on-prem AD user accounts. You’ll do all this using PowerShell.
Let’s get going!
Prerequisites
The majority of this post will be a tutorial. If you intend to follow along, be sure you have the following:
- An Active Directory domain.
- A single Active Directory group and user – This tutorial will use an AD group called test-group-1 and a user account called test-user-1 with a password of p@$$w0rd12 to test access to the file share.
- A domain-joined Windows 10 PC logged in with a user with permissions to create computer objects.
- Windows PowerShell v5.1 or higher. The tutorial will use PowerShell 7.1.
- The Az, ActiveDirectory, and AzFilesHybrid PowerShell modules installed. This tutorial will use the following versions:
- Az v5.8.0
- ActiveDirectory v1.0.1.0
- AzFilesHybrid v0.2.3
- Authenticated to Azure in PowerShell using the
Connect-AzAccountcmdlet.
- An Azure AD account with permission to create storage accounts.
- An Azure resource group to create demo resources within. The tutorial will use a resource group called ATAAzureFileDemo.
Tutorial Summary
This tutorial is broken down into six steps. Each step will build upon the previous one until you have a fully functioning Azure file share set up that authenticates access from your on-prem AD environment!
- Creating a new storage account
- Creating the Azure file share.
- Joining the storage account to your on-prem Active Directory domain.
- Mounting the file share using a storage account access key.
- Assigning share permissions.
- Renewing the computer account password assigned to the storage account.
Now that you have an idea of what you’re in for, open your PowerShell console and let’s jump into the demos!
Creating a Storage Account
To set up an Azure file share for on-prem AD authentication, you must first create the storage account the Azure file share will use. To do so, run the New-AzStorageAccount cmdlet to create the storage account using the Name, resource group (ResourceGroupName), Azure region (Location), and SKU (SkuName) as shown below.
Ensure the storage account name is 15 characters or less. Later in the tutorial, you will be creating an AD computer account to represent the storage account. AD computer accounts are limited to 15 characters.
The below example creates a globally unique storage account called ataazurefiledemo in the UKWest region with a Standard_LRS SKU. The below command uses the Standard_LRS SKU because resiliency is not a concern for this demo.
If you want more performance from the storage account and require solid-state-based hardware, specify the
Kindparameter with theFileStorageargument.
New-AzStorageAccount -ResourceGroupName "ATAAzureFileDemo" -Name "ataazurefile" -Location "ukwest" -SkuName "Standard_LRS"
Microsoft recommends only deploying Azure file shares into storage accounts with other Azure file shares. Do not create any other resources such as blobs, tables, etc., in that storage account.
Creating an Azure File Share
Once you’ve created the storage account, it’s time to create the Azure file share. To do that, invoke the PowerShell command New-AzRmStorageShare, as shown below.
The below command creates an Azure file share called atafileshare in the resource group ATAAzureFileDemo backed by a storage account called ataazurefile.
If you’re setting up this Azure file share in a production environment, you may opt for the Premium or Hot access tiers.
New-AzRmStorageShare -ResourceGroupName "ATAAzureFileDemo" -StorageAccountName "ataazurefile" -Name "atafileshare"
Joining the Storage Account to Active Directory
Now that you’ve created a storage account and file share, you need to make the storage account itself a member of your target domain.
To add an Azure storage account as a member of an on-prem Active Directory domain, you must:
- Create two storage account keys for use with authentication (one for initially configuring the share and one to rotate and renew the soon-to-be AD computer account the storage account will use).
- Create an on-prem AD computer account object for the storage account that the storage account will use for authentication.
- Assign one of the Kerberos keys as the computer object’s password to authenticate the storage account to the domain.
- Assign a CIFS service principal name (SPN) to the storage account’s computer object. The Kerberos authentication process requires this SPN.
- Enable the Active Directory Domain Services feature on the storage account to “domain join” the storage account.
Let’s start by creating the Kerberos tokens.
Creating the Azure Storage Account Keys
Like all other computer accounts, the storage account must use a password to authenticate to AD. But, since an Azure storage account doesn’t automatically get an AD password, you must create one. To do that, you must create a couple of Azure Storage Account keys to use as passwords.
Storage account keys will act as passwords when initially configuring the file share and to use for AD computer object password renewals in the future.
To create the keys for the storage account, execute the New-AzStorageAccountKey PowerShell command providing:
- The name of the resource group the storage account is in (
ResourceGroupName) - The name of the storage account (
Name) - A
KeyNamefor each token.
The below example specifies kerb1 and kerb2 as the KeyName to easily identify which keys to use for authentication on this storage account.
New-AzStorageAccountKey -ResourceGroupName "ATAAzureFileDemo" -Name "ataazurefile" -KeyName "kerb1"
New-AzStorageAccountKey -ResourceGroupName "ATAAzureFileDemo" -Name "ataazurefile" -KeyName "kerb2"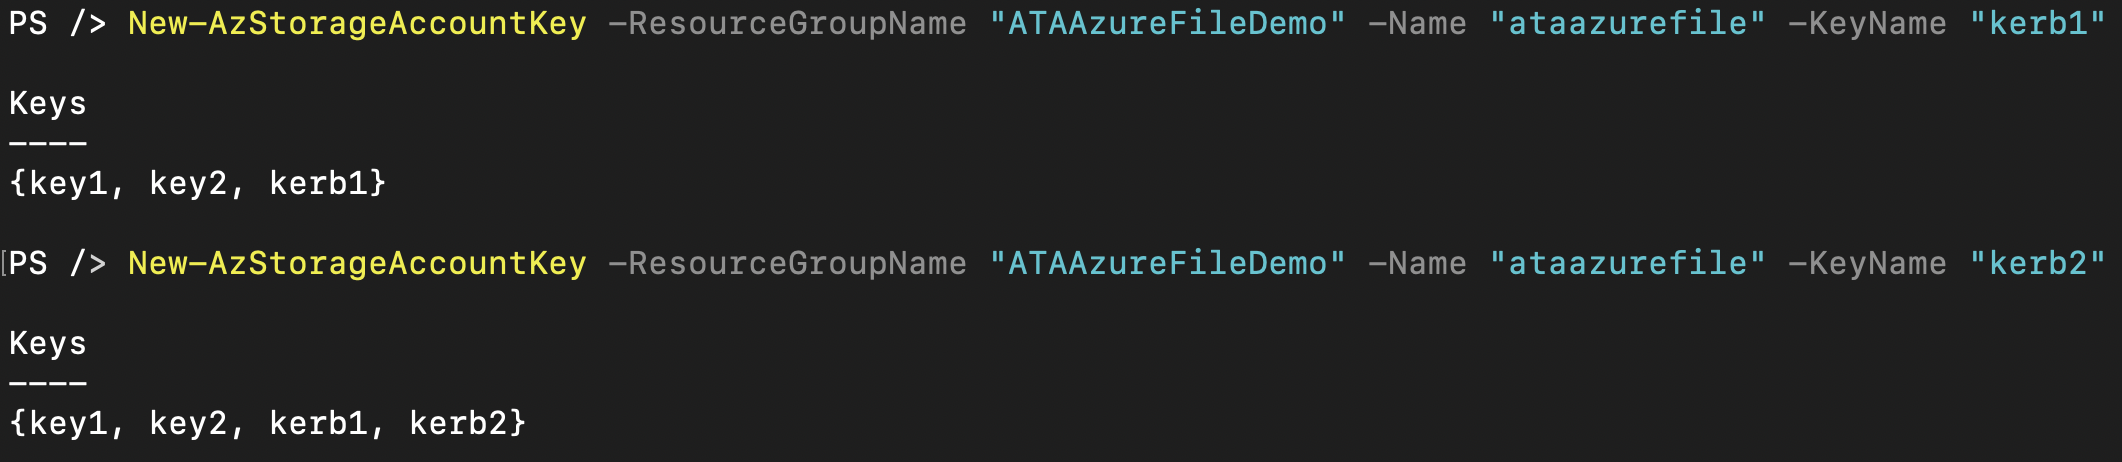
Creating the Active Directory Computer Account
Once you’ve created the Azure storage account keys, it’s time to create the AD computer object for the storage account.
If you need to allow cross-forest authentication to the storage account, you must perform some additional configuration. For simplicity, create the storage account’s AD computer object in the same domain that contains the users that will be accessing it.
First, create the computer object, query the value of the first token (kerb1 in this tutorial), and save it to a variable ($Token). Then, using that token, create the computer object using the New-ADComputer command assigning the token’s value as the computer account’s password, as shown below.
## Find the value of the key you just created by finding all of the storage account keys using Get-AzStorageAccountKey (ListKerbKey) and filter all results for only those matching the key name of kerb1
$Token = (Get-AzStorageAccountKey -ResourceGroupName "ATAAzureFileDemo" -Name "ataazurefile" -ListKerbKey | Where-Object {$_.KeyName -eq "kerb1"}).Value

## Create the AD computer object called ataazurefile assigning the password as the value of the storage account key. The computer account MUST be the exact same name as the storage account.
New-ADComputer -Name "ataazurefile" -AccountPassword (ConvertTo-SecureString -AsPlainText $Token -Force)
Specify the
Pathparameter ofNew-AdComputerif you wish to create the computer account in another organizational unit.
Assigning a CIFS SPN to the Storage Account’s Computer Object
Now that you’ve created the storage account’s computer object, you must assign it a CIFS SPN. Kerberos authentication in AD uses this SPN to associate the CIFS service with the computer account.
Assign the SPN to the computer object using the Set-ADComputer PowerShell command, as shown below. The command below adds the CIFS SPN of ataazurefile.file.core.windows.net representing the storage account’s fully qualified domain name (FQDN) to an AD computer object’s samAccountName called ataazurefile.
If you don’t know the FQDN of your storage account, run
([uri](Get-AzStorageAccount -ResourceGroupName "ATAAzureFileDemo" -Name "ataazurefile").PrimaryEndpoints.File).Host
Set-ADComputer -Identity "ataazurefile$" -ServicePrincipalNames @{Add="cifs/ataazurefile.file.core.windows.net"}Enabling Active Directory Domain Services on the Storage Account
As one final step to adding the storage account to your on-prem AD domain, you must now enable AD domain services on the storage account. Enabling AD Domain services on a storage account disables Azure AD authentication if previously configured and enables the on-prem Active Directory feature for the storage account.
To enable AD domain services on the Azure storage account, use the Set-AzStorageAccount PowerShell command. But first, you must find your AD domain’s GUID, SID, and the SID of the computer account for the Azure storage account.
The code snippet below uses Get-ADDomain and Get-ADComputer to query all of the required GUIDs and SIDs to pass to the Set-AzStorageAccount. It then uses PowerShell splatting to pass parameters to the Set-AzStorageAccount cmdlet to enable AD Domain Services on the storage account.
Learn more about the concept of parameter splatting here!
## Find the on-prem AD domain's GUID
$DomainGuid = (Get-ADDomain -Identity "ata_domain").ObjectGuid.Guid
## Find the on-prem AD domain's SID
$DomainSid = (Get-ADDomain -Identity "ata_domain").DomainSID.Value
## Find the storage account's AD computer account's SID
$StorAccountSid = (Get-ADComputer -Identity "ataazurefile").SID.Value

## Provide Set-AzStorageAccount with all appropriate GUIDs and SIDs
## along with the AD domain it should be a part of
$Splat = @{
    ResourceGroupName = "ATAAzureFileDemo"
    Name = "ataazurefile"
    EnableActiveDirectoryDomainServicesForFile = $true
    ActiveDirectoryDomainName = "ata_domain.local"
    ActiveDirectoryNetBiosDomainName = "ata_domain"
    ActiveDirectoryForestName = "ata_domain"
    ActiveDirectoryDomainGuid = $DomainGuid
    ActiveDirectoryDomainsid = $DomainSid
    ActiveDirectoryAzureStorageSid = $StorAccountSid
}
Set-AzStorageAccount @Splat
Mounting the Azure File Share
Now that you’ve set up the Azure file share and AD computer account for the file share, it’s time to see if you can mount and access the file share. At this time, the only AD account with permission to access the Azure file share is the storage account’s own AD computer account.
First, to mount the file share, find the first storage account key’s value using the Get-AzStorageAccountKey command and assign it to a variable as performed in the Creating the Active Directory Computer Account section.
You don’t have to assign the value to a variable, but it will be easier to pass to the next command when you attempt to mount the share.
$Key = (Get-AzStorageAccountKey -ResourceGroupName "ATAAzureFileDemo" -Name "ataazurefile" | Where-Object {$_.KeyName -eq "key1"}).ValueNext, run the net use command to mount the share to a drive letter in Windows. The command below mounts an Azure file share called atafileshare hosted on the ataazurefile storage account authenticating as the AD computer account ataazurefile using the storage account key.
net use S: \\ataazurefile.file.core.windows.net\atafileshare /user:ata_demo\ataazurefile $KeyThe storage account access key grants full admin access to the storage account and file share. Do not use the access key unless necessary, but when initially configuring the file share, you must use the storage account key to configure NTFS permissions on the share as it is the only account that will grant you enough access.
Configuring Share Permissions
At this point, you can browse to the share in Windows Explorer authenticated using the storage account key. But you’re not done yet. You must now allow the appropriate AD user accounts to access the Azure file share.
You can set up share permission a few different ways but in the end, you must eventually assign the AD user rights in one of three Azure roles.
- Storage File Data SMB Share Reader – Allows read access in Azure Storage file shares over SMB
- Storage File Data SMB Share Contributor – Allows read, write, and delete access in Azure Storage file shares over SMB.
- Storage File Data SMB Share Elevated Contributor – Allows read, write, delete, and modify Windows ACLs in Azure Storage file shares over SMB.
To easily add and remove user access in the future, this tutorial will assign an AD group (test-group-1) to a role so that all users within the group (such as test-user-1) will inherit permissions assigned by that role.
The role assignment will happen at the storage account object level, which means that any file share objects created on this storage account will inherit this role assignment by default unless an explicit deny assignment is configured at the file share object level.
To assign the AD group rights to the required Azure role, invoke the New-AzRoleAssignment PowerShell command to assign the role. The command below finds the AD group’s SID, the Azure role definition, and the ID of the storage account. It then uses those values to pass to the New-AzRoleAssignment command to assign the group to the role.
## Find the AD group you'd like to assign the role
$AdGroup = Get-AzADGroup -DisplayName "test-group-1"
## Find the Azure role definition you'd like to assign to the share
$AzRole = Get-AzRoleDefinition -Name "Storage File Data SMB Share Contributor"
## Find the storage account's ID
$StorAccId = (Get-AzStorageAccount -ResourceGroupName "ATAAzureFileDemo" -StorageAccountName "ataazurefile").Id

## Assign the AD group to the role limiting the scope to the storage account
New-AzRoleAssignment -ObjectId $AdGroup.Id -RoleDefinitionName $AzRole.Name -Scope $StorAccId
You can now mount the share using the AD credentials of the test user using the net use command.
You must disconnect from the share using the
net use /deletecommand first if you are still connected using the storage account key from the previous step.
net use S: \\ataazurefile.file.core.windows.net\atafileshare /user:ata_demo\\test-user-1 p@$$w0rd12Once you mount the share, you should be able to browse to it using Windows Explorer, but this time you are connected using a domain account!
By default, the
NT AUTHORITY\Authenticated Usersgroup has modify permission on the root of the Azure file share,, which means any authenticated AD user account can change anything in the share. So, be sure to lock down the NTFS permissions going forward!
Optional: Renewing the Computer Account Password
Although you’re done with the setup, you still might run into one lingering issue if your AD domain enforces password expiration for computer accounts.
To be safe, it’s best to routinely change the storage account’s computer account before it expires. To do that, use the Update-AzStorageAccountADObjectPassword command in the AzFilesHybrid PowerShell module. This command performs actions similar to storage account key rotation.
The command below first rotates the AD computer object password to the kerb2 Kerberos token you created earlier. It then regenerates the kerb1 token and rotates the AD computer object again to this new token. This action avoids any potential loss of service whilst the kerb1 token is renewed.
$Splat = @{
    RotateToKerbKey = "kerb2"
    ResourceGroupName = "ATAAzureFileDemo"
    StorageAccountName = "ataazurefile"
}

Update-AzStorageAccountADObjectPassword @Splat
Using the command above, you could then create a PowerShell foreach loop to find all Azure storage accounts with AD Domain services enabled on them and update the password for all via the PowerShell script below.
## Find all storage accounts in the subscription that have AD Domain
## services enabled
$AdStrAccs = Get-AzStorageAccount | Where-Object {$_.AzureFilesIdentityBasedAuth.DirectoryServiceOptions -eq "AD"}

## Process each storage account found and update their password with the storage
## account key (kerb2) created earlier.
foreach ($StrAcc in $AdStrAccs) {
    $Splat = @{
        RotateToKerbKey = "kerb2"
        ResourceGroupName = $StrAcc.ResourceGroupName
        StorageAccountName = $StrAcc.StorageAccountName
    }

    Update-AzStorageAccountADObjectPassword @Splat
}
Conclusion
In this tutorial, you have learned how to configure an Azure Files share to use an on-premises Active Directory for authentication and authorization. Using this configuration should help you migrate those legacy on-premises SMB file servers.
What other use cases can you see for configuring an Azure file share to use on-prem AD authentication?


