


One of the most ubiquitous commands in a senior Windows admin’s arsenal is probably the Windows net command. This command has a lot of functionality. In this article, you’re going to learn about net use.
The net use command is a legacy, yet still completely functional command to create, remove and manage SMB Windows mapped connections and drives.
Let’s dig into the net use command and cover what it’s capable of and how to use it in this tutorial.
Prerequisites
To follow along with any examples in this tutorial, ensure you have at least:
- A Windows client computer (any version will work) in an Active Directory domain. This tutorial will use Windows 10.
The
net usecommand will work in non-domain environments. If not though, you’ll always need to pass a username and password to authenticate to the remote file share.
- One or more available file shares on an accessible server part of an Active Directory domain. This tutorial will be connecting to an administrative file share called C$ on a server called DEVSRV.
- A user account with read access to the file share and NTFS read permissions to the folder the share is pointing to
Getting Started with Net Use
The net use command enables you to work with files on network file shares. It does this using various parameters and switches as shown below.
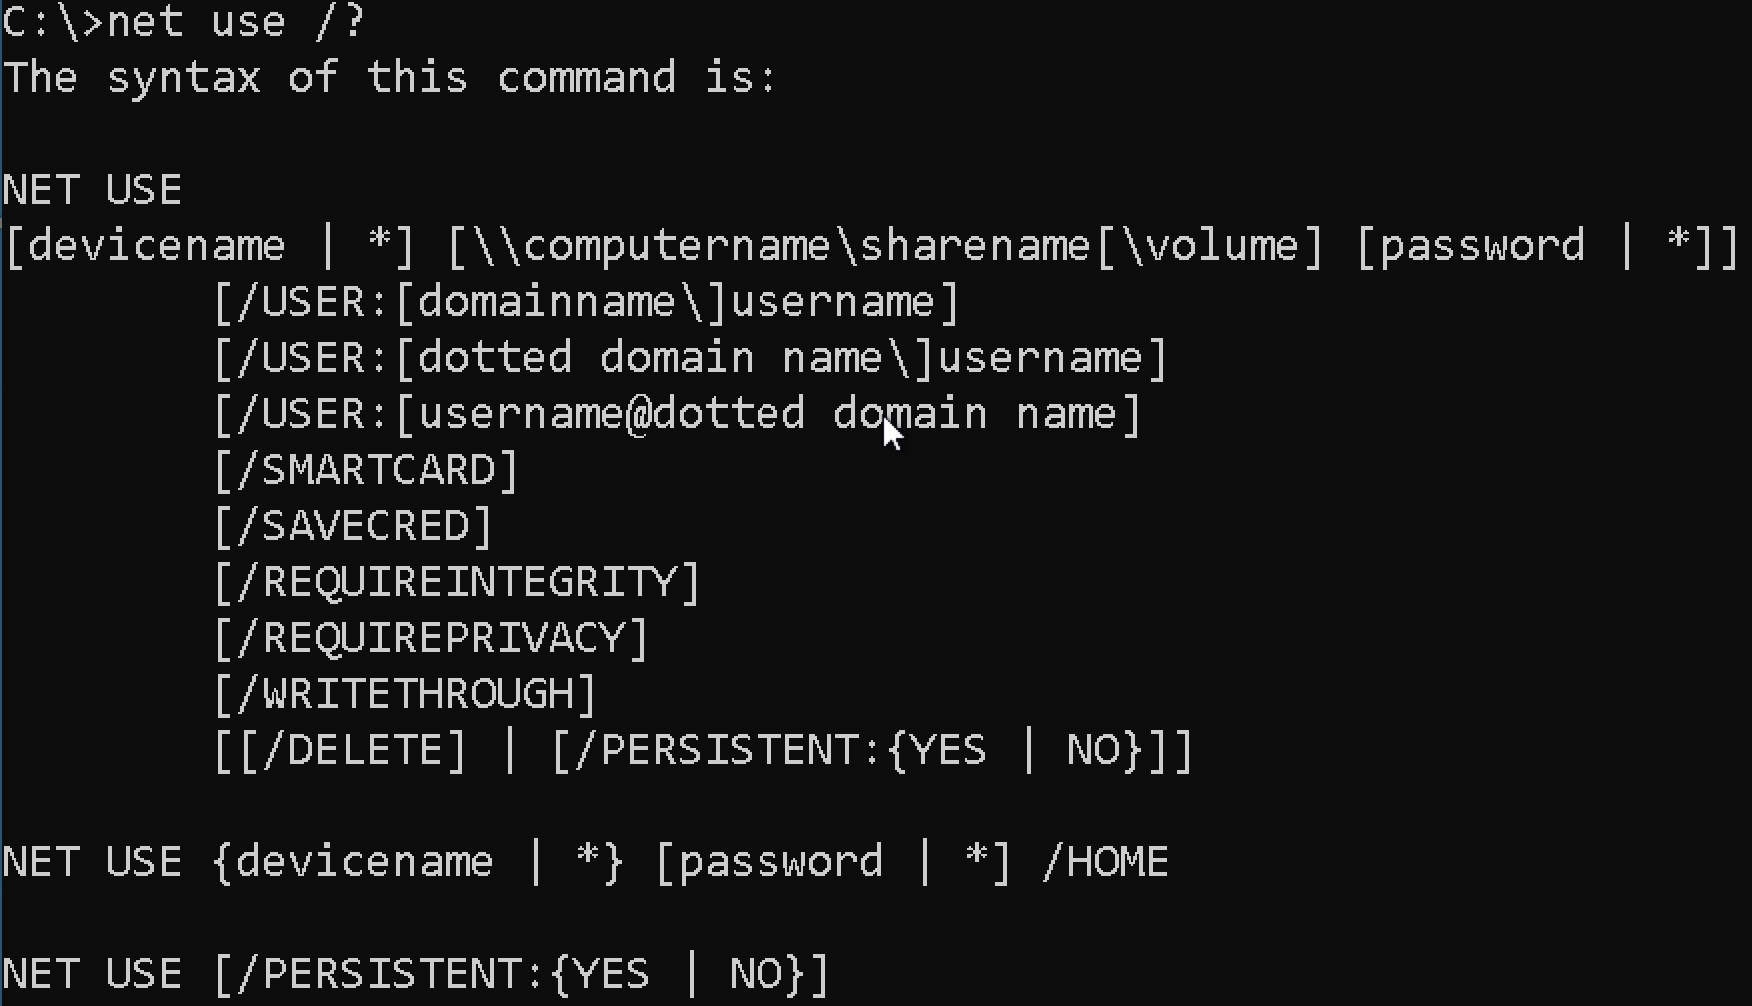
The net use command can view device connections, create new connections and remove them. Throughout this tutorial, you’re going to learn about each parameter and see in what use case each parameter fits.
Much of the content you’ll see around
net userefers to the endpoints it works with as ‘connections’ instead of ‘drives’. This command is capable of connecting to printers and other devices but for this tutorial, you’re going to focus on remote file shares.
Creating Remote Connections
Creating new connections is one of the most common reasons to use the net use command. This command allows you to connect to remote file shares to copy files to, remove from, etc just like if the folder you’re connecting to was local.
To create a new remote file share connection, you have two options with net use. You can either create what Microsoft calls a “deviceless” connection which is simply a file share connection without a drive letter or a mapped drive.
Mapping Network Drives Using Logged-In Credentials
Mapping network drives is one of the most common uses of the net use command. This command allows you to map a network drive on the command line much like you would via File Explorer.
Assuming you’re on a Windows 10 PC in a domain environment with a Windows server hosting a file share:
1. Open a command prompt or PowerShell console as administrator.
2. Let’s map the drive letter F: to the DEVSRV server file share C$. To do so, specify the drive letter to map the network drive to followed by the UNC path of the remote file share.
net use f: \\DEVSRV\c$You can use any letter to map the network drive to if it’s not already in use.
If the file share has spaces in it, always be sure to surround it in quotes e.g.
\\DEVSRV\"My File Share".

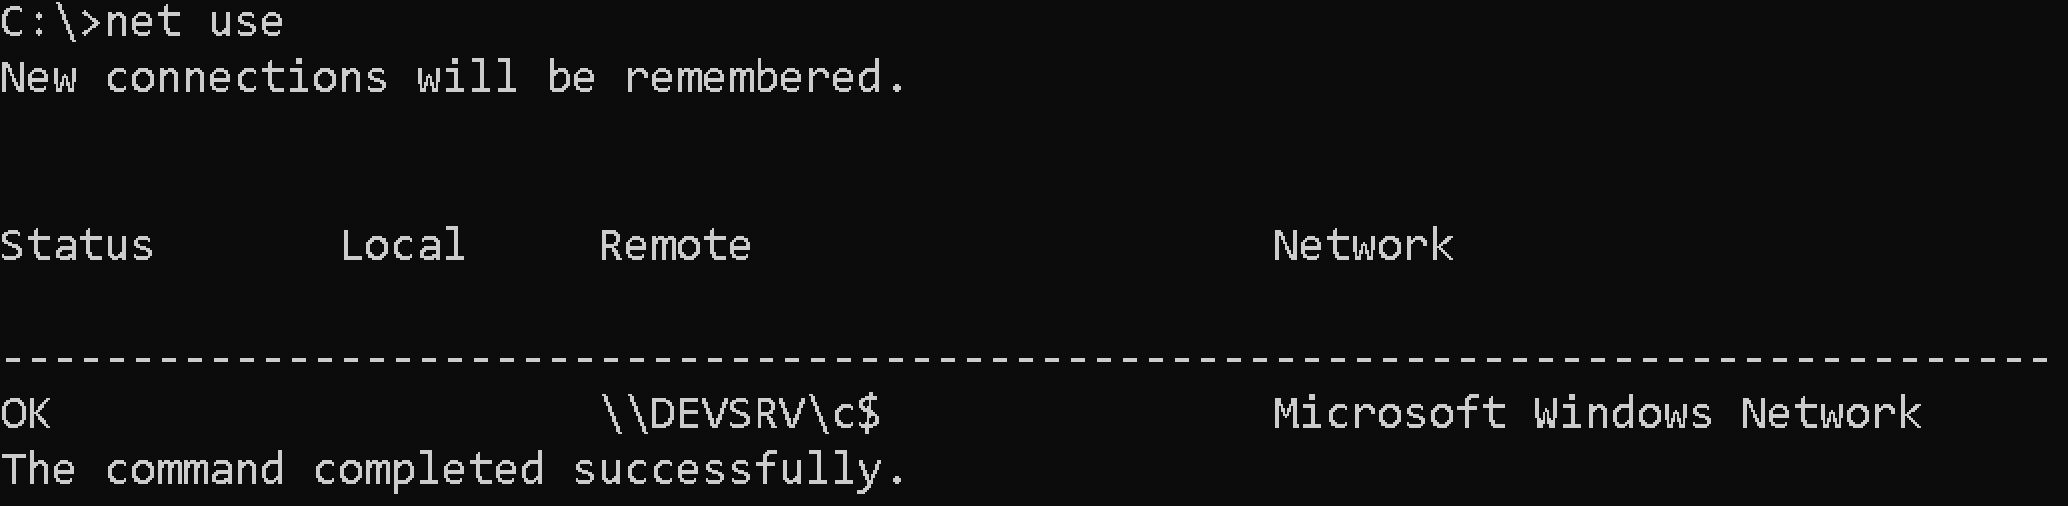
3. Now run net use with no parameters to confirm Windows mapped the drive correctly.
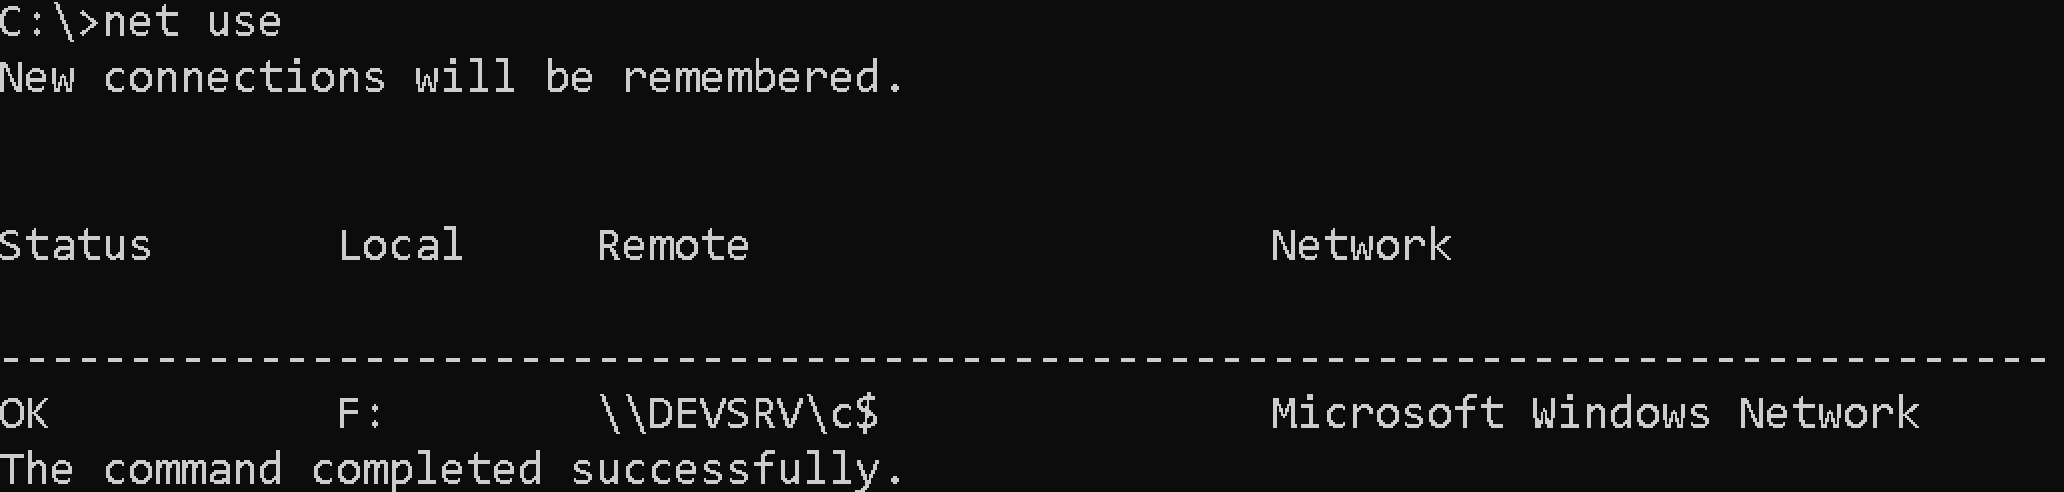
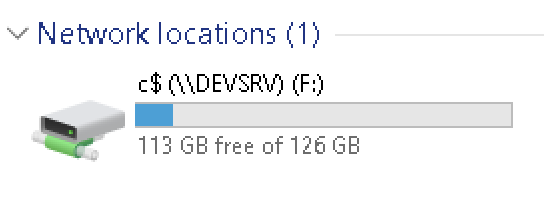
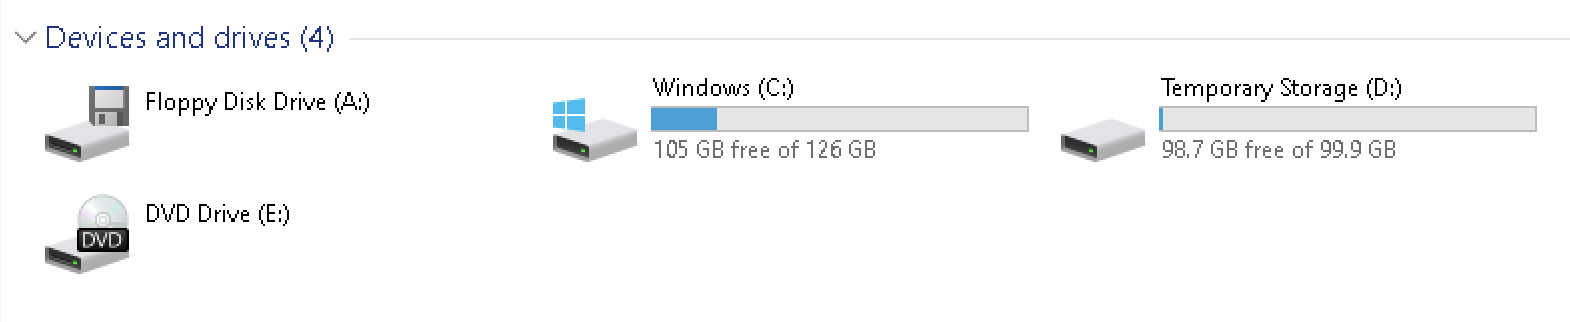
4. Open File Explorer and you’ll also now notice a new network location.
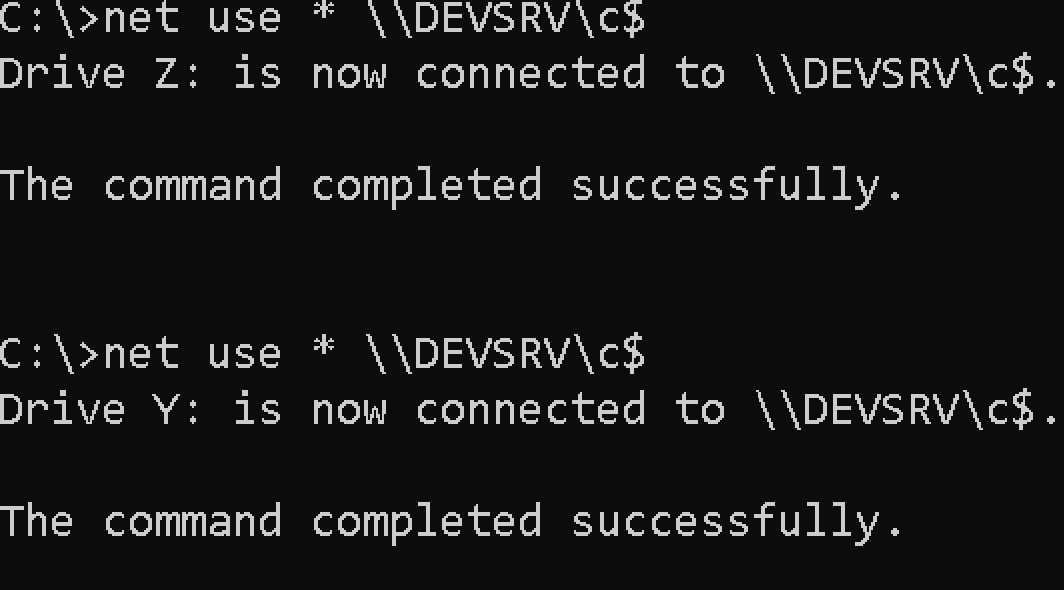
If you don’t care what device (drive letter) to map the drive to, you can also use an asterisk (*) for the drive letter. Doing so will tell Windows to find the next available drive letter.
Mapping Network Drives Using Alternate Credentials
If you went through the demo above and mapped a network drive, you did so authenticating as the logged on user. But what if you need to authenticate to the remote file share using alternate credentials?
Mapping a network drive authenticating as a non-logged-in user account is nearly the same as with a logged-in account. The only difference is using a couple more parameters.
To map a network drive with alternate credentials, open a command prompt or PowerShell console as an administrator.
Run net use providing:
- The drive letter to map to
- The UNC path of the file share
- The username to authenticate with (
/u) - The password
In the below example, Windows will map the F: drive to the \\DEVSRV\c$ file share authenticating as the test_user account in the domain domain using the password of passwordhere.
net use f: \\DEVSRV\c$ /u:domain\\test_user passwordhereSpecify a local user account on the remote computer by removing the domain from the username parameter e.g.
/u:test_user.
Use the
/savecredparameter to save the credentials to prevent being prompted the password later.
Create “Deviceless” Connections (No Drive Letter)
Perhaps you need to use a remote file share but you don’t want to map a drive letter to it. In that case, simply remove the drive letter.
Let’s create a file share connection without a drive letter known as a “deviceless” connection. Assuming you’re on a Windows 10 PC in a domain environment with a Windows server hosting a file share:
1. Open a command prompt or PowerShell console as administrator.
2. Create the “deviceless” connection by specifying the UNC path to the remote file share a username and password to authenticate and hitting Enter.
net use \DEVSRV\c$ /u:domain\test_user passwordhereIf your client computer and remote Windows server are in an Active Directory domain and you’re logged into your client computer with a domain user account, it doesn’t typically make sense to use
net usein this situation. You can already access these resources with no extra steps. But when you need to authenticate with an alternate user account, that’s where it comes in handy.
The connection has been made but if you look in File Explorer, you’ll see no connection. This connection is “deviceless”.
3. Now, confirm the connection has been made by running net use with no parameters. You can see below that Windows knows a connection is there.
At this point you can now navigate and work with the file share just as if it was local to you using the alternate user account credentials.

Persistent Connections
Whenever you establish new connections, Windows can keep those connections around after a reboot or not called persistence. The net use command has a parameter called /persistent that defines whether or not a connection remains after a reboot.
To ensure a connection stays around, add the /persistent parameter to any attempt to create a new connection like:
net use \\DEVSRV\c$ /persistent:yesMapped drives are not persistent, by default.
Windows will remember the last created connection’s persistence setting. If you set
/persistenttoyesfor a connection, all subsequent connections will be persistent if you do not explicitly set/persistenttono. To ensure all connections are persistent in the current session, usenet use /persistent:yes.
Advanced Connection Parameters
Most of the time, you’ll only need the parameters discussed earlier to create a connection. But, you may run into situations where you’ll need to perform some advanced connection tasks
Mapping Drives with Write Through (Forced Unit Access)
Added in Windows 10 build 1809, you can use the /writethrough parameter to map a drive bypassing all OS caches and forcing I/Os through to disk.
Increasing Security
The net use command also has two advanced parameters that increase security; /reguireintegrity and /requireprivacy through a feature called UNC Hardened Access. This feature “tags” information on these shares to inform Multiple UNC Provide (MUP) and UNC providers of additional security requirements
Using the /requireintegrity parameter ensures additional integrity checks to block tampering attacks.
The /requireprivacy parameter instructs net use to use encryption to prevent third parties from seeing any sensitive information in the file share communication.
Removing Network Connections
Finally, if you’ve set up some connection and need to get rid of them, the /delete parameter is your friend. To remove a non-persistent connection, provide the /delete parameter and the UNC path to the network share as shown below.
net use /delete \\devsrv\c$
To remove a mapped drive, provide the drive letter and the mapped drive
net use f: \\devsrv\c$ /delete Conclusion
You should now have a good idea of just about everything you can do with the net use command. This old-school yet handy command is still in use today and can still help you map network drives in Windows.
How are you going to use net use?


