

DigitalOcean, like other cloud platforms, has been progressively crucial to deploying, managing, and scaling applications. But how exactly? DigitalOcean lets you manage and interact with your resources via the DigitalOcean CLI (doctl).
In this tutorial, you will learn to install doctl, authorize your DigitalOcean account, and quickly manage your DigitalOcean resources.
Stay tuned, and effectively manage your resources!
Prerequisites
This tutorial comprises hands-on demonstrations. To follow along, ensure you have the following in place:
- A DigitalOcean account with active billing enabled – A free trial account is sufficient.
- A system running Linux, macOS, or Windows – This tutorial uses Ubuntu 20.04.
Downloading and Installing doctl
As a developer or system administrator, managing and interacting with DigitalOcean resources from a command-line environment is a powerful and flexible option. The same goes with doctl, making it a valuable addition to your toolkit.
But before taking advantage of doctl, you must first download and install it on your system, as follows:
1. Open a terminal, and run the following snap command to install doctl.
sudo snap install doctlThe output below indicates you have successfully installed doctl on your Ubuntu system. At this time of writing, v1.93.1 is the latest version of doctl.

2. Next, run the following commands, which do not provide output but enable different interfaces, and connect the doctl snap to each interface below: Interface.
| Interface | Details |
|---|---|
ssh-keys | This interface is required to use the doctl compute subcommand. |
dot-docker | This interface is a part of the Ubuntu Snap system, which provides a secure way to store and access personal files related to Docker. In addition, it allows you to authenticate with the DigitalOcean Container Registry securely. |
kube-config | This interface allows you to use doctl’s integration with kubectl and manage your DigitalOcean Kubernetes cluster. |
# Connect doctl snap to ssh-keys interface
sudo snap connect doctl:ssh-keys :ssh-keys
# Connect doctl snap to dot-docker interface
sudo snap connect doctl:dot-docker
# Connect doctl snap to kube-config interface
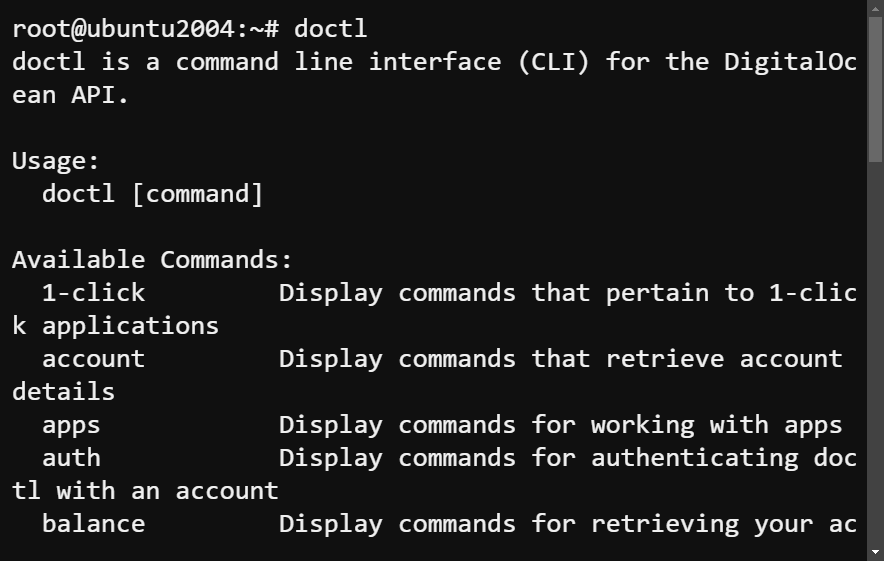
sudo snap connect doctl:kube-config3. Ultimately, run the doctl command below to verify the installation was successful.
doctlWith a successful doctl installation, you will get the following output.
Retrieving An API Access Token
You have successfully installed doctl on your system, but can you already manage your DigitalOcean resources? Well, not yet, unless you have access to DigitalOcean’s API. You must first retrieve an API access token authenticate, and access the API endpoints.
With an API access token, developers can programmatically manage and interact with DigitalOcean resources. These resources include but are not limited to Droplets (VMs), Kubernetes clusters, load balancers, storage volumes, and more.
To retrieve an API access token, follow these steps:
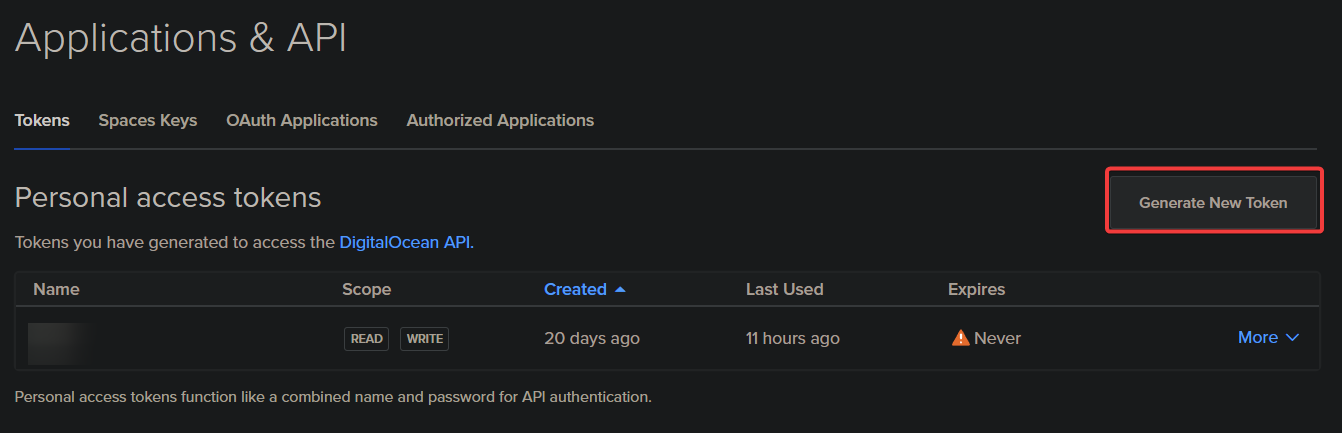
1. Open your favorite web browser, log in to your DigitalOcean console, and navigate to the API page.
2. On the API page, look Generate New Token (upper-right) to initiate creating a new API access token.
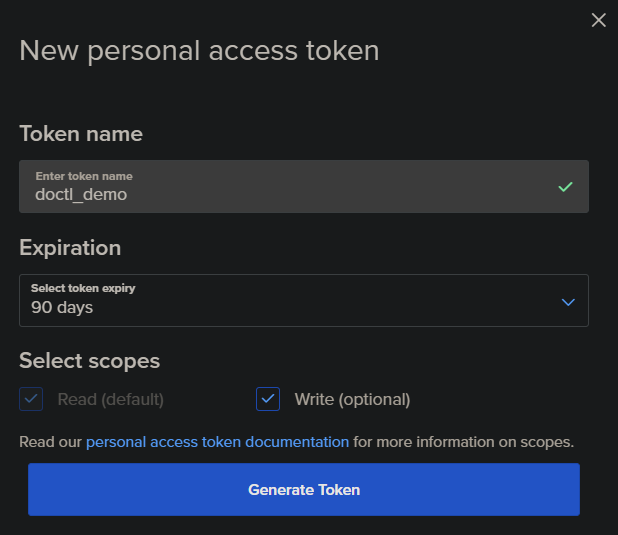
3. Next, configure the API access token with the following:
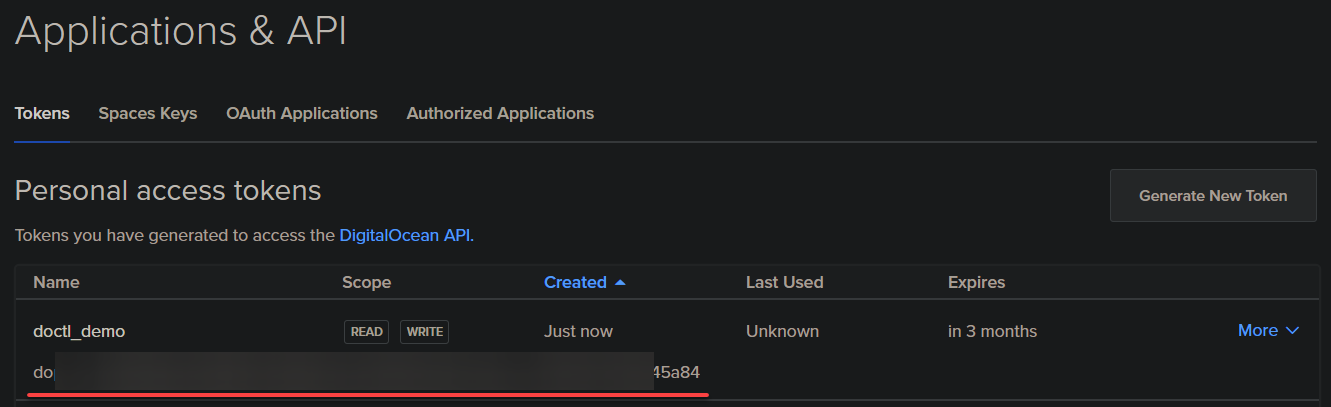
- Token name – Provide a descriptive name (i.e., doctl_demo) for the API access token to distinguish between multiple tokens.
- Expiration – Set the length of time your API access token is valid. This option increases your DigitalOcean account’s and resources’ security.
- Select scopes – Set the permissions to grant your API access token. By selecting the appropriate scopes, you can control the token’s actions.
Once configured, click Generate Token to finalize creating the API access token.
4. Lastly, write down the API access token from the list, as shown below, in a secure place, such as a password manager or encrypted file, for later use.
Once you close the token generation page or navigate away, the token will no longer be displayed on the screen. This security measure prevents unauthorized access to your account and resources.
Authenticating DigitalOcean Accounts With doctl
With an API access token at your disposal, you can move on to authenticating your DigitalOcean account with doctl. In the context of DigitalOcean and doctl, authentication involves providing your API access token to doctl to make requests on your behalf.
To authenticate your DigitalOcean account with doctl:
1. Run the below command, which does not produce output but creates a config directory (mkdir) named .config in your home directory (~/). This .config directory stores the doctl configuration file.
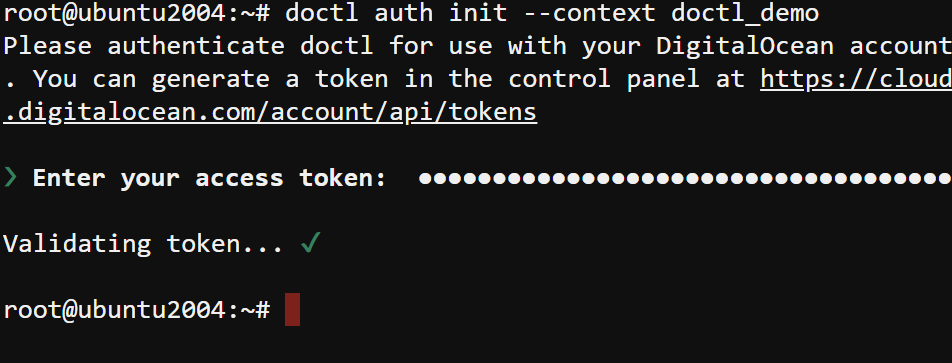
mkdir ~/.config2. Next, run the below doctl auth command to initiate (init) an authentication session with DigitalOcean via doctl. Replace doctl_demo with your desired name for the session.
doctl auth init --context doctl_demoWhen prompted, provide your API access token to authenticate your DigitalOcean account with the doctl. After authenticating, doctl creates a local configuration file that stores your access token and saves it in the newly-created ~/.config/ directory.
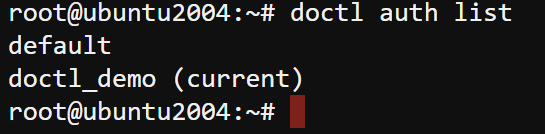
3. Once authentication completes, run the following auth list command to list all the tokens associated with your DigitalOcean account.
doctl auth listBelow are two associated tokens associated with your DigitalOcean account, as shown below.
4. Now, run the account get command below to confirm that you have successfully authenticated doctl with your DigitalOcean account. This command displays the authenticated DigitalOcean account information, including the user UUID, email address, and status.
doctl account get
Creating a Droplet via doctl
After configuring the doctl, you are set to use the tool to manage DigitalOcean resources. One of the basic features doctl offers is creating a Droplet that runs on DigitalOcean’s cloud infrastructure.
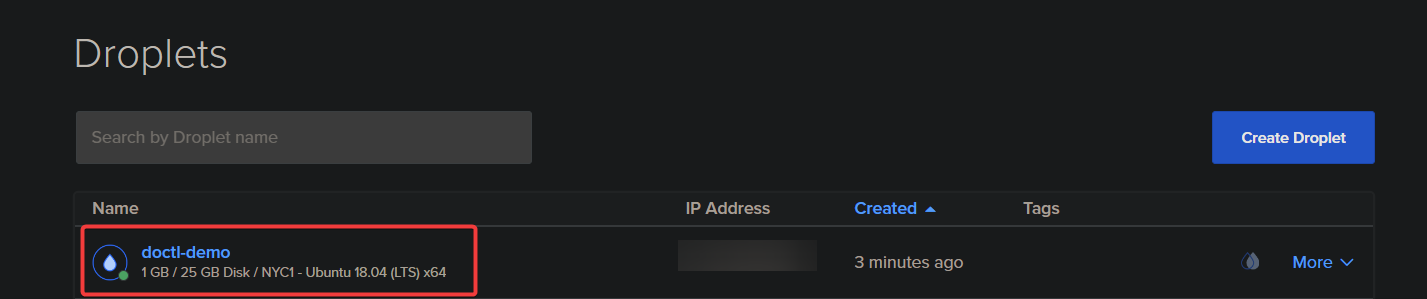
Run the below command to create a new Droplet (compute droplet create) called doctl-demo (arbitrary) with the specified configuration parameters as follows:
--region– Specifies the DigitalOcean region where to create the Droplet, which is New York City 1 (nyc1).--image– Specifies the image used to create the Droplet. In this case, the image is Ubuntu 18.04 LTS 64-bit (ubuntu-18-04-x64).--size– Specifies the Droplet size, which in this case, is 1 virtual CPU, 1 GB of RAM, and 25GB of disk (s-1vcpu-1gb).
doctl compute droplet create --region nyc1 --image ubuntu-18-04-x64 --size s-1vcpu-1gb doctl_demo
Now, navigate to the DigitalOcean console to see the newly-created Droplet.
You may want to delete unused Droplets to prevent accruing unnecessary charges. If so, run the
doctlcommand below. But ensure you replacedoctl-demowith your Droplet’s name.doctl compute droplet delete doctl-demo

Creating a Database Cluster
Besides creating a Droplet, you can also create a database cluster with doctl. A database cluster is a group of nodes that work together to provide a scalable, highly available, and reliable database service.
Run the following databases create command to create a Redis Database Cluster (redis) named db-demo with specifications as follows:
- Region – Default region (nyc1).
- Size – Default size (1 GB RAM / 1vCPU / 10 GB Disk).
- Version – The latest Redis version (Redis 7).
DigitalOcean’s Managed Databases service allows you to create and manage PostgreSQL, MySQL, and Redis clusters. All these use a simple and intuitive interface or API requests via the doctl.
doctl databases create db-demo --engine redis
Finally, navigate to your DigitalOcean console to verify the newly-created database cluster (de-demo), as shown below.

Conclusion
In this tutorial, you learned how to install, configure, and use doctl to manage Droplets and database clusters on DigitalOcean. With an API access token and an authorized DigitalOcean account, you could securely create and manage your resources quickly.
You have seen how doctl is a powerful and efficient way to manage your DigitalOcean resources. But why not explore other commands available to manage DigitalOcean resources? Perhaps learn how to manage a Kubernetes cluster?


