


You use countless online services that require you to create and remember passwords regularly. Making sure you remember these passwords and securing them can be daunting. A single misstep can lead to password reuse and other security risks.
If you have a spare device or free resource available, you should consider a self-hosted Padloc Password Manager server. This solution helps you overcome these challenges by securely storing your passwords and making them available to all your devices from a single source.
Read on and learn how to install, configure, and use Padloc to manage your passwords securely. Never worry about storing your passwords again!
Prerequisites
This tutorial will be a hands-on demonstration. If you’d like to follow along, be sure you have the following.
Note: This tutorial is specifically for the self-hosted Padloc instance and is different from the Padloc plans.
- A Linux machine. This tutorial uses Rocky Linux 8.5, but any distribution will work.
- You have Docker and Docker Compose installed on your Linux machine.
- A DNS record (A or CNAME) pointed to your machine’s IP address. Whether to use a base domain (example.com) or sub-domain (subdomain.example.com) is up to you. This tutorial will be using the DNS A record atapadloc.icuc.ml.
- An SMTP server and account to use for sending verification emails. If you don’t have one yet, consider signing up for a SendGrid account or AWS Simple Email Service (SES).
- The Padloc instance will be accessible externally, meaning ports 80 and 443 must be open on your network.
Installing Padloc
To be clear, installing Padloc means that you’ll be deploying the Padloc server and web app in two separate Docker containers.
In this section, you will learn to create a Docker Compose file that will make this process painless and convenient. Afterward, you will configure NGINX to securely serve the Padloc web app with a valid SSL certificate.
Creating the Working Directories
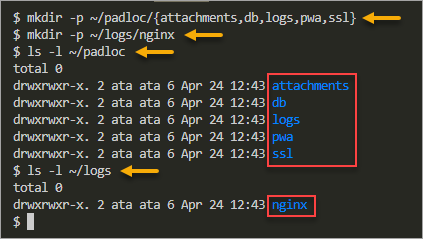
First, SSH to your machine and run the below commands to create your Padloc instance directory structure. These directories will contain your Compose file, certificates, database, and Padloc data.
# Create the parent and child directories
mkdir -p ~/padloc/{attachments,db,logs,pwa,ssl}
mkdir -p ~/logs/nginx
# Verify the new directories exist
ls -l ~/padloc
ls -l ~/logs
Preparing the Docker Compose File
The Docker Compose reads the Docker Compose file to define and configure your application’s services. By using Compose, you’ll avoid installing the Padloc dependencies manually. This tutorial provides a pre-made docker-compose.yml file for your convenience.
1. To download the docker-compose.yml, run the below commands.
curl -s -L https://github.com/ata-dotcom/padloc/raw/main/docker-compose.yml -o ~/padloc/docker-compose.yml2. After downloading the docker-compose.yml file, open it in the text editor to confirm the file’s contents. The below command uses nano to open the file.
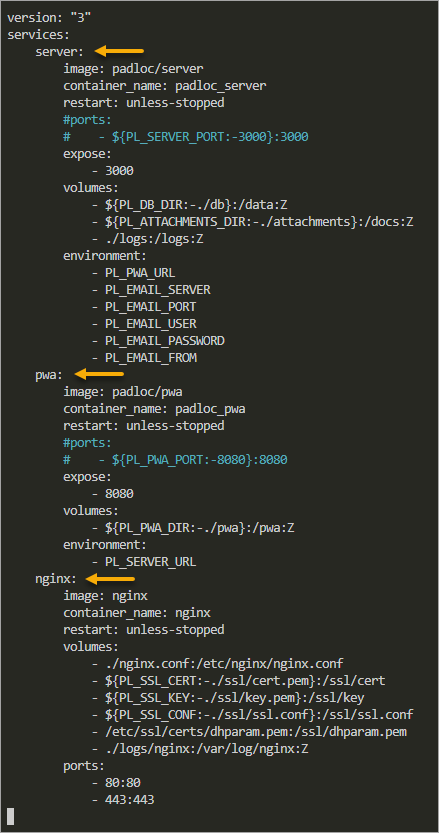
nano ~/padloc/docker-compose.ymlAs you can see on the below screenshot, this Docker Compose file defines the three services that make up your Padloc application. These services are:
server - is the core Padloc application based on the padloc/server Docker image.
pwa - is the Progressive Web App (PWA) that serves as the web front-end for the Padloc server. This service is based on the padloc/pwa Docker image.
- nginx – is the web service that sits in front of the Padloc application that exposes ports 80 and 443, proxying requests to the appropriate service. This service uses the NGINX Docker image as the base.
Additionally, all these services use volumes to make your application’s data persistent.
3. Close the file and exit the editor without making any changes.
Configuring NGINX and Installing an SSL Certificate
To ensure the Padloc web app is secured and the transactions are encrypted, you must install a valid SSL certificate and configure NGINX to use it.
The SSL certificate must come from a well-known certificate authority, so that client devices universally trust it. In this example, you’ll be acquiring the SSL certificate from Let’s Encrypt for free.
1. First, download the nginx.conf to the ~/padloc directory.
curl -s -L https://github.com/ata-dotcom/padloc/raw/main/nginx.conf -o ~/padloc/nginx.conf2. Open a ~/padloc/nginx.conf file to confirm its contents.
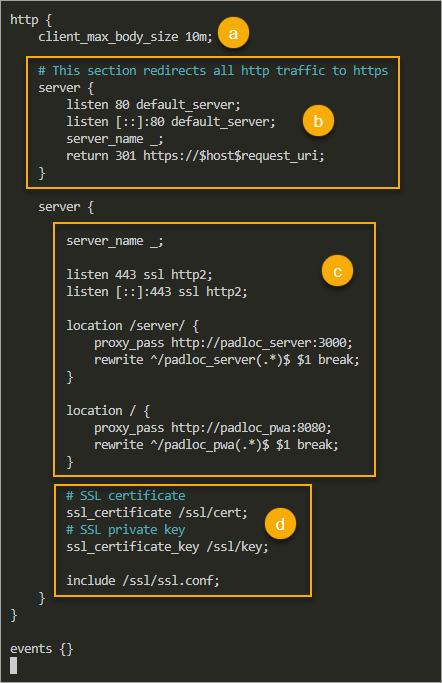
nano ~/padloc/nginx.confThis file tells NGINX to do the following:
a. Set the maximum upload size to 10MB (client_max_body_size 10m;). You may adjust this value if you ever need to upload attachments larger than the current size.
b. Listen on port 80 (for HTTP) and redirect all HTTP traffic to HTTPS.
c. Listen on port 443 and proxy all requests to the /server/ path to the Padloc server service. Proxy all other requests to the pwa service where the Padloc web app is running.
d. Specifies the location of your SSL certificate and key files and the SSL configuration file.
Save and close the file when you are finished.
3. Now, run the below command to install the certbot tool. You’ll use this tool to request and download the SSL certificate from Let’s Encrypt.
sudo dnf install epel-release -y && sudo dnf install certbot -y4. Copy the below command and change the values of -m with your email address and -d with your Padloc domain (the one in your DNS record). Run the command after you update those values.
This step requires that port 80 is accessible from outside of your network. The certbot tool creates a temporary HTTP web server that listens on port 80 as the means to verify your domain ownership. If not, the certificate request will fail.
sudo certbot certonly \
--standalone \
--agree-tos \
--no-eff-email \
--staple-ocsp \
--preferred-challenges http \
-m [email protected] \
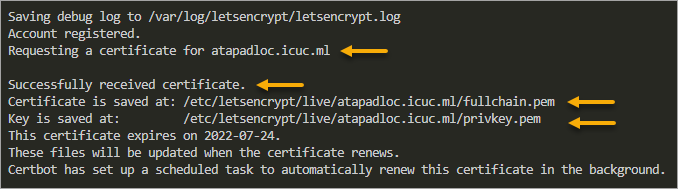
-d atapadloc.icuc.mlIf all goes well, you should see a result similar to the screenshot below. As you can see, the command successfully requested and downloaded the certificate files.
Let’s Encrypt certificates have a 90-day expiration. But don’t worry about missing the certificate expiration because certbot also creates a scheduled task to renew the certificate.
5. Now, run the below command to generate the Diffie-Hellman parameters. This step is not strictly necessary, but it will add an extra layer of security to your SSL configuration.
sudo openssl dhparam -out /etc/ssl/certs/dhparam.pem 2048
6. To complete the SSL configuration, download the ssl.conf file to the ~/padloc/ssl directory.
curl -s -L https://github.com/ata-dotcom/padloc/raw/main/ssl.conf -o ~/padloc/ssl/ssl.conf7. Open the ssl.conf file in the text editor to inspect its contents.
nano ~/padloc/ssl/ssl.confThis file sets the general parameters for your SSL configuration, such as the protocols and which ciphers to use. This file also sets up the Online Certificate Status Protocol (OSCP) Stapling, which checks the certificate’s validity.
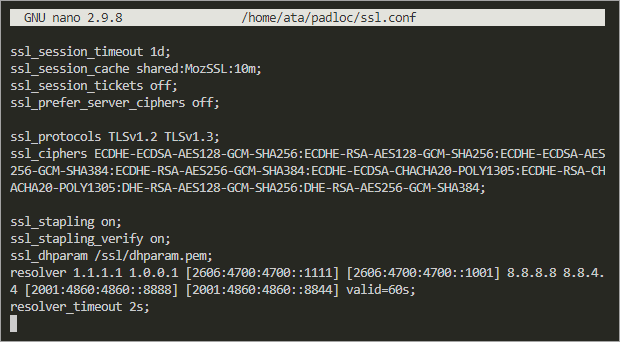
8. Lastly, close the ssl.conf file and exit the editor.
Configuring Padloc
Now that you’ve configured the underlying services that enable Padloc, it’s time to configure the Padloc environment itself. The environment variables and settings are inside the Docker environment file (.env), in the same directory as your docker-compose.yml file.
1. First, download the environment file to the ~/padloc folder.
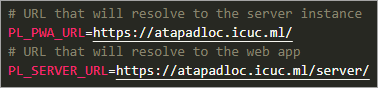
curl -s -L https://github.com/ata-dotcom/padloc/raw/main/.env -o ~/padloc/.env2. Open the ~/padloc/.env in your text editor.
nano ~/padloc/.env3. Once you’ve opened the file, ensure to edit the following lines.
- RReplace example.com in the PL_PWA_URL and PL_SERVER_URL lines with your Padloc server’s FQDN. In this tutorial, the FQDN is atapadloc.icuc.ml.
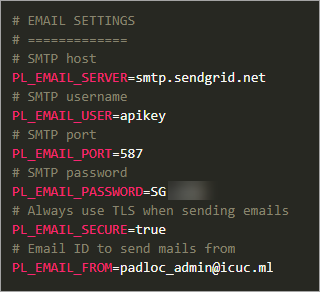
- Set the PL_EMAIL_SERVER value to your SMTP server address. This example will use smtp.sendgrid.net as the SMTP server address.
- Set the PL_EMAIL_USER and PL_EMAIL_PASSWORD values to your SMTP username and password. The SMTP user account in this example is apikey.
- Change the PL_EMAIL_PORT value with your SMTP server’s port number. The port number in this example is 587.
- Uncomment the PL_EMAIL_SECURE line and change the value to true if the SMTP server requires TLS. This example uses an SMTP server that requires TLS so that the value will be true.
- Set the value of PL_EMAIL_FROM to your Padloc sender email address. The sender’s address in this example is [email protected].
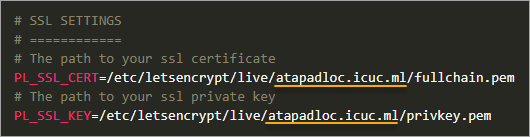
- Replace example.com in the PL_SSL_CERT and PL_SSL_KEY with your Padloc server FQDN.
Running the Padloc Application
Now that you have all the necessary files and configurations in place, it’s time to launch your Padloc instance.
Run the following command to launch your Padloc instance. This command launches the containers as defined in your docker-compose.yml file. The -d option tells docker-compose to run the containers in detached mode.
cd ~/padloc && docker-compose up -d
Wait a few moments for the containers to launch. Once the process completes, you will see the following output. You can see that Docker launched three containers: nginx, padloc_server, and padloc_pwa.
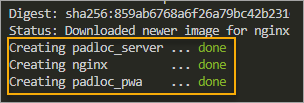
Now, check the status of the containers that make up your Padloc instance by running the below command.
docker ps -a --format "table {{.ID}}\\t{{.Names}}\\t{{.State}}\\t{{.Status}}"
You will see the following output. This output shows that all three containers are running.

Accessing the Padloc Web App and Creating an Account
You’ve managed to start up your Padloc instance so far. But does it work? To find out, you must test if the Padloc web app is accessible and that you can sign up for an account in your Padloc instance.
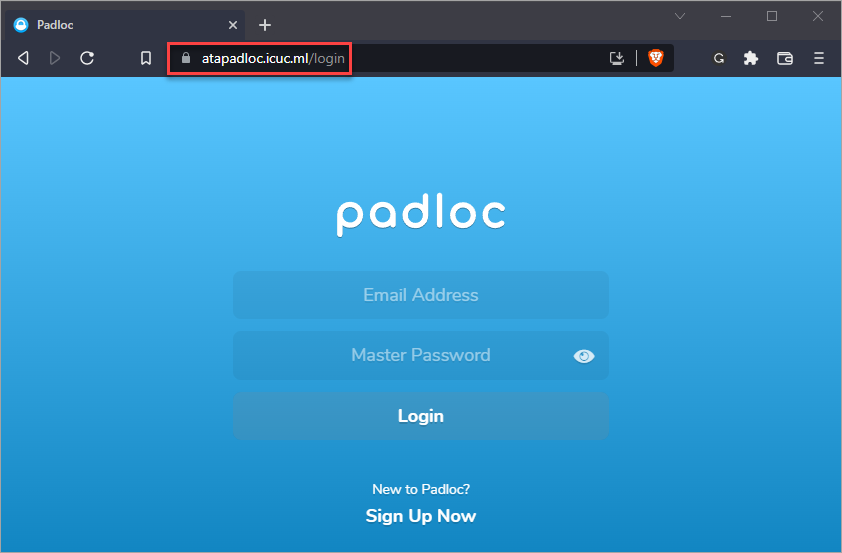
1. Open your web browser and navigate to your Padloc instance URL. In this example, the Padloc URL is https://atapadloc.icuc.ml. The server will redirect you to the Padloc web app login page below.
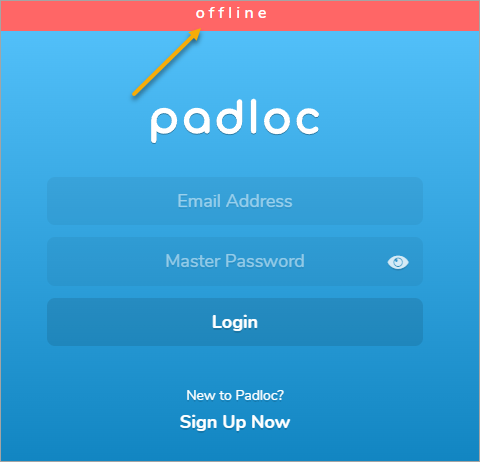
Note that if you see an offline banner message shown below, your Padloc application may still be bootstrapping. Wait a few minutes and test the web address again.
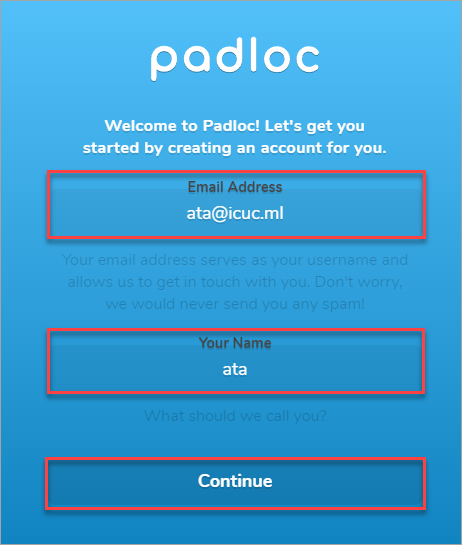
2. Click on Sign Up Now to create a new account since now’s your first time using Padloc.

3. Provide your email address and the username you prefer, and click on Continue. Ensure that the email address is valid because Padloc will send a confirmation email to this address.
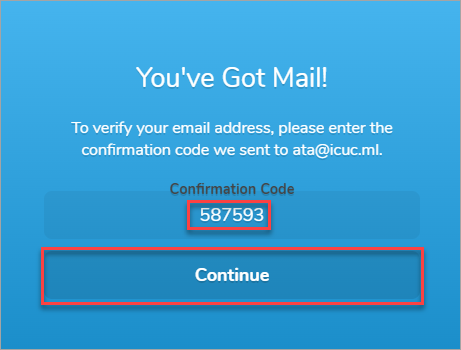
4. Check your inbox and confirm that you received the email from Padloc with the subject Verify Your Email Address. In the email, you’ll see a six-digit code.
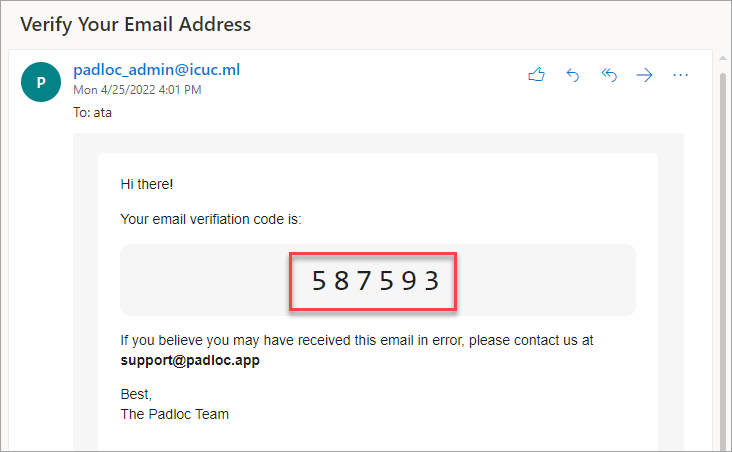
Enter this code into the Padloc page and click Continue.
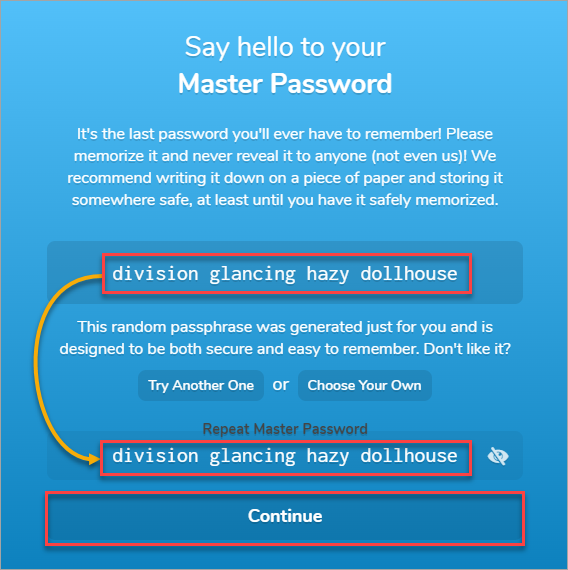
5. On the next screen, you will see the randomly generated master password. Padloc uses this password to encrypt all your data. If you lose your master password, you’ll lose access to your Padloc account forever.
If you choose to create your password, make sure that your password is at least eight characters long and contains a mix of uppercase and lowercase letters, numbers, and symbols.
Once you have decided on a master password, re-type the master password inside the Repeat Master Password box and Continue.
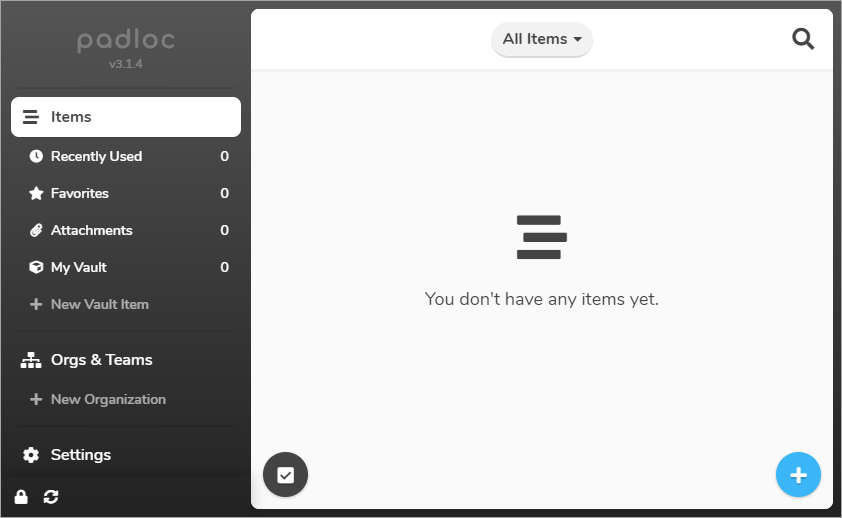
Once you have set your master password, you now have access to the Padloc dashboard, as shown below.
Adding Your First Password Entry
Now that you have logged in to your Padloc account, you can add your first password entry. You’ll have one vault by default called My Vault. A Vault is a secure folder that can hold entries called Vault Items.
1. Click on the + plus sign button at the bottom right, as shown below, to add your first entry.
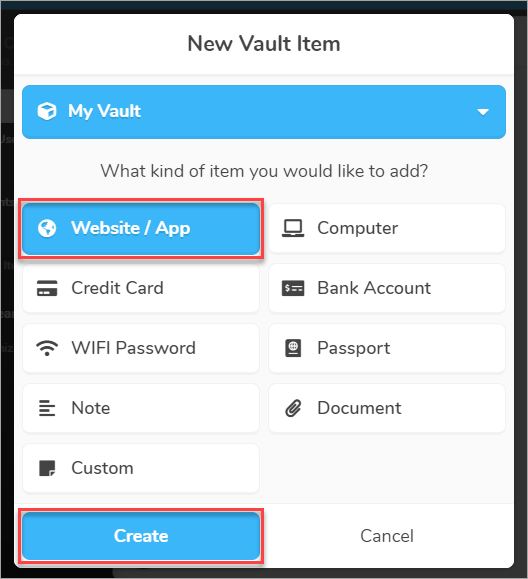
2. As you can see below, there are different Vault Item types you can create, such as Website, Computer, and Credit Card.
In this example, click the Website / App —> Create.
3. Next, type in the new item’s name, username, password, and the URL to which this password entry applies.
Within this Padloc instance, you can create multiple organizations and multiple vaults inside each organization. This feature is handy when you need to securely share passwords within a team.
Note: None of the fields in the vault are required. You can create a vault item without filling out any information for whatever reason.
Note: Click the Field button to insert a field into the vault item. You may add pre-defined fields such as email address or phone number. You may also add a custom field if that’s your requirement.
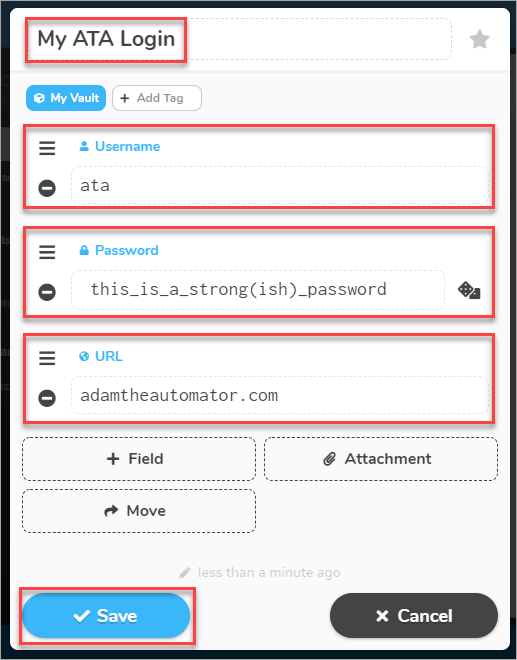
You now have one item in your vault.

Conclusion
This article has taught you how to install and set up the Padloc password manager as a self-hosted instance. You have also learned to add your first device/password to Padloc. At this point, you now have a password manager that’s accessible on any of your devices.
There are many more exciting features await you in Padloc. Why not try it out for yourself and see how it improves your password management?


