


Microsoft Azure does not have an email delivery service. Whether you are testing applications or developing scripts in Azure to send emails, know that there is no native email service available to you.
Outbound SMTP connection via port 25 is completely blocked in Azure, too. If you are an enterprise client, you may request to unblock port 25 for your Azure tenant. Otherwise, how else can you send emails from Azure?
There are typically two ways to let outbound emails through Azure; using an SMTP smart host and REST API requests. Most email delivery services offer both SMTP and API methods of sending emails. In this article, you’ll learn how to send emails from Azure to the rest of the world.
Prerequisites
This article is a How-To, and if you plan to follow the examples as they progress, there are some requirements you must meet.
- An Azure subscription. You may register for a free trial Azure subscription if you don’t have one yet.
- An Azure Virtual Machine (VM). Refer to Create a Windows virtual machine in the Azure portal to learn how to create a new VM if you don’t have one yet.
- Windows PowerShell 5.1 or PowerShell 7.1.
- A valid sender email address. Using a free email address domain, such as gmail.com, is not recommended. As much as possible, use a sender email address that uses a domain that you own.
Knowing Which Email Services to Use with Azure to Send Emails
There are several cloud email services available to use. Some of the prominent names are SendGrid, MailJet, and MailGun. Whichever email service you choose, using them to send emails from Azure is similar; server address and port for SMTP and API endpoint address for REST.
SendGrid is an example of a third-party email service used in this article. Additional email services used as examples are Office 365 SMTP relay and Microsoft Graph API.
Related: Which Azure Email Service to Choose for 2021
Using SendGrid
SendGrid is probably the most popular email service option for sending emails from Azure. Azure and SendGrid are so popular because there used to be a free plan with 25,000 emails per month limit to Azure customers.
Although the free plan is no longer being offered in the Azure portal, as confirmed by Microsoft, it is possible to sign-up for a free subscription with 100 emails per day limit. You will then have access to SendGrid’s SMTP relay service or Email API to send emails from an Azure app or VM.
Creating a SendGrid Account
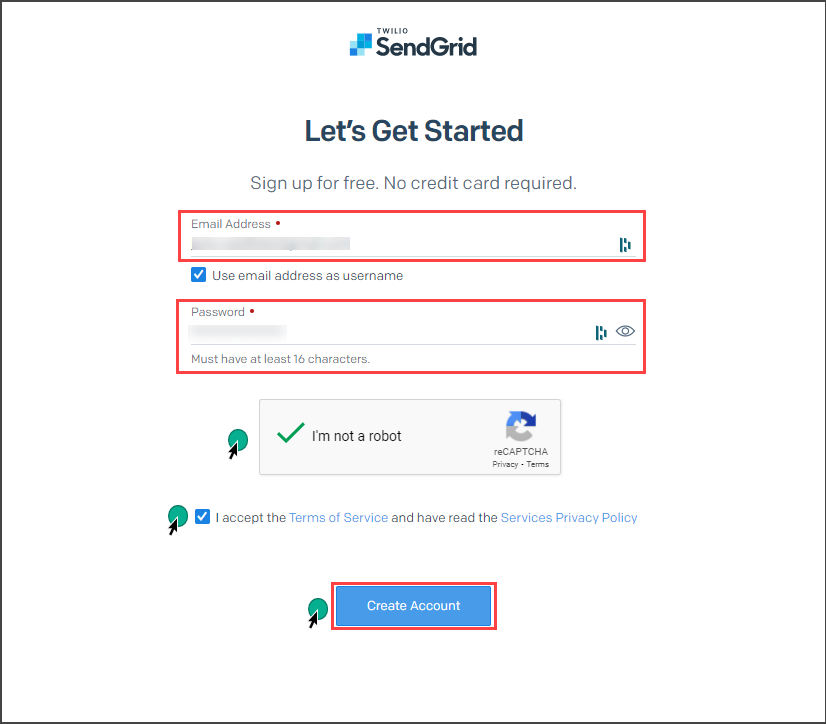
Using SendGrid’s services requires you to have a SendGrid account first. Go to the Sign-up page, and you should see the form as shown below. Enter your email address and your chosen password. Then, accept the terms and click on the Create Account button.
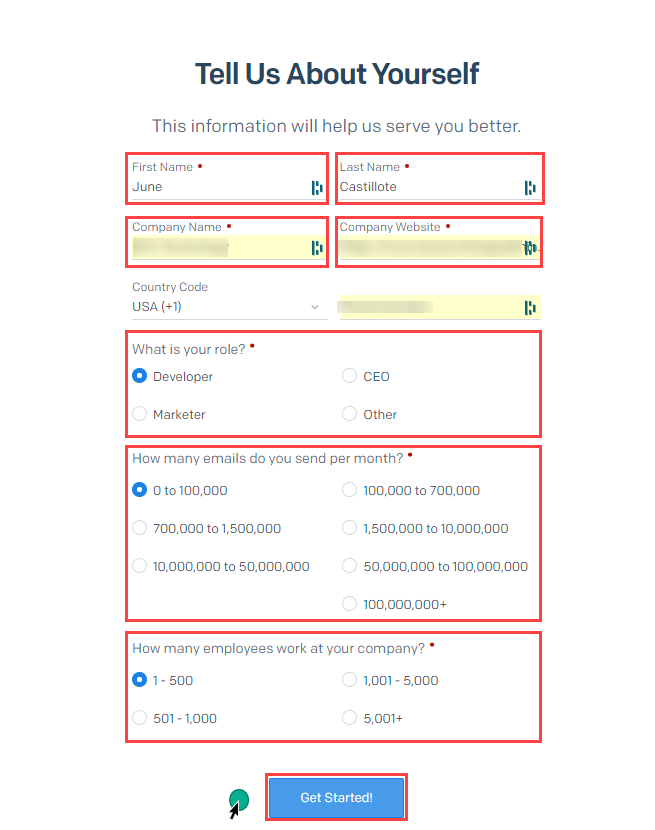
On the next page, you need to enter your name and company information. You also need to select the appropriate options such as your role, emails to send per month, and the number of employees. Then, click on Get Started.
When you first log in to SendGrid, you may get an error saying, “You are not authorized to access SendGrid; please contact Support.” When this happens, open a ticket with SendGrid support. They may need to ask some verification questions before they unlock your access.
You will be asked to enable Two-Factor authentication during your first log in. Make sure to follow the instructions accurately.
Creating a SendGrid Sender Identity
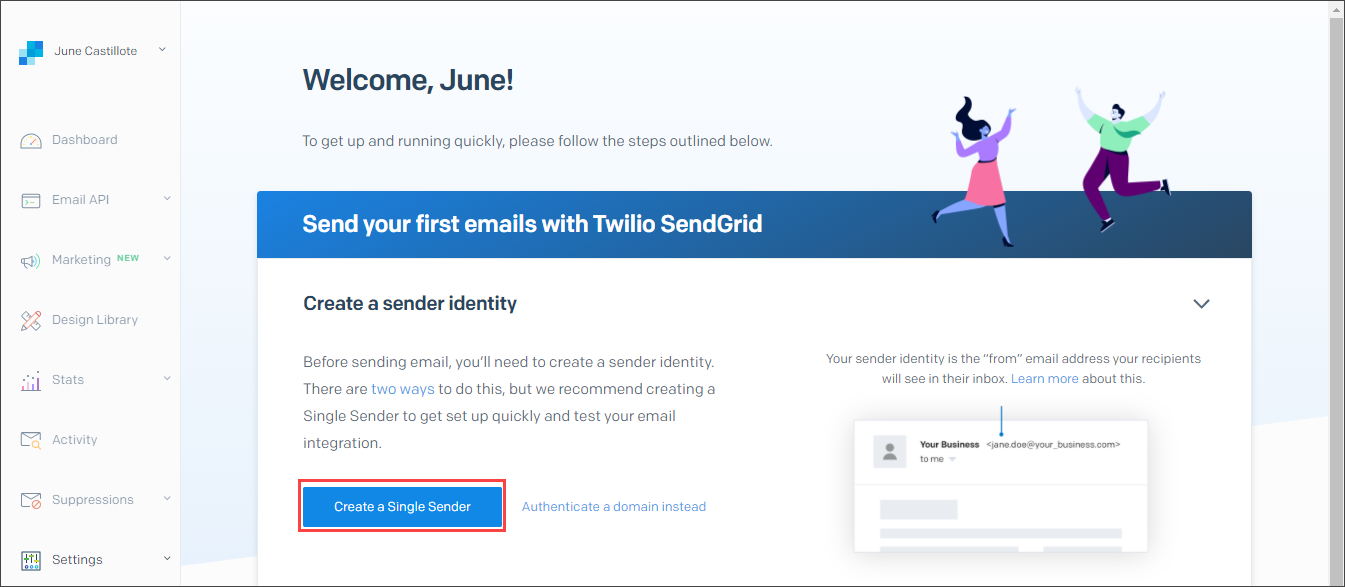
After creating the SendGrid account, the next step is to authorize the sender’s identity. There are two options; authenticate a single sender (e.g., [email protected]) or authenticate an entire domain (e.g., domain.com).
In this example, you will create a single sender identity that will serve as your sender address. Only the verified sender address will be allowed to send messages through SendGrid’s service. Follow the instructions below to create the single sender identity.
- On the Welcome page, click on the Create a Single Sender button.
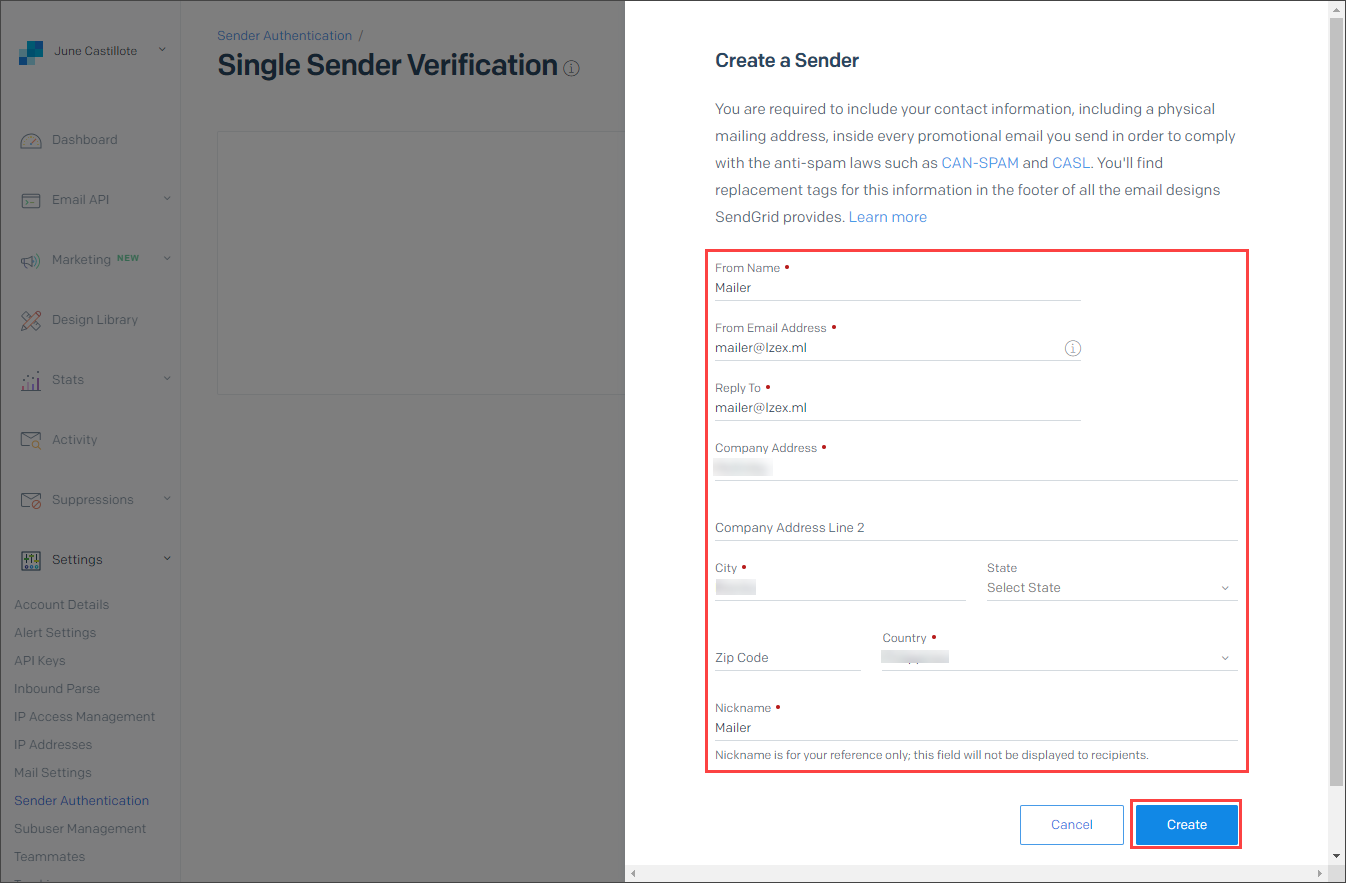
2. Next, on the Create a Sender fly-out, provide all the required information. The required fields are marked with a red asterisk next to them for easier reference. After entering the details, click on Create.
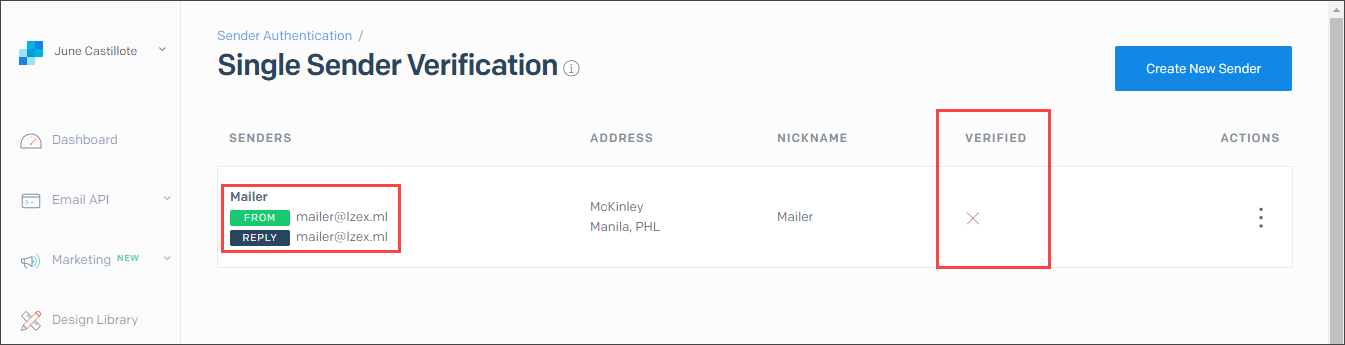
You will then see the new sender address listed under the Single Sender Verification page. As you can see from the example below, the address is not yet verified, as indicated by a red X under the VERIFIED column.
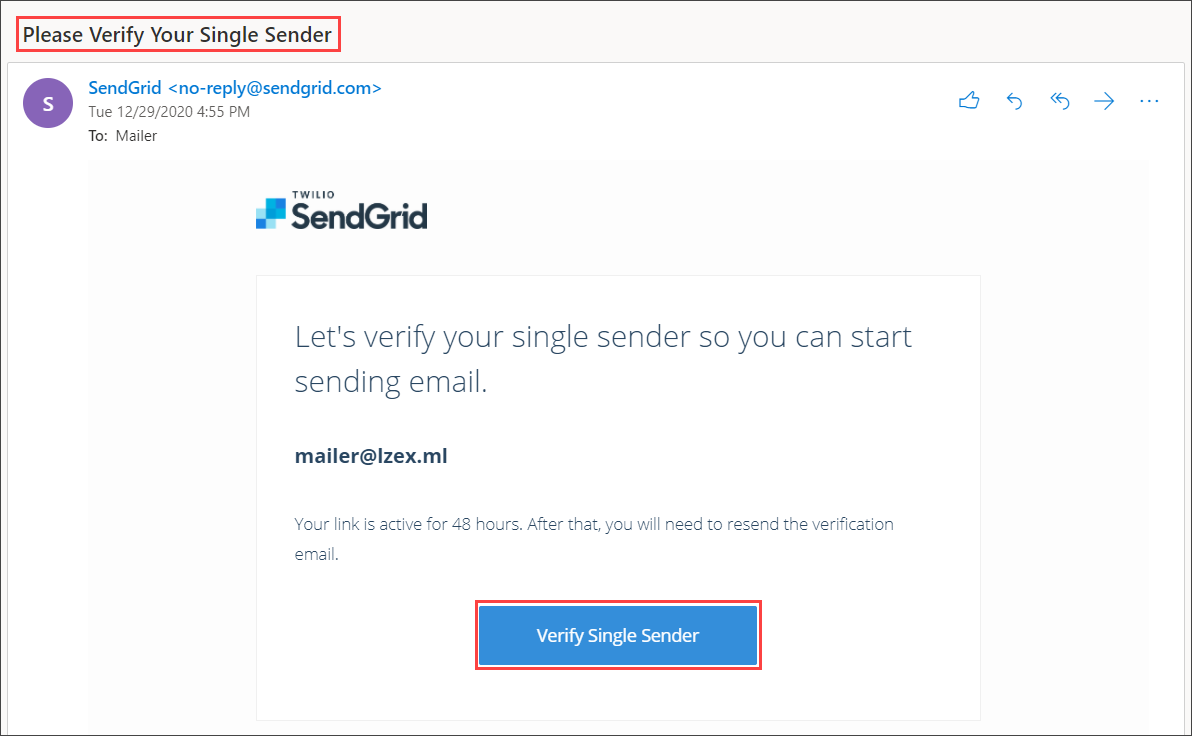
3. To verify the sender, locate the email sent to the sender’s address, similar to the screenshot below. Then, click on the Verify Single Sender button.
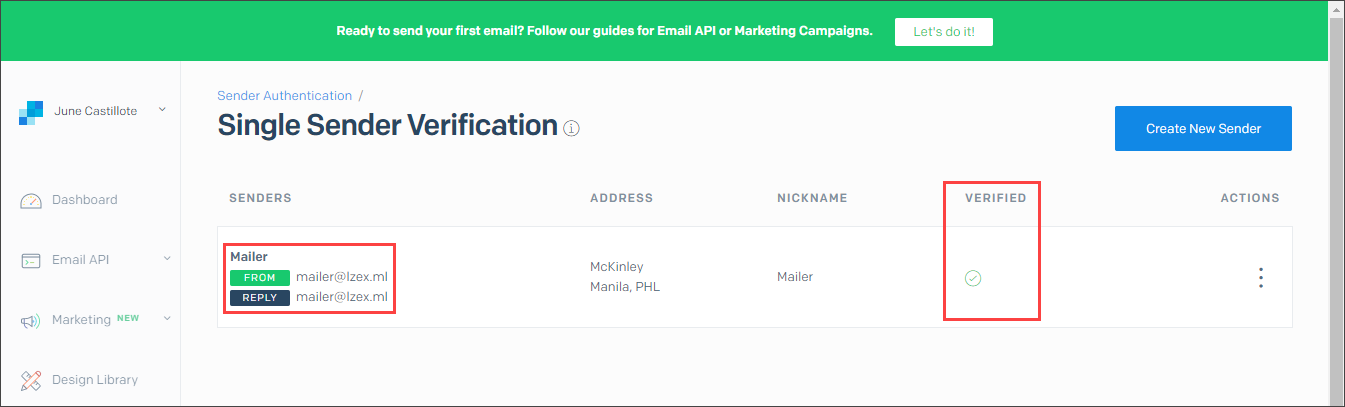
The sender’s address will become verified. You should see a similar page, as shown below, confirming that the sender verification is complete.
Creating a SendGrid API Key
After creating the single sender address, the interface to create API keys becomes available. Think of the SendGrid API key as the password. Without it, your code cannot authenticate with the SendGrid SMTP relay service. Follow the steps below to create a new API key.
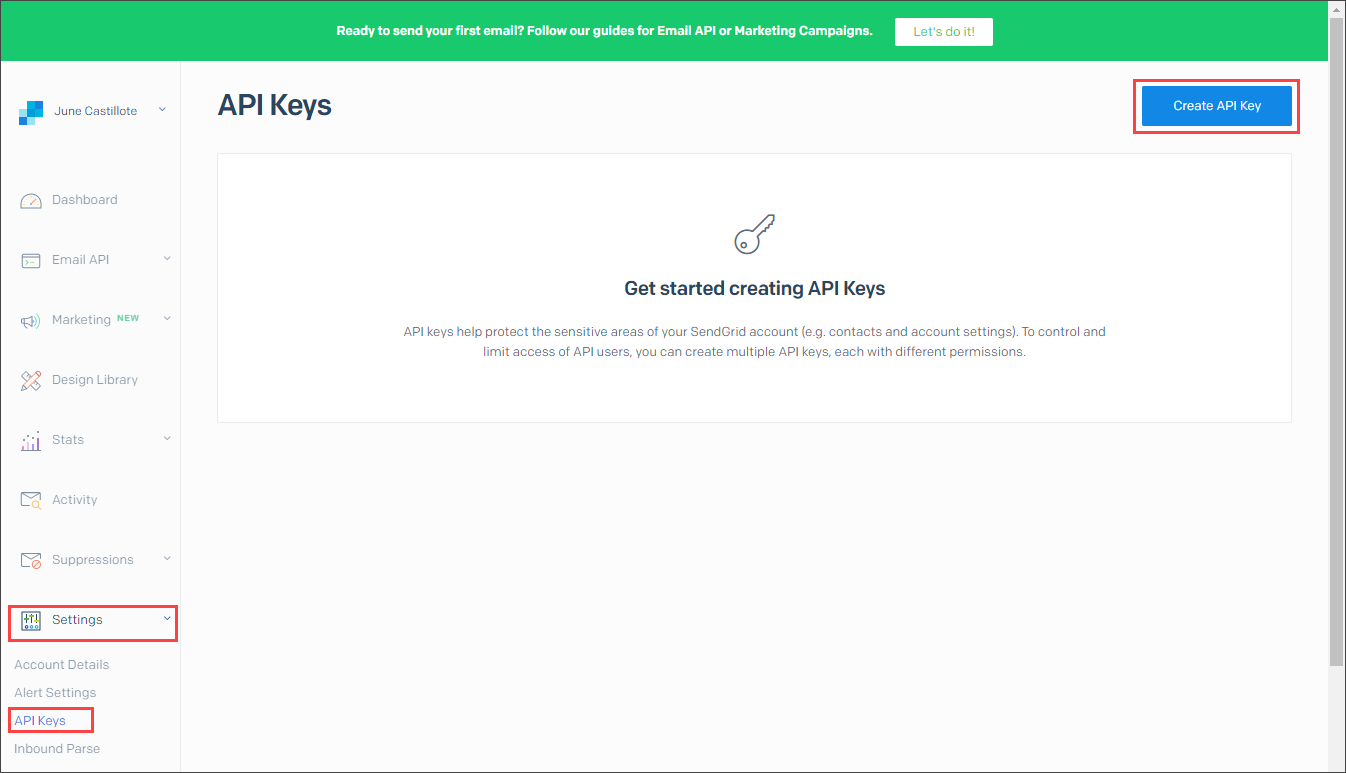
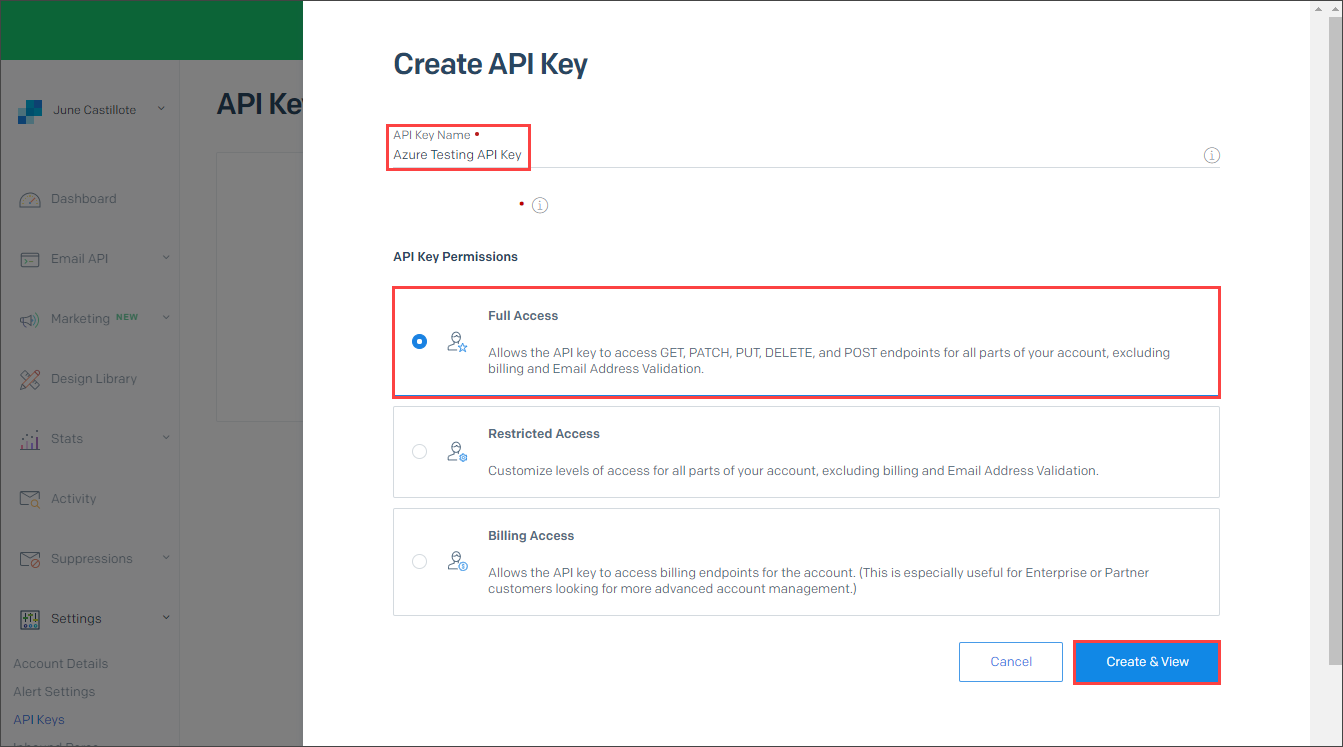
- On the left-hand side menu, click on Settings > API Keys. Then, click on the Create API Key button on the top-right corner of the page.
2. The Create API Key fly-out appears. Enter the name of the API key you are creating. Use a name that makes sense, such as “Azure Testing API Key.” Next, for simplicity’s sake, select Full Access as the permission. Finally, click on the Create & View button.
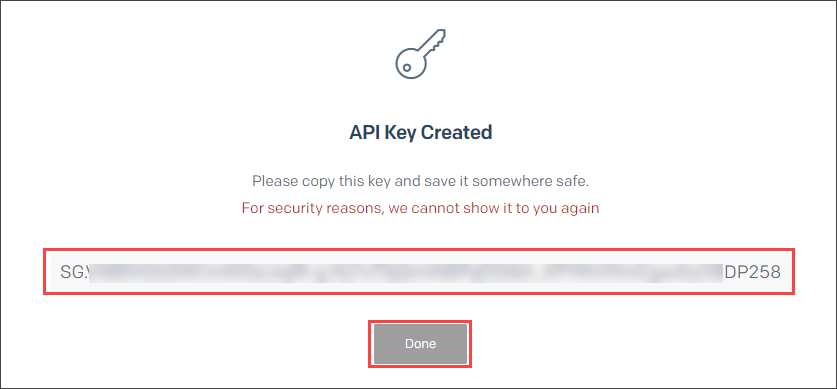
3. The new API Key is shown next. Now copy and save the key-value because it will not be shown to you again. After copying the key, click on Done.
Sending an Email from Azure using SendGrid SMTP Relay
Now you have the required components (account, sender, and key) to use SendGrid to send Azure emails. It is time to test whether the SendGrid SMTP relay service works. In this section, you are going to use PowerShell to send emails from an Azure VM.
Before running any code, you should know these requirements.
- The SendGrid SMTP server address is smtp.sendgrid.net.
- The username used for SMTP authentication is always apikey.
- The password to use is the value of the API key you created in SendGrid.
- Do not use port 25. Use port 587 instead.
- Only the verified sender address in SendGrid is valid to use as the sender of your emails. In this example, the authorized sender is [email protected].
The script below will send an email through the SendGrid SMTP relay. Copy the code below and change the $sendGridApiKey, From, To, and Body values. Then, run the code in your PowerShell session. Refer to the comments to understand what each line of code does.
# Set your API Key here
$sendGridApiKey = 'SG...........P258'

$SendGridEmail = @{
	# Use your verified sender address.
	From = '[email protected]'
	# Specify the email recipient. Any valid email address should work.
	To = '[email protected]'
	# Update this with the email subject you want to use.
	Subject = 'This is a test message from Azure via SendGrid'
	# Update this with the email body or message that you want to send.
	Body = 'This is a test message from Azure via SendGrid'

	# DO NO CHANGE ANYTHING BELOW THIS LINE
	SmtpServer = 'smtp.sendgrid.net'
	Port = 587
	UseSSL = $true
	Credential = New-Object PSCredential 'apikey', (ConvertTo-SecureString $sendGridApiKey -AsPlainText -Force)
}

# Send the email
Send-MailMessage @SendGridEmail
The demo below shows what running the code above in PowerShell looks like in real-time.

To confirm email deliverability, check the recipient mailbox to find the test message you sent. The result would be similar to the one shown below. As you can see, the message came from the sender’s address via sendgrid.net.

Relate: Send-MailMessage: The PowerShell Way to Send Email
Sending an Email from Azure using SendGrid API
Another way to use SendGrid with Azure to send emails is using the SendGrid Web API V3. Instead of communicating with SendGrid via SMTP, using the API communicates using HTTP. The HTTP request is sent to SendGrid’s API endpoint URL.
The example PowerShell script below uses the Invoke-RestMethod cmdlet to submit the email request from Azure to SendGrid. Copy the code and change the $sendGridApiKey, $fromAddress, $toAddress, $mailSubject, and $mailMessage variable values.
When you’re done updating the variables, run the code in PowerShell.
Set your API Key here
 $sendGridApiKey = 'SG………..P258'
 Set the sender and recipient addresses
 $fromAddress = "[email protected]"
 $toAddress = "[email protected]"
 Set the mail subject
 $mailSubject = "This is a test message from Azure via SendGrid API"
 Set the mail message
 $mailMessage = "This is a test message from Azure via SendGrid API"
 DO NOT CHANGE ANYTHING BELOW THIS LINE
 Compose the Mail Body
 $mailbody = @{
   personalizations = @(
     @{
       to      = @(
         @{
           email = $toAddress
         }
       )
       subject = $mailSubject
     }
   )
   from             = @{
     email = $fromAddress
   }
   content          = @(
     @{
       type  = "text/plain"
       value = $mailMessage
     }
   )
 } | ConvertTo-Json -Depth 10
 $headers = @{'Authorization' = "Bearer $($sendGridApiKey)" }
 $mailApiUri = 'https://api.sendgrid.com/v3/mail/send'
 Send the email
 Invoke-RestMethod -Method Post -Uri $mailApiUri -Body $mailbody -Headers $headers -ContentType application/json
After running the PowerShell code above, check the recipient’s mailbox and confirm that it received the test message. The example below shows a successfully delivered test message from Azure via SendGrid API.

If you want to learn more about SendGrid Web API, visit the V3 Mail Send API page.
Using Office 365 SMTP Auth
Another option to send Azure emails is to use the Office 365 SMTP relay. That is if your organization already has an Exchange Online subscription. Just like using SendGrid as an SMTP smart host, the Office 365 SMTP relay requires authentication and the use of port 587 only.
Before using Office 365 SMTP relay, you must know the following conditions for it to work.
- The sender address must be a valid Exchange Online recipient object such as a mailbox or a mail user. But, if non-delivery receipts (NDR) are to be stored, use a mailbox instead.
- The authentication user must have a valid Exchange Online license. Only licensed Exchange Online users are allowed to use the Office 365 SMTP relay.
- Suppose the authentication user is different from the sender. In that case, the user must be assigned the Send As permission to the sender account.
- The authentication method used is basic (legacy). This means that if SMTP basic authentication is disabled in your organization or when Microsoft finally drops basic authentication, SMTP Auth will no longer work.
- The SMTP relay server address is smtp.office365.com, and the port number is 587.
Related: How to Send Email with Office 365 Direct Send and PowerShell
Creating an Office 365 Sender Address
In this example, the sender and the authentication user are separate. Make sure to connect to Exchange Online PowerShell first. Once you’re connected, follow the steps below.
Create a shared mailbox using the command below. Change the -Name and -PrimarySMTPAddress to your correct values.
New-Mailbox -Shared -Name 'SMTP Mailer 365' -PrimarySMTPAddress '[email protected]'
The shared mailbox should be created and would return a result similar to the one below.

Then, assign the Send As permission to the authentication user. In the example below, the user is assigned the Send As permission to the shared mailbox.
Add-RecipientPermission -Identity '[email protected]' -Trustee '[email protected]' -AccessRights SendAs -Confirm:$false
Once the command above is executed, you should get a result similar to the one below.

Sending an Email from Azure using Office 365 SMTP Relay
After the sender address creation and assigning the Send As permission, the next step is to test the email delivery using PowerShell and Office 365 SMTP relay.
The code below authenticates using [email protected]. The address [email protected] appears as the sender. Make sure to assign your correct values before running the code.
# Provide your SMTP credentials
$username = '[email protected]'
$password = '*************'

# Provide the sender and recipient email address
$fromAddress = '[email protected]'
$toAddress = '[email protected]'

# Specify the email subject and the message
$mailSubject = 'This is a test message from Azure via Office 365 SMTP Relay'
$mailMessage = 'This is a test message from Azure via Office 365 SMTP Relay'

# DO NO CHANGE ANYTHING BELOW THIS LINE
$Office365RelayEmail = @{
	From = $fromAddress
	To = $toAddress
	Subject = $mailSubject
	Body = $mailMessage
	SmtpServer = 'smtp.office365.com'
	Port = 587
	UseSSL = $true
	Credential = New-Object PSCredential $username, (ConvertTo-SecureString $password -AsPlainText -Force)
}

# Send the email
Send-MailMessage @Office365RelayEmail
Using credentials in scripts that are in plain text is not recommended. Production scripts must use credential encryption or secret management to secure usernames and passwords.
Now it’s time to check the recipient’s mailbox. Confirm that the test message was received.

Using Microsoft Graph API to Send Azure Email
Instead of using the Office 365 SMTP relay, the more secured and recommended way is to use Microsoft Graph API. With Microsoft Graph API, you can send emails from any mailbox in your organization using REST API calls.
To use Microsoft Graph API to send emails requires a registered Azure AD app. The registered app must be assigned with the Mail.Send API permission. The following sections will show you how to configure Microsoft Graph API and use it to send emails.
Related: Using the Microsoft Graph API with PowerShell
Registering a New App in Azure Active Directory
In this section, you will register a new web app in the Azure active directory. The new app acts as the authentication identity for Microsoft Graph. Log in to the Azure Portal if you haven’t logged in yet.
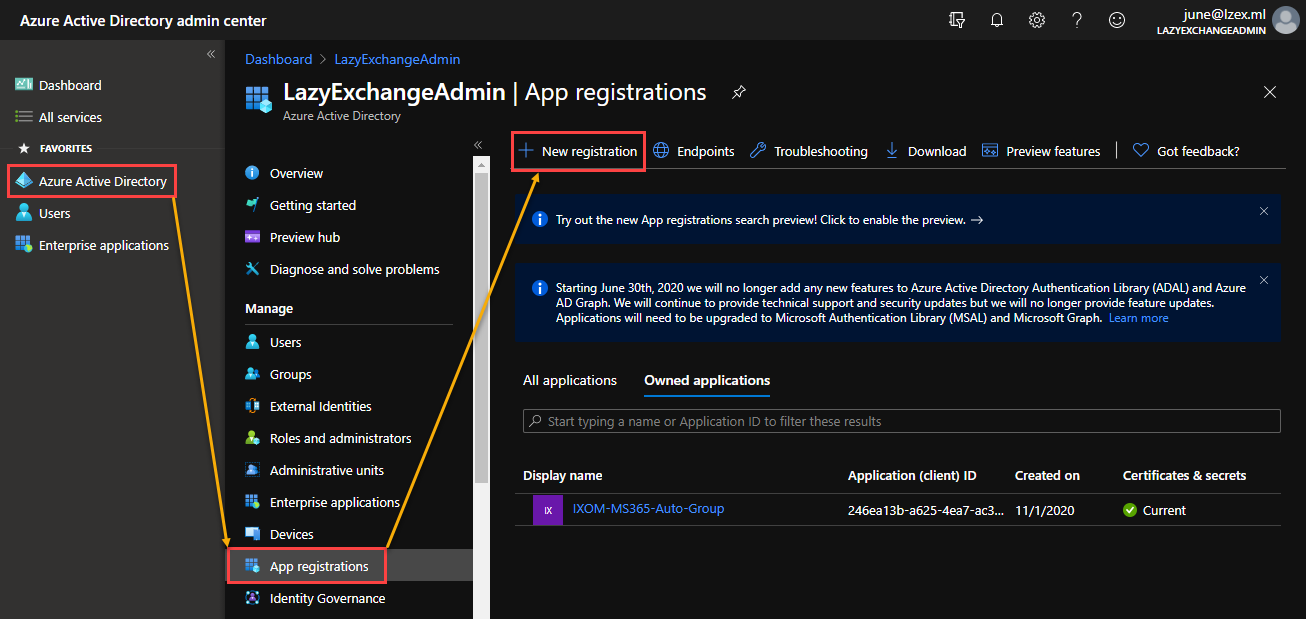
- Navigate to Azure Active Directory —> App registration. Then, click on the New registration button.
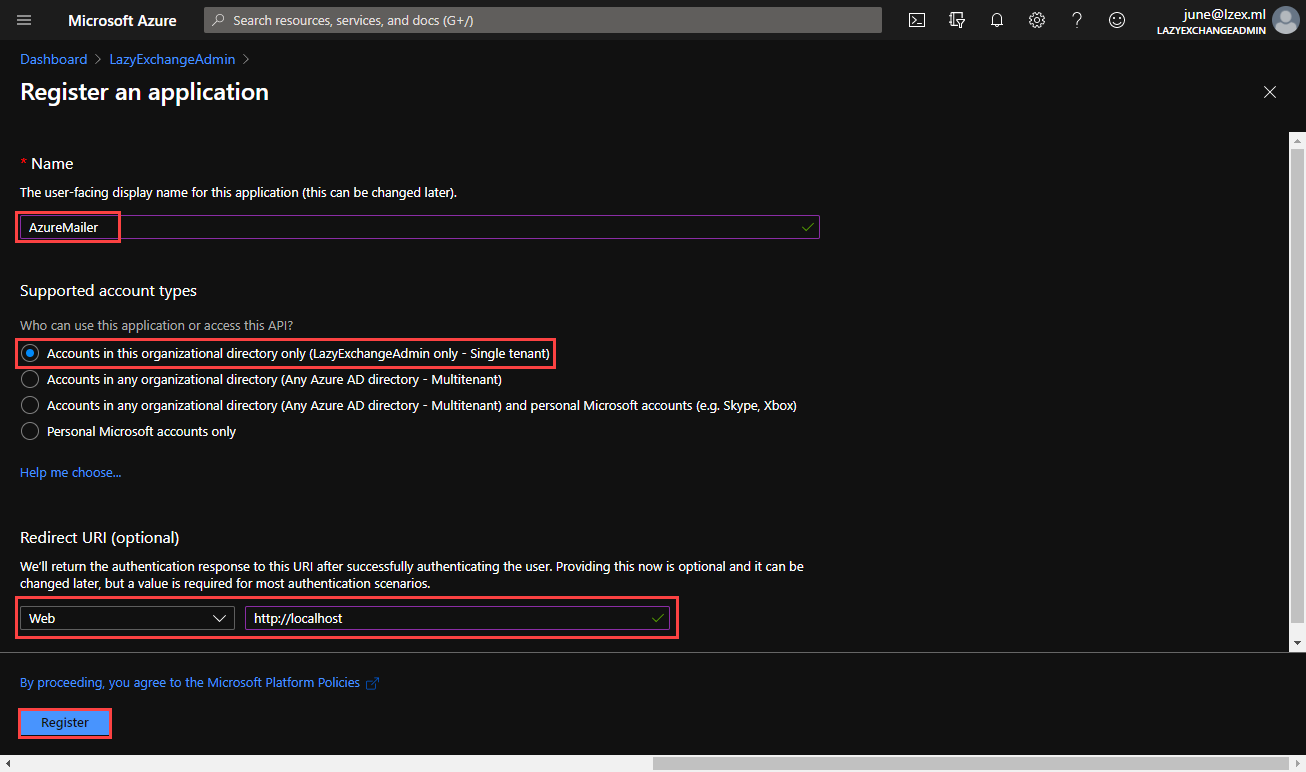
2. On the Register an application page, enter the name of the app.
3. Under the Supported account types, choose Accounts in this organizational directory only. Type in HTTP://localhost as the Redirect URI. Finally, click on the Register button.
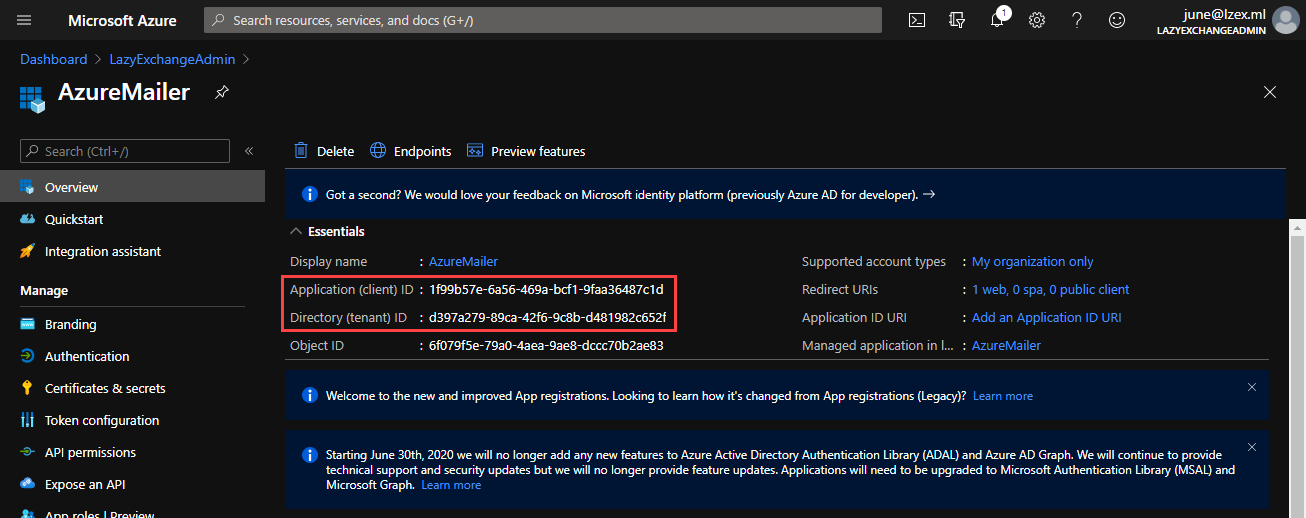
4. Wait for the registration to complete. The process only takes a few seconds. Don’t forget to note the resulting Application (client) ID and the Directory (tenant) ID values. You will need those later.
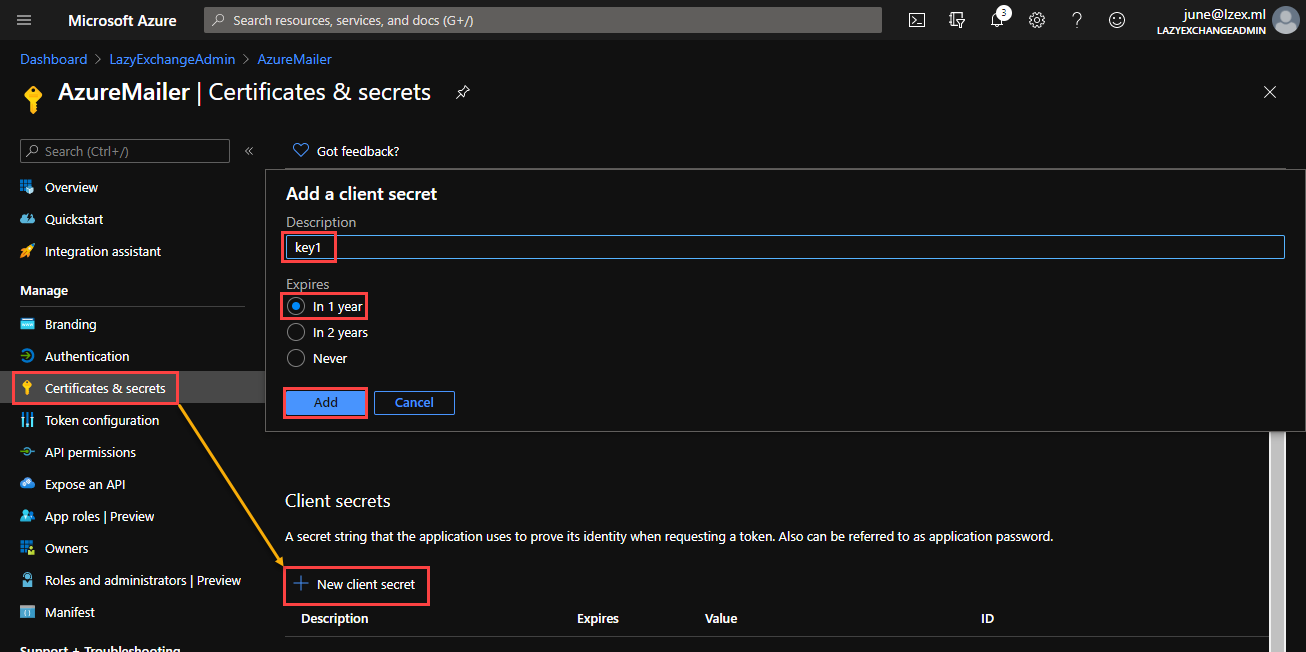
Creating a Client Secret Key
Think of the application ID that you created in the previous section as the username. And that application ID needs a password – which is the secret key.
To add a new application secret key, follow the steps below.
- Go to Certificates & secrets, then click on New client secret.
- Input the description for the client secret, such as key1.
- Select when the secret expires and click Add. In the example below, the secret key expires in 1 year.
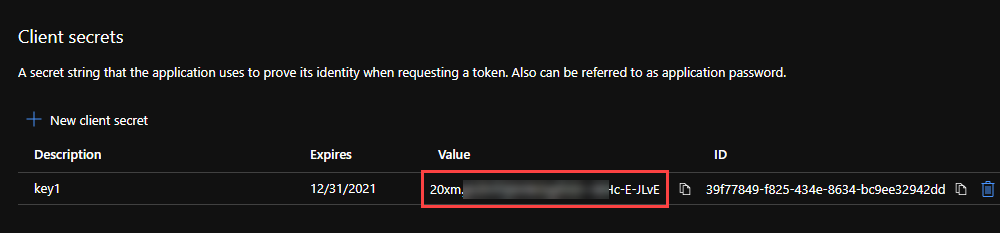
You’ll see the new key listed under the Client secrets section. Now is the only time you will see the key value, so save a copy.
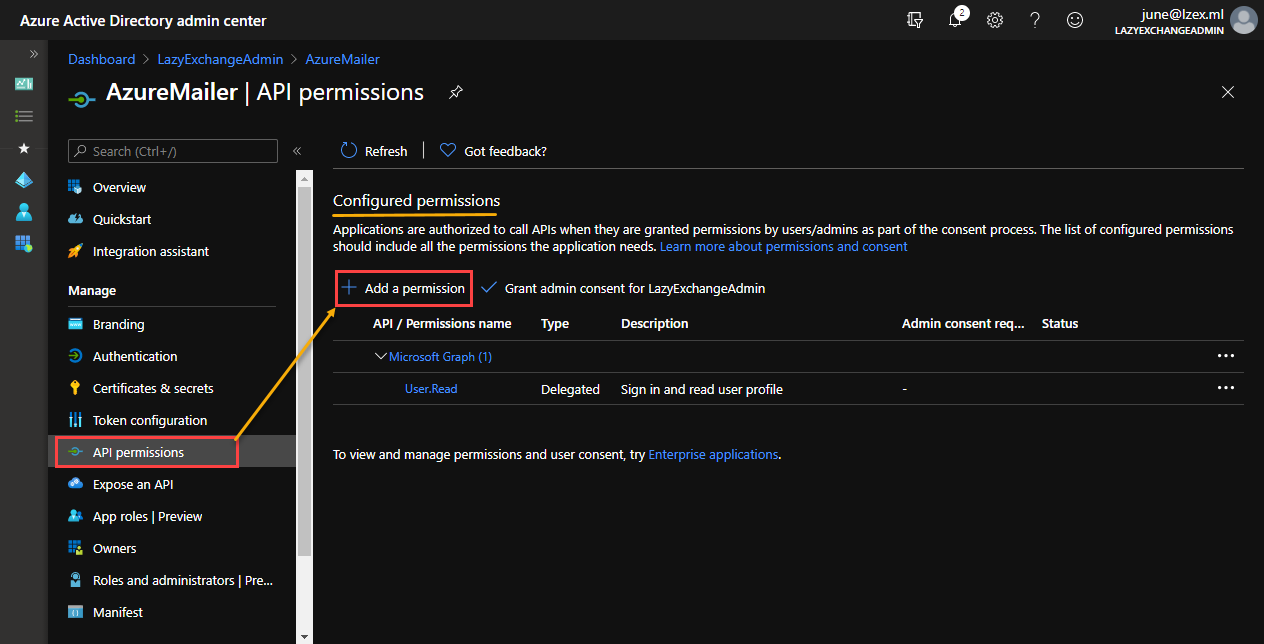
Assigning API Permission and Granting Admin Consent
Now that you’ve created the application ID and secret, what’s left is to assign the required Microsoft Graph API permission. Without assigning permission, the application can authenticate but will have no authority to do anything, such as to send emails.
To start assigning permission, follow the steps below.
- Click on API permissions on the left-side menu.
2. Then, under the Configured permissions page, click on the Add a permission button.
3. In the Request API permissions fly-out, click to select Microsoft Graph API.
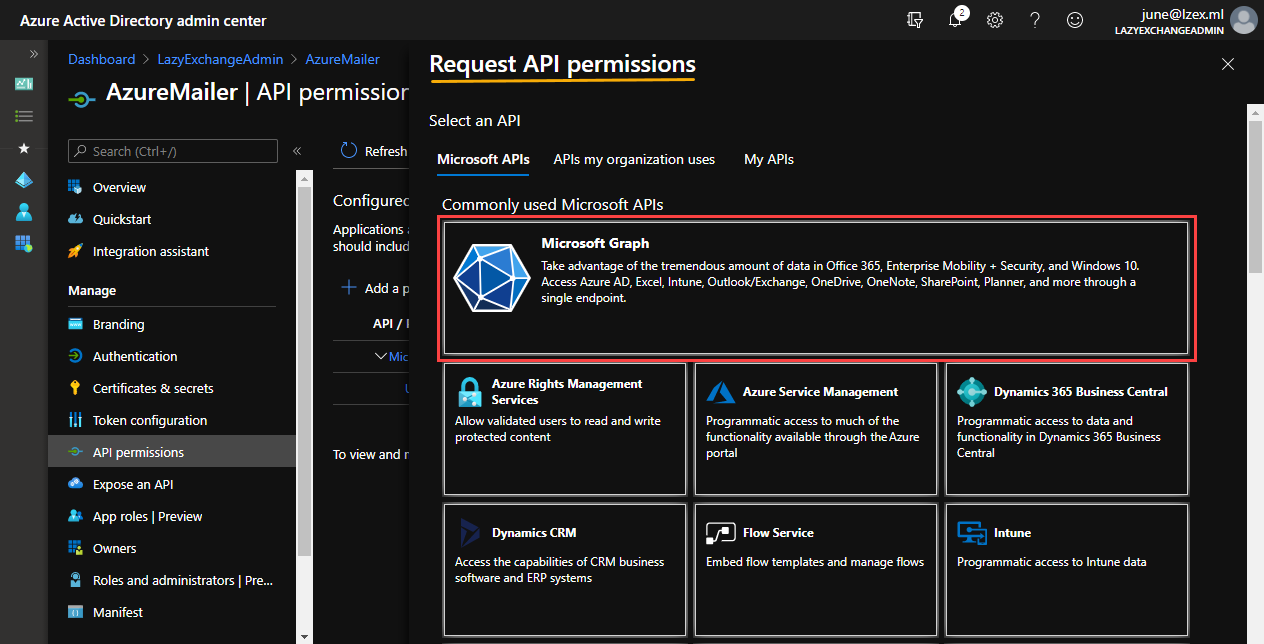
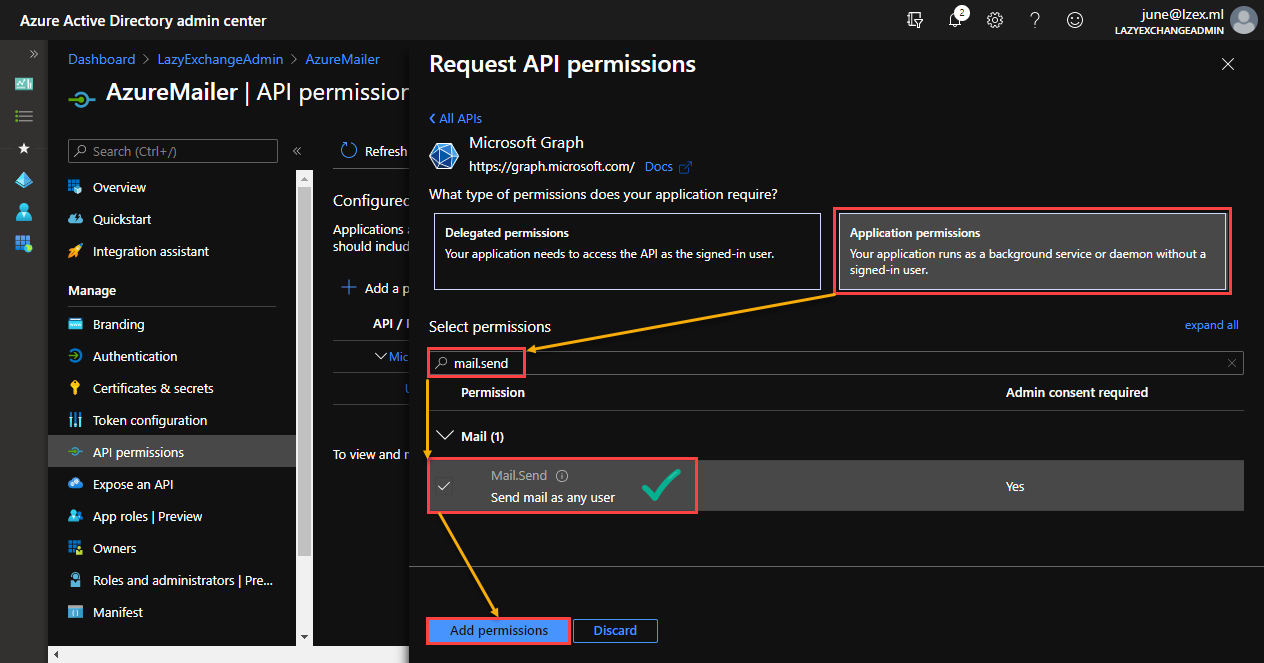
4. When asked to choose the type of permission required by the application, click on Application permissions.
5. In the search box, type in Mail.Send to search for it. In the result, click to check the Mail.Send permission. Lastly, click on Add permissions.
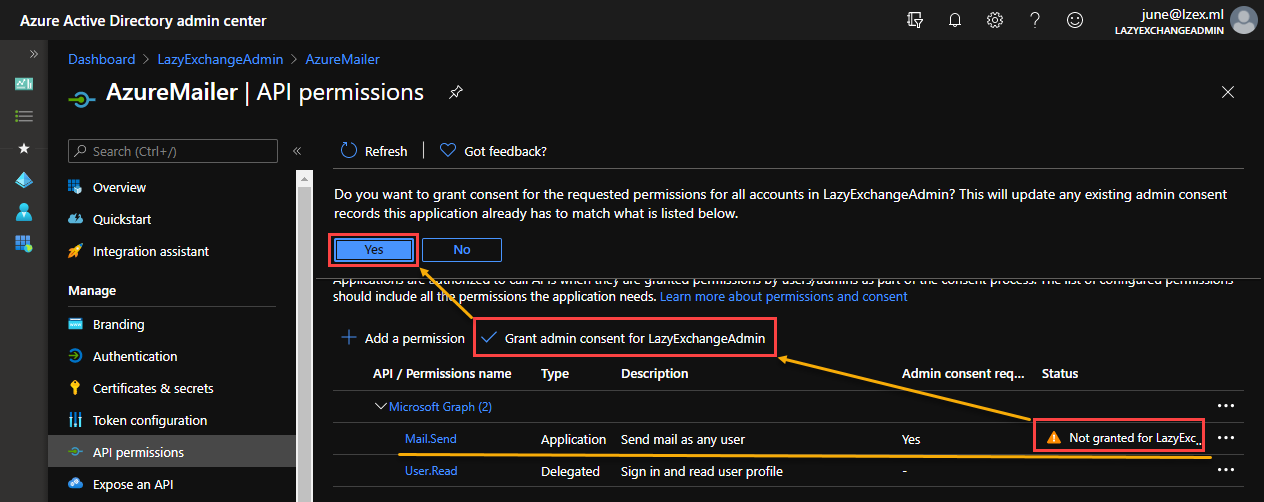
6. You’ll notice that the permission status is “Not granted for <organization name>.” At this point, you or a Global admin must first give consent for the application. To grant permission, click on the Grant admin consent for <organization> button.
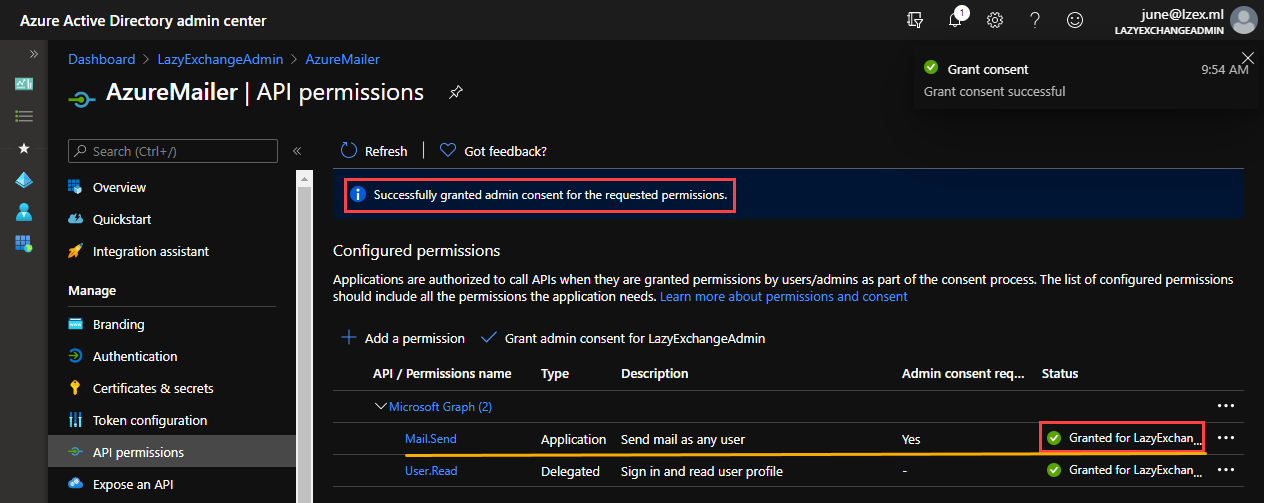
The API permission status then changes to “Granted for <organization name>”.
Acquiring an Access Token
Requests sent to Microsoft Graph API requires an access token. At this point, you already have your application ID, secret key, and tenant ID. Those three pieces of information are what’s needed to acquire an access token.
The PowerShell script below sends the access token request to the Microsoft Graph API endpoint. You must update the $client_id, $client_secret, and $tenant_id to your correct values first. Then, copy and paste the code in PowerShell to request the access token.
# replace with your application ID
$client_id = 'APPLICATION ID'
# replace with your secret key
$client_secret = 'SECRET KEY'
# replace with your tenant ID
$tenant_id = 'TENANT ID'

# DO NOT CHANGE ANYTHING BELOW THIS LINE
$request = @{
        Method = 'POST'
        URI    = "https://login.microsoftonline.com/$tenant_id/oauth2/v2.0/token"
        body   = @{
            grant_type    = "client_credentials"
            scope         = "https://graph.microsoft.com/.default"
            client_id     = $client_id
            client_secret = $client_secret
        }
    }
# Get the access token
$token = (Invoke-RestMethod @request).access_token
# view the token value
$token
The demonstration below shows the PowerShell script above in action. Notice that the requested access token is stored to the $token variable.

Access tokens are valid for one (1) hour only from the time it was acquired. You will need to request another access token after the previous token expired.


