

Are remote work challenges leaving you searching for a solution seamlessly empowering your team? The struggle to balance user experience, security, and flexibility can be overwhelming. But fear not because the Azure Virtual Desktop (AVD) is a game-changer in town.
In this tutorial, you’ll learn the basics of deploying and managing cloud-based virtual desktops and applications. AVD is your solution for a secure, scalable, and flexible virtual desktop environment.
Discover AVD and ensure a smooth remote working experience for your team!
Prerequisites
Before you dive headfirst into the exciting world of AVD, ensure you’ve got the following in place to follow along:
- An Azure account with an active subscription – The free tier account is sufficient for this tutorial.
- A local environment to access the virtual desktops (i.e., laptop or desktop computer) – This tutorial uses a Windows 10 device, but a macOS or Linux machine also works.
- Remote Desktop Client installed on your local machine. The default Remote Desktop Connection application will not work for this tutorial.
Setting Up a Resource Group for an Azure Virtual Desktop
Embarking on deploying AVDs requires a solid foundation, starting with creating a well-structured resource group. A resource group is your project’s filing cabinet within Azure, keeping all related services neatly organized.
To set up a resource group for an AVD, carry out the following:
1. Open your web browser, navigate to the Azure Portal, and enter your login credentials.
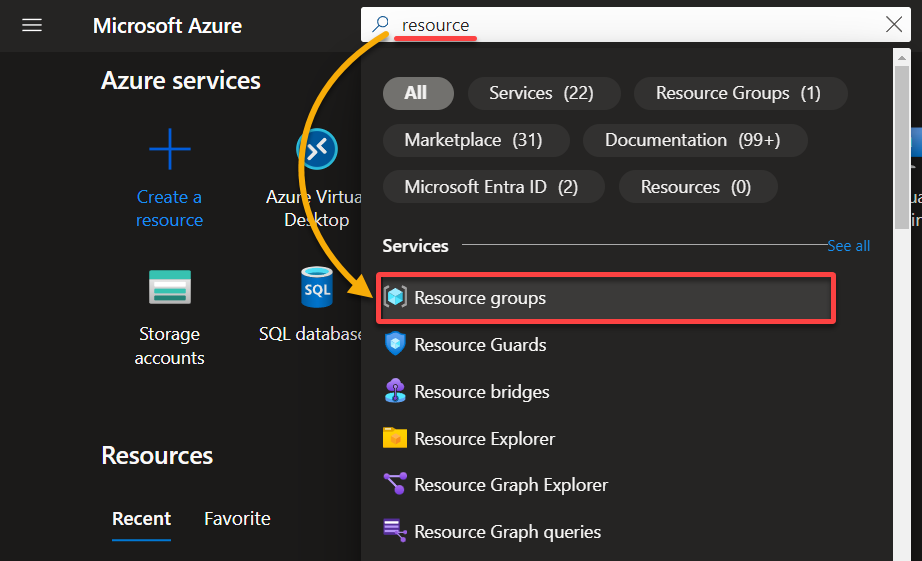
2. Next, search for resource and select Resource groups from the auto-suggested list to navigate to the resource group management interface.
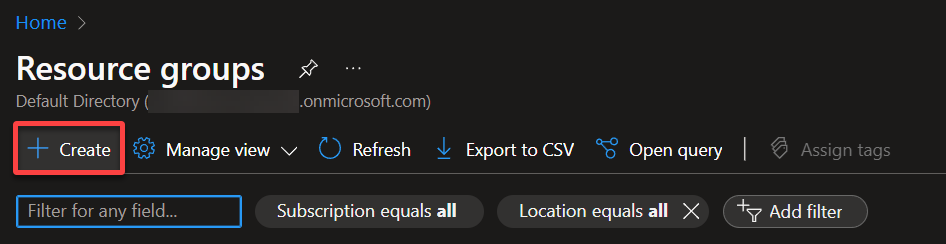
3. Hit the Create button on the Resource groups page to start the creation wizard.
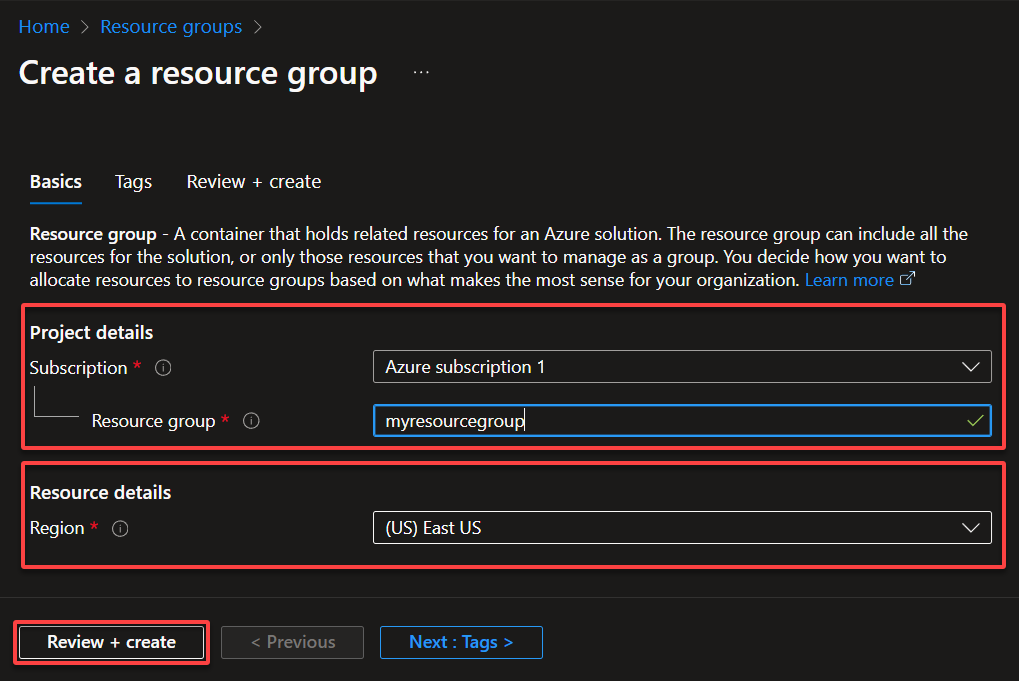
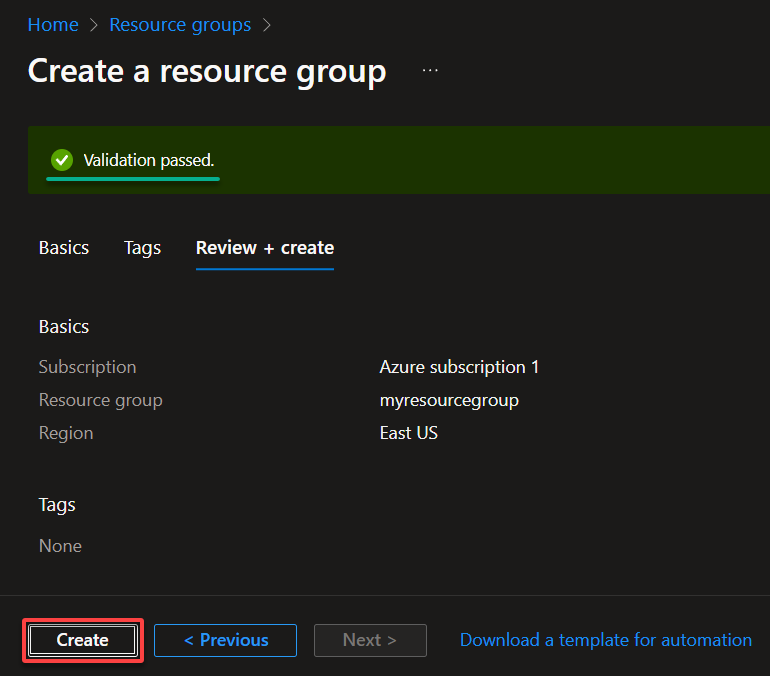
4. On the next page, configure the basic details of the new resource group as follows:
- Subscription – Select your preferred subscription.
- Resource group – Assign a name to your resource group, like myresourcegroup.
- Region – Choose a region close to your users for optimal performance (i.e., (US) East US).
Once configured, click Review + create to validate your resource group.
5. Once validated, click Create to establish your new resource group.
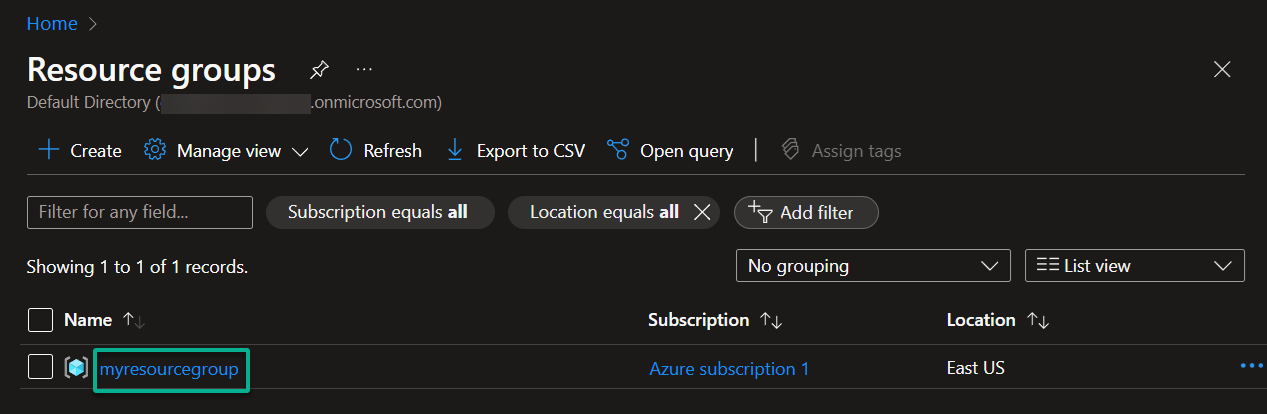
Your resource group is now created and is shown in the dashboard, as in the screenshot below.
💡 Tip: Consider automating resource group creation using Azure CLI or PowerShell scripts, especially if you frequently set up similar environments.
Setting Up a Virtual Network
Creating a virtual network is like setting up a private clubhouse for your virtual desktops. This virtual network is where they can securely communicate and operate, insulated from the outside world.
To set up a virtual network for an AVD, complete the steps below:
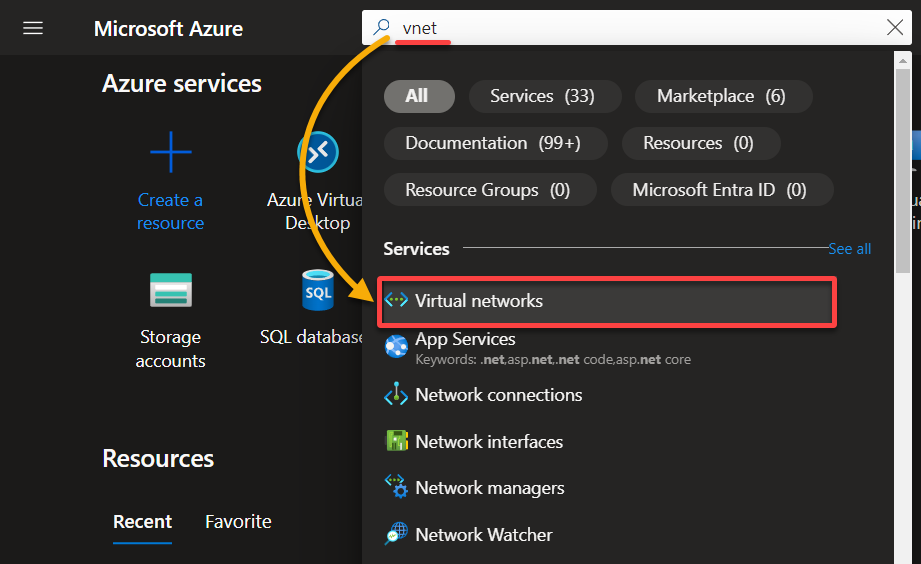
1. In the Azure Portal, search for vnet, and select Virtual networks from the dropdown list to access the Virtual networks service.
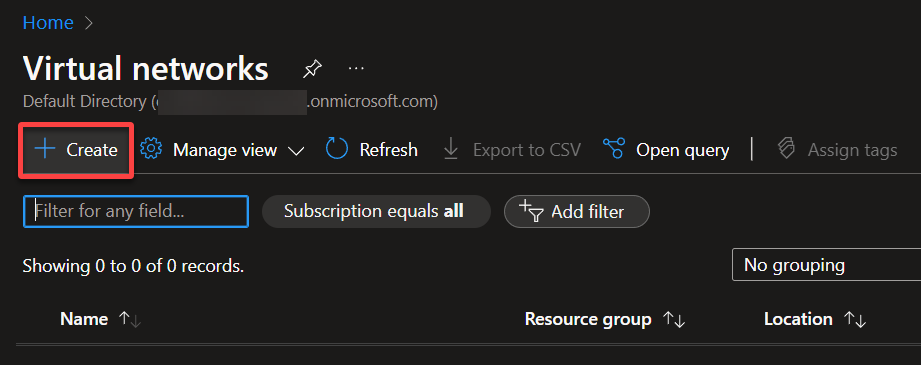
2. Next, click Create to initiate creating a virtual network.
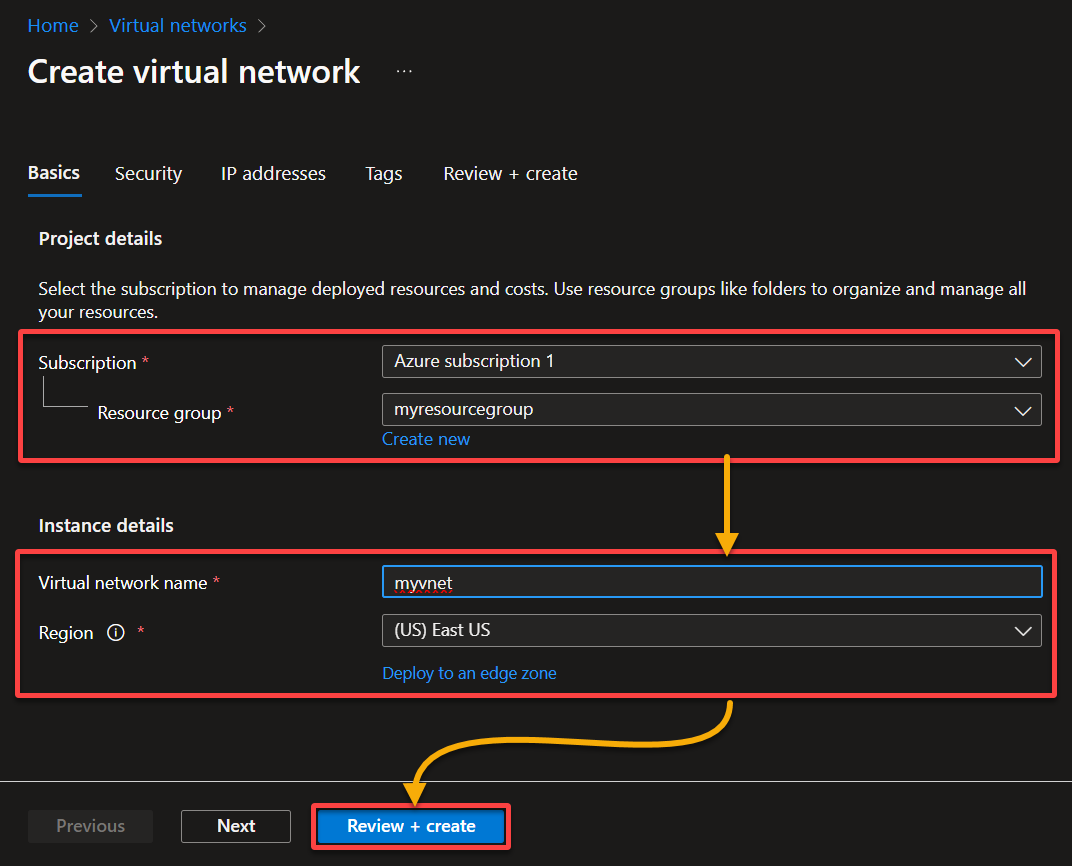
3. On the next page, set up the essential details for the virtual network with the following:
- Subscription – Select the same subscription as your resource group to ensure consistency.
- Resource group – Select your newly created resource group (i.e., myresourcegroup) to host your virtual network.
- Virtual network name – Provide a unique name (i.e., myvnet) for your virtual network.
- Region – Choose the same region (i.e., (US) East US) as your resource group to keep latency low.
Once set up, click Review + create to review and validate your settings.
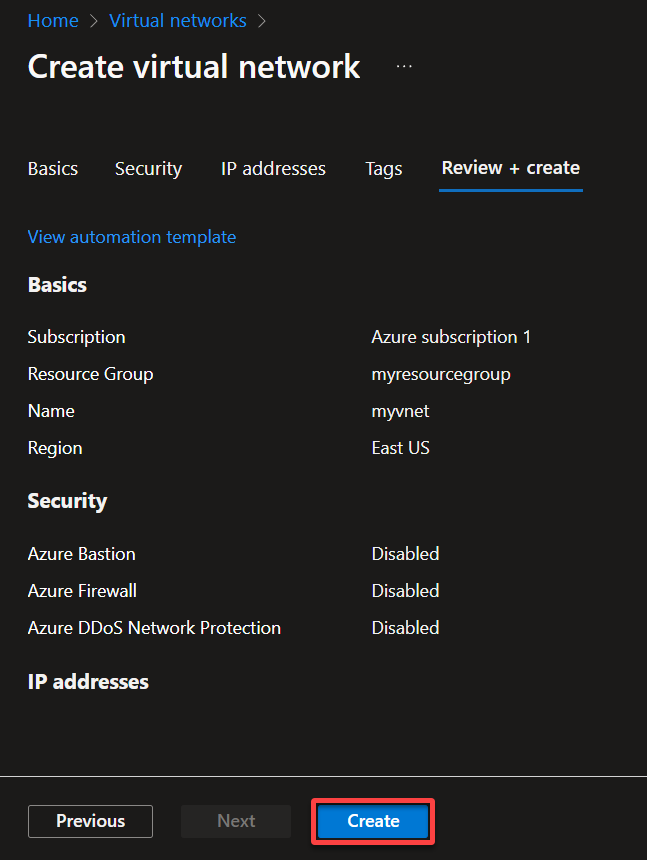
4. Now, leave the default settings in place unless specific changes are required for your setup, and click Create to deploy your virtual network.
Deploying an Azure Virtual Desktop
From setting up a resource group and a virtual network, you’ve laid the groundwork for a seamless AVD experience. Now, you’ll dive into the heartbeat of it all—deploying an AVD. Witness the magic unfold as you walk through the steps to deliver a user experience transcending traditional boundaries.
Imagine you’re the mayor of a bustling digital city in the cloud, where people worldwide come to work without leaving their homes. This city is built within the vast Azure cloud, and your mission is to create a space where everyone can have their own personalized office.
To deploy an AVD, execute the following:
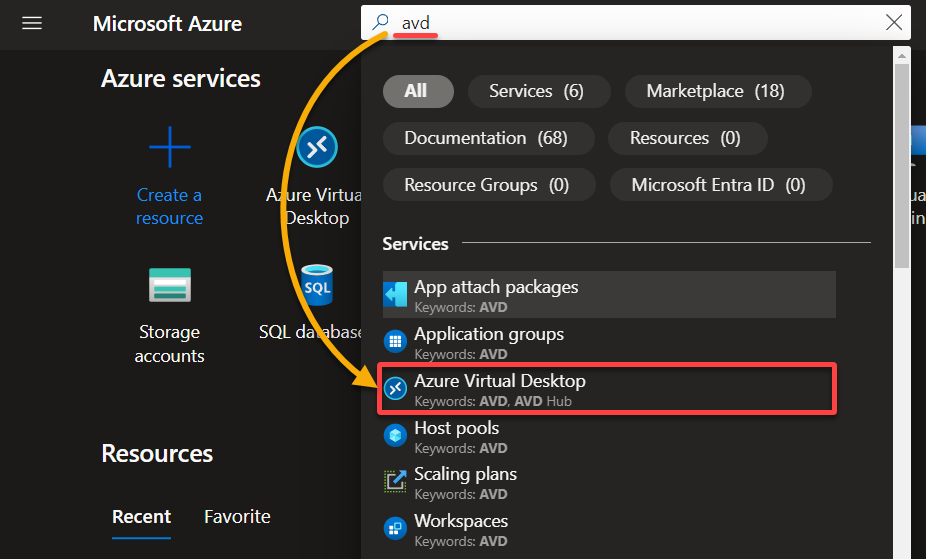
1. In the Azure Portal, search for avd and select Azure Virtual Desktop from the dropdown list to access the AVD service.
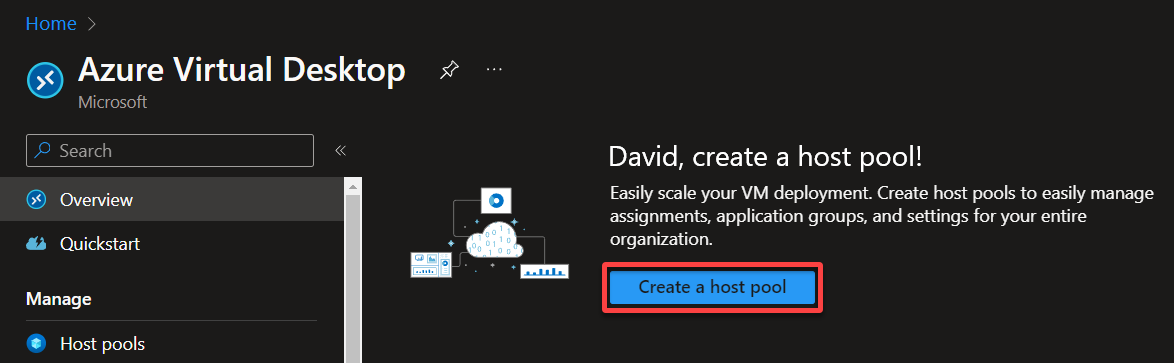
2. Next, click Create a host pool on the Azure Virtual Desktop page to initiate creating a host pool for setting up your virtual desktop environment. A host pool is a logical grouping of Azure VMs that work together to provide desktop sessions to users.
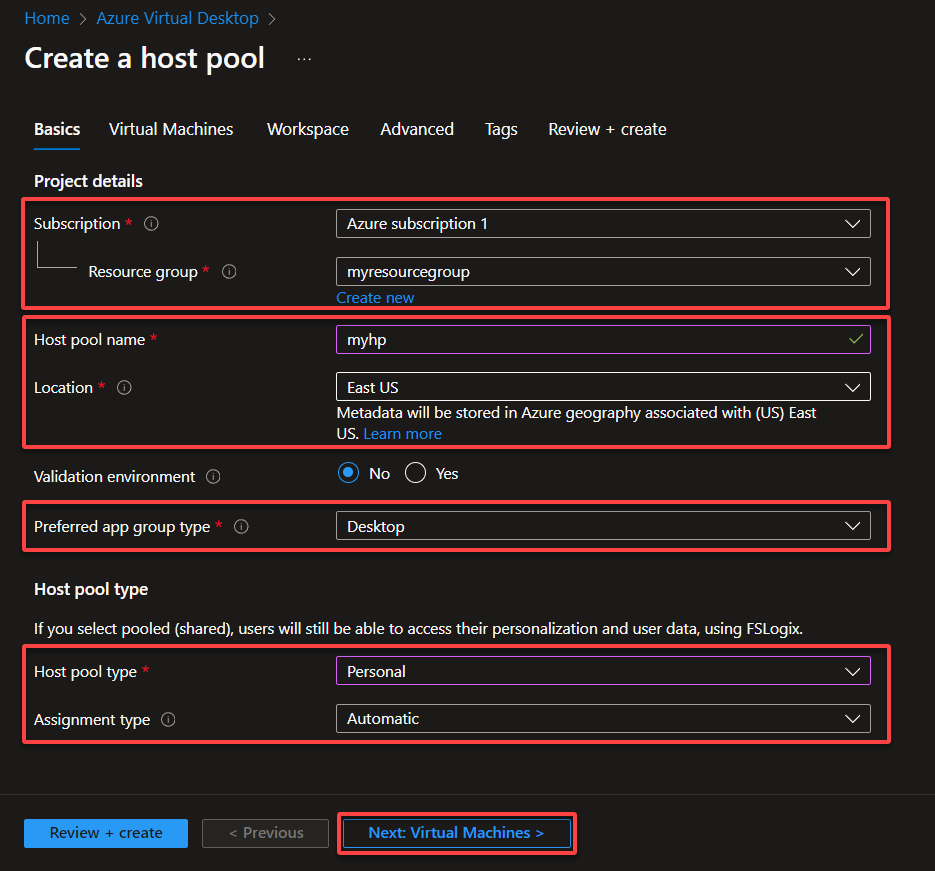
3. Configure your new host pool with the following:
- Subscription and Resource group – Select your preferred subscription and resource group (i.e., myresourcegroup).
- Host pool name – Provide a unique name (i.e., myhp) for your host pool.
- Location – Choose the same region (i.e., (US) East US) as your virtual network and resource group.
- Preferred app group type – Select Desktop from the dropdown since you’ll deploy a virtual desktop.
- Host pool type – Choose Personal to assign a dedicated session host VM to each user, which ensures a consistent desktop experience. Think of a personal pool as a neighborhood of custom homes—each one designed for a specific resident. In the AVD context, a personal desktop pool is a collection of VMs assigned to individual users with their VM that maintains its state over time.
- Assignment type – Opt for Automatic to allow Azure to manage the user-to-VM assignments on a first-come, first-served basis.
Once set up, click Next: Virtual Machines to continue.
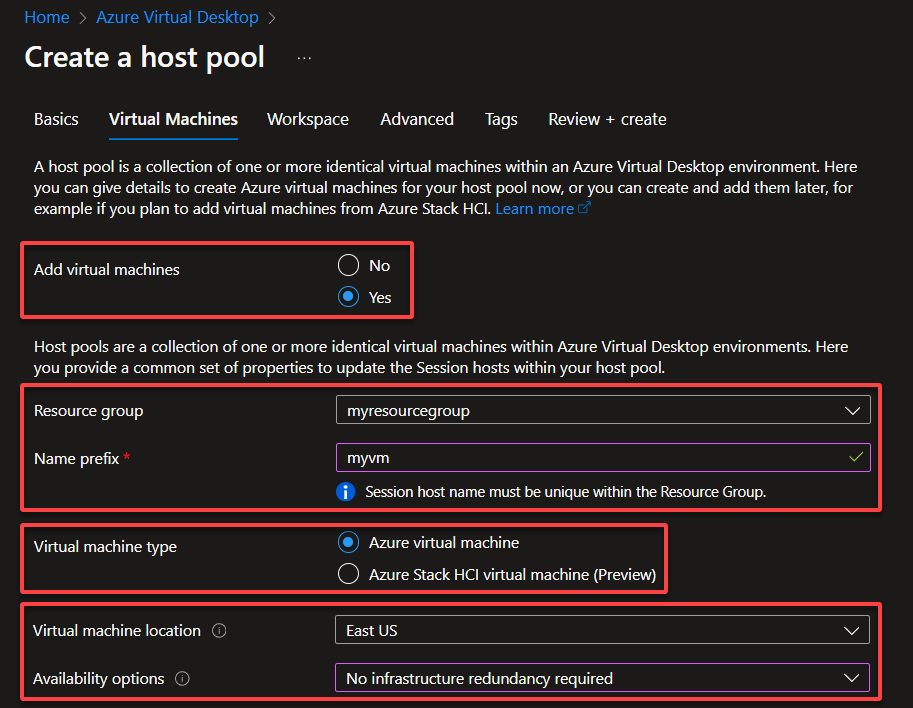
4. Under the Virtual Machines tab, make these selections for basic VM configurations, from resource to availability:
- Add virtual machines – Choose Yes since the goal is to add a VM.
- Resource group and Name prefix – Select your resource group (i.e., myresourcegroup), and provide a prefix for your VMs (i.e., myvm). This VM’s name will be automatically followed by a sequential number for identification (i.e., myvm-0, myvm-1, …).
- Virtual machine type – Select Azure virtual machine for this tutorial.
💡 Note: Azure Stack HCI is only an option with an Azure Stack HCI subscription.
- Virtual machine location – Select the same region as your resource group and virtual network (i.e., US East).
- Availability options – Choose No infrastructure dependency required as you will deploy a single session host VM.
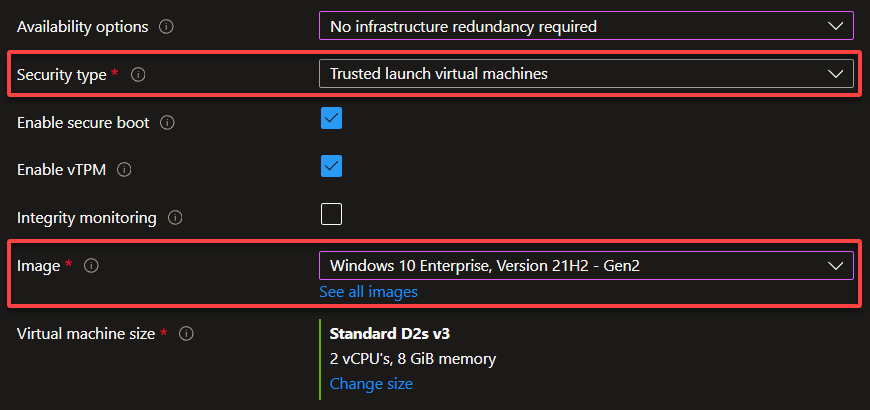
5. Scroll down and configure the following:
- Security type – Select Trusted launch virtual machines to ensure higher trust and integrity for the VMs within your host pool.
- Image – Choose Windows 10 Enterprise, version 22H2 – Gen 2, for this tutorial. But you may also opt for a different one, depending on your needs.
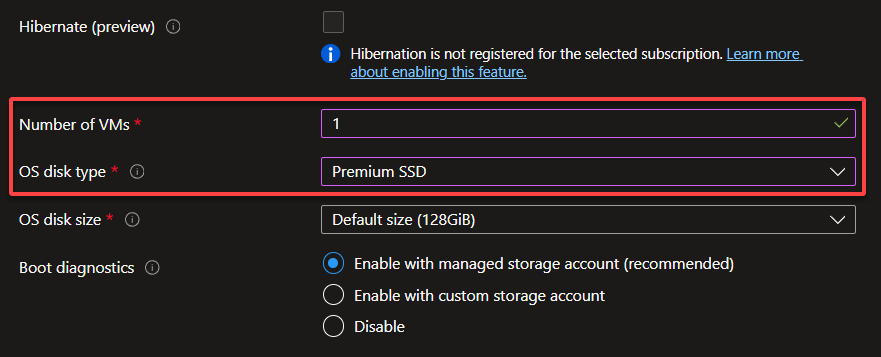
6. Next, set the options as follows for further VM configurations:
- Number of VMs – Provide your initial or desired quantity of VMs (i.e., 1) to include in your host pool.
- OS disk type – Select Premium SSD for improved performance.
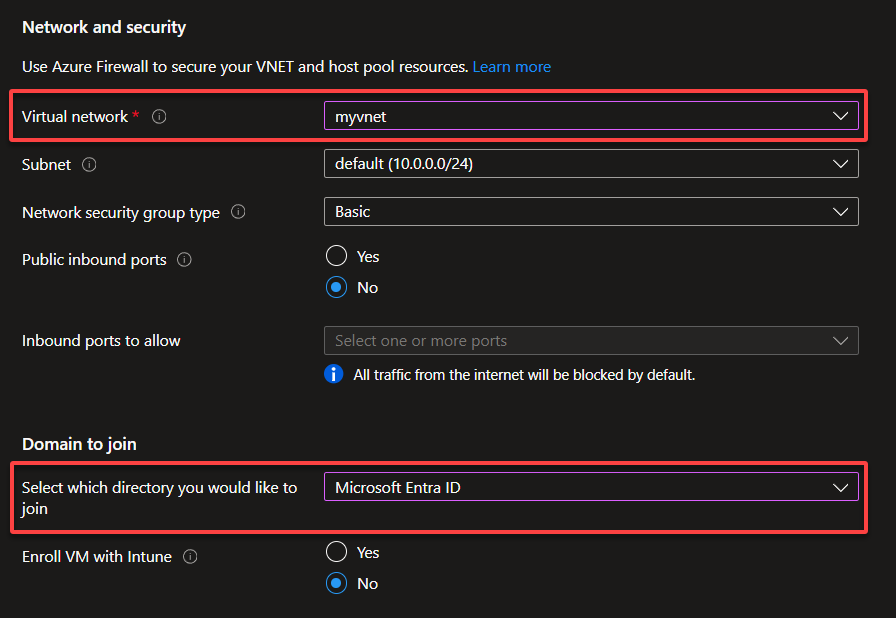
7. Subsequently, set the following for the network security and domain:
- Virtual network – Choose your virtual network from the dropdown list (i.e., myvnet).
- Select which directory you would like to join – Choose Microsoft Entra ID for directory joining.
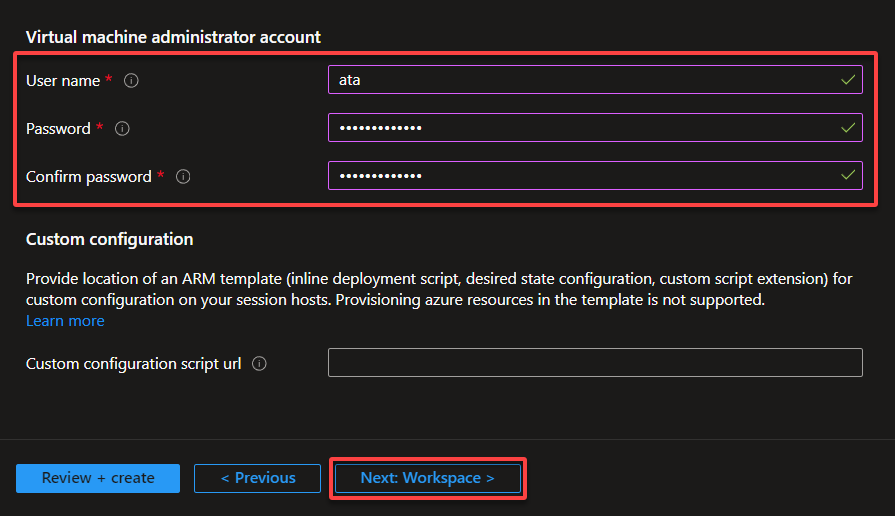
8. Provide a User name (i.e., ata) and Password for creating a local administrator account, keep the other default settings, and click Next: Workspace to continue.
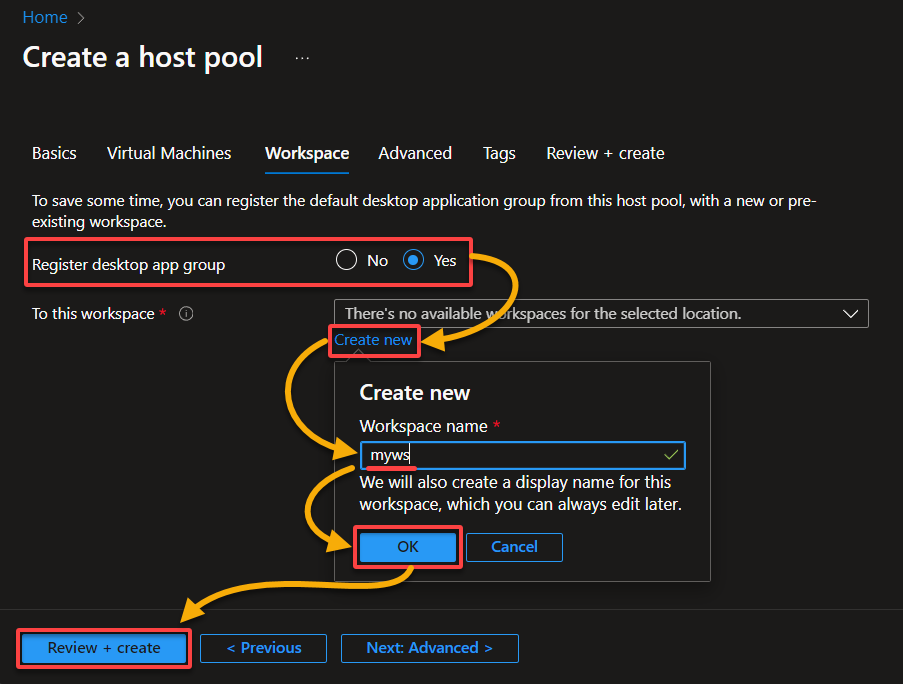
9. Execute the following for creating your workspace:
- Register desktop app group – Choose Yes to register the default app group for the selected workspace.
- To this workspace – Click Create new, provide a Workspace name (i.e., myws), and hit OK.
In AVD, a workspace is like a digital plaza, a collection of resources where virtualized desktops and applications are made available to end-users.
Once set, click Review + create to begin the deployment process, which may take some time to complete.
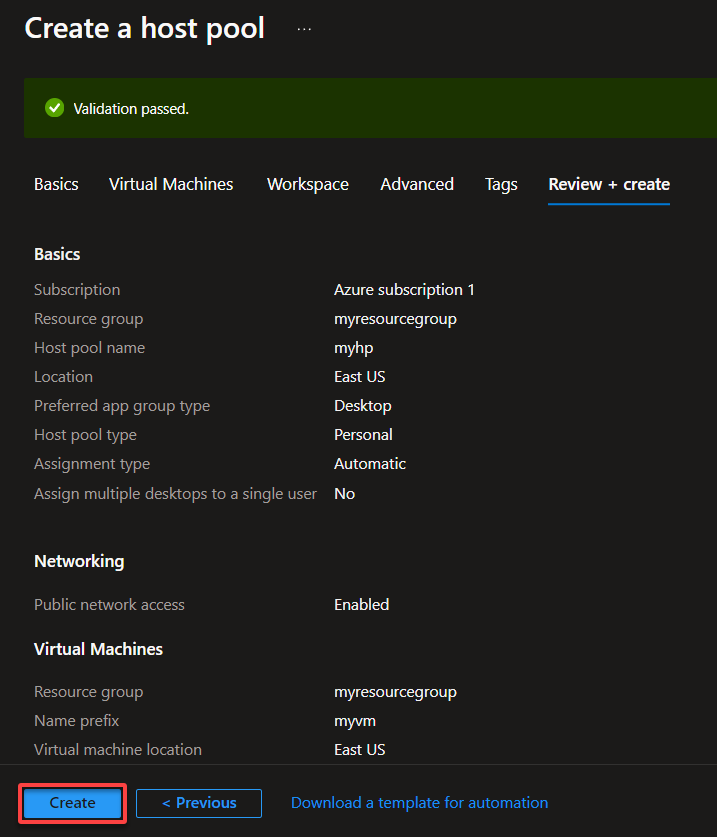
10. Lastly, review your selected settings after successful validation, and click Create to finalize deploying your AVD.
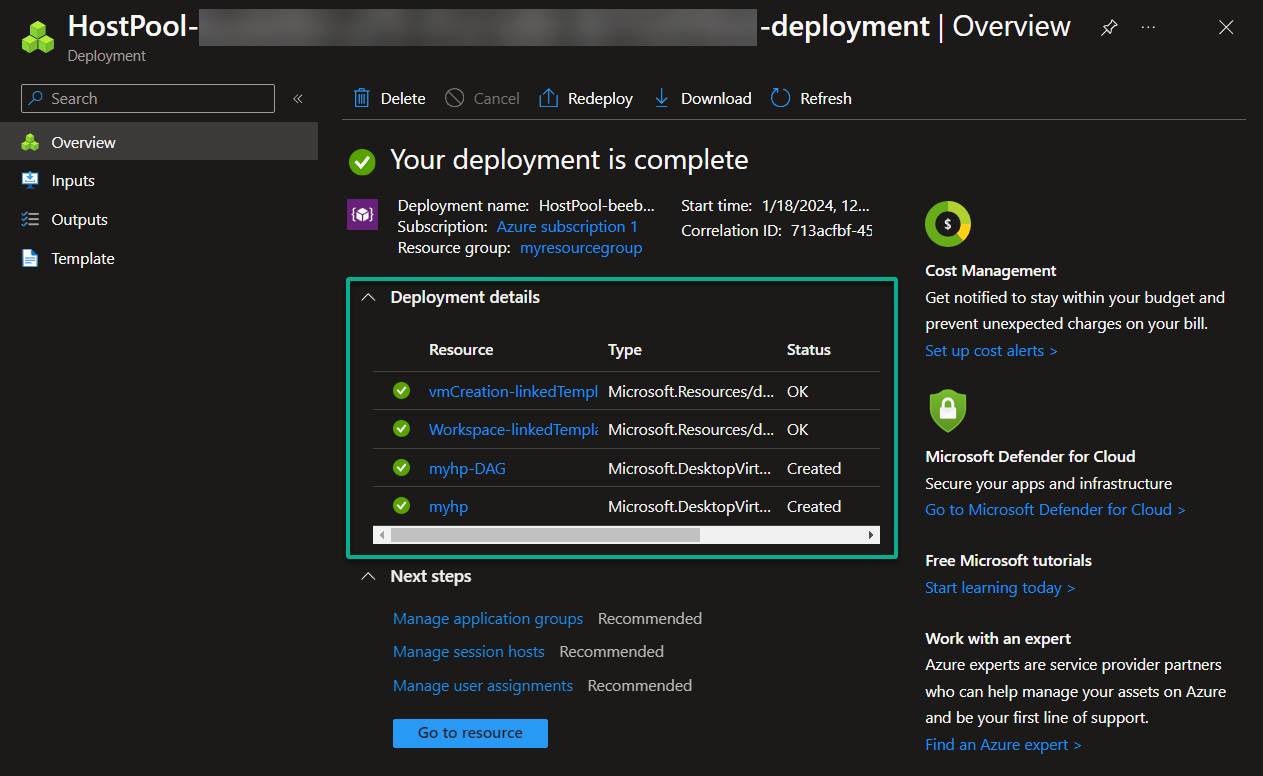
Deployment will take time to complete. Once done, you’ll see the following output with the deployment details showing the resources created, as shown below.
Verifying the Session Host VM Deployment
After deploying your AVD, you might wonder, “Did everything come together seamlessly?” Well, fear not! You’re about to verify your session host VM deployment from your host pool.
To verify your deployment, follow these steps:
1. On the Azure Portal, navigate to the Azure Virtual Desktop page.
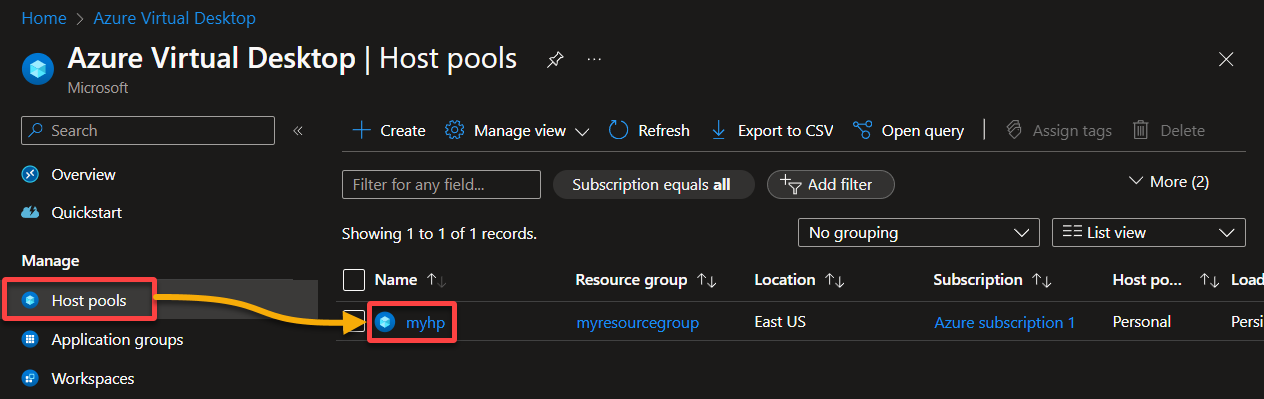
2. Navigate to Host pools (left pane), and click your personal host pool’s name (myhp) from the list, as shown below, to access its overview page (step three).
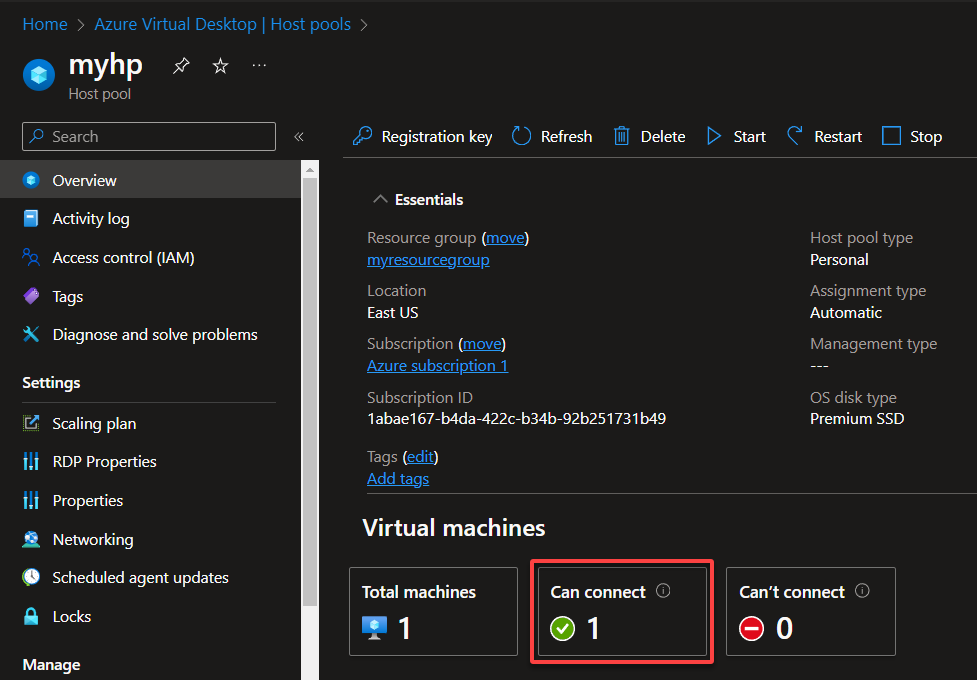
3. Now, confirm the Can connect status under Virtual machine is set to 1, and click on it to view more details about the session host VM.
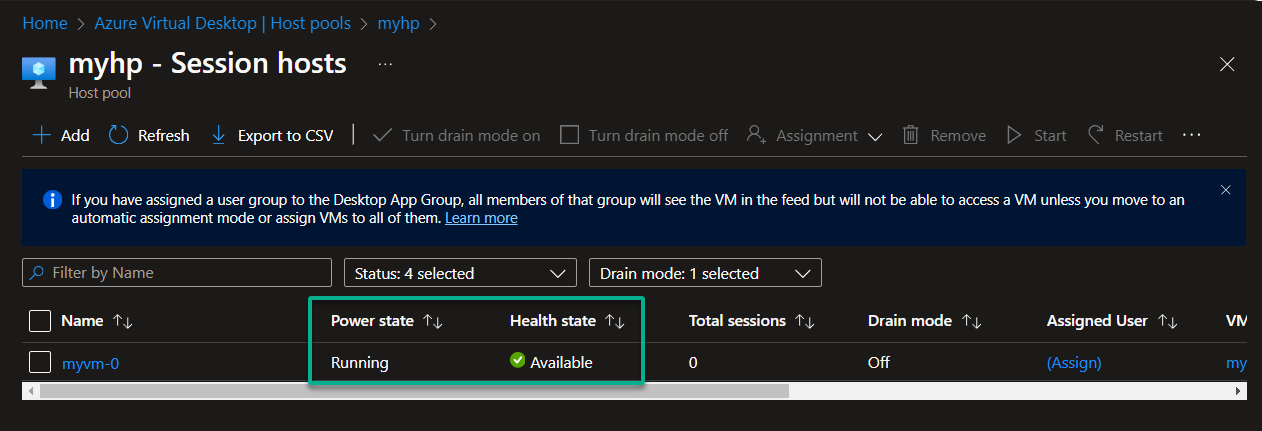
Notice a properly configured session host VM shows a Health state of Available and a Power state of Running, as shown below. These indicators confirm that the session host VM is operational and ready for user connections.
Enabling the Remote Desktop Protocol (RDP)
As you revel in the success of verifying your session host VM deployment, you now shift focus to a pivotal aspect that unlocks the full potential of your AVD environment.
Like a digital mayor, you’ll enable seamless remote access to your AVD, ensuring your citizens can access their virtual office.
To enable RDP in your AVD, perform the following:
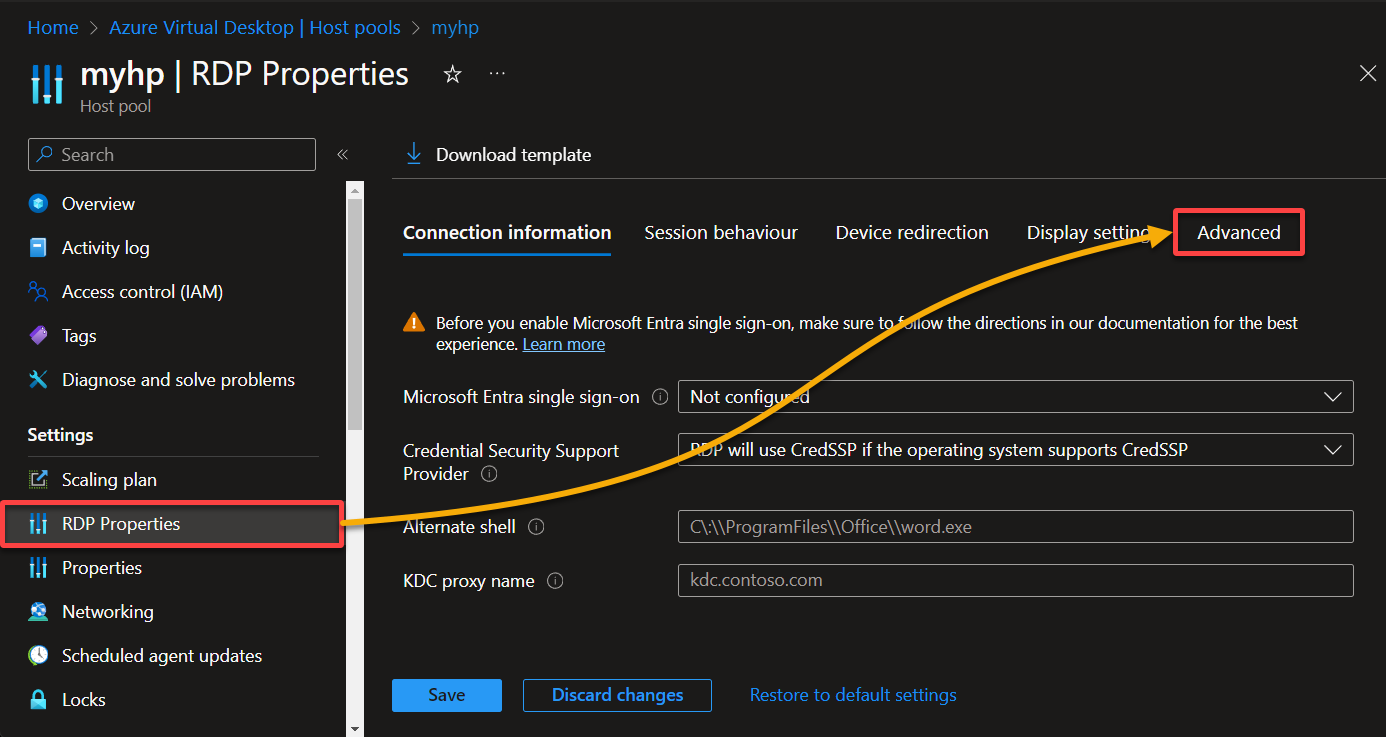
Switch back to your host pool’s (myhp) page, navigate to RDP Properties (left pane), and click the Advanced tab to access your host pool’s advanced RDP properties.
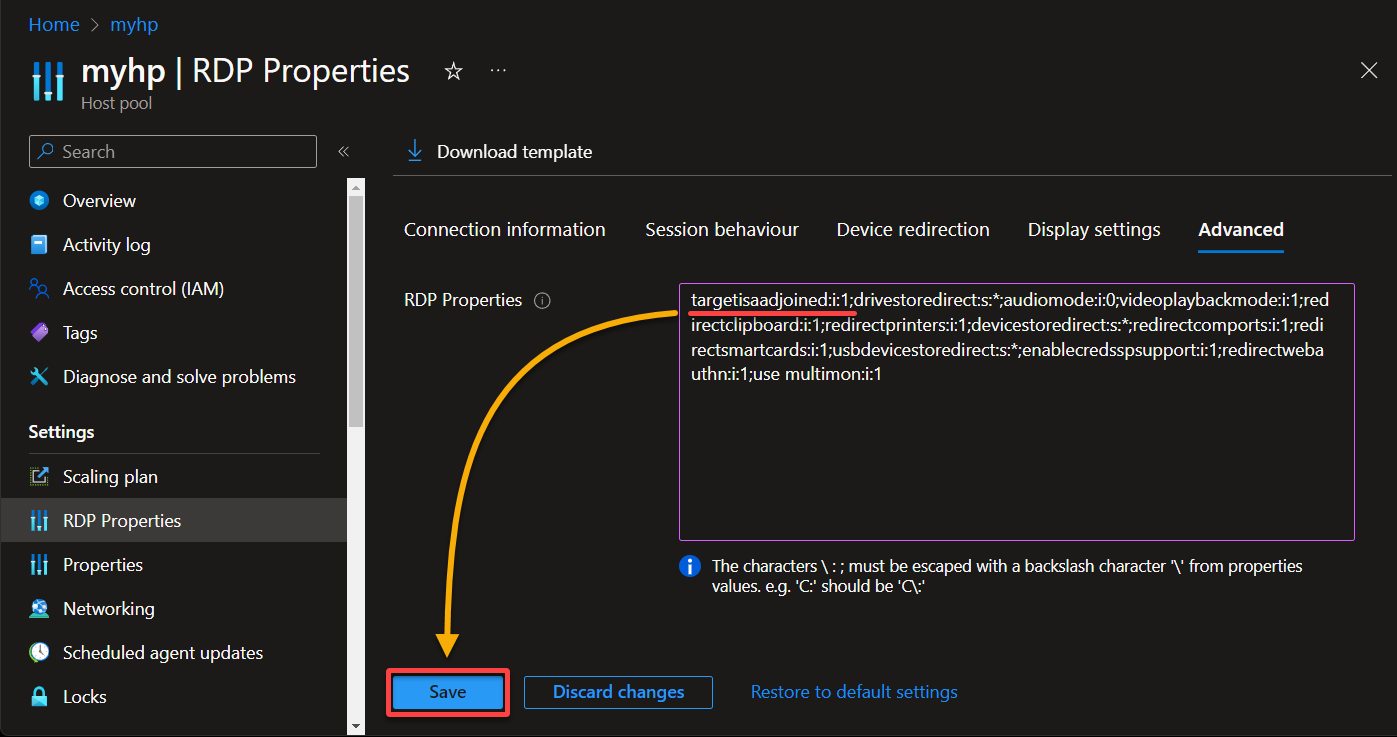
Now, prepend targetisaadjoined:i:1; to the existing instructions in the RDP Properties field.
This parameter configures how the RDP client interacts with AVD, with the following breakdown:
- The
targetisaadjoined:refers to the target machine, implying the virtual machine or session host in Azure Virtual Desktop. - The
istands for an integer, and1is the value assigned to this parameter. In this configuration,1is “true” or “enabled.”
Once configured, click Save to save your changes to the RDP properties.
Assigning Users to the Application Group
After ensuring RDP is enabled, and your session host VM is fit for occupation, you must configure who gets to access the workspace. You’ll assign a user to an application group, like handing out keys to a trustworthy person.
Imagine application groups as community centers in a district where people can access different services. Application groups are collections of applications available to users within the workspace.
To assign a user to an application group, proceed with the following:
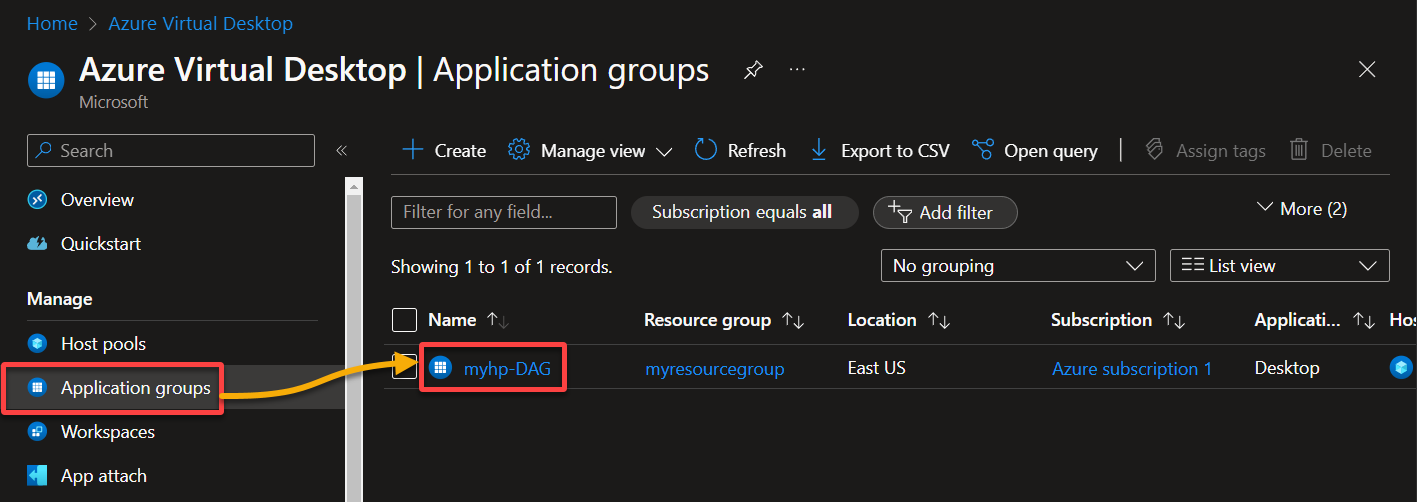
1. On the AVD page, navigate to Application groups (left pane), and click your application group’s name (myhp-DAG) to access its details page (step two).
This application group is automatically created during deploying an AVD.
💡 Note that you can have one group for financial apps, another for creative software, and so on. This feature enables a tailored approach to your virtual desktop environment, allowing each team to access only the applications relevant to their roles.
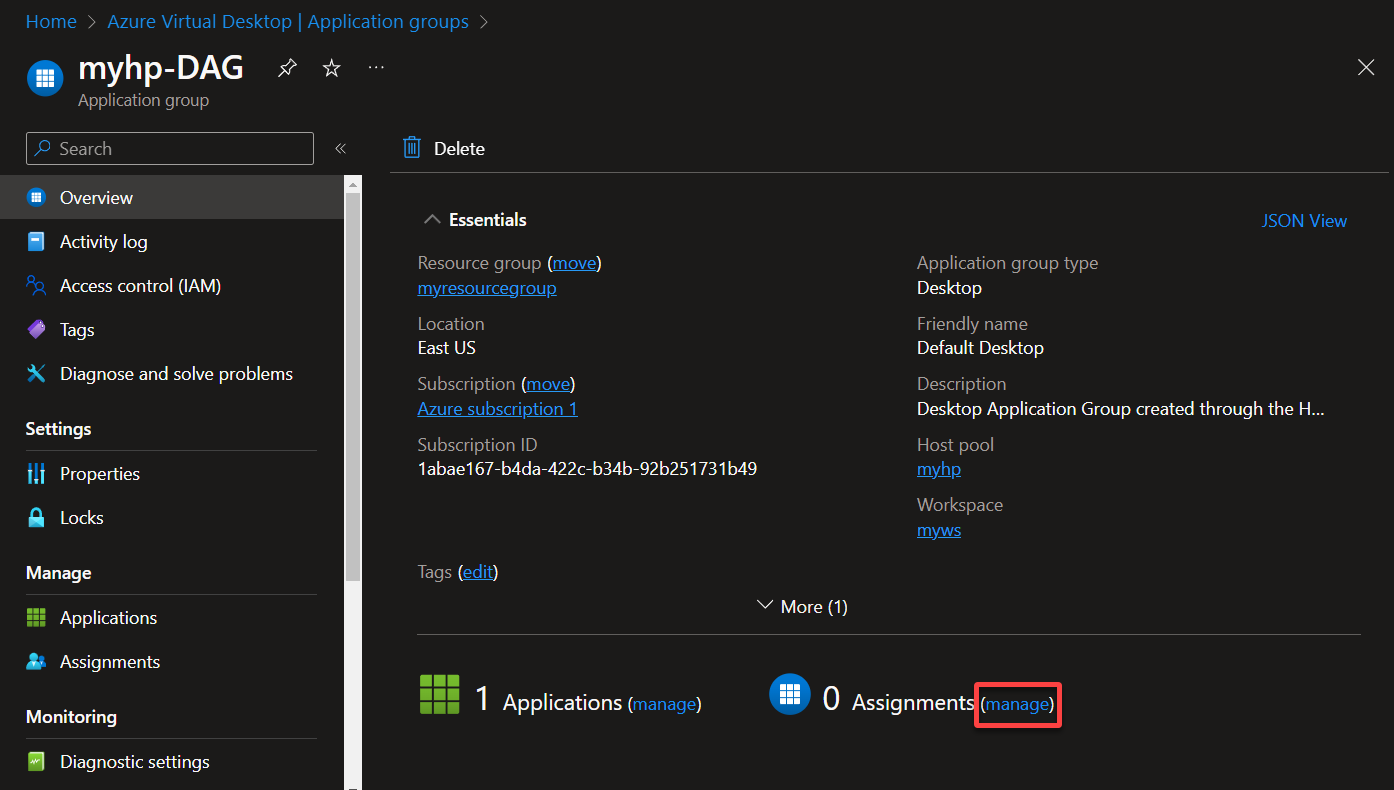
2. Next, click manage next to Assignments, as shown below, to access the application group’s dashboard.
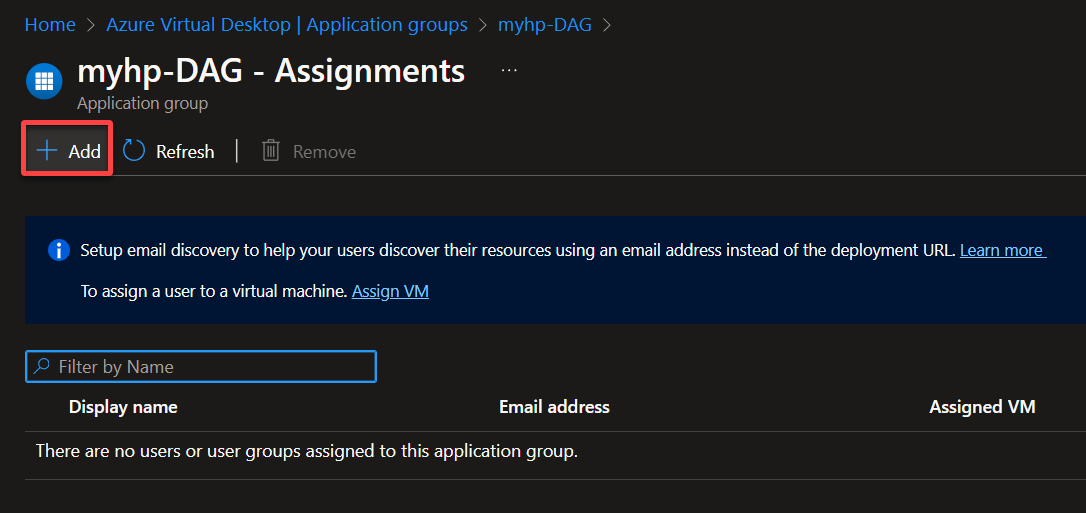
3. Click Add on your application group’s (myhp-DAG) page to initiate adding a new user.
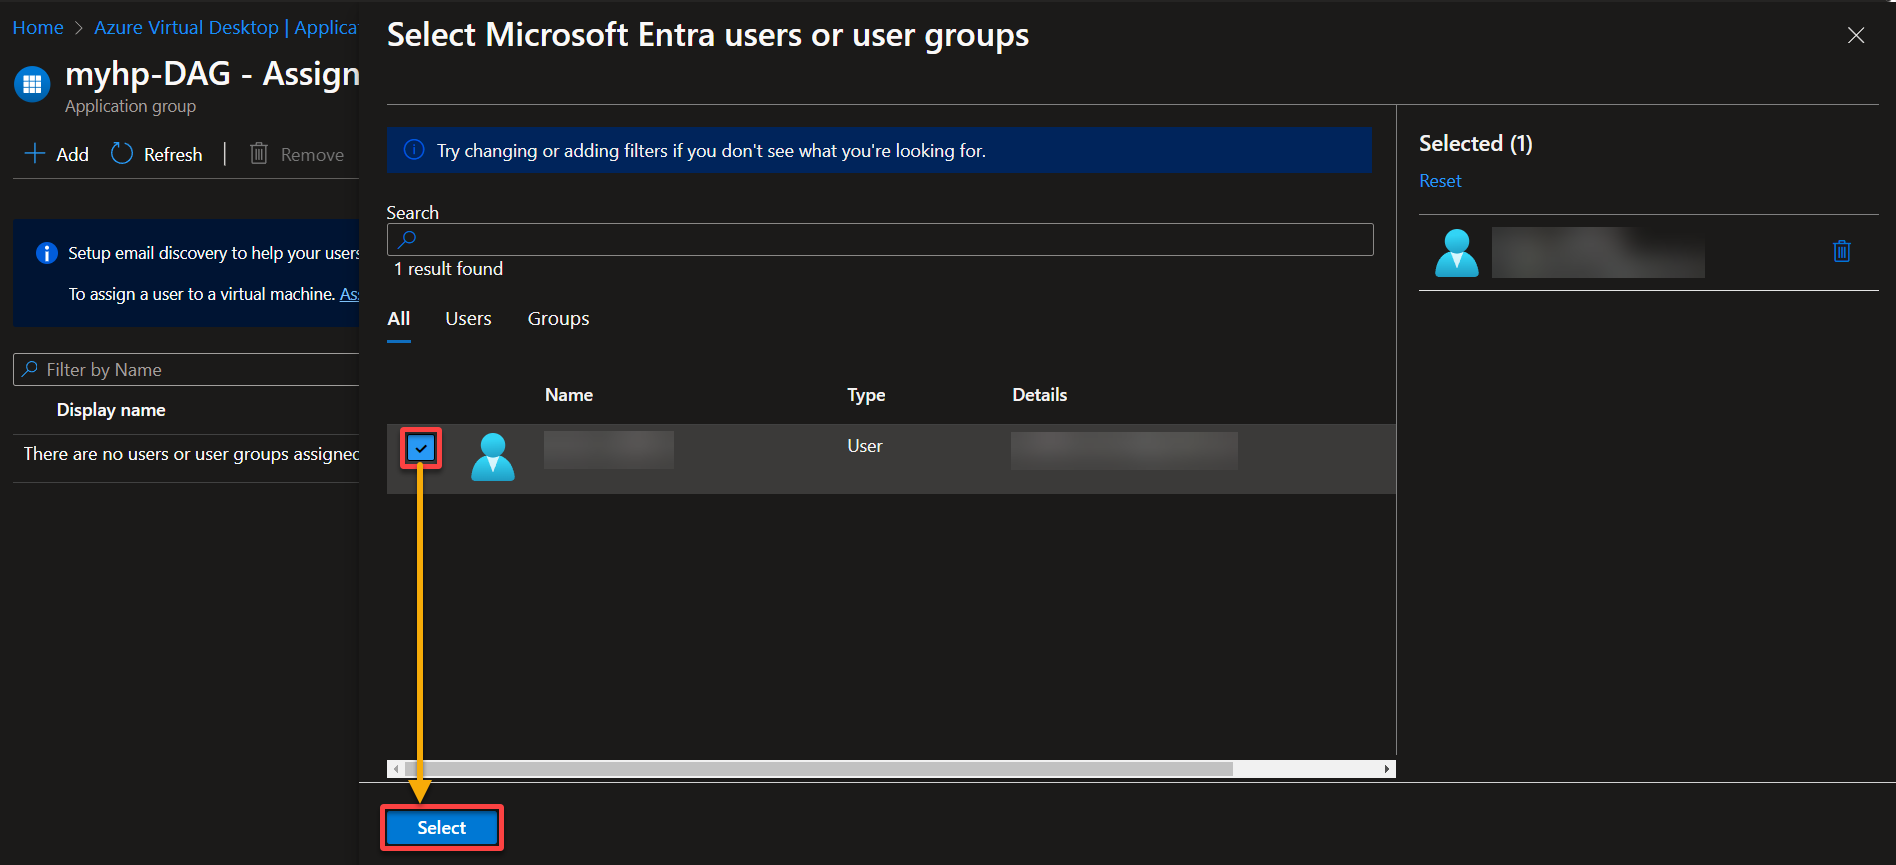
4. Now, select the desired user to add to your application group from the sidebar that appears, and click Select.
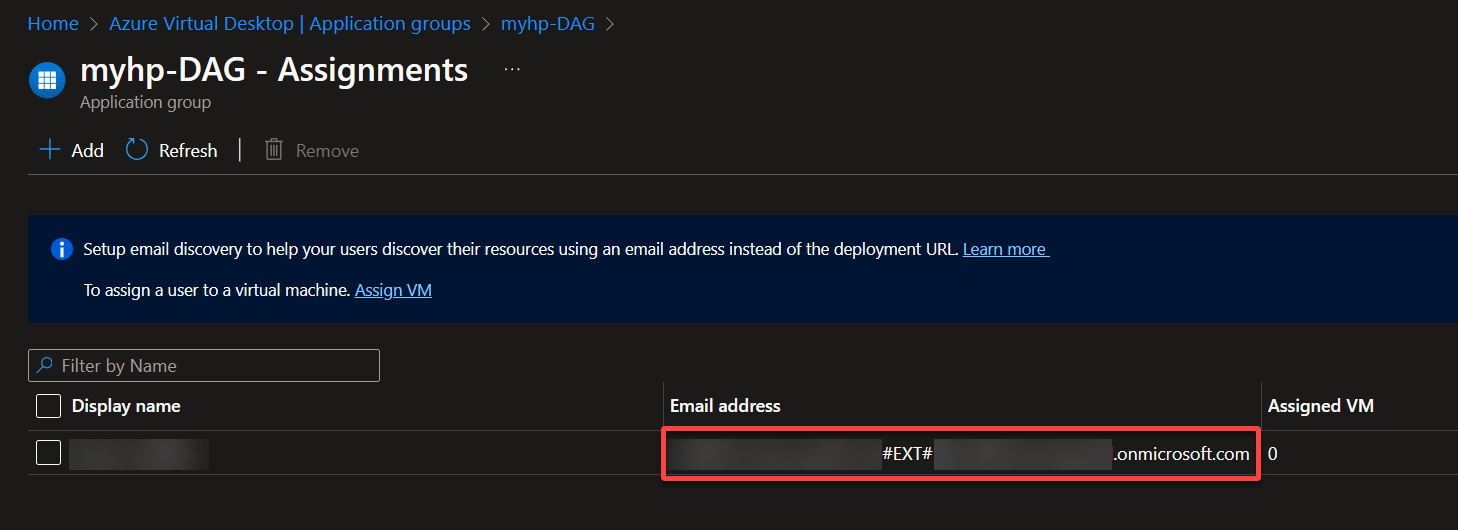
5. Once added, copy the user’s email address, which is crucial for future access to the virtual desktop environment.
Accessing the AVD via the Remote Desktop Client
With a fine-tuned AVD experience, you must test that the workspace is “just a click away.” You’ll access the workspace via the Remote Desktop Client, so ensure you have the user’s email address ready.
To remotely access your AVD, proceed with these steps:
1. Launch the Remote Desktop Client on a user’s device.
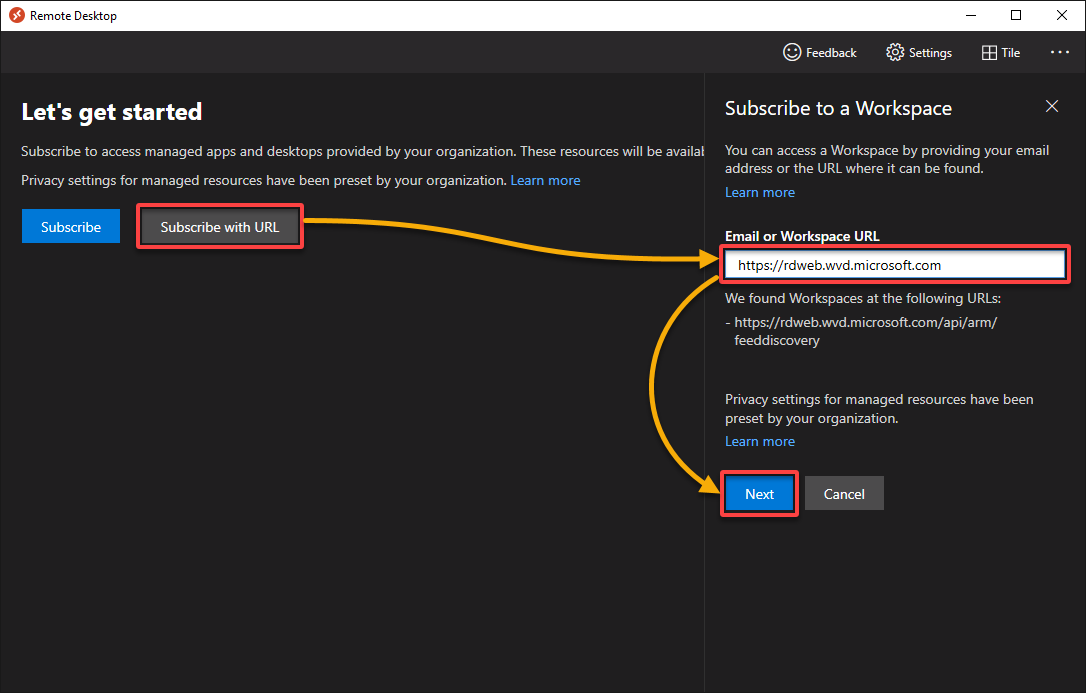
2. Next, select Subscribe with URL at the main screen, enter https://rdweb.wvd.microsoft.com into the URL field, and click Next to start the connection process.
This URL connects users to the Remote Desktop Web (RDWeb) access portal, an integral part of AVD, facilitating access to virtual desktops and applications.
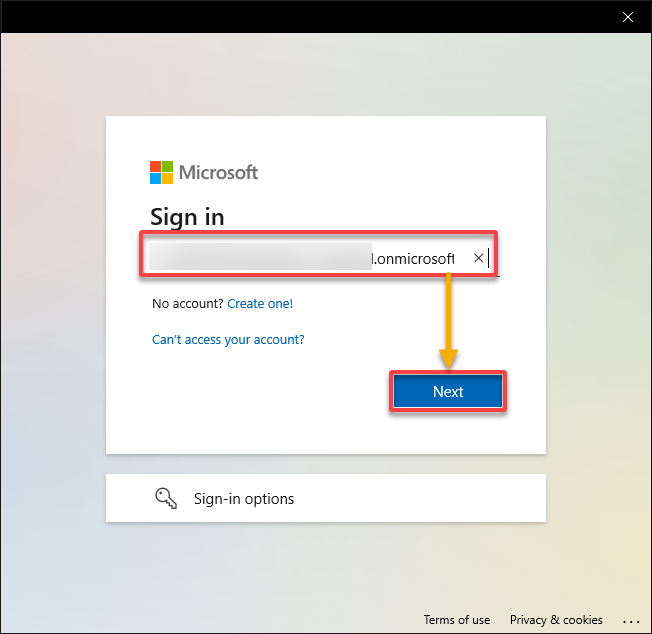
3. When prompted, input the user’s email address and click Next to proceed.
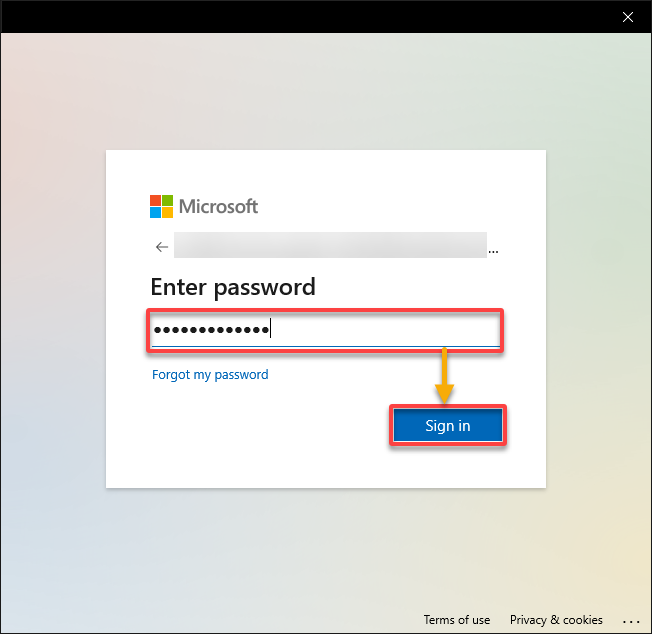
4. Input the user’s password and click Sign in to sign in to the workspace.
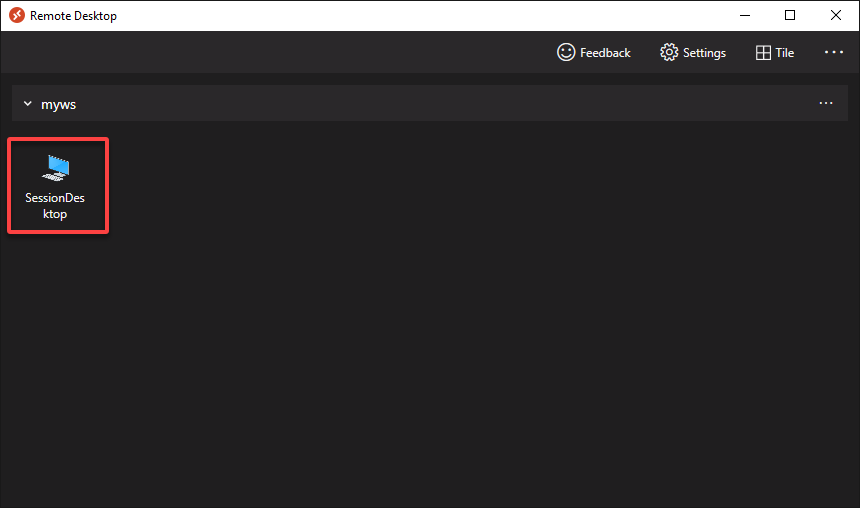
5. Now, double-click SessionDesktop to connect to the session host VM designated for the logged-in user.
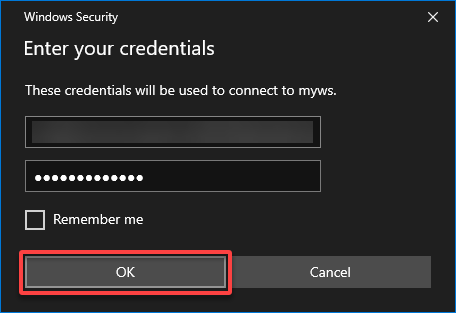
6. Finally, input the user’s password again to authenticate the connection.
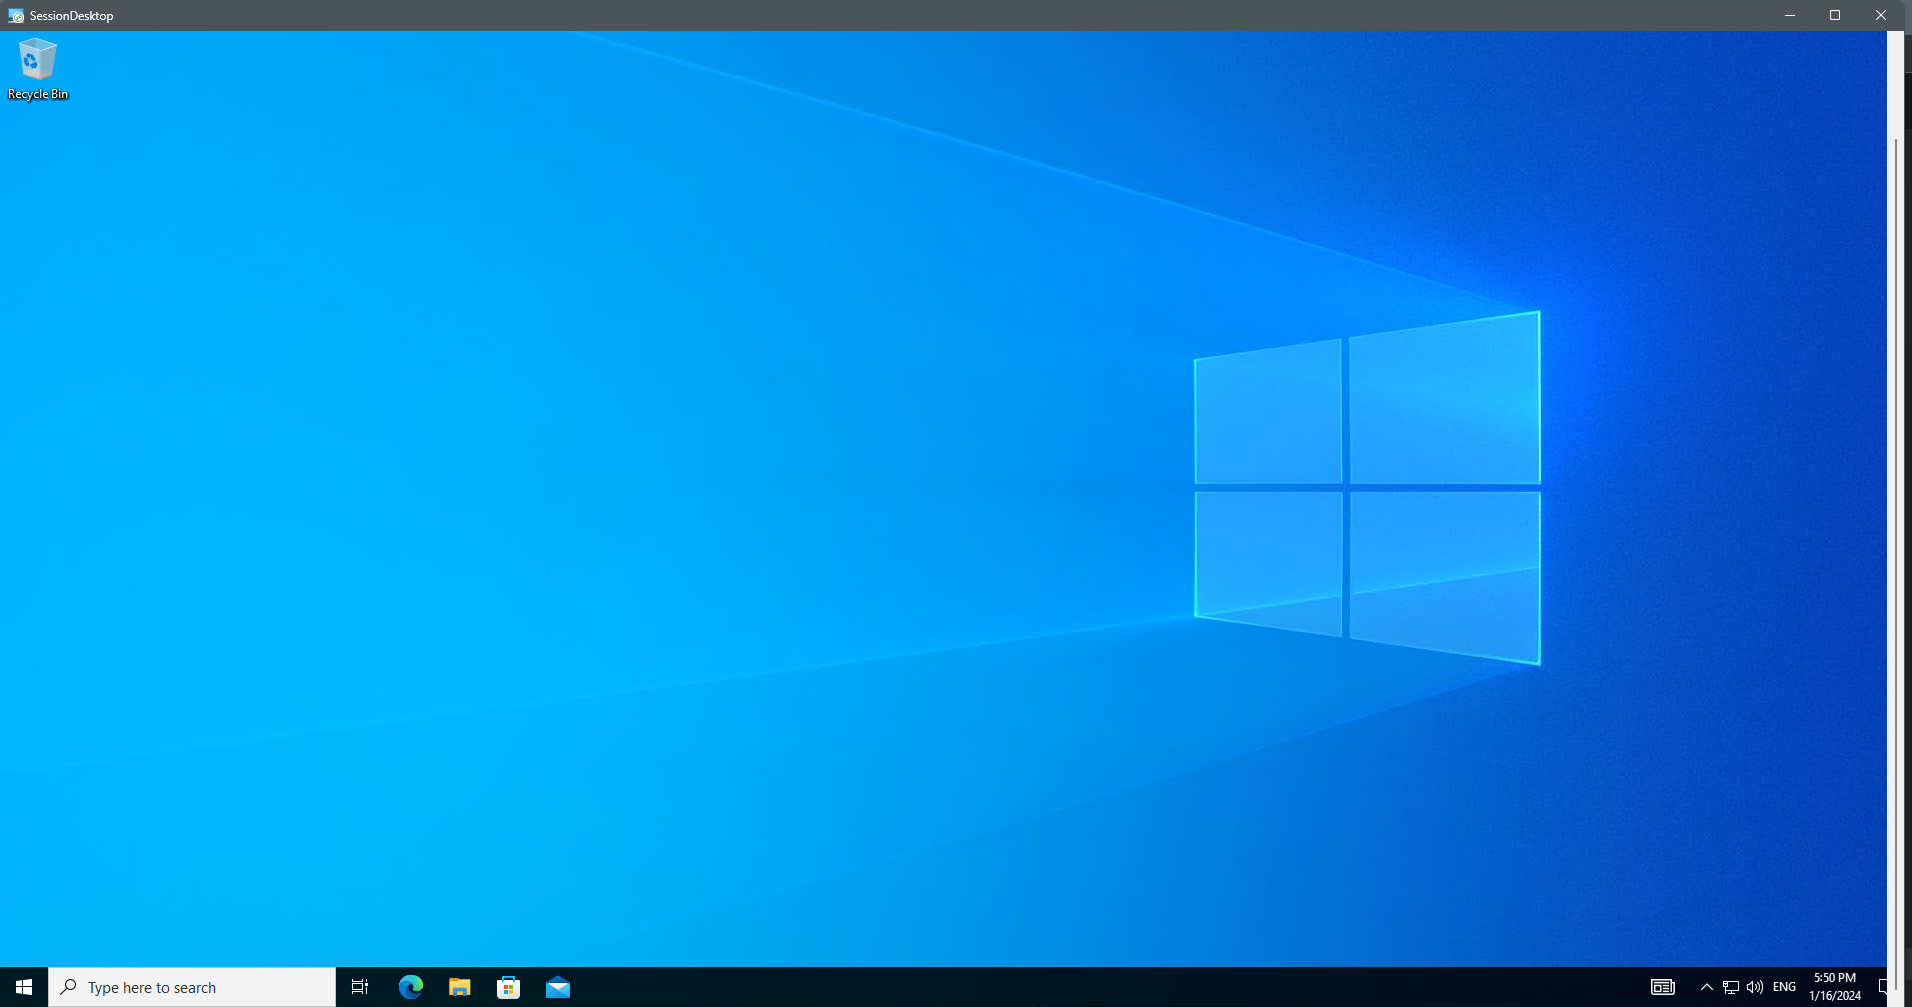
If all goes well, the user can access an AVD session, as shown below, and commence their tasks.
Conclusion
You’ve embarked on transforming your workspace with Azure Virtual Desktop. You’ve mastered setting up a virtual network, verifying your session host VM deployment, and assigning users to application groups.
Your virtual desktop is now primed for remote access, allowing you and your team to collaborate seamlessly from anywhere. But moving forward, why not explore advanced configurations, such as fine-tuning access controls and customizing user experiences with more application groups?
Remember, just like how a city requires maintenance and upkeep, so does your virtual desktop environment. Stay on top of updates and watch performance to ensure your citizens are happy and productive in their virtual environment!