


How often have you deployed the same Virtual Networks, Network Security Groups (NSGs), and virtual machines (VMs)? Every time, you may say now is the time to automate the process. Instead of putting this off, learn how to automate and save time in the long run.
The first in a series, this article about Automating Azure Resource Deployments on creating a virtual machine, adding a networking configuration, and deploying a PowerShell script internally to the Windows system.
Prerequisites
With the Az module installed, you need an Azure Subscription capable of deploying resources and access to PowerShell. Here, PowerShell 7.3.7 and a recent version of Visual Studio Code are used to demonstrate and run the code examples.
Finding the Right Image
Before deploying a VM, you must connect PowerShell to Azure and locate the right resources to deploy. After setting your Tenant ID, import the Az module and run the Connect-AzAccount cmdlet to authenticate your Azure subscription.
# Fake Tenant ID for Demonstration Purposes
$TenantID = "8761672b-bb1e-4b60-a9bd-e11e9ddc3001"

Import-Module -Name 'Az'
Connect-AzAccount -Tenant $TenantID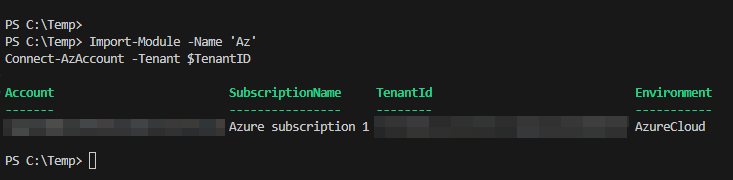
Once authenticated, you can run subsequent commands without re-authenticating for each. Of course, you may know the name of the VM OS to deploy, such as Windows 2022, but what is the actual representation in the code?
Thankfully, Azure offers a few different cmdlets that, when chained together, help you to narrow down the OS to assign to the VM.
1. First, you need to find the available Publishers in the given region. Here, East US is used. For that, you will use Get-AzVMImagePublisher with a location. To narrow the many results returned down, first find all of the publisher names with Microsoft and then from that list, only those with Server in the name. The end target is the MicrosoftWindowsServer publisher.
Get-AzVMImagePublisher -Location "East US"
  | Select-Object -Property 'PublisherName'
  | Where-Object PublisherName -Match 'Microsoft'
  | Where-Object PublisherName -Match 'Server'
  | Sort-Object PublisherName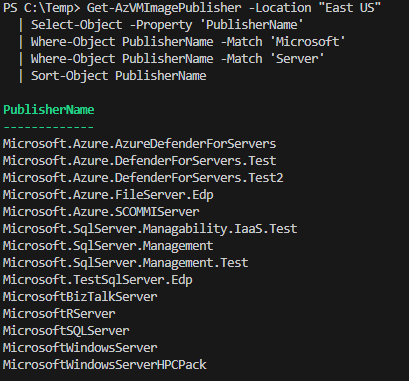
2. With the Publisher narrowed down, you next find the Image Offers under the MicrosoftWindowsServer publisher. From the Get-AzVMImageOffer results, you need the WindowsServer offer.
Get-AzVMImageOffer -Location "East US" -PublisherName 'MicrosoftWindowsServer'
  | Select-Object Offer
  | Sort-Object Offer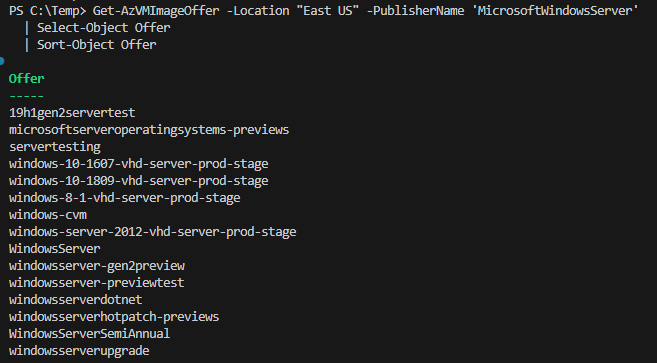
3. For this example, the latest iteration of Windows Server, 2022, would be ideal. With the Get-AzVMImageSku cmdlet, limit the returned Skus to 2022 only.
Get-AzVMImageSku -Location "East US" -PublisherName 'MicrosoftWindowsServer' -Offer 'WindowsServer'
  | Where-Object Skus -Match '2022'
  | Select-Object Skus
  | Sort-Object Skus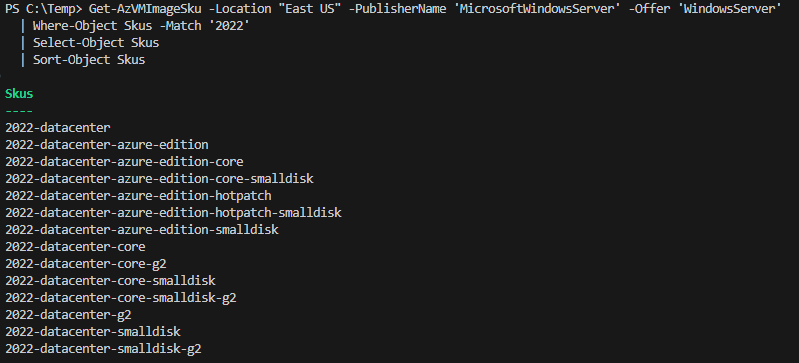
4. To finally locate the proper image to use, as several versions may exist, use everything learned to run the Get-AzImage cmdlet and locate exactly what to run. With the many returned images, what if you just wanted to use the most recent? You can use the Latest version tag to target the most recent, as shown later when setting the Source Image for the VM.
Get-AzVMImage -Location "East US" -PublisherName 'MicrosoftWindowsServer' -Offer 'WindowsServer' -Sku '2022-datacenter'
  | Select-Object Version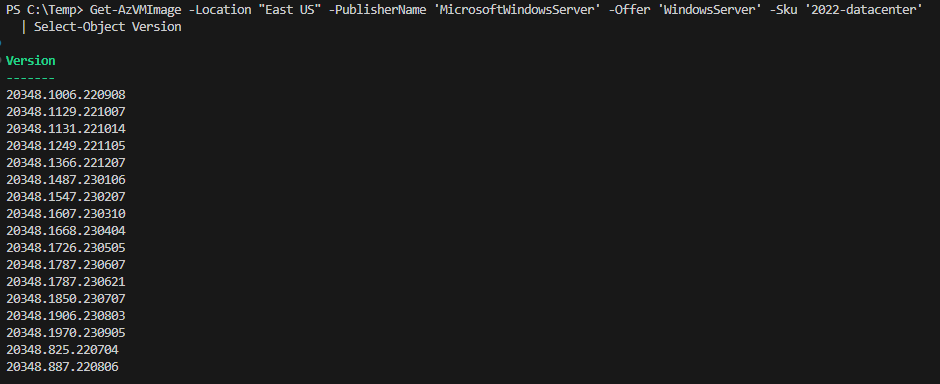
Setting up the Environment
Before you can jump into deploying the VMs, you need a Resource Group. You may already have one, but if you don’t, then the New-AzResourceGroup makes quick work. Below is one strategy for setting up your Resource Groups.
In this code, a $DateTime variable is defined with a specific format to include in the name of the Resource Group itself. In addition, a $Prefix variable standardizes the calls with a common naming scheme. Lastly, the $Location variable is set to East US, where all the resources will be deployed.
$DateTime      = Get-Date -Format 'yyyyMMddHHmm'
$Prefix        = 'Test'
$Location      = 'East US'
$ResourceGroup = New-AzResourceGroup -Name ("{0}-{1}" -F $Prefix, $DateTime) -Location $Location

You may want to jump right into deploying the VM, but you need a Virtual Network before you can do that. Below, you are using much of what you have already learned. Passing the saved $ResourceGroup variable, specifically its ResourceGroupName property, and setting the Virtual Network name using the same scheme as before with the New-AzVirtualNetwork.
Three crucial parameters are the AddressPrefix, DNSServer, and subnet Name. The address prefix sets what IP space the Virtual Network will occupy. If the DNS Server is left alone, it will use the default Azure DNS configuration. The reason that it is set to 172.16.0.5 is that you will deploy an Active Directory (AD) server, and this will be the static IP of that VM. All other client VMs will then automatically use the AD server as their DNS server.
$Params = @{
  Name              = ("{0}-{1}-vnet" -F $Prefix, $DateTime)
  ResourceGroupName = $ResourceGroup.ResourceGroupName
  Location          = $Location
  AddressPrefix     = @('172.16.0.0/24')
  DNSServer         = '172.16.0.5'
  Subnet = @(
    New-AzVirtualNetworkSubnetConfig -Name 'Primary' -AddressPrefix '172.16.0.0/24'
  )
}

$VirtualNetwork = New-AzVirtualNetwork @Params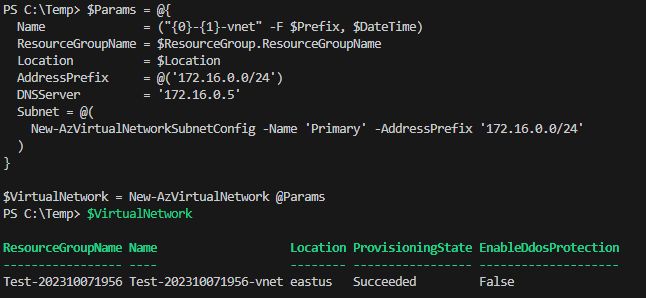
Deploying a Windows Server 2022 Virtual Machine
With the proper infrastructure, it’s time to deploy the VM! There are a few steps to make this work well. To allow you to remote into the VM, though not for configuration, you need to attach a Public IP.
💡 An alternative to opening up RDP ports is to use Azure Bastion, but this costs extra with additional setup steps.
Setting a Public IP
You must set a public IP to access this VM from outside Azure, without a solution such as Azure Bastion. With the following values, you are requesting a Static IP of the Regional type, and with the Standard SKU through the New-AzPublicIpAddress cmdlet.
$Params= @{
  Name              = ("{0}-{1}-ip" -F $Prefix, $DateTime)
  ResourceGroupName = $ResourceGroup.ResourceGroupName
  Location          = $Location
  Sku               = 'Standard' # Basic is deprecated
  AllocationMethod  = 'Static'
  IpAddressVersion  = 'IPv4'
  Tier              = 'Regional'
}

$VMDCPublicIP = New-AzPublicIpAddress @Params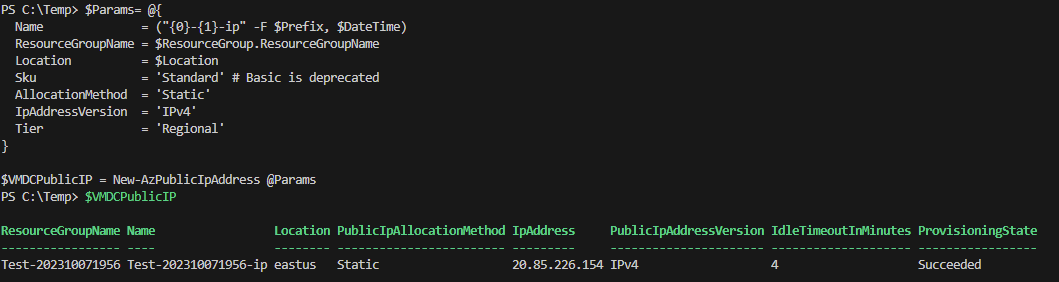
Creating the Network Security Group
Next, to control access to the VM, you need a network security group (NSG) that contains the necessary rules to control access. First, you must define the rules; here, a standard allow RDP (port 3309) rule is crafted.
The NSG is created with the SecurityRules provided in an array (though only one is provided here). Passing all this to the New-AzNetworkSecurityGroup creates the NSG and assigns the necessary rules.
$NSGRuleParam = @{
  Name                     = 'RDP'
  Description              = 'Allow RDP'
  Access                   = 'Allow'
  Protocol                 = 'Tcp'
  Direction                = 'Inbound'
  Priority                 = 100
  SourceAddressPrefix      = 'Internet'
  SourcePortRange          = '*'
  DestinationAddressPrefix = '*'
  DestinationPortRange     = 3389
}

$Params = @{
  Name              = ("{0}-{1}-nsg" -F $Prefix, $DateTime)
  ResourceGroupName = $ResourceGroup.ResourceGroupName
  Location          = $Location
  SecurityRules = @(
    New-AzNetworkSecurityRuleConfig @NSGRuleParam
  )
}

$VMDCNSG = New-AzNetworkSecurityGroup @Params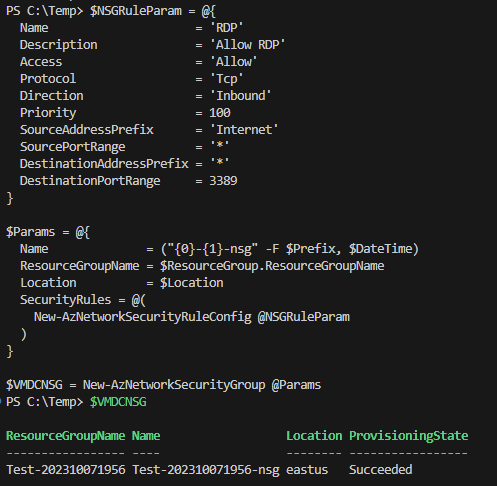
Creating the Network Interface
Pulling all of the networking together is the New-AzNetworkInterface cmdlet. The VM needs an IP configuration that is defined via the New-AzNetworkInterfaceIpConfig that takes the Public IP address you previously requested, a static IP (which is the 172.16.0.5 also used for the DNS of the Virtual Network), and a subnet that is retrieved from the Get-AzVirtualNetworkSubnetConfig.
$NetworkIPParams = @{
  Name             = 'ipconfig1'
  PublicIpAddress  = $VMDCPublicIP
  PrivateIpAddress = '172.16.0.5'
  Primary          = $True
  Subnet           = (Get-AzVirtualNetworkSubnetConfig -Name 'Primary' -VirtualNetwork $VirtualNetwork)
}

$Params = @{
  Name                 = ("{0}-{1}-nic" -F $Prefix,$DateTime)
  ResourceGroupName    = $ResourceGroup.ResourceGroupName
  Location             = $Location
  NetworkSecurityGroup = $VMDCNSG
  IpConfiguration   = @(
    New-AzNetworkInterfaceIpConfig @NetworkIPParams
  )
}

$VMDCNIC = New-AzNetworkInterface @Params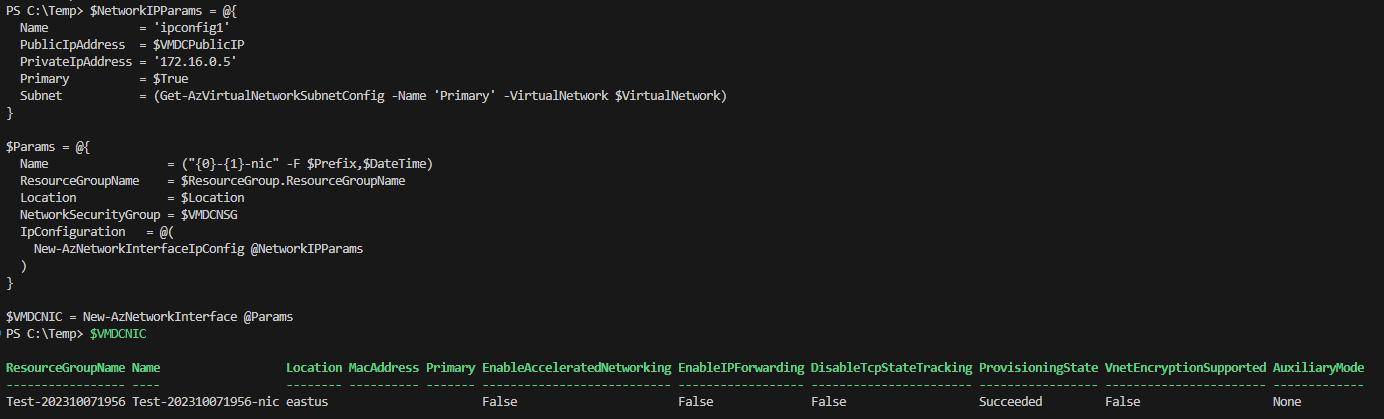
Deploying the VM
With everything in place, it’s time to deploy the virtual machine. You must first define the VM characteristics through the New-AzVMConfig cmdlet, which initially defines the name and size of the VM.
Set-AzVMSourceImage– Use the values you previously figured out to set the OS.Set-AzVMOperatingSystem– This sets certain values for the given OS, in this case Windows, and sets the Admin password.Add-AzVMNetworkInterface– This sets the networking that was previously defined.
Run the New-AzVM with all values passed in to start deploying the VM.
$DateTimeComputer     = Get-Date -Format 'yyMMddHH'
$VMLocalAdminUser     = "AdminUser"
$VMLocalAdminPassword = ConvertTo-SecureString "as@!!AW34r3323" -AsPlainText -Force
$VMSize               = 'Standard_B2ms'

$Params = @{
  VMName = ("{0}-{1}" -F $Prefix, $DateTimeComputer)
  VMSize = $VMSize
}

$VMDCConfig = New-AzVMConfig @Params

$VMDCConfig | Set-AzVMSourceImage -PublisherName 'MicrosoftWindowsServer' -Offer 'WindowsServer' -Sku '2022-datacenter' -Version 'Latest' | Out-Null
$VMDCConfig | Set-AzVMOperatingSystem -Windows -ComputerName ("{0}-{1}" -F $Prefix, $DateTimeComputer) -Credential (New-Object System.Management.Automation.PSCredential ($VMLocalAdminUser, $VMLocalAdminPassword)) -ProvisionVMAgent -EnableAutoUpdate | Out-Null
$VMDCConfig | Add-AzVMNetworkInterface -Id $VMDCNIC.Id | Out-Null

$Params = @{
  ResourceGroupName = $ResourceGroup.ResourceGroupName
  Location          = $Location
  VM                = $VMDCConfig
}

New-AzVm @Params | Out-Null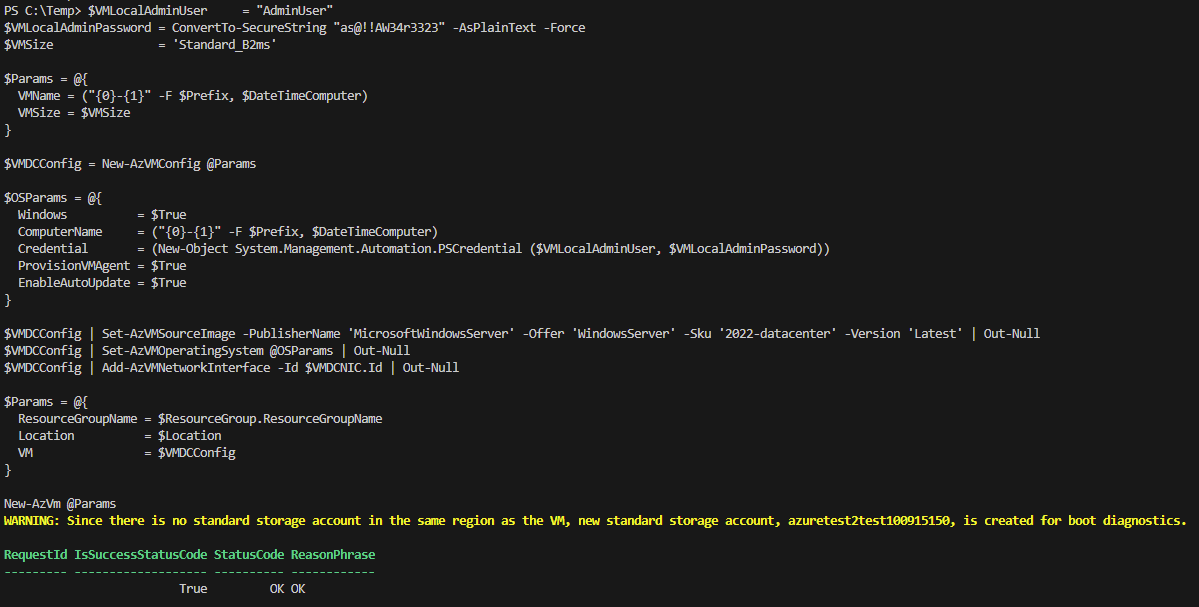
💡 Don’t need to see those breaking change notices? Turn them off with
Update-AzConfig -DisplayBreakingChangeWarning $False.
Installing Active Directory Domain Services
Now that you have a new VM, it’s time to get it configured with domain services. In the past, you may have opened a remote desktop connection to the system and navigated through the GUI to install the domain services. There is a better way!
The Set-AzRuncommand runs PowerShell scripts using the Azure Agent installed on the Windows system. You can use this to automate installation procedures from one controlling script instead of manually copying and running scripts from the inside.
The Set-AzVMRunCommand runs a script against a VM using the Azure Agent, which requires explicit targeting of the Resource Group, VM Name, and Location. Give the command a name, and you can set the cmdlet to NoWait, which starts the script and returns control to the host.
You may notice the ProtectedParameter array parameter. Given a series of hashtables, this will pass a SecureString value to the script with the given variable name ($Password). The script will show the variable as a type of String, but this is an encapsulated SecureString within a String.
Finally, why not use the ScriptLocalPath parameter? If used, each line is concatenated. Though this can be mitigated by adding semicolons to each line, it’s imperfect. With the below method, grab the file content and pass this to the cmdlet, without needing special formatting.
$Params = @{
  ResourceGroupName  = $ResourceGroup.ResourceGroupName
  VMName             = ("{0}-{1}" -F $Prefix, $DateTimeComputer)
  RunCommandName     = 'DCStep1'
  Location           = $Location
  SourceScript       = (Get-Content -Path 'C:\\Temp\\script_dc_step1.ps1' | Out-String)
  NoWait             = $True
  ProtectedParameter = @(
    @{
      Name  = 'Password'
      Value = $VMLocalAdminPassword # Provide a SecureString shows as type String in script (SecureString encapsulated)
    }
  )
}

Set-AzVMRunCommand @Params | Out-Null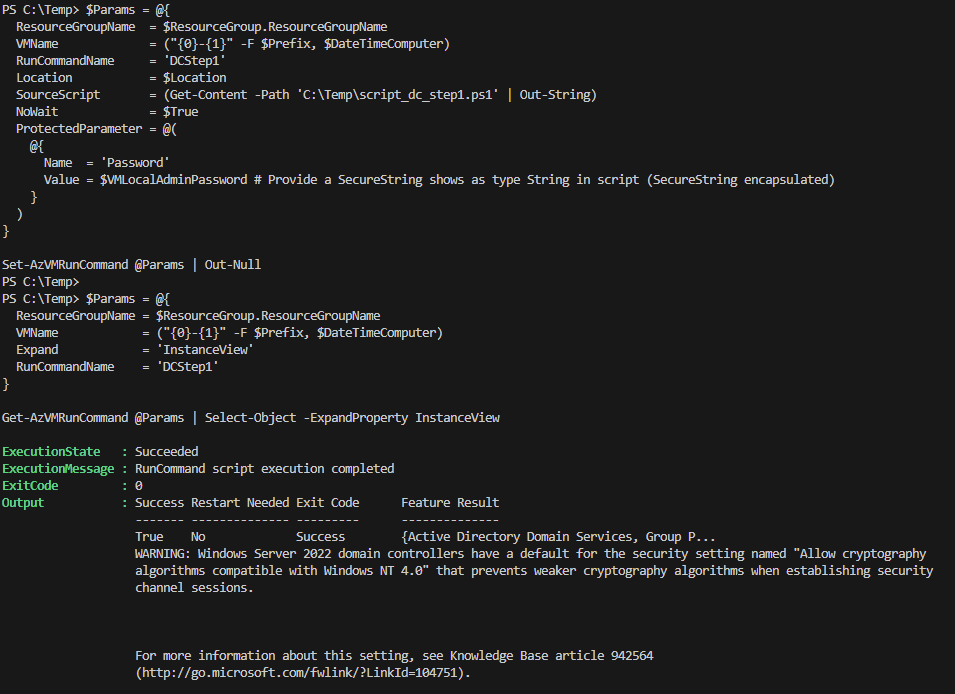
So what is in the actual script? The script shown below takes in a $Password parameter, sent from the ProtectedParameter array parameter (you can use the regular Parameter array for non-protected values). Next, the $Password is re-encrypted from an encapsulated SecureString to a proper SecureString for use with other cmdlets. After this, by installing the AD-Domain-Services tools and running Install-ADDSForest will provision a domain.
Param(
  $Password
)

$EncryptedPassword = ConvertTo-SecureString -String $Password -Force -AsPlainText

Install-WindowsFeature 'AD-Domain-Services' -IncludeManagementTools

$Params = @{
  DomainMode                    = 'WinThreshold'
  DomainName                    = "domain.local"
  ForestMode                    = 'WinThreshold'
  SafeModeAdministratorPassword = $EncryptedPassword
}

Install-ADDSForest @Params -Confirm:$False
Next Steps in Part Two of Automating Azure Virtual Machines
Next time you will learn how to configure certificate services, LDAPS, and provision accounts for testing. In the third part of the series, provision another Server VM and install SQL Services. By the end you will have all the tools you need to automate Azure environment deployments.


