

As an administrator of Active Directory (AD), you’re probably managing users, computers, and organizational units (OUs) most of the time. Less frequently, you will need to manage Active Directory sites. But when you need to use the command line or automate AD site creation, PowerShell is a must.
Not a reader? Watch this related video tutorial!In this tutorial, you will learn how to manage AD sites using PowerShell, so you never have to open a Windows MMC ever again!
Prerequisites
This tutorial will have various demos. To follow along, be sure you have the following:
- Windows PowerShell v5.1 or greater – This tutorial will PowerShell 5.1.
- An AD domain – The examples will use a Windows Server 2019 domain controller (DC), but the commands will work for any version.
- A domain-joined Windows 10 machine logged in as an AD user part of the Enterprise Admins group.
- Remote Server Administration Tools (RSAT) installed on the AD-joined computer.
Inspecting Active Directory Sites, Links, and Subnets with PowerShell
Let’s kick off this tutorial by first getting a lay of the land and inspecting what AD sites your environment has to work with.
Assuming you’re on a domain-joined Windows PC with the ActiveDirectory PowerShell module installed, open PowerShell to get started.
Active Directory Sites
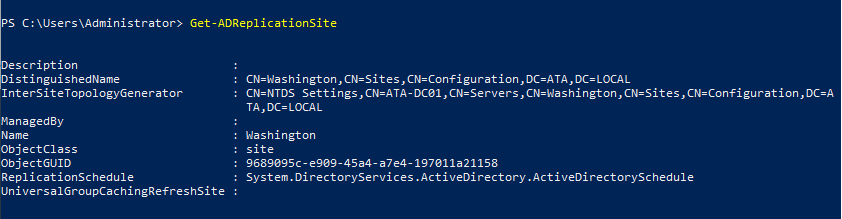
1. Run the Get-AdReplicationSite cmdlet with no parameters. PowerShell will return the Active Directory site the computer you’re running the command from is in. In the screenshot below, the computer running Get-ADReplicationSite is in the Washington site.
To find all of the PowerShell commands to work with AD sites, run
Get-Command "*ADReplication*".
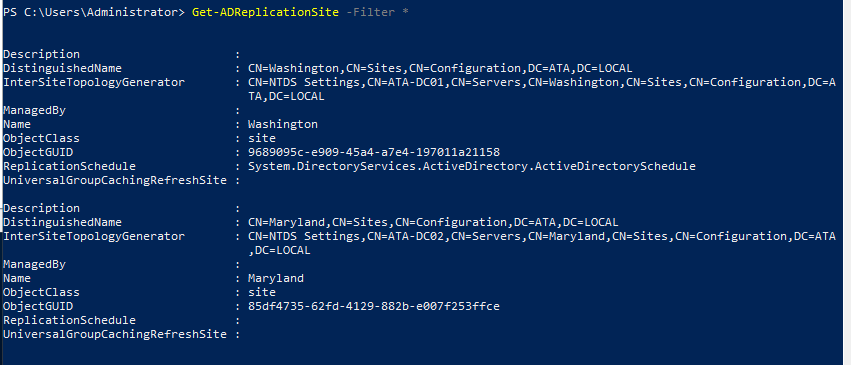
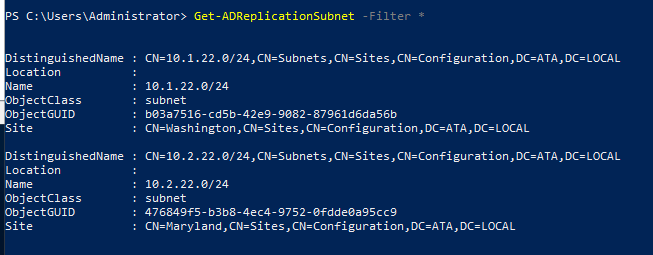
2. To find all Active Directory sites for the entire domain, run Get-AdReplicationSite using the Filter parameter and an asterisk (*).
The
Filterparameter allows you to filter sites in many different ways. For more information on how to build queries for theFilterparameter, run the commandGet-Help about_ActiveDirectory_Filter.
Active Directory Site Links
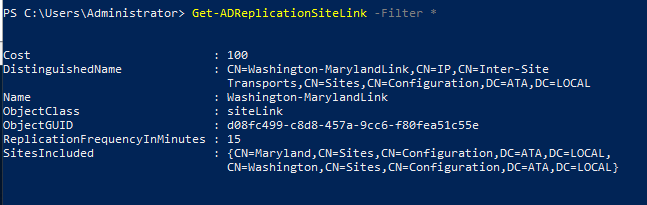
To find AD site links, the process is nearly identical to finding sites; just invoke the Get-ADReplicationSiteLink command instead. But, unlike the Get-ADReplicationSite command, the Get-ADReplicationSiteLink command requires you to specify the Filter parameter.
You can see below the tutorial environment has a single link called Washington-MarylandLink linking the Maryland and Washington sites.
Active Directory Subnets
Finally, you can find the subnets with the Get-ADReplicationSubnet command, the same as inspecting Active Directory sites and links.
Creating Active Directory Sites
Now that you know how to view existing AD sites, let’s jump into a demo on creating new sites with PowerShell. An AD site consists of three components, all of which you can create with PowerShell:
- The site
- One or more subnets in the site
- A replication link
To set up a new AD site assuming you still have PowerShell open:
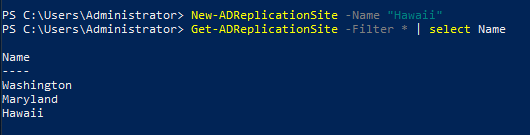
1. Create the new AD site using the New-ADReplicationSite command and providing the Name. The command below creates a site named Hawaii.
New-ADReplicationSite -Name "Hawaii"2. Confirm you’ve created the site by running Get-ADReplicationSite using the Filter parameter to find all sites.
To limit output, the example below is piping output from
Get-AdReplicationSiteto theSelect-Objectcmdlet to only display theNameproperty.
Get-AdReplicationSite Filter * | Select NameYou can see below; the tutorial environment has three sites available; Washington, Maryland, and Hawaii.
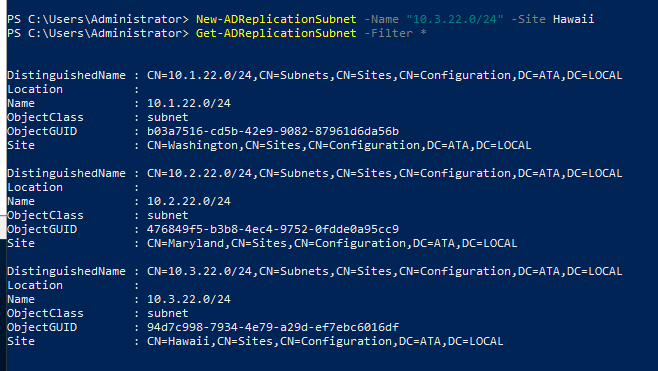
3. Next, create a subnet and assign it to the site with the New-ADReplicationSubnet command providing the Name/network in CIDR notation followed by the Site name. The below command is creating a subnet for the 10.3.22.0/24 network attached to the Hawaii site.
New-ADReplicationSubnet -Name "10.3.22.0/24" -Site HawaiiAfter you’ve created the site, run Get-ADReplicationSubnet to confirm you’ve created the subnet as expected. Notice that the site shows as Hawaii.
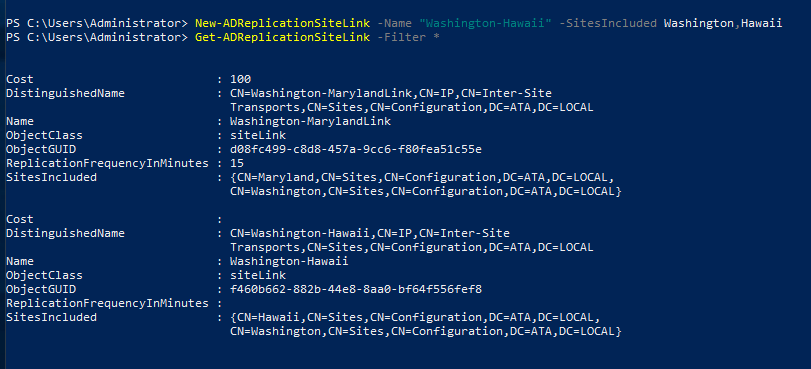
4. Finally, create a new site link with the New-ADReplicationSiteLink command specifying the name of the link and the sites to link together. The below example is creating a site link called Washington-Hawaii linking the Washington and Hawaii sites together.
The site link name is completely customizable, but it’s common to include the sites included in the site link in the name.
New-ADReplicationSiteLink -Name "Washington-Hawaii" -SitesIncluded Washington,HawaiiOnce created, run the Get-ADReplicationSiteLink to confirm you’ve created the link as expected.
To add sites to an existing Active Directory site link, invoke the
Set-ADReplicationSiteLinkcommand a PowerShell hashtable and anAddkey likeSet-ADReplicationSiteLink -Identity "Washington-MarylandLink" -SitesIncluded @{Add="Hawaii"}.
Inspecting Active Directory Sites, Links, and Subnets with Active Directory Sites and Services
Even though this tutorial is about PowerShell, it’s still important to understand how to inspect and manage AD sites via the GUI. You probably won’t be using PowerShell all of the time to manage AD sites.
Click on Start and type Active Directory Sites. The Active Directory Sites and Services open should appear in the Windows Administrative Tools program group.
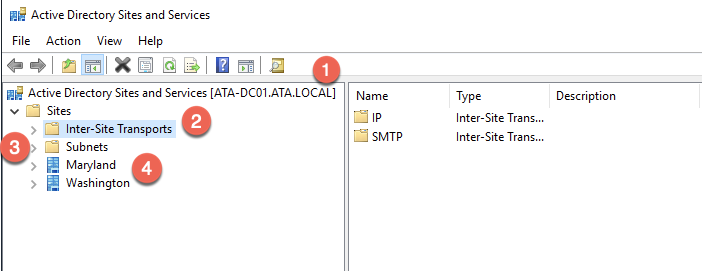
When you open Active Directory Sites and Services, you will see a screen like the one shown below. The AD Sites and Services tool has a few interesting areas:
- The DC the tool is currently connected to. Knowing the DC is helpful because it may take multiple hours to replicate between sites when you make a change.
- Inter-Site Transports – The protocols that the sites will use for replication.
- Subnets – The subnets that are assigned to each site.
- The list of sites – In a default domain, you will only see Default-First-Site-Name here, but the tutorial environment has a Maryland and Washington site created.
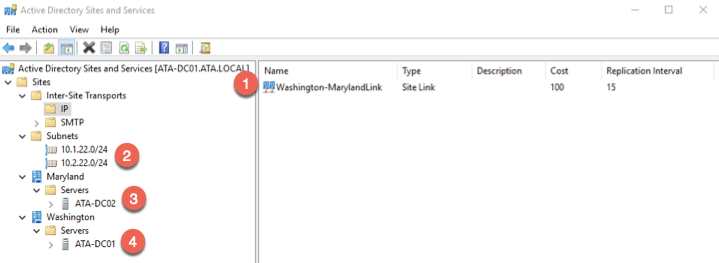
If you expand the items in AD Sites and Services, you’ll see:
- An IP transport – The tutorial transport or site link is called Washington-MaryandLink.
- Subnets – The tutorial has two subnets of 10.1.22.0/24 for the Washington site and 10.2.22.0/24 for the Maryland site.
- The domain controller assigned to the Maryland site.
- The domain controller assigned to the Washington site.
Removing Active Directory Sites
So you’ve got some sites created but it’s time to decommission then. No problem. Removing an Active Directory site is simply a reversal of this process.
Before you remove a site, be sure that no client machines are using the site’s subnets any longer. Check out the netlogon.log file for information on how to discover clients in sites.
To remove an AD site with PowerShell:
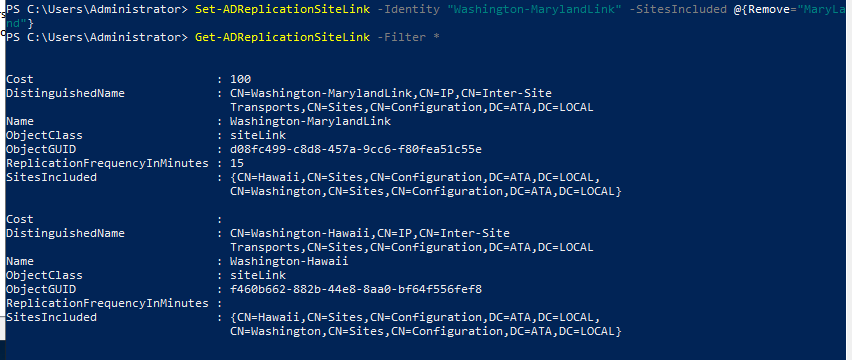
1. First, remove the site link with the Set-ADReplicationSiteLink command using the Remove key in the hashtable passed to the SitesIncluded parameter and verify the removal. The below example removes the Maryland site from the Washington-MarylandLink site.
Set-ADReplicationSiteLink -Identity "Washington-MarylandLink" -SitesIncluded @{Remove="MaryLand"}
 Get-ADReplicationSiteLink -Filter *
Notice that now both site links connect the same two sites (the SitesIncluded property).
2. Remove the Washington-Maryland link entirely with the Remove-ADReplicationSiteLink command and verify the link is removed.
Remove-ADReplicationSiteLink -Identity "Washington-MarylandLink"
 hit y at the prompt
 Get-ADReplicationSiteLink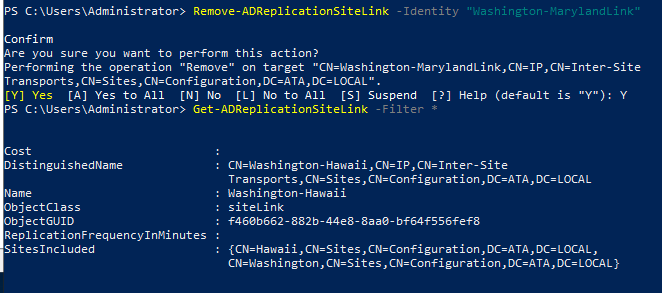
3. Now, remove the links that were part of the site with the Remove-ADReplicationSubnet command and verify the removal.
Remove-ADReplicationSubnet -Identity "10.2.22.0/24"
 Get-ADReplicationSubnet -Filter *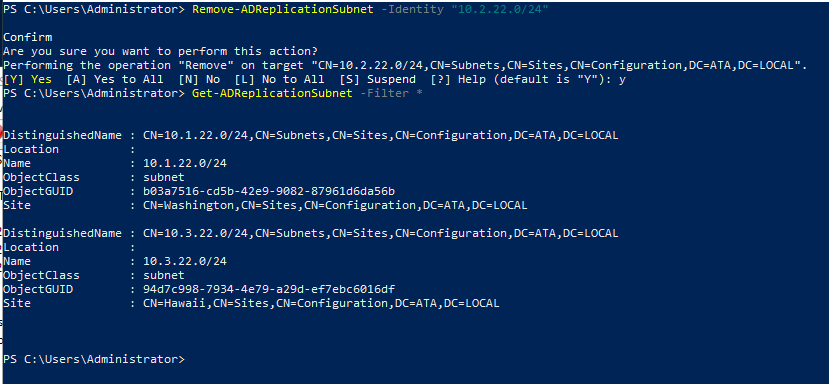
Finally, remove the site itself with the Remove-ADReplicationSite command and verify removal.
Remove-ADReplicationSite -Identity "Maryland"
 Get-ADReplicationSite -Filter *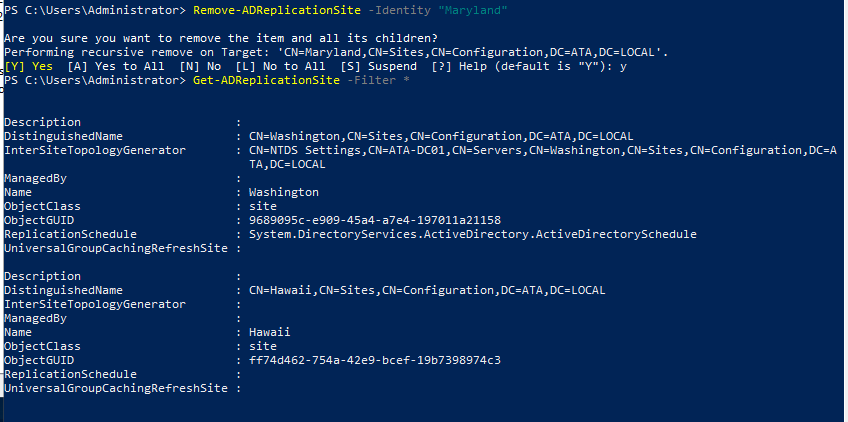
Conclusion
In this tutorial, you’ve learned the basics of manage Active Directory sites with PowerShell. But, there’s still a lot you can do with AD sites and PowerShell.
Now that you have created your first Active Directory Sites, why not extend this in your home lab? Create some sites on different subnets and see how the replication time impacts Active Directory changes such as password resets and group policy updates.


