


Have you ever felt your cloud management tasks are taking over your life? Why not automate your workflows within your Microsoft Azure dynamic cloud ecosystem? Ansible Azure, an open-source automation platform, lets you simplify the management of complex infrastructure and application deployments.
In this tutorial, you will learn how to integrate Ansible with Azure to streamline operations, reduce manual effort, and ensure consistency across your Azure infrastructure.
Say hello to a world where automation reigns supreme!
Prerequisites
Before you start tinkering with Ansible Azure automation, ensure you have the following in place:
- An Azure subscription – The free trial version will suffice.
- Ansible is installed on your local machine – This tutorial uses Ansible Core 2.15.9.
- Azure CLI is installed on your local machine – This tutorial uses Azure CLI Version 2.57.0.
Authenticating Ansible with Azure
With the prerequisites out of the way, you now focus on automating the deployment of an Azure Virtual Machine (VM) running an Ubuntu Operating System (OS) on Microsoft Azure. The Ubuntu Server will then run an Apache web server provisioned via Ansible Azure.
But first, you must configure Azure authentication for Ansible by creating a service principal to grant it access to Azure resources.
To authenticate Ansible with Azure using a service principal, proceed with the following:
1. Launch the Azure CLI on your environment, and run the following az command to initiate the login to the Azure process.
This command opens a web browser window, prompting you to sign in to your Azure account (step two).
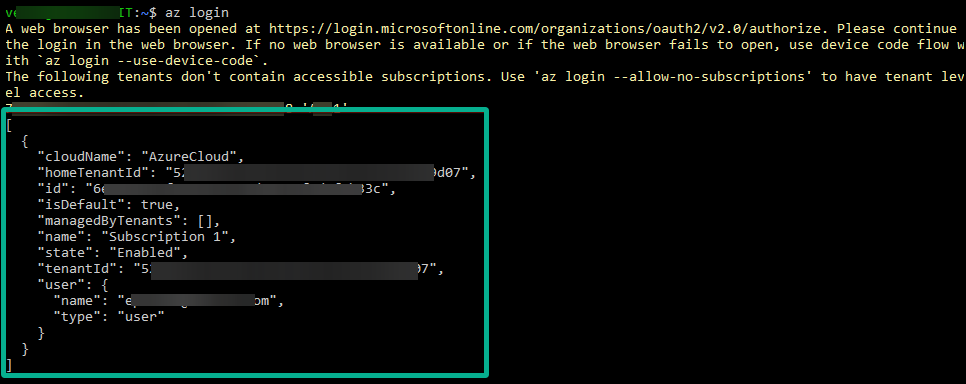
az login
2. When prompted, enter your Azure credentials and follow the instructions to complete the login process.
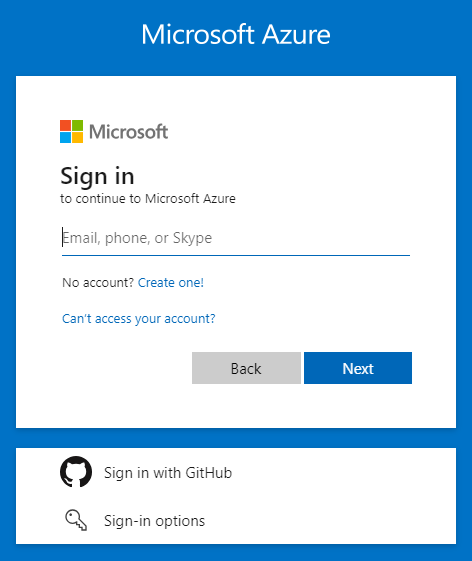
After successful authentication, the Azure CLI will display information about your Azure subscriptions and tenants.
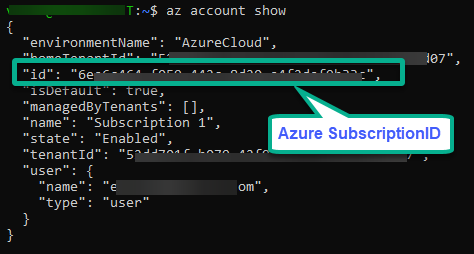
3. Next, execute the account show command below to get the details of your Azure subscription.
az account showIn the output, copy the Azure SubscriptionID to your Notepad, as you will need it in the following step.
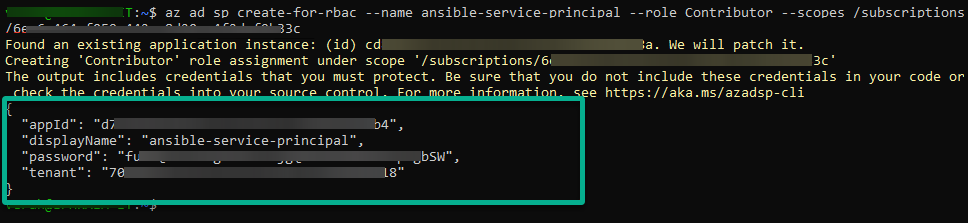
4. Now, run the following command to create a new service principal. Replace <subscription_id> with the ID of your Azure subscription.
az ad sp create-for-rbac --name ansible-service-principal --role Contributor --scopes /subscriptions/<subscription_id>This command outputs a JSON object containing the service principal’s credentials and other details. Save this information securely, as you will use it to authenticate Ansible with Azure.
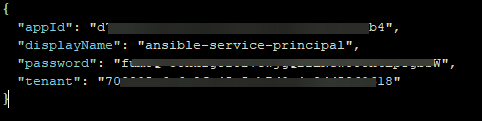
5. Store the service principal credentials securely in a JSON file (i.e., azure_credentials.json).
Replace YOUR_APP_ID, YOUR_SERVICE_PRINCIPAL_PASSWORD, and YOUR_TENANT_ID with the values you noted in step four.
{
  "appId": "YOUR_APP_ID",
  "displayName": "YOUR_SERVICE_PRINCIPAL_NAME",
  "password": "YOUR_SERVICE_PRINCIPAL_PASSWORD",
  "tenant": "YOUR_TENANT_ID"
}
6. Next, run each command below to set (export) environment variables to configure Ansible to use the Azure credentials stored in the azure_credentials.json file.
These export commands have no output to your terminal, but Ansible is now authenticated and ready to manage Azure resources using the provided service principal credentials.
export AZURE_CLIENT_ID="YOUR_APP_ID"
export AZURE_SECRET="YOUR_SERVICE_PRINCIPAL_PASSWORD"
export AZURE_SUBSCRIPTION_ID="Azure SubscriptionID"
export AZURE_TENANT="YOUR_TENANT_ID"Provisioning Azure Resources with Ansible Azure
After ensuring that Ansible is authenticated with Azure, it is time to put that synergy to work. Provisioning resources with Ansible Azure involves using Ansible playbooks to automate the creation of Azure resources, such as VMs, storage accounts, networks, and more.
Ansible provides modules designed for interacting with Azure’s APIs, letting you quickly manage Azure resources through automation.
To provision Azure resources with Ansible Azure, carry out the following, where you will add snippets to a playbook one step at a time:
1. Create a file called deploy_vm.yml as your Ansible playbook, and add the following snippet.
This snippet outlines the structure of an Ansible playbook intended to deploy a VM in Azure.
---
# Specify the name of the playbook aimed at Deploying an Azure VM
- name: Deploy Virtual Machine in Azure
  # Define the target hosts where the tasks will be executed.
  hosts: localhost
  # Specify the list of tasks to be executed.
  tasks:
2. Next, add the following snippet to your playbook, which creates an Azure resource group named myResourceGroup-001 in the eastus region.
Your Azure infrastructure sprawls across a digital landscape with VMs, databases, and storage accounts. Amidst this complexity lies the beacon of order—the resource group.
A resource group sets the foundation for efficient infrastructure management and enables seamless integration with Ansible’s automation capabilities. All resources in Azure must belong to a resource group.
    # Define the task to create a resource group.
    - name: Create Resource Group
      # Use the azure_rm_resourcegroup module to manage Azure resource groups.
      azure_rm_resourcegroup:
        # Specify the name of the resource group to be created.
        name: myResourceGroup-001
        # Specify the Azure region where the resource group will be created.
        location: eastus
3. Populate the snippet below to the same playbook, which creates a virtual network (VNet).
In Azure, a VNet logically isolates the network in the cloud. You can use a VNet to securely connect Azure resources, like VMs, to each other, to the internet, and even to on-premises networks.
    # Define the task of creating a virtual network.
    - name: Create Virtual Network
      # Use the azure_rm_virtualnetwork module to manage Azure VNets.
      azure_rm_virtualnetwork:
        # Specify the resource group in which the virtual network will be created.
        resource_group: myResourceGroup-001
        # Specify the name of the virtual network to be created.
        name: myVirtualNetwork-001
        # Specify the address prefixes for the virtual network.
        address_prefixes:
          - "13.0.0.0/16"
        # Specify the Azure region where the virtual network will be created.
        location: eastus
4. Now, create a subnet by adding the following snippet to your playbook.
Think of subnets as clever partitions within your VNet that help organize and segment your network resources. This organization makes managing your network resources easier and amps up your control over traffic flow and security.
    # Define the task to create a subnet.
    - name: Create Subnet
      # Use the azure_rm_subnet module to manage Azure subnets.
      azure_rm_subnet:
        # Specify the resource group where the virtual network resides.
        resource_group: myResourceGroup-001
        # Specify the name of the virtual network where the subnet will be created.
        virtual_network_name: myVirtualNetwork-001
        # Specify the name of the subnet to be created.
        name: mySubnet-001
        # Specify the address prefix for the subnet.
        address_prefix: "13.0.1.0/24"
5. Add another snippet to the playbook, which creates a public IP.
Public IP addresses allow Azure resources, such as the VMs and application gateways, to communicate with the internet or other Azure resources over the internet.
    # Define the task to create a public IP address.
    - name: Create Public IP Address
      # Use the azure_rm_publicipaddress module to manage Azure public IP addresses.
      azure_rm_publicipaddress:
        # Specify the resource group where the public IP address will be created.
        resource_group: myResourceGroup-001
        # Specify the allocation method for the public IP address (Static or Dynamic).
        allocation_method: Static
        # Specify the name of the public IP address to be created.
        name: myPublicIP-001
        # Specify the SKU (Standard or Basic) for the public IP address.
        sku: Standard
        # Specify the Azure region where the public IP address will be created.
        location: eastus
6. Subsequently, input the following snippet to your playbook, which creates a Network Security Group (NSG) that allows you to control inbound and outbound traffic to your Azure resources.
An NSG acts as a virtual firewall that filters network traffic based on user-defined rules.
    # Define the task to create an NSG.
    - name: Create Network Security Group
      # Use the azure_rm_securitygroup module to manage Azure NSGs.
      azure_rm_securitygroup:
        # Specify the resource group where the NSG will be created.
        resource_group: myResourceGroup-001
        # Specify the name of the NSG to be created.
        name: myNSG-001
        # Specify the Azure region where the NSG will be created.
        location: eastus
7. Moving on, create a Virtual Network Interface Card (NIC) by adding the following snippet to the playbook.
Each Virtual NIC buddies up with a specific Azure resource, like a VM, and gives it the power to connect with other resources inside your VNet. Virtual NICs can also venture out to external networks, including the vast expanse of the internet.
Moreover, NICs dish out access to IP addresses, sort out routing, and keep your network secure with nifty features.
    # Define the task to create a Virtual NIC.
    - name: Create Virtual Network Interface Card
      # Use the azure_rm_networkinterface module to manage Azure Virtual NICs.
      azure_rm_networkinterface:
        # Specify the resource group where the Virtual NIC will be created.
        resource_group: myResourceGroup-001
        # Specify the name of the Virtual NIC to be created.
        name: myNIC-001
        # Specify the name of the VNet where the Virtual NIC will be connected.
        virtual_network: myVirtualNetwork-001
        # Specify the Subnet's name within the VNet where the Virtual NIC will be located.
        subnet: mySubnet-001
        # Specify the name of the Public IP Address associated with the Virtual NIC.
        public_ip_name: myPublicIP-001
        # Specify the Azure region where the Virtual NIC will be created.
        location: eastus
8. Add the following snippet to the playbook, which creates an Azure VM.
Azure VMs provide scalable and on-demand computing resources, allowing you to deploy and manage virtualized workloads without the need to maintain physical hardware.
    # Define the task to create a VM.
    - name: Create Virtual Machine
      # Use the azure_rm_virtualmachine module to manage Azure VMs.
      azure_rm_virtualmachine:
        # Specify the resource group where the VM will be created.
        resource_group: myResourceGroup-001
        # Specify the name of the VM to be created.
        name: myVM-001
        # Specify the size of the VM.
        vm_size: Standard_DS1_v2
        # Specify the username for the VM's admin account.
        admin_username: azureuser
        # Specify the password for the VM's admin account.
        admin_password: Azureuser@2023
        # Enable password-based SSH authentication.
        ssh_password_enabled: True
        # Specify the image details for the VM.
        image:
          offer: UbuntuServer
          publisher: Canonical
          sku: '18.04-LTS'
          version: latest
        # Specify tags for the VM.
        tags:
          environment: production
Following the steps up to this point, you will have the complete playbook demonstrated below.
This playbook provisions various resources in Azure, including a resource group, virtual network, subnet, public IP address, network interface card (NIC), and the VM itself.
Ansible’s declarative syntax and Azure modules make defining and executing provisioning tasks quicker, enabling you to scale your infrastructure efficiently in the Azure cloud.
---
# Specify the name of the playbook aimed at Deploying an Azure VM
- name: Deploy Virtual Machine in Azure
# Define the target hosts where the tasks will be executed.
hosts: localhost
# Specify the list of tasks to be executed.
tasks:
# Define the task to create a resource group.
- name: Create Resource Group
# Use the azure_rm_resourcegroup module to manage Azure resource groups.
azure_rm_resourcegroup:
# Specify the name of the resource group to be created.
name: myResourceGroup-001
# Specify the Azure region where the resource group will be created.
location: eastus
# Define the task of creating a virtual network.
- name: Create Virtual Network
# Use the azure_rm_virtualnetwork module to manage Azure VNets.
azure_rm_virtualnetwork:
# Specify the resource group in which the virtual network will be created.
resource_group: myResourceGroup-001
# Specify the name of the virtual network to be created.
name: myVirtualNetwork-001
# Specify the address prefixes for the virtual network.
address_prefixes:
- "13.0.0.0/16"
# Specify the Azure region where the virtual network will be created.
location: eastus
# Define the task to create a subnet.
- name: Create Subnet
# Use the azure_rm_subnet module to manage Azure subnets.
azure_rm_subnet:
# Specify the resource group where the virtual network resides.
resource_group: myResourceGroup-001
# Specify the name of the virtual network where the subnet will be created.
virtual_network_name: myVirtualNetwork-001
# Specify the name of the subnet to be created.
name: mySubnet-001
# Specify the address prefix for the subnet.
address_prefix: "13.0.1.0/24"
# Define the task to create a public IP address.
- name: Create Public IP Address
# Use the azure_rm_publicipaddress module to manage Azure public IP addresses.
azure_rm_publicipaddress:
# Specify the resource group where the public IP address will be created.
resource_group: myResourceGroup-001
# Set the allocation method for the public IP address (Static or Dynamic).
allocation_method: Static
# Specify the name of the public IP address to be created.
name: myPublicIP-001
# Specify the SKU (Standard or Basic) for the public IP address.
sku: Standard
# Specify the Azure region where the public IP address will be created.
location: eastus
# Define the task to create an NSG.
- name: Create Network Security Group
# Use the azure_rm_securitygroup module to manage Azure NSGs.
azure_rm_securitygroup:
# Specify the resource group where the NSG will be created.
resource_group: myResourceGroup-001
# Specify the name of the NSG to be created.
name: myNSG-001
# Specify the Azure region where the NSG will be created.
location: eastus
# Define the task to create a Virtual NIC.
- name: Create Virtual Network Interface Card
# Use the azure_rm_networkinterface module to manage Azure Virtual NICs.
azure_rm_networkinterface:
# Specify the resource group where the Virtual NIC will be created.
resource_group: myResourceGroup-001
# Specify the name of the Virtual NIC to be created.
name: myNIC-001
# Specify the name of the VNet where the Virtual NIC will be connected.
virtual_network: myVirtualNetwork-001
# The Subnet's name within the VNet where the Virtual NIC will be located.
subnet: mySubnet-001
# Specify the name of the Public IP Address associated with the Virtual NIC.
public_ip_name: myPublicIP-001
# Specify the Azure region where the Virtual NIC will be created.
location: eastus
# Define the task to create a VM.
- name: Create Virtual Machine
# Use the azure_rm_virtualmachine module to manage Azure VMs.
azure_rm_virtualmachine:
# Specify the resource group where the VM will be created.
resource_group: myResourceGroup-001
# Specify the name of the VM to be created.
name: myVM-001
# Specify the size of the VM.
vm_size: Standard_DS1_v2
# Specify the username for the VM's admin account.
admin_username: azureuser
# Specify the password for the VM's admin account.
admin_password: Azureuser@2023
# Enable password-based SSH authentication.
ssh_password_enabled: True
# Specify the image details for the VM.
image:
offer: UbuntuServer
publisher: Canonical
sku: '18.04-LTS'
version: latest
# Specify tags for the VM.
tags:
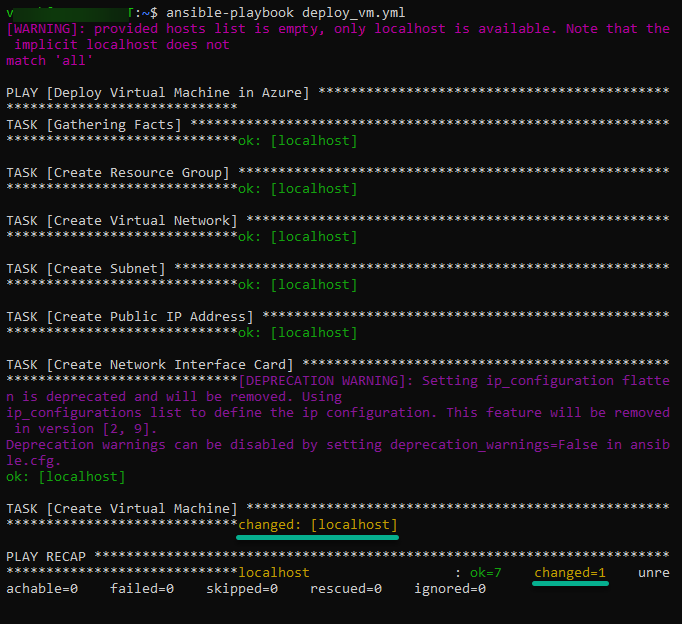
environment: production9. Ultimately, run the ansible-playbook command below to execute your playbook (deploy_vm.yml) using the
ansible-playbook deploy_vm.ymlIf all goes well, the Azure resources creation process will be initiated, and the output below will appear.
Verifying the Deployed Azure VM
You have successfully deployed resources in Azure, but will you settle in blindly trusting what transpired in the background? You must verify all things fell into place, ensuring the integrity and functionality of your Azure infrastructure.
To verify your deployed Azure VM, follow these steps:
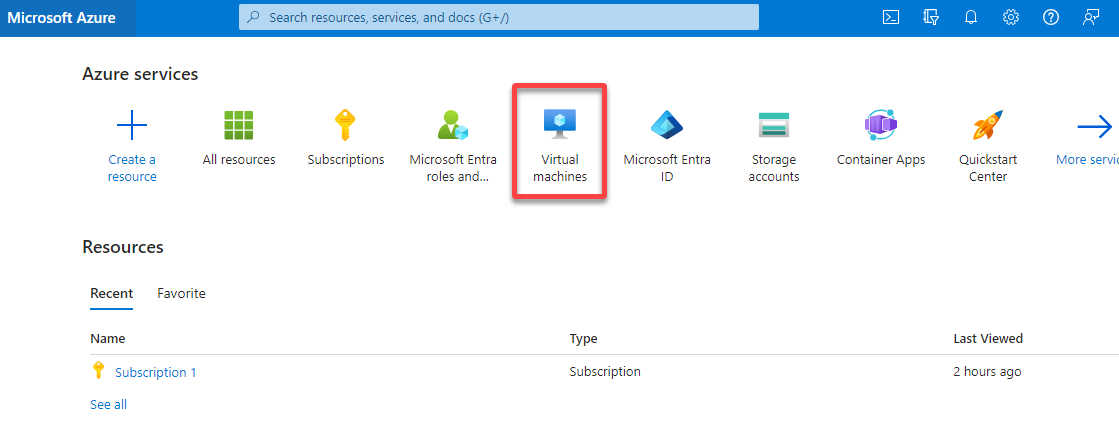
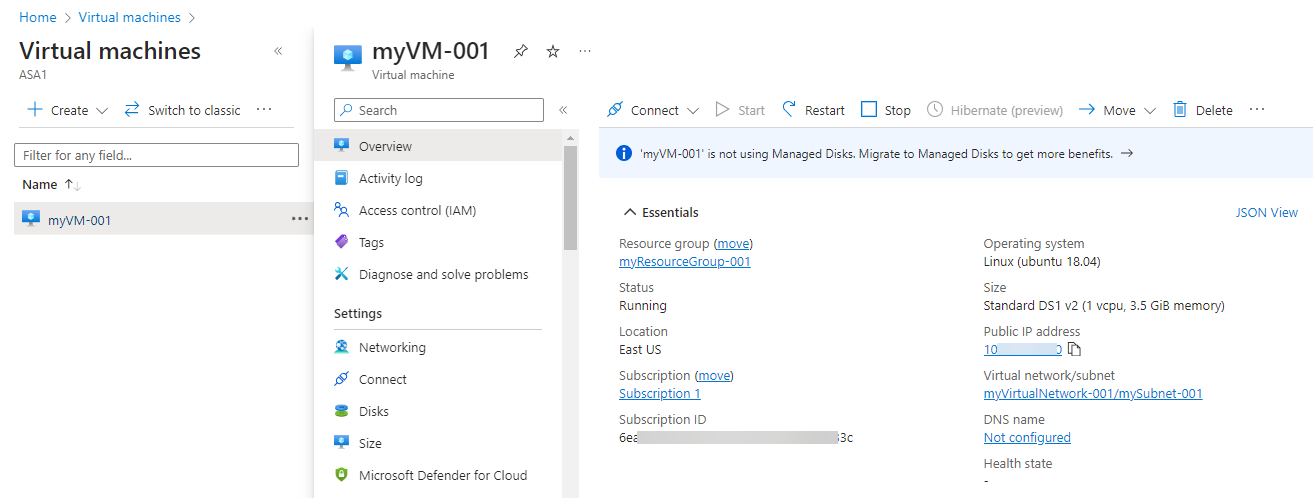
1. Login to Azure Portal and access the Virtual machines services.
2. In the list that appears, look for the VM you deployed (i.e., myVM-001), and click on its name to view the VM’s details.
Provisioning resources with Ansible Azure allows you to automate the creation of Azure resources, reducing manual effort and ensuring consistency in your infrastructure deployments.
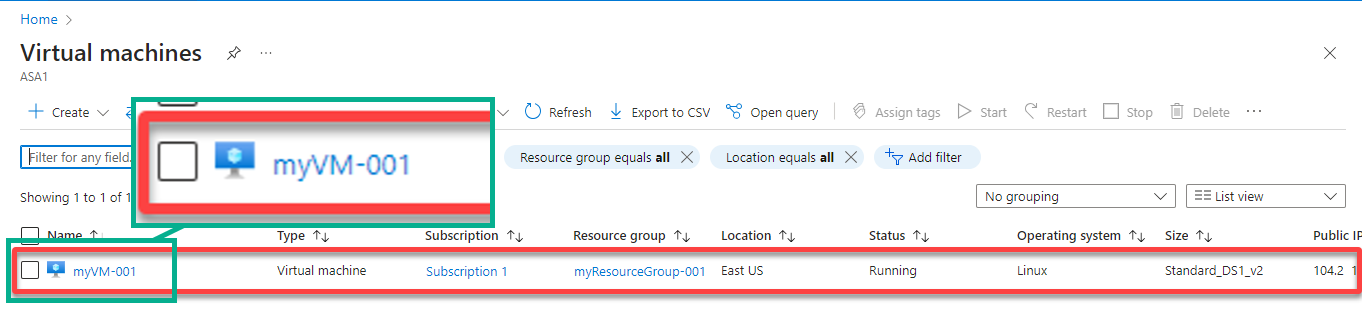
3. Now, review the details of the new VM to confirm it matches the expected deployment, including the VM’s name, size, OS, and other properties.
Configuring Dynamic Inventory Using Ansible Azure
Instead of manually specifying hosts in a static inventory file, Ansible can query Azure’s APIs to generate an up-to-date list of resources with dynamic inventory. This approach allows you to effortlessly manage your cloud resources, adapting to changes in real-time and ensuring your inventory remains current and accurate.
In this tutorial, you will use Azure’s dynamic-inventory plug-in to populate your Ansible inventory. This feature removes the burden of maintaining static inventory files.
Generating a Dynamic Inventory in Ansible Azure
In the dynamic realm of cloud infrastructure, static inventories fall short of capturing the fluidity and scale of modern environments. Enter dynamic inventory management with Ansible Azure—a paradigm shift empowering administrators to adapt seamlessly to the ever-evolving landscape of cloud resources.
To generate a dynamic inventory, complete the steps below:
Create a file (dynamic inventory) named myazure_rm.yml and add the following lines.
This configuration allows Ansible to dynamically generate an inventory of Azure resources from the specified resource group (myResourceGroup-001) using the azure_rm plugin.
# Specify the dynamic inventory plugin being used, which is 'azure_rm'.
plugin: azure_rm
# Specify the Azure resource groups to include in the dynamic inventory.
include_vm_resource_groups:
  - myResourceGroup-001
# Specify the authentication source for Azure, which is set to 'auto'.
auth_source: auto
Next, run the following ansible-inventory command to query the VM(s) within the specified resource group (i.e., myResourceGroup-001).
ansible-inventory -i myazure_rm.yml --graphUpon command execution, the below output appears.
Notice that the already existing VM belongs to the ungrouped group, which is a child of all group in the Ansible inventory.

💡 Note: By default, the Azure dynamic inventory plug-in returns globally unique names, resulting in displaying some extra characters after the VM name. You can disable that feature by adding
plain_host_names: yesto the dynamic inventory.
Finding an Azure VM hostvars
In the dynamic landscape of Azure infrastructure management, understanding and accessing host variables for Azure VMs is paramount. These host variables contain key information about each VM, from network configurations to OS details, essential for effective automation and orchestration.
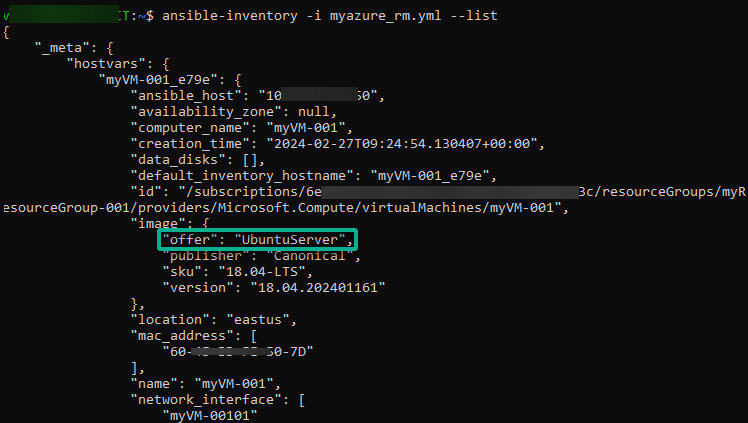
Execute the following command to view all hostvars.
ansible-inventory -i myazure_rm.yml --listAnsible reads the inventory file myazure_rm.yml, processes its contents, and prints a JSON representation of the inventory to the terminal, as shown below.
The dynamic inventory retrieves data from Azure to populate the hostvars for each Azure VM. These hostvars are subsequently utilized to ascertain the VM group memberships within the Ansible inventory.
Assigning Group Membership via Conditional Groups
Imagine you have a bunch of hosts, and you want to organize them in a way that makes sense. Enter conditional groups—the dynamic duo of Ansible inventories! In Ansible, conditional groups dynamically group hosts based on specific criteria or conditions.
Conditional groups are made of two parts. The first part consists of the group name; the other part is the condition for adding a member to the group.
To assign group membership via conditional groups, proceed with these steps:
Open the myazure_rm.yml dynamic inventory file and add the following conditional_groups at the bottom of the file.
conditional_groups:
  Linux: "'UbuntuServer' in image.offer"
Now, run the ansible-inventory command below to generate a graphical representation (--graph) of the inventory specified in the myazure_rm.yml file.
ansible-inventory -i myazure_rm.yml --graphNotice below that the VM(s) are no longer associated with the ungrouped group. The following output validates the conditional group functionality works as expected in your Ansible inventory, dynamically grouping hosts based on defined conditions.
With dynamic inventory, you can easily manage and automate your Azure infrastructure using Ansible, ensuring that your inventory is always up-to-date with the latest resources provisioned in Azure.

Automating Processes with Ansible Azure
When overwhelmed by the endless manual tasks of handling your Azure setup, embrace the wonders of automation with Ansible Azure! Automating processes with Ansible involves using playbooks to define and execute a series of tasks in an automated manner.
Ansible allows you to automate various IT operations, including configuration management, application deployment, orchestration, and more.
To automate processes with Ansible Azure, execute the following:
1. Create an Ansible playbook called (install_apache.yml) that defines the tasks you want to automate, like installing the Apache web server on Linux machines as follows.
---
# Name of the playbook, aimed to install Apache on Ubuntu
- name: Install Apache on Ubuntu
# Define the target hosts where the tasks will be executed.
hosts: Linux
# Enable privilege escalation to become the root user.
become: yes
tasks:
# Task to update the apt package cache.
- name: Update apt package cache
apt:
update_cache: yes
# Task to install Apache.
- name: Install Apache
apt:
name: apache2
state: present
# Task to start the Apache service.
- name: Start Apache service
service:
name: apache2
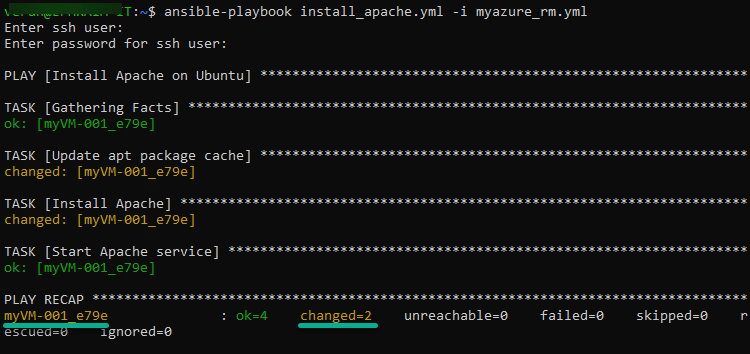
state: started2. Next, run the following command to execute the Ansible playbook (install_apache.yml)
ansible-playbook install_apache.yml -i myazure_rm.ymlAnsible connects to the specified hosts, authenticates via SSH, and executes the tasks defined in your playbook.
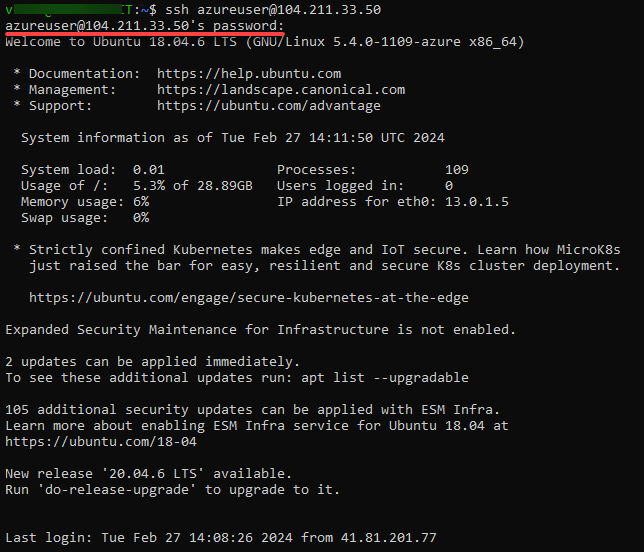
3. Afterward, execute the ssh command below to connect to your Azure VM.
Ensure you replace azureuser with your actual username and VM_IP_Address with the public IP address of your Azure VM.
ssh azureuser@VM_IP_AddressProvide the password for the azureuser account when prompted.
4. Finally, run the following command to check the Apache version (-v).
apache2ctl -vThe output below shows the Apache server version and additional information, such as the build date and platform, in the following.
Automating processes with Ansible enables you to streamline IT operations, reduce manual effort, and ensure consistency and reliability in your environment.

Conclusion
Throughout this tutorial, you have unlocked the power of Ansible Azure, learning how to provision Azure resources, configure dynamic inventory, and automate processes. From spinning up VMs to orchestrating complex workflows, you have gained the skills to supercharge your management and automation in the Azure environment.
By integrating Ansible’s automation capabilities with Azure’s vast array of services, you streamline operations, improve efficiency, and ensure consistency across infrastructures.
Now that you have mastered the basics, why not explore more about automating the provisioning and management of your Azure infrastructure using Terraform?


