


Are you new to Ansible and struggling to create your first Ansible Playbook? Going through an Ansible playbook example would be an excellent start to get your head over how an Ansible playbook works. Lucky for you, this tutorial has got you covered.
In this tutorial, you’ll learn how to build and create Ansible playbooks for service deployment while understanding the breakdown of what makes an Ansible playbook as a whole.
Without further delay, read on and start building!
Prerequisites
This tutorial comprises step-by-step instructions. If you’d like to follow along, be sure you have the following in place:
- An Ansible controller host – This tutorial uses Ansible v2.11.7 on an Ubuntu 20.04.3 LTS machine.
- A remote Linux computer to test the tomcat installation – This tutorial uses Ubuntu 20.04.3 LTS as the remote node.
- An inventory file and one or more hosts configured to run Ansible commands and playbooks. The remote Linux computer is called myserver, and this tutorial uses an inventory group called web.
- Python v3.6 or later installed both on your Ansible controller host and the remote node machine – This tutorial uses Python v3.9 on an Ubuntu machine.
Declaring a Basic Ansible Playbook
Ansible playbooks let you deploy complex applications, offer reusable configuration management, multi-machine deployments, and perform multiple tasks on repetition. Ansible playbooks are written in YAML format containing multiple tasks and executed in sequential order.
To better understand how an Ansible playbook works, you’ll declare an Ansible playbook to install Apache on your remote node.
1. Log in to the Ansible Controller host using your favorite SSH client.
2. Next, create a file named apache.yml in your home directory with your preferred text editor. Populate the file with the below content (playbook), which starts and enables the Apache service.
The code below deploys the Ansible task to install Apache to the destination server address (web) with the remote user (ubuntu).
# Playbook apache.yml
---
- name: Installing Apache service
  hosts: my_app_servers                                  # Define all the hosts
  remote_user: ubuntu                                    # Remote_user is ubuntu
  # Defining the Ansible task
  tasks:
  - name: Install the Latest Apache
    apt:
      name: httpd
      state: latest
3. Run the below ansible-playbook command to verify the playbook (apache.yml) to catch syntax errors (--syntax-check) and other problems.
Remember always to do this syntax check before you run your Ansible playbook. Doing so lets you avoid accidentally messing things up with your project.
ansible-playbook apache.yml --syntax-checkAs you can see below, there are no errors displayed, which confirms that the Ansible playbook (apache.yml) has no syntax issues and can be executed safely.

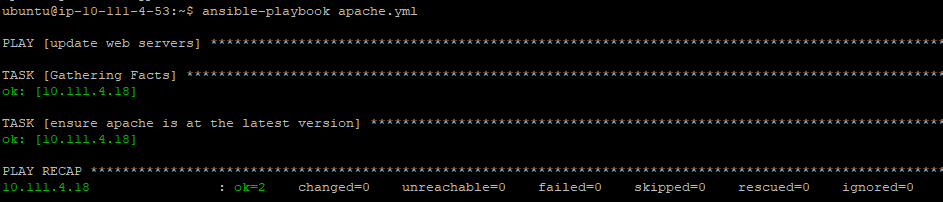
4. Finally, run the command below to execute the Ansible playbook (apache.yml).
ansible-playbook apache.ymlIf you see an OK status that specifies the Ansible task doesn’t need to perform any work. But if you get the changed status, the task is executed successfully on the remote node.
Preventing Ansible Playbook from Stopping Executing Tasks
Previously you learned how to create a basic Ansible playbook. But while you execute the playbook, Ansible may receive a non-zero return code from a command. Or a failure from a module stopping the playbook from executing further.
To prevent the failures of stopping other tasks from executing, consider using the error handling feature in the Ansible playbook. Error handling allows you to operate even when any task fails using rescue and always functions and the output you want.
Create a new playbook named main.yml and copy/paste the below code. The below Ansible Playbook performs various tasks while handling failed tasks with the Ansible built-in debug module (ansible.builtin.debug)
---
- name: update web servers
# Testing the Ansible Playbook on your local machine
  hosts: localhost
  remote_user: ubuntu
  tasks:
  - name: Ansible block to perform error handling
    block:

      - name: Ansible task prints a message I execute normally
        ansible.builtin.debug:
          msg: 'I execute normally'

      - name: Ansible task will fail
        ansible.builtin.command: /bin/false

      - name: Ansible task will not proceed due to the previous task failing
        ansible.builtin.debug:
          msg: 'I never execute, '

    rescue:
      - name: Ansible task Print when errors
        ansible.builtin.debug:
          msg: 'I caught an error, can do stuff here to fix it

    always:
      - name: Ansible task will always get executed
        ansible.builtin.debug:
          msg: 'This executes always'
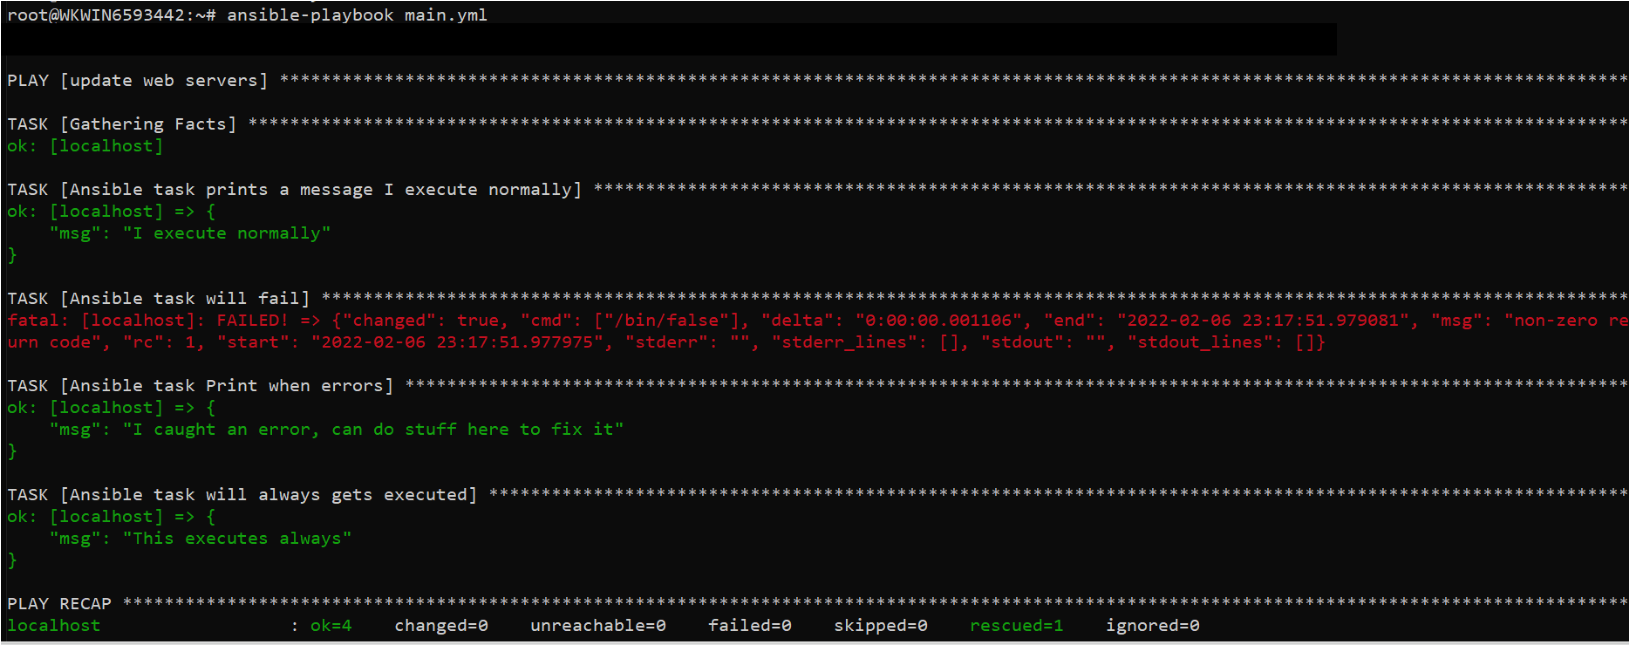
Now, run the below command to execute the playbook (main.yml)
ansible-playbook main.yml
Below, you’ll notice that rescue functions in the Ansible block allowed Ansible tasks to continue and run, while other tasks terminated as they failed:
- The first task executed, printing a message that says I execute normally.
- The second task fails as the command specified is incorrect (
ansible.builtin.command: /bin/false). - The third task won’t proceed because the second task failed.
- The fourth and fifth tasks always run as they contain rescue and always functions.
Defining Ansible Role Tomcat for an Ansible Playbook
At this point, you now have a basic understanding of how to build Ansible playbooks to execute simple tasks. But when you need to perform a lot of deployment work or multiple tasks that can repeat many times over, then consider using Ansible roles.
Using Ansible roles is good practice because the content in roles can be reused and shared with others. You’ll see how Ansible roles work in action by creating an Ansible-playbook to deploy Apache Tomcat service on your remote node. But first, you’ll create an Ansible role folder.
1. Open the terminal in your Ansible controller host, then run the following commands to create a directory called ~/ansible_playbook_demo and switch to that directory. This directory will contain the playbook and all the required configuration files you’ll need to deploy Apache Tomcat.
mkdir ~/ansible_playbook_demo
cd ~/ansible_playbook_demo
2. Next, run the command below to create another directory named roles inside the ~/ansible_playbook_demo directory, and switch to that directory.
The ~/ansible_playbook_demo/roles directory will contain the Tomcat role you need to deploy.
By default, Ansible looks for roles in two locations in a directory called roles/ within the directory where playbook resides or in the /etc/Ansible/roles. If you wish to store roles at different paths, declare the paths using the
- role:parameter in the playbook.
mkdir -p roles && cd roles3. Finally, run the command below to create the folders required by the tomcat role.
The p flag tells the mkdir command to create the parent directory (tomcat) and the folders such as tasks, handlers, defaults, vars, and templates. Each of these folders is common for every Ansible role and will eventually contain a main.yml file to deploy the Tomcat role.
You can create the role with any name within the roles directory.
# task directory - contains the list of tasks that a role needs to execute
# handlers directory - is like normal tasks in an Ansible playbook.
	# but they run only if the task contains a “notify” directive.
# library directory - store any plugins or modules such as Python
# files directory - copy any files from the Ansible controller host to other nodes
# vars directory - contains all the variables you need to use in the main.yml file
# defaults directory - stores the variables that required by the role to execute
# templates - is a file that contains all your configuration parameters,
	# but the dynamic values are given as variables in the Ansible
mkdir -p tomcat/{tasks, handlers, defaults, vars, templates}
4. Finally, run the tree command below to verify all required folders in the roles directory.
treeAt this point, you should have the file structure shown below.

Building an Ansible Playbook
Now that you have set up the Ansible role tomcat folder, you’ll add a main.yml files inside each subdirectory of the ~/ansible_playbook_demo/roles/tomcat/ directory.
Ansible playbook automatically picks the values from the correct file (main.yml) from the relevant folder and deploys the Apache Tomcat on the remote node.
1. Open your favorite text editor, and create a file named main.yml in the tasks directory.
Populate the file with the below content (playbook), which starts and enables the Tomcat service.
---
# Installing the Java (Open Jdk)
- name: Install Java 1.8
  apt: name=openjdk-8-jdk

# Adding the group tomcat
- name: add group "tomcat"
  group: name=tomcat

# Adding the user tomcat along with Ansible When condition
- name: add user "tomcat"
  user: name=tomcat group=tomcat home=/usr/share/tomcat createhome=no
  become: True
  become_method: sudo
  when: ansible_os_family == "Debian"

# Downloading the tomcat package using the Ansible variables
- name: Download Tomcat
  get_url:
     url:  "{{ tomcat_download_url }}"
     dest: "{{ tomcat_download_location }}"

# Creating the tomcat directory
- name: Create a tomcat directory
  file:
    path: /usr/share/tomcat
    state: directory
    owner: tomcat
    group: tomcat

# Extracting the tomcat archive
- name: Extract tomcat archive
  unarchive:
    src: "{{ tomcat_download_location }}"
    dest: /usr/share/tomcat
    owner: tomcat
    group: tomcat
    remote_src: yes
    extra_opts: "--strip-components=1"
    creates: /usr/share/tomcat/bin

# Copying the Ansible Jinja template (tomcat.service.j2) file to the destination node
- name: Copy tomcat service file
  template:
    src: templates/tomcat.service.j2
    dest: /etc/systemd/system/tomcat.service


# Starting and Enabling the tomcat service on the destination node.
- name: Start and enable tomcat
  service:
    daemon_reload: yes
    name: tomcat
    state: started
    enabled: yes
when: ansible_service_mgr == "systemd"2. Next, create another file named main.yml in the vars directory and copy/paste the below code.
The code below contains the variables tomcat_download_url and tomcat_download_location. These variables are set with assigned values that the Ansible role picks from the main.yml file in the tasks directory while running the playbook.
tomcat_download_url: https://dlcdn.apache.org/tomcat/tomcat-10/v10.0.14/bin/apache-tomcat-10.0.14.tar.gz
tomcat_download_location: /tmp/apache-tomcat-10.0.14.tar.gz
3. Lastly, create a template file named tomcat.service.j2 in the templates directory and populate with the below code.
Below is the tomcat.service.j2 template that Ansible renders when you execute the playbook. Ansible then copies the data from this template to the destination node in the /etc/systemd/system/tomcat.service directory.
# Unit defines the name of the service you need to deploy, which is Tomcat.
[Unit]
Description=Tomcat
After=network.target

# Service section allows you to define the type of service.
# Forking allows you to start the tomcat service as a system start-up
# and keeps the service running in the background.
[Service]
Type=forking

User=tomcat
Group=tomcat

# Environment contains the list of environment variables, such as
# JAVA_HOME, etc., that Tomcat requires to run.

Environment=JAVA_HOME=/usr/lib/jvm/java-8-openjdk-amd64
Environment=CATALINA_HOME=/usr/share/tomcat
Environment=CATALINA_BASE=/usr/share/tomcat
Environment=CATALINA_PID=/usr/share/tomcat/temp/tomcat.pid

ExecStart=/usr/share/tomcat/bin/startup.sh
ExecStop=/usr/share/tomcat/bin/shutdown.sh

# Install section defines if the specified Unit is enabled or disabled
# WantedBY automatically starts the Tomcat at boot up.
[Install]
	WantedBy=multi-user.target
Deploying an Ansible Playbook with the tomcat Ansible Role
You’ve managed to set up and configure the Ansible role file structure and files/folder within the Tomcat Ansible role. But unless you run the playbook, the role you created is not doing anything, so you’ll quickly deploy the Ansible role using the Ansible playbook.
Create a YML file with a name you prefer, and copy/paste the below code. For this example, the file is named ~/ansible_playbook_demo/tomcat-setup.yml.
The code below deploys the Ansible role (tomcat) that you configured in the “Defining Ansible Role Tomcat for an Ansible Playbook” section to the destination server address (web). Notice you deploy the Ansible role with the remote user (ubuntu) with admin access.
You can use roles in three ways: play level with the roles option, tasks level with include_role, and import_role options.
- name: Tomcat deployment playbook
  hosts: web
  remote_user: ubuntu
  roles:
    - tomcat
Validating the Ansible playbook using the
--checkflag with theansible-playbookcommand shown below is a good practice before actually executing the playbook. The--checkflag tells Ansible to perform a simulation without running the playbook.
ansible-playbook tomcat-setup.yml –check
Now, run the below command to execute the playbook
ansible-playbook tomcat-setup.yml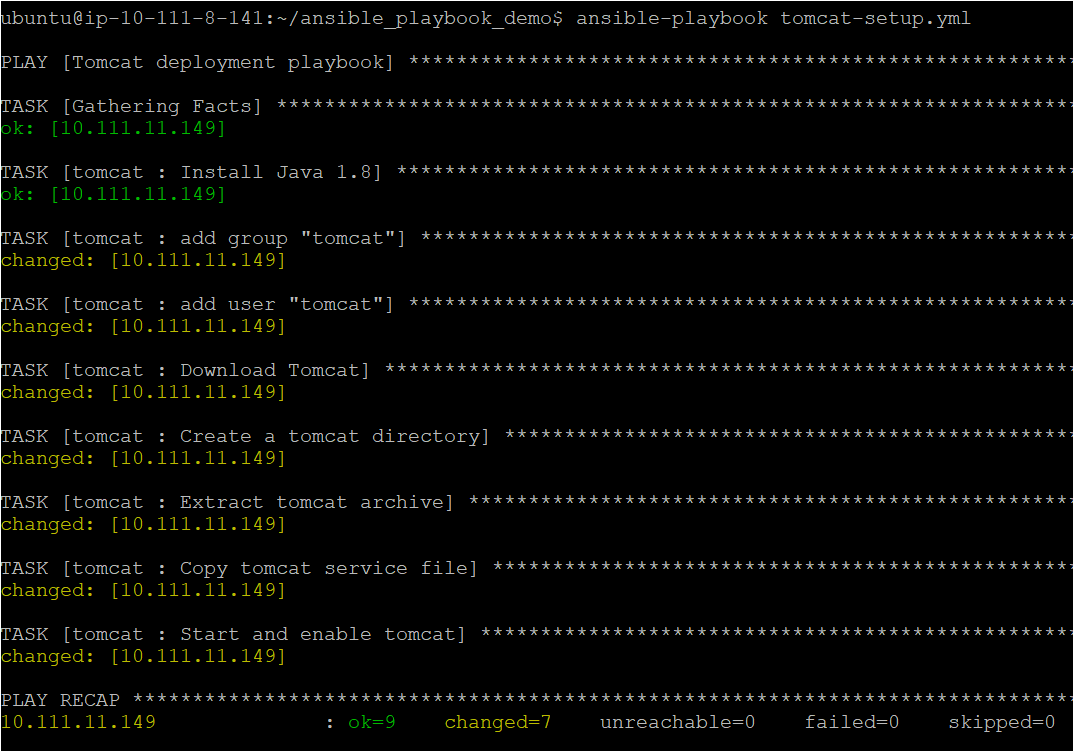
Verifying the Tomcat Service Works on a Remote Machine
You’ve executed your Ansible playbook and deployed Apache Tomcat on the remote machine. So the next step is to test if the Tomcat service is running successfully. You’ll verify the Tomcat service’s status and see if you can access the Apache Tomcat landing page.
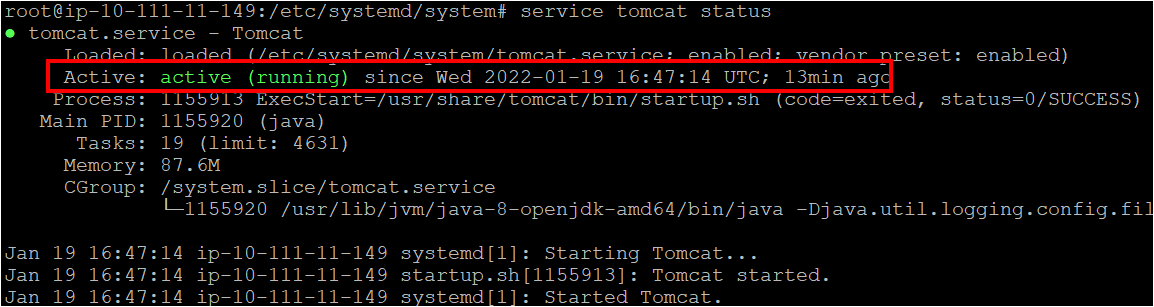
Open the terminal in the remote node, and execute the below command to verify the Tomcat service. The tomcat command will provide the status of the Tomcat service.
service tomcat status
Below, you can see that status shows Tomcat service is running.
Now, run the curl command below to access Apache Tomcat’s landing page (localhost:8080).
curl localhost:8080
Notice an output of an HTML code below, which indicates you’ve accessed Apache Tomcat’s landing page. This output confirms that your Ansible playbook works perfectly in deploying Apache Tomcat service.

Conclusion
In this tutorial, you’ve taken advantage to learn how to build a rock-solid Ansible playbook using various Ansible features such as Ansible role, variables, and so on. Using the same Ansible playbook you built, you also learned to deploy Apache tomcat.
Now that you have sound knowledge of the Ansible playbook, which application do you plan to deploy with Ansible playbooks? Or perhaps learn how to leverage Ansible variables in roles and playbooks?


