


If you’re new to Docker and containers, learning to deploy a Python Flask API application on Docker is a great way to start. Docker lets you containerize applications with light-weighted technology and security for quick application deployment.
In this tutorial, you’ll learn to become your own master in setting up and deploying Python Flask API applications on Docker containers.
Get ready and start deploying!
Hands-on API tutorials are easier when the Python, Docker, and web fundamentals are fresh. If you want structured practice while you build, compare Educative’s interactive developer courses before you buy.
Prerequisites
If you’d like to follow along step-by-step, you will need the following installed:
- Ubuntu machine with Docker installed. This tutorial uses Ubuntu 18.04.5 LTS with Docker v19.03.8.
- Python v3.9 or later installed on Ubuntu machine. This tutorial will be using Python v3.9.2 on a Ubuntu Machine.
- Elinks package installed on the Ubuntu machine used to test the API in this tutorial.
Creating a Python Flask API Application (GET and POST API)
Kick-off this tutorial by creating a Python Flask application. Flask is a lightweight WSGI micro web application framework written in Python. Flask provides handy tools and features in creating web applications in Python.
Before creating a Python Flask application, you’ll install a Python Flask and Python virtual environment where Flask will run an application.
1. Log in to your Ubuntu machine using your favorite SSH client.
2. Next, run the following commands to create a directory named ~/docker_python_flask_demo and switch to that. This directory will hold all the files required by Python and Docker to run an application.
mkdir ~/docker_python_flask_demo
cd ~/docker_python_flask_demo
3. Run the pip command below to install a Python virtual environment (virtualenv) needed by Flask to execute the applications. A Python virtual environment offers its own Python binary and per-application installed packages to avoid conflicts with other applications.
pip install virtualenv
4. Execute the virtualenv command below to create and activate a virtual environment using the venv module.
virtualenv venv
5. Now, run the below command to install the Python flask package with the pip package manager.
pip install flask6. Run the following command to activate packages in your virtual environment before you can start installing or using them. This modifies the VIRTUAL_ENV environment variable to point to your virtual environment and prepends the virtual environment Python binary to the path so you run the correct binary.
source venv/bin/activate7. Create one more file, named requirements.txt, and define the dependency of the Flask application, as shown below.
Flask==2.0.28. Create a text file ~/docker_python_flask_demo/app.py and populate the file with the below Python code.
The below Python code imports the Python flask class and creates a class instance named app. The app class instance contains two login() functions executed when users send requests on /login page.
The success() function then executes, displaying the welcome “name-of-the-user” message on the browser.
from flask import Flask , redirect , url_for , request # Importing the class flask
# app is the object or instance of Flask
app = Flask(__name__)
# app.route informs Flask about the URL to be used by function
@app.route('/success/<name>')
# Creating a function named success
def success(name):
    return 'welcome %s' % name

@app.route('/login', methods = ['GET','POST'])
# Creating a function named login
def login():
    if request.method == 'POST':
       user = request.form['adamlistek']
       return redirect(url_for('success', name = user))
    else:
       return "INVALID"
# Programs executes from here in a development server (locally on your system)
# with debugging enabled.

if __name__ == '__main__':
   app.run(debug = True)
9. Create one more file named ~/docker_python_flask_demo/form.html and copy/paste the below code.
Running the HTML code below creates a form with two inputs; one is text to provide your name, and the other is a submit button.
As soon as you provide a username and hit the submit button, a post request is sent, and Flask executes another function and opens a new web page on http://localhost:5000/success/<username>.
<html>
<body>
<form action="http://localhost:5000/login" method="post">
<p>Please Enter your name</p>
<p><input type="text" name="adamlistek" /></p>
<p><input type="submit" value="Submit" /></p>
</form>
</body>
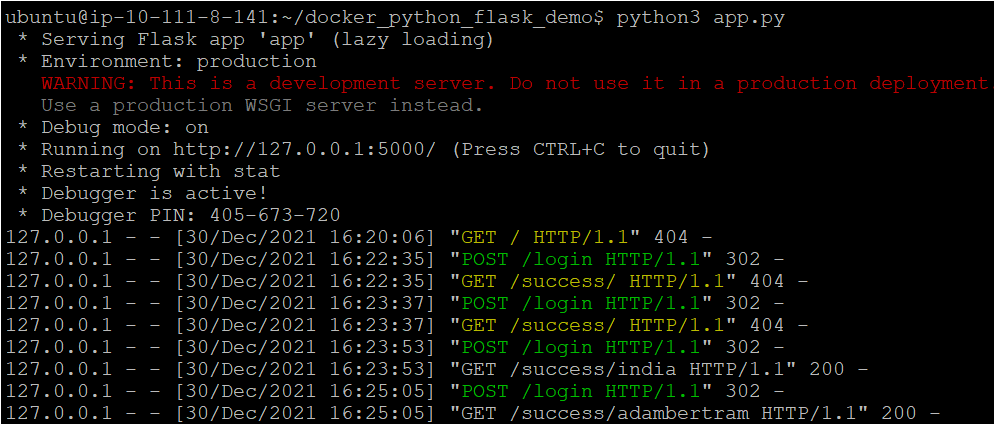
</html>10. Finally, run the Python command below to verify the application (app.py) works locally on your system.
Python app.pyAs you can see below, the application is running successfully on the Ubuntu machine but not on Docker. You’ll launch the same application on Docker in the following sections.
Creating a Dockerfile to Deploy the Python Flask API Application
You’ve just created and verified the Python Flask application works locally on your machine. But before deploying the application on Docker, you’ll first create a Dockerfile to define all sets of instructions to build the Docker image.
Create a file named Dockerfile in the ~/docker_python_flask_demo directory, and copy/paste the content below to the Dockerfile.
Docker will use this Dockerfile to run all the instructions or commands necessary to build a new Docker image on top of the base image (ubuntu:18.04).
# Sets the base image for subsequent instructions
FROM ubuntu:18.04
# Sets the working directory in the container
WORKDIR /app
RUN apt-get update -y
RUN apt-get install -y python-pip python-dev
# Copies the files to the working directory
COPY form.html /app/form.html
# Copies the dependency files to the working directory
COPY requirements.txt /app/requirements.txt
# Install dependencies
RUN pip install -r requirements.txt
# Copies everything to the working directory
COPY . /app
# Command to run on container start
CMD [ "python" , "./app.py" ]
Now, run the tree command below to verify all of the required files to run the Python Flask application are contained in the working directory (~/docker_python_flask_demo).
tree 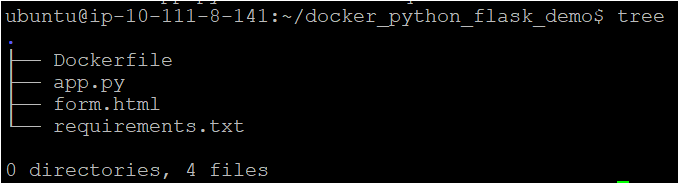
Building a Docker Image for Python Flask API Application
You now have the required files to deploy a Python Flask application, but those files won’t do anything unless you build an image. You’ll run the docker build command to build a Docker image based on the instructions you set in the Dockerfile.
Run the docker build command below to build a Docker image in the working directory (.). This command tags (-t) the image as flask-image version 1 (:v1).
sudo docker build -t flask-image:v1 .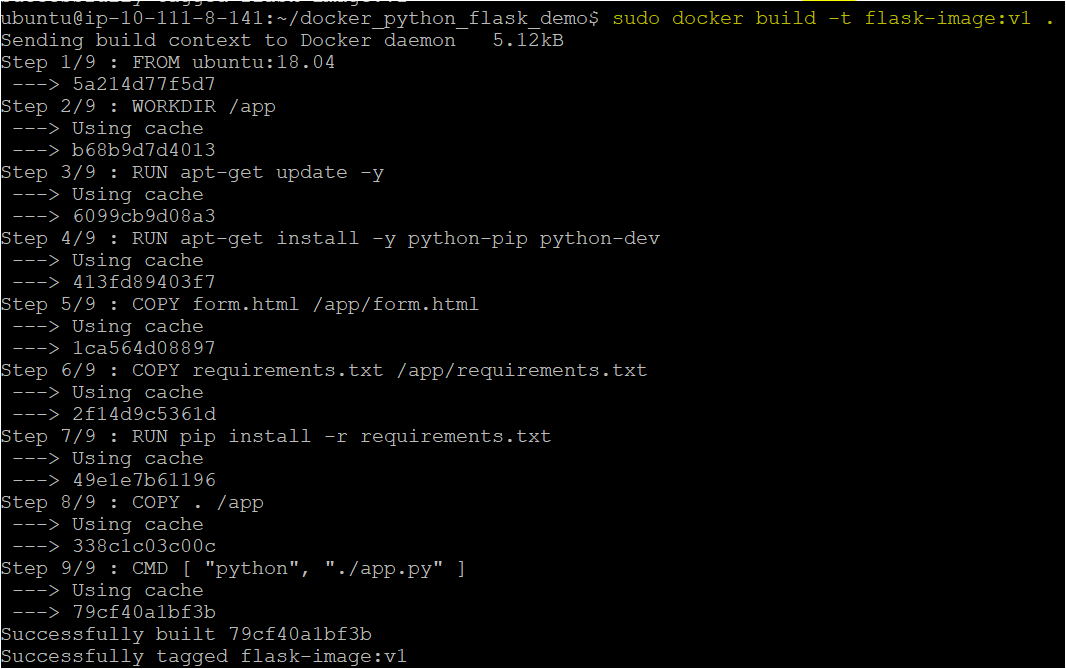
Now, run the docker command below to list all available images.
sudo docker imagesBelow, you can see various attributes returned, such as REPOSITORY. Notice the REPOSITORY name is flask-image and is tagged with a version (v1), as shown below.

Running the Python Flask Application in Docker Container
After creating a Docker image, you can now run the Python flash application in a Docker container. A Docker container packages up code and its dependencies to run applications quickly.
1. Execute the docker run command below to perform the following:
- Start the container in detached mode (
-d), so it runs as a background process and returns the console output upon creation. - Maps the Docker host port (
-p 5000:5000) with the container’s port. - Launches the Docker container (
flask-image:v1)
sudo docker run -d -p 5000:5000 flask-image:v12. Next, run the docker command below to list all containers in the Docker engine. Verify if Docker successfully created the container.
sudo docker ps -a
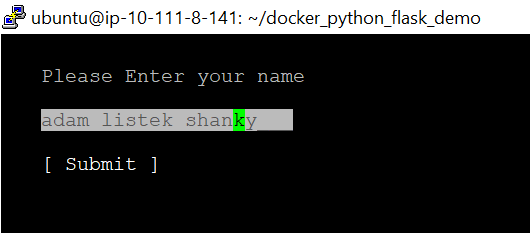
3. Finally, run the command below to open your web browser in the Ubuntu machine using elinks.
elinks form.htmlThe command opens the web browser on the terminal and prompts for a name, as shown below.
Enter your name and hit the Submit button.
4. As you can see below, after hitting the Submit button, the login function redirects to the success function in the Flask application.

Conclusion
This tutorial aimed to help you through the process of setting up a Python Flask API Docker container using Docker images. You’ve also touched on how to launch Python Flask containers using Dockerfiles, which allows you to edit and build customized containers of your choice.
So what other applications do you have in mind to deploy on Docker container? Perhaps a Docker MongoDB container?


