


Are you looking for a place to safely store your custom-built Docker images for your personal projects or use them within your organization? Or maybe a centralized system to manage your Continuous Integration and Deployment processes? A place where you can pull and upload your custom-built images for your application at will and improve the deployment rate?
Not a reader? Watch this related video tutorial!Look no further! A private Docker registry makes all of that possible! This step-by-step tutorial will guide you on building your own private Docker registry. Dive in to get started!
Prerequisites
To follow along with this tutorial, be sure to have the following:
- Two Ubuntu 20.04 LTS devices. One will host the Docker registry, and the other will act as a client machine to send requests to your Docker registry.
- NGINX is required only in the host machine for setting up SSL encryption and HTTP authentication.
- A registered domain name. NGINX will route traffic to your registered domain name to your Docker registry running in a container.
- You need Docker in both the host and client machine for this tutorial. The default install is enough.
- Docker-compose in the Docker registry host machine to set up and start up the components for your Docker registry. Related: Everything You Need to Know about Using Docker Compose
Setting up the Docker Registry
The first step you need to take is to set up the Docker registry on the host device, provided as a free image on Docker Hub.
Instead of being restricted to issuing Docker commands to accomplish this task, you will create a docker-compose.yml file. The file uses the docker-compose file format and can set up the components required for the Docker registry with relative ease.
To follow along, open your favorite SSH client, and connect to the device that will be the registry server.
1. In the /home directory, create a directory called docker-registry with the mkdir command:
# Creating working directory
mkdir docker-registry
2. Navigate to the docker-registry directory:
# Navigate to the working directory
cd ~/docker-registry
3. Inside of the docker-registry directory, create a subdirectory called data. Inside the data directory is where the Docker registry will store the Docker images. The data directory acts as a file system for the Docker registry to preserve the Docker images.
# Create filesystem to persist data
mkdir data
4. Inside of the docker-registry directory, create a docker-compose.yml file:
# Create the docker-compose file
nano docker-compose.yml
You will find configurations for setting the registry in the newly created file. Among the settings, you will notice:
- Sets the
registryservice with theregistry:latestimage with thelatesttag. - Sets the restart policy for the
registryservice toalways. Provided that the Docker engine is running, theregistryservice will always restart when stopped. - The
portssection maps the port5000in the registry container to port5000on the host machine. - The
registryservice in theenvironmentsection sets the environment variableREGISTRY_STORAGE_FILESYSTEM_ROOTDIRECTORYto the data directory created earlier. - Docker requires a volume to persist the Docker images in the
registrycontainer. You will add thevolumesobject to map the /data directory on the host machine to the/datadirectory in the container.
The mapping will store the data on the host machine’s file system instead of inside the container. Since Docker now stores the data on the host machine, it can be backed up, migrated, encrypted, or replaced.
Below you can see the full YAML configuration for the components needed to start and run the Docker registry. Copy the YAML code below and paste it into the docker-compose.yml file you created and save it with CTRL + S and press CTRL + X to exit:
version: '3.3'
services:
  registry:
    image: registry:latest
		restart: always
    ports:
    - "5000:5000"
    environment:
      REGISTRY_STORAGE_FILESYSTEM_ROOTDIRECTORY: /data
    volumes:
      - ./data:/data
Docker-compose runs multiple containers as a single application. The
docker-compose.ymlfile configures these multiple containers as part of services.
5. Now run the docker-compose file and create and start the Docker registry:
# Start docker registry application
sudo docker-compose up
In the command output below, you can see the Docker registry running. To close the application, press CTRL + C.
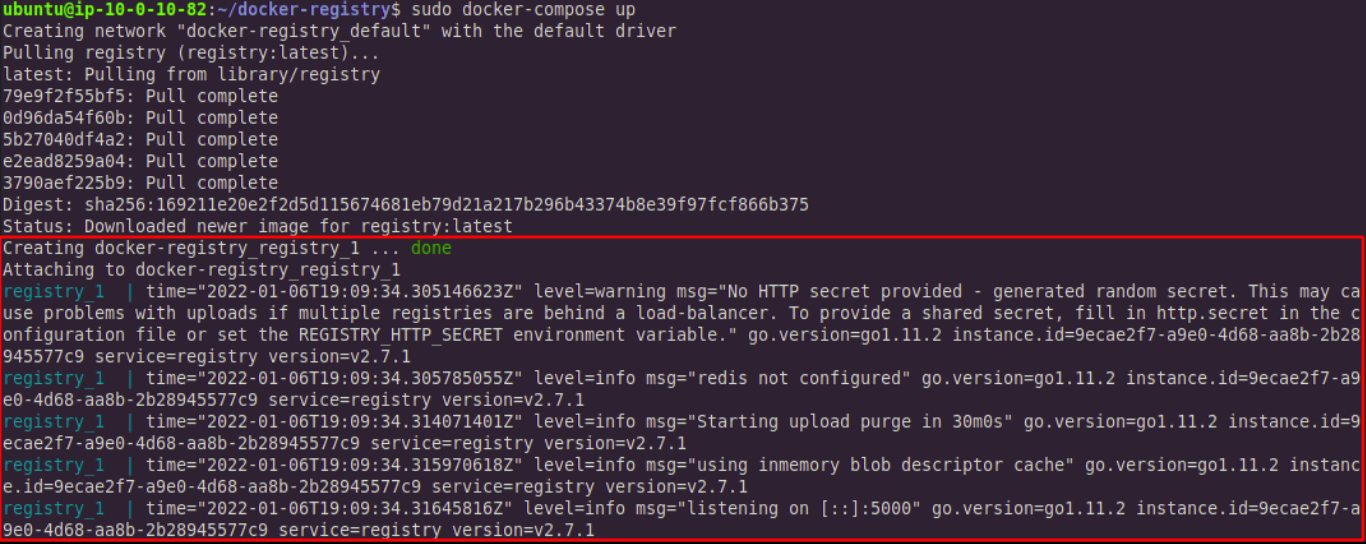
CTRL + C to close itSetting up NGINX
Now that you have the Docker registry set up, it is time to set up NGINX on the host machine. NGINX will forward traffic from client devices to the Docker registry. For this tutorial, you will forward the traffic via a domain name. Read on to tackle this step.
Initially, you will have to set up NGINX port forwarding for your domain via the /etc/nginx/sites-available/your_domain_name file.
1. Create the file with the following command:
# Creating configuration for your domain
sudo nano /etc/nginx/sites-available/your_domain_name
You will find many references to your_domain_name in the following sections. This string is a placeholder. Do not forget to replace it with a domain name you own when trying the commands yourself. In the examples registry.joeshiett.xyz is the selected domain name.
2. Copy the following NGINX configuration and add it to the your_domain_name file you created:
server {
	listen 80;
  # Replace your_domain_name with your domain name
  server_name your_domain_name;

    location / {
      # Do not allow connections from docker 1.5 and earlier
      # docker pre-1.6.0 did not properly set the user agent on ping, catch "Go *" user agents
      if ($http_user_agent ~ "^(docker\/1\.(3|4|5(?!\.[0-9]-dev))|Go ).*$" ) {
        return 404;
      }

      proxy_pass                          http://localhost:5000;
      proxy_set_header  Host              $http_host;   # required for docker client's sake
      proxy_set_header  X-Real-IP         $remote_addr; # pass on real client's IP
      proxy_set_header  X-Forwarded-For   $proxy_add_x_forwarded_for;
      proxy_set_header  X-Forwarded-Proto $scheme;
      proxy_read_timeout                  900;
    }
}
3. Port forwarding isn’t complete yet. You need to attach a symbolic link first. You will link /etc/nginx/sites-available/your_domain_name configuration file to /etc/nginx/sites-enabled/. The full command follows:
cd /etc/nginx/sites-enabled/ && sudo ln -s /etc/nginx/sites-available/your_domain_name .4. Restart the NGINX service after creating the symbolic link:
# Restarting Nginx service
sudo systemctl restart nginx
Open the browser on your client device and navigate to https://your_domain_name/v2/ to access the v2 endpoint, the Docker HTTP API.
The image below shows the expected output from the host terminal after navigating to the link. The image also shows that the browser sent a GET request to the Docker HTTP API via the v2 endpoint.

After navigating to the v2 endpoint via the link, an empty JSON object – {} – will be displayed on the browser’s window.
Configuring the NGINX File Upload Size
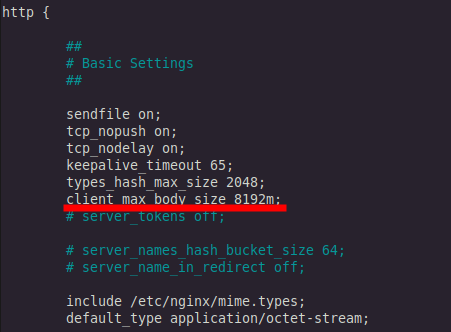
NGINX’s default upload size limit is 1m, where m stands for megabyte. The default limit is not nearly enough for uploading Docker images to your registry. To change this value, edit nginx.conf, so NGINX accepts large file uploads.
1. Once again, log into the host machine.
2. Edit the /etc/nginx/nginx.conf file:
3. Under the http section in nginx.conf file, add the following line to increase the upload size to accommodate 8,192 megabytes, and save the file:
client_max_body_size 8192m;The configuration will look somewhat like this:
Setting up SSL
An SSL certificate is required to secure the connection to the Docker registry. To add an SSL certificate, you need to install Certbot on the registry host.
You can install Certbot with the snap package manager. Snap package manager already comes pre-installed in Ubuntu 20.04.
1. To install Certbot, run the following command on your host machine:
# Install certbot using the snap package manager
sudo snap install --classic certbot
2. Add Certbot to PATH so Certbot commands can work by creating a symbolic link:
# Attaching certbot to PATH
sudo ln -s /snap/bin/certbot /usr/bin/certbot
3. Run this command to get a certificate and have Certbot edit your NGINX configuration automatically, and also enable HTTPS access for your domain:
# Creating a certificate and enabling HTTPS access
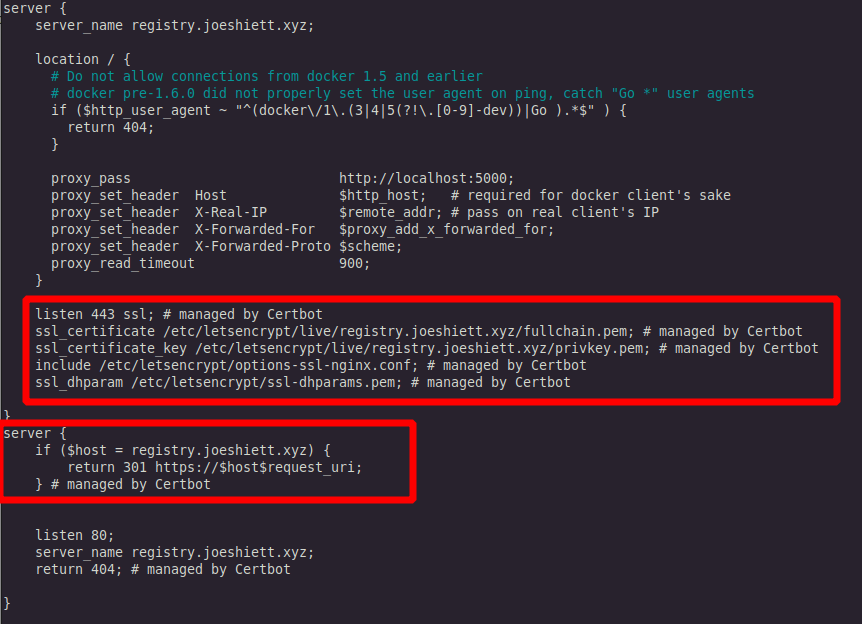
sudo certbot --nginx
Certbot will modify the your_domain_name configuration file at the /etc/nginx/sites-enabled/ directory and apply an SSL certificate to your domain name.
The image below shows what the final configuration for your /etc/nginx/sites-enabled/your_domain_name file will look like after Certbot has applied the certificates.
If you browse to https://your_domain_name/, you will find it is secure with the certificate from Certbot.
Setting up HTTP Authentication for Docker Registry
It is always a good idea to have good security practices. So you will secure your Docker registry and restrict access to only you and some other users you may wish to add. You will use HTTP authentication, provided by HTTP Basic Auth.
1. HTTP authentication requires a htpasswd file with your username and password. To create the htpasswd authentication, you will need to install the apache2-utils package:
# Installing apache2-utils package
sudo apt-get install apache2-utils
2. After installing apache2-utils create a registry.credentials file in the /etc/nginx directory with the httpasswd command. Add a preferred username by replacing your_username in the command below. Next, add a password of your preference when prompted. The full command and its output are below.
# Creating to creating auth credentials
sudo htpasswd -c /etc/nginx/registry.credentials your_username
joeshiett3. After creating the registry.credentials file, navigate to your NGINX configuration file for your Docker registry at /etc/nginx/sites-available/your_domain_name. Add the following text to the NGINX configuration file in the server section:
server {
	...
	...
	location / {
			...
			auth_basic            "Basic Auth";
      auth_basic_user_file  "/etc/nginx/registry.credentials";
			...
	}
}
4. Restart NGINX once again and re-apply the configurations with the following command:
# Restarting nginx
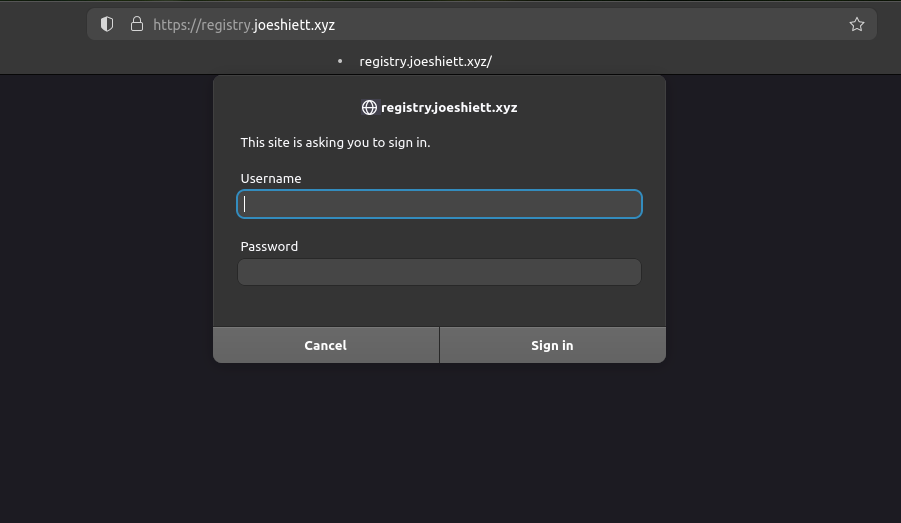
sudo systemctl restart nginxThe image below shows that when you try to access https://your_domain_name/ on your browser, you will be prompted to input your username and password. For this tutorial, the Docker registry runs at a subdomain registry.joeshiett.xyz, with SSL enabled.
Pushing Image to Private Docker Repository
Now that your Docker registry is running and capable of accepting larger file uploads, you will push an image to it. To push an image to your Docker registry, you must access your client machine.
If you do not have a Docker image stored locally on your client machine, you can pull a free one from Docker Hub.
1. Run the following command to pull an Alpine Linux image from the Docker hub, set the name of the image as test-image, and run the container in the interactive shell:
# Pull and run Alpine container
sudo docker run --name test-image -it alpine:latest /bin/sh
2. Once inside the Alpine container, create a file called TEST. This file will then be the confirmation the image you will pull from your Docker registry is the one you are modifying now:
# create a file called TEST
touch /TEST
3. Exit out of the interactive shell by typing exit on your terminal.
4. Now create a Docker image from the Alpine Docker container named test-image, you just customized:
# Creating Docker image
sudo docker commit test-image your_domain_name/test-image:latest
The Alpine image that you pulled and customized earlier is now available locally with a repository called your_domain_name/test-image and tag latest.
5. To push your newly created image to your Docker registry, log in to your Docker registry with the command below:
# Login to Docker registry
sudo docker login https://your_domain_name
You will be prompted to input your username and password that you set up in the previous section. The output will be:
...
Login Succeeded
...
6. After logging in, push the tagged image to your Docker repository: # Pushing docker image sudo docker push your_domain_name/test-image:latest
# Pushing docker image
sudo docker push your_domain_name/test-image:latest
The output of the command will look like this:

Pulling Image from Private Docker Repository
Now that you have successfully pushed your Docker image to your private Docker repository, it is time to pull the image you just pushed.
1. First off, you need to login into your private Docker repository: # Login to Docker registry sudo docker login https://your_domain_name
# Login to Docker registry
sudo docker login https://your_domain_name
2. After logging in, you will pull the Docker image created earlier:
# Pull Docker image from Docker registry
sudo docker pull your_domain_name/test-image
From the image below, you can see that Docker pulls the test-image successfully.

3. Time to run an interactive shell:
sudo docker run -it your_domain_name/test-image /bin/sh4. While in the interactive shell, run the following command:
lsFrom the image below, you can see that the TEST file created earlier is inside the container.

Now you have successfully tested your Docker registry and are good to go!
Conclusion
In this tutorial, you created your very own private Docker registry. You installed the necessary prerequisites; set up SSL and HTTP authentication. And then you finally pushed and pulled an image from your registry.
So, what packages do you plan to push to your registry?


