---
title: "How To Serve NGINX Subdomains or Multiple Domains"
description: "If you can't get your head over how to serve multiple domains with a single IP address, then you're in for a treat! Learn how to configure an NGINX virtual host configuration file to serve an NGINX subdomain or multiple domains in this step-by-step tutorial!"
canonical: "https://adamtheautomator.com/nginx-subdomain/"
---
# How To Serve NGINX Subdomains or Multiple Domains
> If you can't get your head over how to serve multiple domains with a single IP address, then you're in for a treat! Learn how to configure an NGINX virtual host configuration file to serve an NGINX subdomain or multiple domains in this step-by-step tutorial!
Source: https://adamtheautomator.com/nginx-subdomain/
---
ATA Learning
Tap to hide
[
ATA Learning
](/)
* [Home](/)
* [Tutorials](/tutorials/)
* [Instructors](/author/)
* [Advertising](/advertising/)
* [Recommended Resources](/resources/)
* [About Adam](/about-adam/)
Search for:
* [](https://twitter.com/adbertram)
* [](https://github.com/Adam-the-Automator)
* [](https://www.linkedin.com/company/adam-the-automator-llc)
* [](/feed/)

# How To Serve NGINX Subdomains or Multiple Domains
[Hitesh Jethva](https://adamtheautomator.com/author/hitesh-jethva/)6 December 20218 min. read
Categories: [IT Ops](/category/it-ops/)
Tags:[NGINX](/tag/nginx/)
Table of Contents
* [Prerequisites](#prerequisites)
* [Setting Up DNS Records](#setting-up-dns-records)
* [Setting Up Web Directories for NGINX Domain and Subdomain](#setting-up-web-directories-for-nginx-domain-and-subdomain)
* [Setting Up Virtual Host for NGINX Domain and Subdomains](#setting-up-virtual-host-for-nginx-domain-and-subdomains)
* [Setting Up HTTPS on NGINX Domain and Subdomain](#setting-up-https-on-nginx-domain-and-subdomain)
* [Configuring NGINX Virtual Host to Use SSL Certificates](#configuring-nginx-virtual-host-to-use-ssl-certificates)
* [Conclusion](#conclusion)
Do you have a server with a single public IP address, but need to host multiple domains or subdomains? What would you do? This scenario can be confusing if you are a beginner. But no worries, this tutorial has got you covered, so you can serve an NGINX subdomain and multiple domains.
In this tutorial, you’ll learn how to effectively serve NGINX subdomains or multiple domains on one server with a single IP address!
If you’re ready, time to get down to it!
## Prerequisites
This tutorial comes with hands-on demos but doesn’t require many prerequisites and will assume you have an Ubuntu Server LTS with [SSH enabled](https://linuxize.com/post/how-to-enable-ssh-on-ubuntu-20-04/) and [NGINX](https://www.nginx.com/resources/wiki/start/topics/tutorials/install/) installed. The demos in this tutorial are on Ubuntu Server LTS 20.04.1.
## Setting Up DNS Records
Before you can serve NGINX subdomains or multiple domains, you will need to add an [A record](https://support.dnsimple.com/articles/a-record/) in a [DNS](https://adamtheautomator.com/powershell-dns/) control panel. The A record binds and points all domains and subdomains to a single IP address to let web browsers find your website.
Related:[How to use PowerShell for DNS Records](https://adamtheautomator.com/powershell-dns/)
1\. Launch your favorite web browser, and log in to your DNS control panel.
2\. Click on **Add Record** to start adding A records. Your browser redirects to a page where you’ll configure DNS settings for your domain and subdomains.
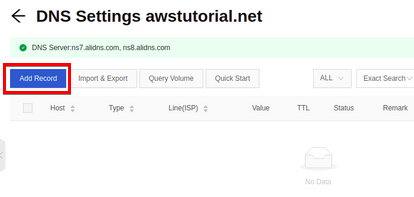
Adding an A Record
Now configure the DNS settings with the following:
Select **A** record in the **Type** field.
Enter **@** in the **Host** field, and your server IP in the **Value** field.
Select your desired value in the **[TTL](https://en.wikipedia.org/wiki/Time_to_live)** field, then click on the **Confirm** button to save the settings.
Repeat the same process for other subdomains.
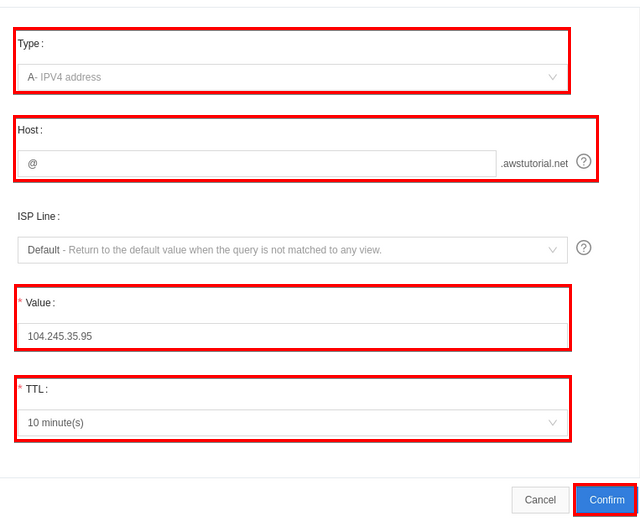
Configuring DNS settings for Domain and Subdomains The final **DNS Settings** page looks like the one below.
The final **DNS Settings** page looks like the one below.
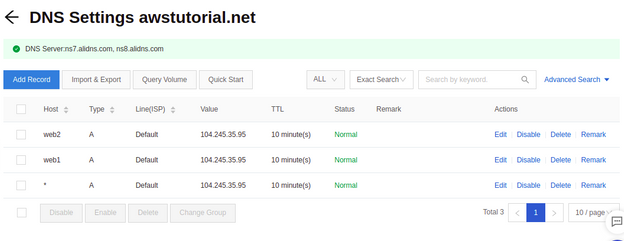
Viewing DNS Settings Page
> _Your DNS record control panel may vary in functionality and design, but the same principles will apply to all._
## Setting Up Web Directories for NGINX Domain and Subdomain
Now that you’ve added A records for your domain and subdomains, it’s time to set up their web directories. NGINX comes with a default virtual host file and is configured to serve a web directory located at _/usr/share/nginx/html._
You’ll create a separate web directory for each domain inside the NGINX default document root (_/var/www/html_).
1\. First, open your terminal and run the commands below to create web directories for all domains and subdomains. Doing so separates, organizes, and isolates files for each website.
```bash
sudo mkdir /var/www/html/awstutorial.net
sudo mkdir /var/www/html/web1.awstutorial.net
sudo mkdir /var/www/html/web2.awstutorial.net
```
2\. Next, run the `chown` command to recursively (`-R`) change the ownership of each directory you created in step one to `www-data` user and group. You’re changing ownership of each directory to `www-data` user and group since NGINX runs as a www-data user.
```bash
sudo chown -R www-data:www-data /var/www/html/awstutorial.net
sudo chown -R www-data:www-data /var/www/html/web1.awstutorial.net
sudo chown -R www-data:www-data /var/www/html/web2.awstutorial.net
```
3\. Create a file named _index.html_ in your preferred code editor and then copy/paste the code below to the _index.html_ file. Save the file inside your domains’ primary web directory (_/var/www/html/awstutorial.net)_.
The HTML code below displays a message that says “Congratulations! The [awstutorial.net](http://awstutorial.net) website is working!” when the _index.html_ file is opened in a web browser.
```markup
Welcome to awstutorial.net!
Congratulations! The awstutorial.net website is working!
```
4\. Finally, create the same _index.html_ in the _/var/www/html/web1.awstutorial.net_ and _/var/www/html/web2.awstutorial.net_ directories. But replace `awstutorial.net` with `web1.awstutorial.net`, and `web2.awstutorial.net` in the code of each _index.html_ accordingly.
## Setting Up Virtual Host for NGINX Domain and Subdomains
You already have an _index.html_ page for your domain and subdomains to serve through an NGINX web server. The next step is you’ll create an NGINX virtual host configuration file for each domain to serve the HTML pages.
Related:[How to Test Your NGINX Configuration Before Screwing it Up](https://adamtheautomator.com/nginx-test-config/)
1\. Create an NGINX virtual host configuration file named _[awstutorial.net](http://awstutorial.net)_ in your preferred code editor, and then copy/paste the code below to that file. Save the file in the _/etc/nginx/sites-available/_ directory.
The code below controls the behavior of your server, such as the server name and index (home) page when a user tries to access your domain.
```bash
server {
# Binds the TCP port 80.
listen 80;
# Root directory used to search for a file
root /var/www/html/awstutorial.net;
# Defines the file to use as index page
index index.html index.htm;
# Defines the domain or subdomain name.
# If no server_name is defined in a server block then
# Nginx uses the 'empty' name
server_name awstutorial.net;
location / {
# Return a 404 error for instances when the server receives
# requests for untraceable files and directories.
try_files $uri $uri/ =404;
}
}
```
2\. Next, run the following `nginx` command to check (`-t`) the NGINX configuration file for any syntax error.
```bash
sudo nginx -t
```
If no syntax error is found in the NGINX configuration file, you will get the following output.

Verifying NGINX configuration file
3\. Next, run the below command to create a symbolic link (`ln -s`) from the _/etc/nginx/sites-available_ to the _/etc/nginx/sites-enabled/_ directory. This command enables the _[awstutorial.net](http://awstutorial.net)_ virtual host configuration file.
```bash
sudo ln -s /etc/nginx/sites-available/awstutorial.net /etc/nginx/sites-enabled/
```
> _The sites-available and sites-enabled format are standard within an NGINX Ubuntu installation but other distributions may use a different standard._
4\. Repeat steps one to three to create NGINX virtual host configuration files named _[web1.awstutorial.net](http://web1.awstutorial.net)_ and _[web2.awstutorial.net](http://web2.awstutorial.net)_.
Change the following lines in each NGINX virtual host configuration file:
* Replace the line `root /var/www/html/awstutorial.net` with the webroot directory of each subdomain (`root /var/www/html/web1.awstutorial.net` and `root /var/www/html/web2.awstutorial.net`).
* Replace the line `server_name awstutorial.net` with the name of each subdomain (`server_name web1.awstutorial.net` and `server_name web2.awstutorial.net`).
5\. Now run the `sudo ln` commands below as you did in step three to enable the virtual host configuration files.
```bash
# Enables web1.awstutorial.net NGINX virtual host configuration file
sudo ln -s /etc/nginx/sites-available/web1.awstutorial.net /etc/nginx/sites-enabled/
# Enables web2.awstutorial.net NGINX virtual host configuration file
sudo ln -s /etc/nginx/sites-available/web2.awstutorial.net /etc/nginx/sites-enabled/
```
6\. Run the below `systemctl` command to restart the NGINX (`restart nginx`) service to apply all configuration changes.
```bash
sudo systemctl restart nginx
```
7\. Finally, navigate to the domain and subdomains’ URLs on your browser to test if the websites work fine.
Related:[How to Use Python to Load Test Websites](https://adamtheautomator.com/load-test/)
If the domain and subdomains load up, you’ll see a message like the one below.

Verifying websites are loading through the web browser.
## Setting Up HTTPS on NGINX Domain and Subdomain
You’ve successfully set up and tested an NGINX domain and subdomains on HTTP protocol, which is great. But you must secure your domain and subdomains’ connection by enabling HTTPS. How? With a certificate that you’ll get from a Certificate Authority like [Let’s Encrypt SSL](https://letsencrypt.org/).
1\. First, run the command below to install the [Certbot](https://certbot.eff.org/) software package (`apt-get install certbot`). Certbot lets you download an SSL certificate for your domain and subdomains.
```bash
sudo apt-get install certbot python3-certbot-nginx -y
```
2\. Next, run the [`certbot`](https://eff-certbot.readthedocs.io/en/stable/using.html) command below to download an SSL certificate (`certonly`) for your domain (`-d awstutorial.net`). Notice that you agree to the term of service (`—agree-tos`) with your email address (`—email`).
```bash
sudo certbot certonly --agree-tos --email myemail@email.com -d awstutorial.net
```
> _Replace the email with your own._
3\. Enter ‘1’ to select the **NGINX Web Server plugin (nginx)** to authenticate with the [ACME CA](https://cert-manager.io/docs/configuration/acme/), as shown below.
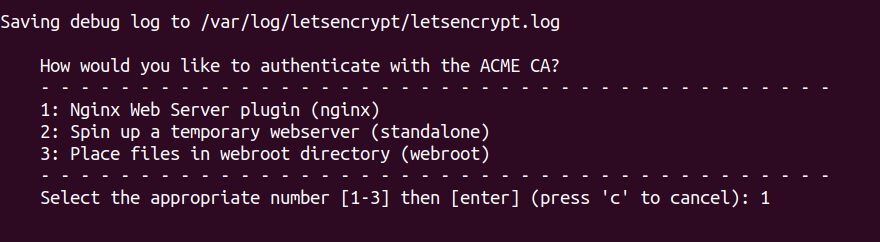
Selecting Plugin to Authenticate with ACME CA
After selecting the NGINX Web Server plugin, you’ll see the download progress of the SSL certificate for your domain (_[awstutorial.net](http://awstutorial.net)_).
By default, Let’s Encrypt’s SSL certificates are stored in the _/etc/letsencrypt/live/_ directory.
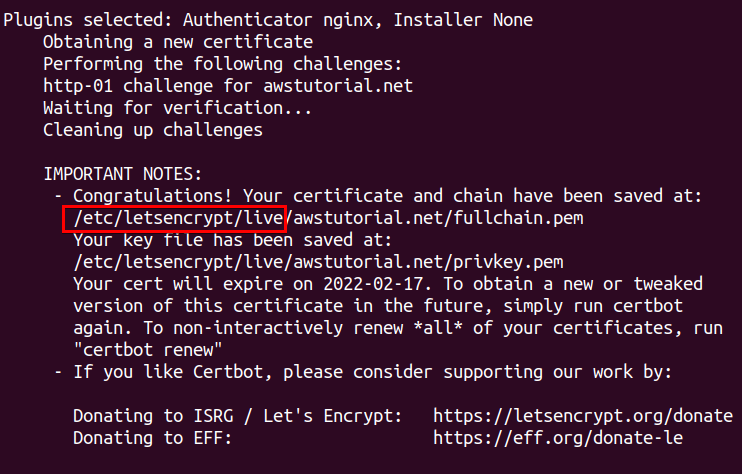
Showing Download Progress of the SSL Certificate
4\. Now run each command below as you did in step two to download SSL certificates for the remaining subdomains (`web1.awstutorial.net` and `web2.awstutorial.net`).
```bash
sudo certbot certonly --agree-tos --email myemail@email.com -d web1.awstutorial.net
sudo certbot certonly --agree-tos --email myemail@email.com -d web2.awstutorial.net
```
5\. Finally, run the `ls` command below to list all SSL certificates in the _/etc/letsencrypt/live/_ directory that contain (`*`) the `awstutorial.net` in their names. Doing so lets you verify that the SSL certificates exist.
```bash
ls /etc/letsencrypt/live/*awstutorial.net/
```
Below, you’ll see the SSL certificates for your domain and subdomains.
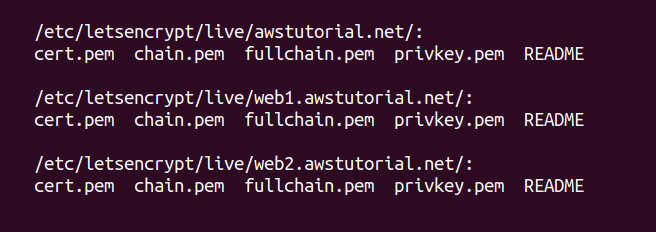
Showing SSL certificate for all domains.
### Configuring NGINX Virtual Host to Use SSL Certificates
At this point, you already have SSL certificates at your disposal. But how do you use them to secure your domain and subdomains? You’ll define the certificates’ path in the `server` block of each NGINX virtual host configuration file.
1\. Open the _[awstutorial.net](http://awstutorial.net)_ NGINX virtual host configuration file sitting at the `/etc/nginx/sites-available/` directory in your preferred code editor.
2\. Replace the content of the file with the code below, where you define your domain’s SSL certificate’s path, and SSL protocol (under `Path of the SSL certificate`).
```bash
server {
# Binds the TCP port 80.
listen 80;
# Defines the domain or subdomain name.
# If no server_name is defined in a server block then
# Nginx uses the 'empty' name
server_name awstutorial.net;
# Redirect the traffic to the corresponding
# HTTPS server block with status code 301
return 301 https://$host$request_uri;
}
server {
# Binds the TCP port 443 and enable SSL.
listen 443 SSL;
# Root directory used to search for a file
root /var/www/html/awstutorial.net;
# Defines the domain or subdomain name.
# If no server_name is defined in a server block then
# Nginx uses the 'empty' name
server_name awstutorial.net;
# Path of the SSL certificate
ssl_certificate /etc/letsencrypt/live/awstutorial.net/fullchain.pem;
ssl_certificate_key /etc/letsencrypt/live/awstutorial.net/privkey.pem;
# Use the file generated by certbot command.
include /etc/letsencrypt/options-ssl-nginx.conf;
# Define the path of the dhparam.pem file.
ssl_dhparam /etc/letsencrypt/ssl-dhparams.pem;
location / {
# Return a 404 error for instances when the server receives
# requests for untraceable files and directories.
try_files $uri $uri/ =404;
}
}
```
3\. Repeat the same process (steps one to two) for the remaining virtual host configuration files (_[web1.awstutorial.net](http://web1.awstutorial.net)_ and _[web2.awstutorial.net](http://web2.awstutorial.net))_. But be sure to replace the SSL certificate’s path with your subdomain’s certificate’s path (under `Path of the SSL certificate`).
4\. Now rerun the `systemctl` command below to restart the NGINX service to apply the configuration changes.
```bash
sudo systemctl restart nginx
```
5\. Finally, navigate to your domain and subdomain’s URLs on your web browser. But this time, instead of the HTTP protocol, use HTTPS to see if they work.
Below, you can see a padlock icon at the address bar, which indicates the website is secure with your SSL certificate.

Verifying Domain is Secure
## Conclusion
In this tutorial, you’ve learned how to serve an NGINX subdomain or multiple domains by configuring a virtual host configuration file. You’ve also touched on securing your domains with an SSL certificate that you also define in the virtual host configuration file.
Now, why not use this setup in a production environment, such as to host multiple apps on a single server, and provide affordable web hosting?
Share this article
[Share on X](https://twitter.com/intent/tweet?url=https%3A%2F%2Fadamtheautomator.com%2Fnginx-subdomain%2F&text=How%20To%20Serve%20NGINX%20Subdomains%20or%20Multiple%20Domains)[Share on Facebook](https://www.facebook.com/sharer/sharer.php?u=https%3A%2F%2Fadamtheautomator.com%2Fnginx-subdomain%2F)[Share on LinkedIn](https://www.linkedin.com/sharing/share-offsite/?url=https%3A%2F%2Fadamtheautomator.com%2Fnginx-subdomain%2F)
## Related Posts

### [How to Install Statping on Ubuntu Linux](/statping/)
Make sure your services are up and running with this open source web and app status monitoring solution in Statping!

### [How to Fix NGINX 502 Errors Now!](/nginx-502/)
NGINX 502 errors are a challenge for any system administrator, learn how to solve these pesky errors in this ATA Learning tutorial!

### [Simple Virtual Host Management With NGINX Proxy Manager](/nginx-proxy-manager/)
Learn to manage virtual hosts and SSL certificates quickly and easily with the NGINX Proxy Manager in this step-by-step tutorial!
## Categories
* [IT Ops](/category/it-ops/)
* [Cloud](/category/cloud/)
* [DevOps](/category/devops/)
* [Home Ops](/category/home-ops/)
* [Information Security](/category/infosec/)
* [Software Development](/category/software-development/)
## Site
* [Home](/)
* [Tutorials](/tutorials/)
* [Instructors](/author/)
* [Advertising](/advertising/)
* [Recommended Resources](/resources/)
* [About Adam](/about-adam/)
Copyright 2026© ATA Learning | [Privacy Policy](/privacy/)