


Imagine that you have a new web application, and you know it performs well with a small group of users. But how would your application respond to the increased traffic that goes beyond the expected load? Run a load test against your web application with Python!
Not a reader? Watch this related video tutorial!In this article, you’ll learn how to run a load test on a web application by simulating hundreds of users accessing your application at once.
Read on to start load testing websites!
Prerequisites
This tutorial will be a hands-on demonstration. If you’d like to follow along, be sure you have the following:
- An Ubuntu Linux machine – This tutorial uses Ubuntu 21.04, but macOS or other Linux distros will also work, including WSL.
- Python 3.8 or higher and installed.
- Pip package manager and the Virtual Environment module.
- A Microsoft Azure account with a storage account.
Setting up a Static Website
Before running a load test against a website, you first must set up a demo site. You’ll create a static website and a demo API for this tutorial, but here you will focus on the static website first. A static website will show you the load testing basics, while an API will show you how to pass different parameters simulate different operations.
If you prefer to start running the load test against API, you can skip to the next section, where you’ll install Locust and run it on your machine. The demos in this tutorial use the Swagger Petstore demo API.
- Create a new file in your preferred code editor, copy the code below into the new file and save it with your preferred name. For this example, the file is named load_test_page.html.
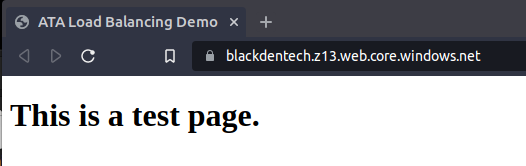
Below is an HTML document, which displays the “This is a test page.” text when opened on a web browser.
<!DOCTYPE html>
<html>
	<head>
		<title>ATA Load Balancing Demo</title>
	</head>
	<body>
		<h1>This is a test page.</h1>
	</body>
</html>
2. Next, open your favorite web browser, and navigate to your storage account in the Azure Portal.
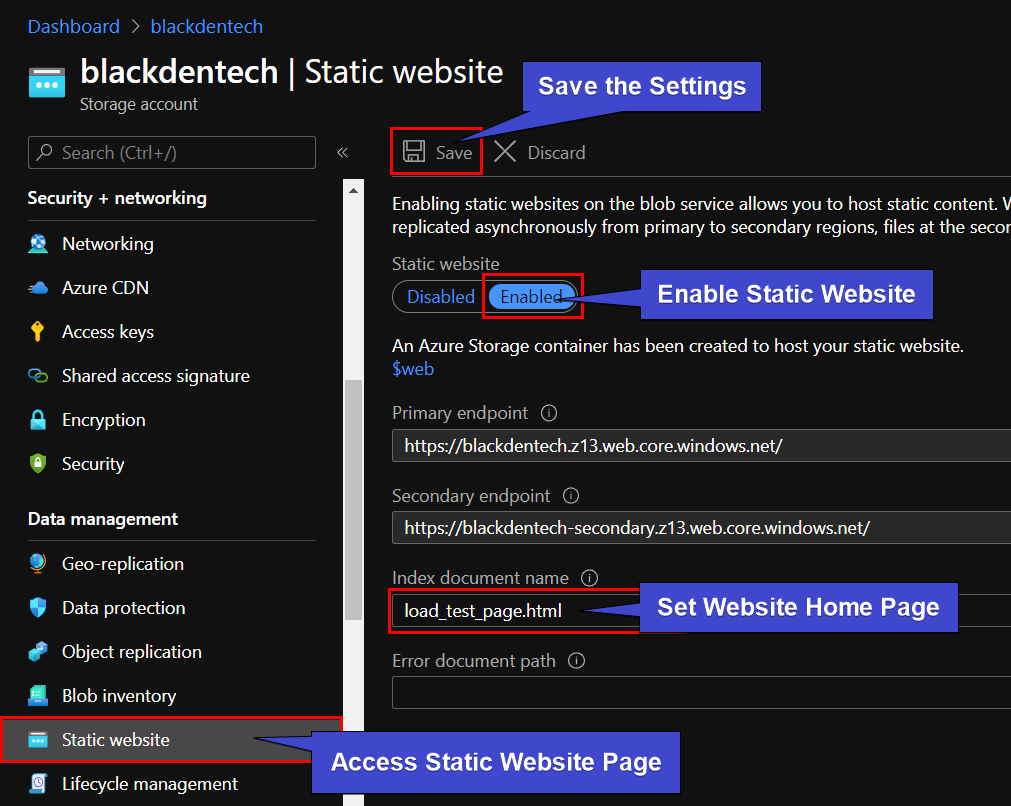
3. Follow the steps below to enable static website hosting within a storage account, and set your website’s home page:
- Click Static website on the left-hand navigation panel. The Static website page is where you’ll upload the files for your demo site.
- Click Enabled, as shown below, to enable static website hosting.
- Enter load_test_page.html in the Index document name field, and click Save. Doing so automatically creates a blob container and a URL (primary endpoint), which points to your website. The URL won’t work yet, but save it for later.
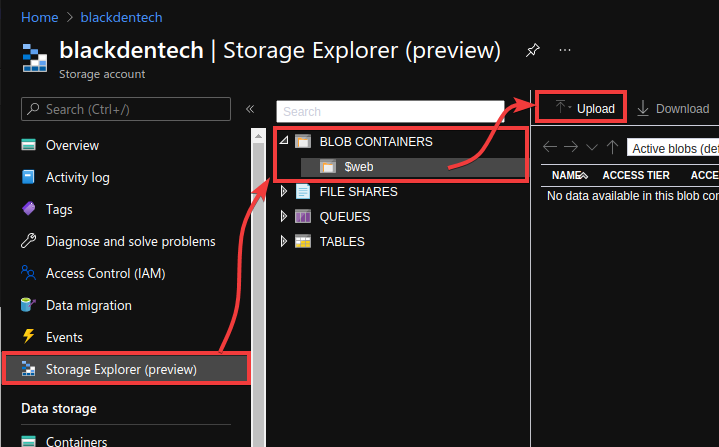
4. Click on Storage Explorer (Preview) in the left panel and navigate to Blob Containers → $web. The $web blob container, created by the Static website feature, will host all your static files.
Click Upload, and then upload the load_test_page.html you created in step one.
5. Finally, open a new tab on your web browser, navigate to the URL you noted in step two, and see if the URL is working now.
Installing the Locust Framework
You now have a site to test, but you still need load testing tools to test your website. Writing your code to manage high load testing is time-consuming and error-prone. So why not use the Locust framework? Locust is an open-source tool written in Python that you can install via the pip package manager.
If you need to brush up on your Python, check out Python functions for newbies.
Locust can run load tests against static sites, web applications, or even APIs. The only requirement is that whatever you are testing has an HTTP(S) endpoint that you can reach from your device.
By default, the
pippackage manager installs packages under the ~/.local directory on Linux and MacOS, which is not on the system path. That path is available to a Python virtual environment only, which is why you’ll usepipin this tutorial.
- Open your terminal and run the commands below to create a new virtual environment and install Locust.
# Uses the venv module to create a new python virtual environment
python3 -m venv venv
# Activate the virtual environment
source venv/bin/activate
# Install locust in the new virtual environment
python3 -m pip install locust
2. Run the commands below to make the new directory and navigate to it. Doing so keeps the locust files isolated from the rest of your codebase, making it easier to organize. For this example, the directory is named locust_dir.
mkdir locust_dir
cd locust_dir
3. Finally, create a new file called locustfile.py in the locust_dir directory, then copy/paste the code below to the locustfile.py file. This file will contain your test instructions, like how to simulate users, which endpoints those users will hit, and what parameters to pass along.
When Locust runs, it looks for a specific file named locustfile.py. So it’s best to save that file in a separate directory (locust_dir), enabling Locust to find it, and you can create additional tests without overwriting other tests.
The code below runs an HTTP GET request against the path of the hostname you provide, which is equivalent to running curl http://<Host>/ from the command line.
Once a response is received, Locust immediately sends the subsequent request, and the whole process repeats for every virtual user in the test.
# Imports classes from Locust
from locust import HttpUser, task

# Instantiate a new virtual user
class HelloWorldUser(HttpUser):
    # This tells locust to treat the method below
    # as something the virtual user would do
    @task
    # Define a new method
    def hello_world(self):
        # This method will run an HTTP GET request on the path `/`
        # of the site you are testing
        self.client.get("/")
If the path in the method looks incomplete, that’s because it is. Only the path and the query parameters are defined in a locust file, while the host is passed at runtime. This method will make more sense in the next step.
Running a Load Test Against Static Sites
Now that you’ve installed Locust, it’s time to run a load test! Load testing is about more than writing a series of web requests to see what your application does. A complete test records response times, failure rates, and error codes across different endpoints and configurations.
Locust is flexible in running as it can be called from the command line or through a web interface. For this tutorial, you’ll use the web interface to run a load test against a static site.
Run the locust command to start the locust graphical application using the test scenario from your locustfile.py file.
locust 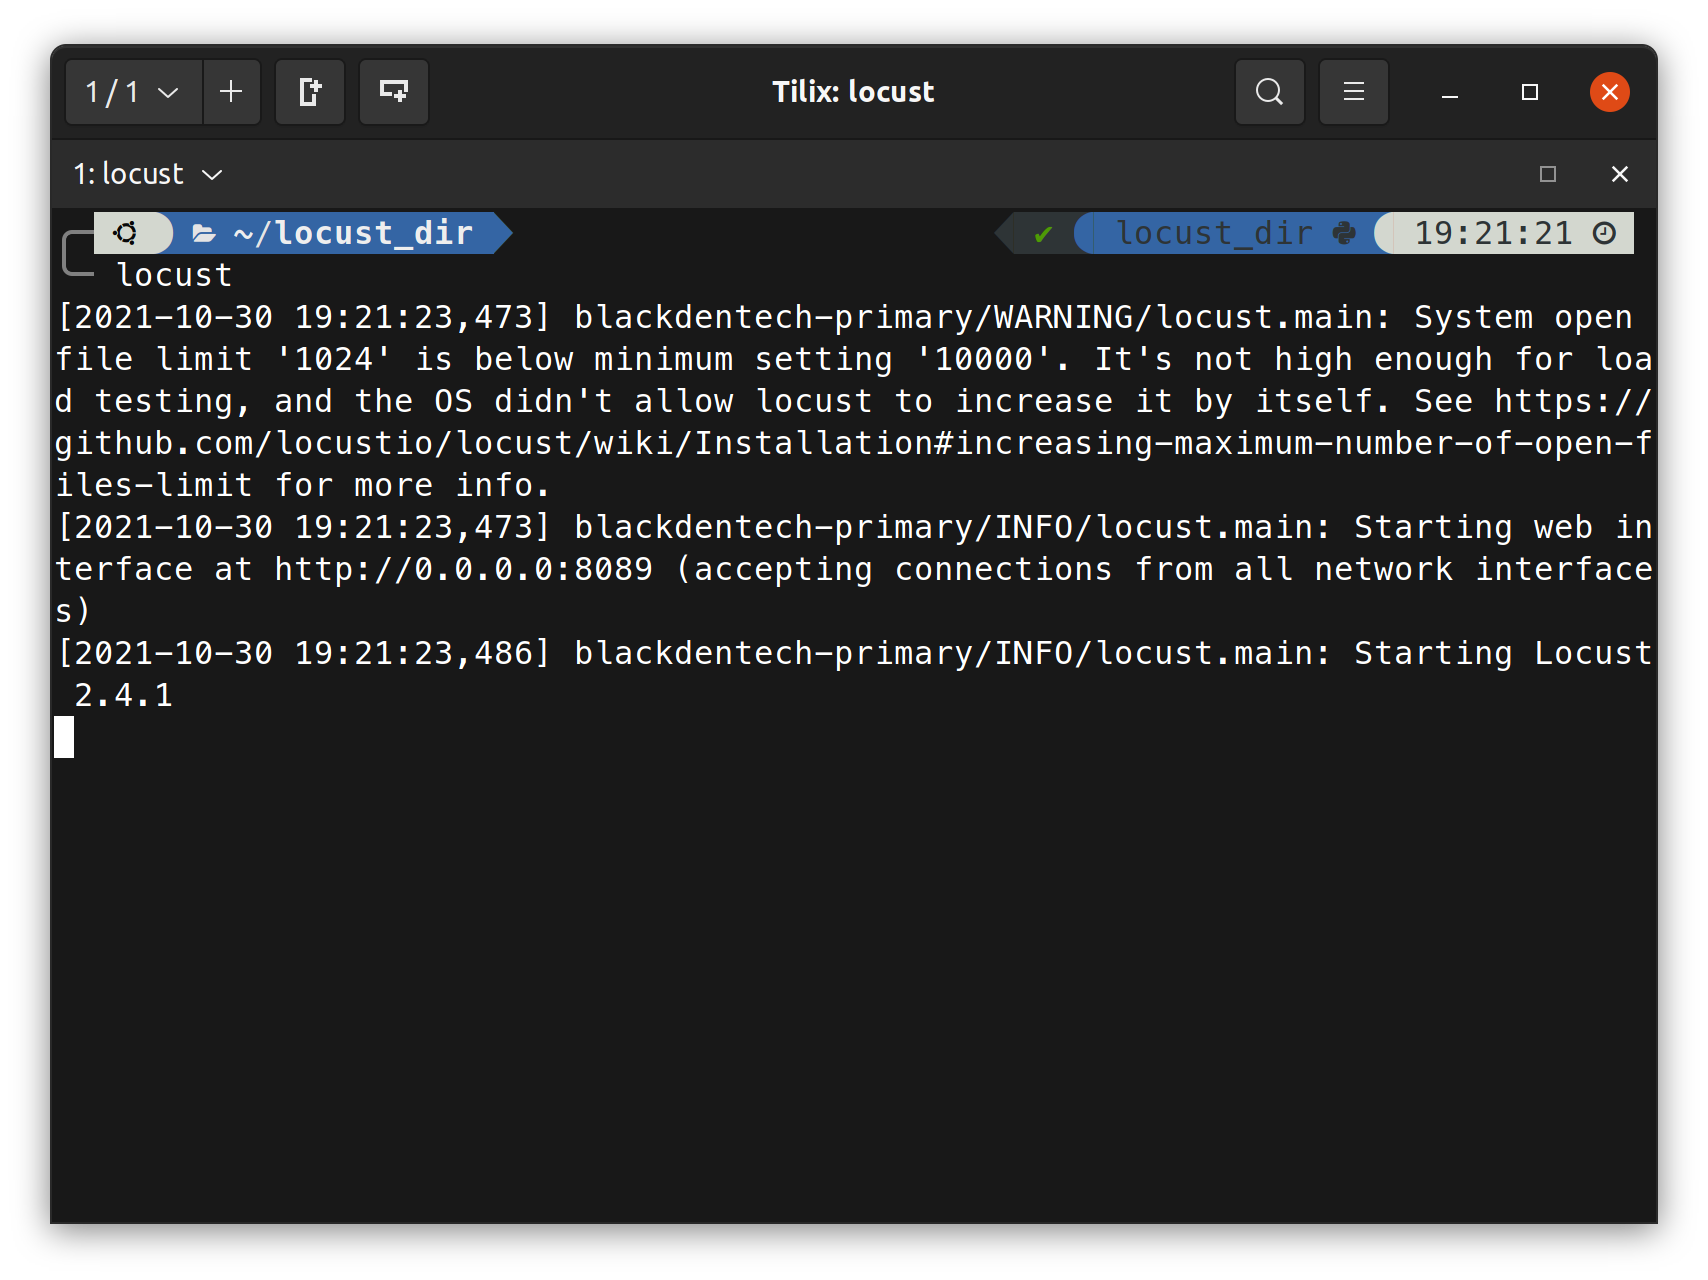
2. Open a web browser and navigate to http://localhost:8089/ to access Locust. The 8089 port is the default port that Locust runs on.
Remember the URL (primary endpoint) that you noted in step three under the “Setting up a Static Website” section? Now is the time to use it in the next step!
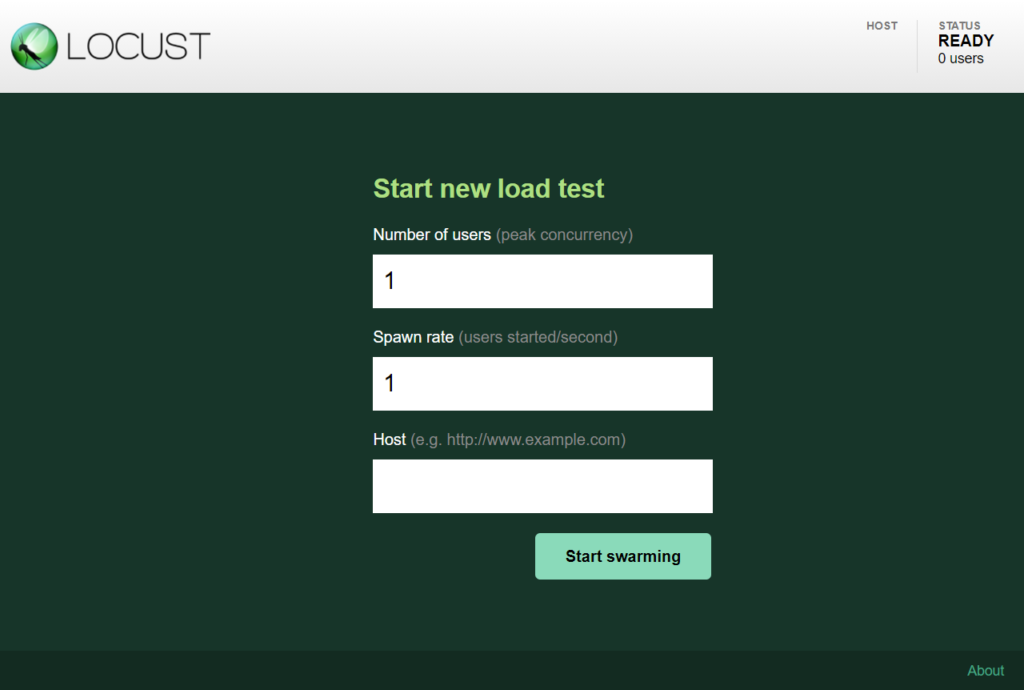
3. Finally, enter the URL (primary endpoint) into the Host field seen in the screenshot below, then click Start swarming to start the load test. Doing so tells any tests in your locustfile.py to run against the URL you entered in the Host field.
For this demo, changing the value of the Number of users or the Spawn rate fields is optional.
The Number of users is the max number of virtual users to create simultaneously. At the same time, Spawn rate is the number of users created every second until Locust reaches the peak concurrency of virtual users. The number of virtual users stays at max until you stop the test.
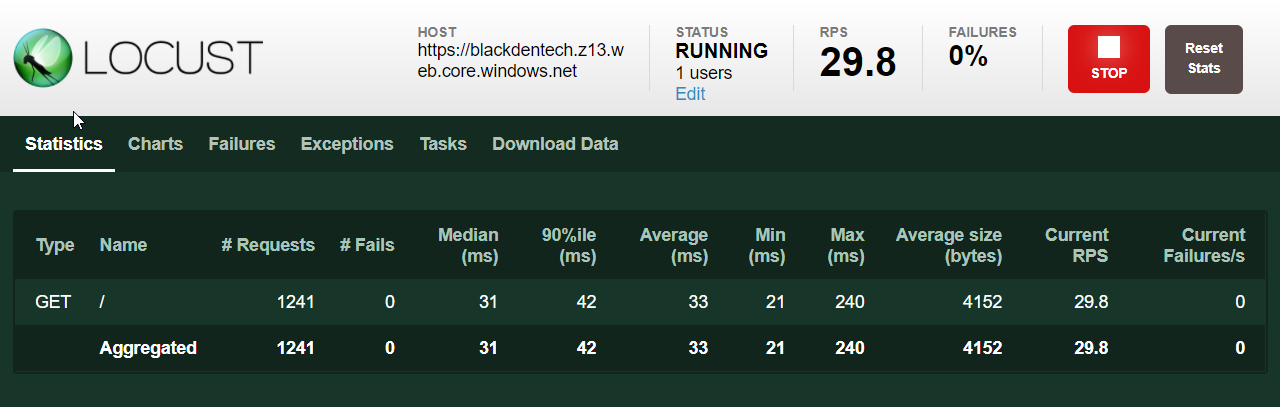
While running tests, Locust adds the host, then sends a request to each path in the user class in real-time. Once a response is received, Locust immediately sends another.
You’ll see a list of endpoints tested shown below, as well as some statistics about the response times, failures, and requests per second.
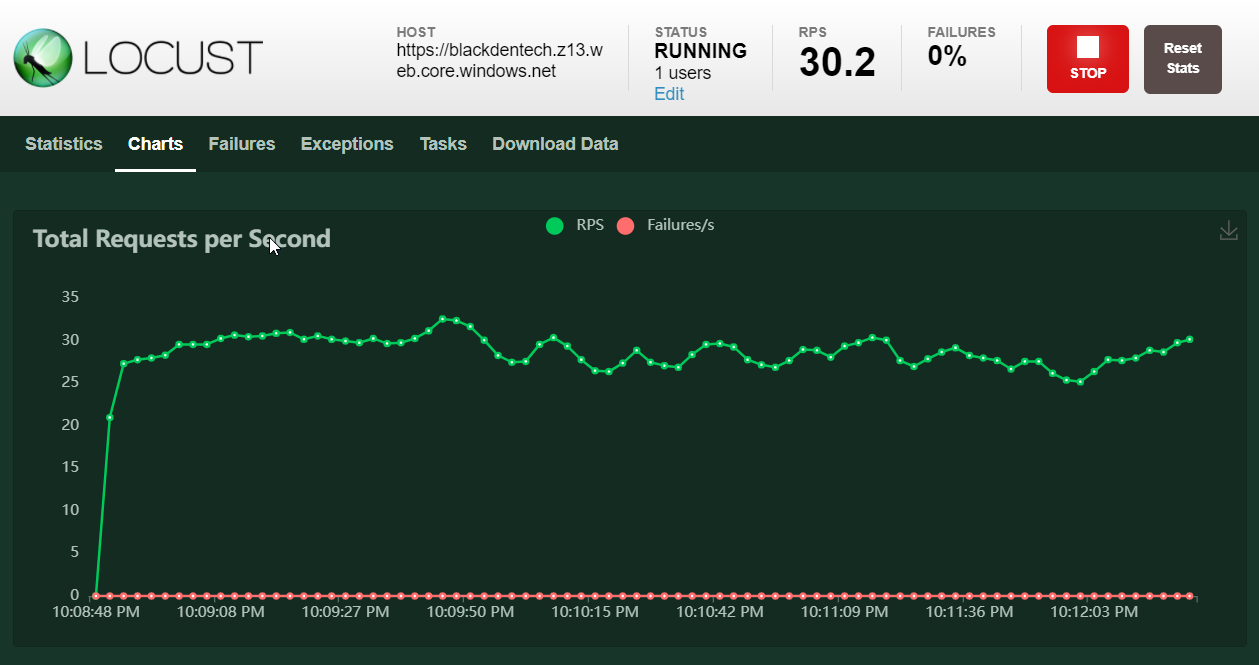
If you prefer to see your website’s performance metrics in a graphical output, as shown below, click on the Charts tab.
Running a Load Test Against APIs
Now that you’re familiar with the basics of Locust, let’s look at a more realistic test case. A static site is pretty stable, and there’s not a lot that can go wrong when you run performance testing. So why run a load test against an API?
An API can have a lot more variability in responses, less stable hosting options, and a lot more potential impact for your organization if they experience downtime.
If you’re not familiar with APIs and how they work, there’s an article that goes over basics like authentication, HTTP methods, and JSON responses. The article is intended for PowerShell, but the API concepts will be important later in this article.
- Replace the contents of the locustfile.py file with the code below, which does a few things:
- Runs a GET request to authenticate the user when Locust instantiates a new virtual user
- Runs a GET request on the host, which will fail because that resource does not exist
- Runs a POST request that passes a JSON body over a range of items in the same endpoint
.
import time # Importing time from Python system library
from locust import HttpUser, task

class HelloWorldUser(HttpUser):

    # This task will run when the user is instanciated
		def on_start(self):
        # The petstore API doesn't have a user database,
        # so any username and password will work
        username = "foo"
        password = "bar"
        # This needs to conform to the loginUser endpoint from the API docs
        self.client.get("/user/login?username="+username+"&password="+password)

    # This task will fail because there is no endpoint at https://petstore.swagger.io/v2/
    @task
    def hello_world(self):
        self.client.get("/")

    # The (3) after the task decorator tells Locust to run this task 3 times as often
    @task(3)
    def update_pets(self):
        # Using a for loop, count from 0-4 and use in HTTP request below
        for pet_id in range(5):
            # Run HTTP POST request and pass a JSON Body
            self.client.post(f"/pet?petId={pet_id}", json={"name":"Mittens"})
            time.sleep(1) # Wait for 1 second before continuing
Without adding an
on_startstatement to your test class, other methods would return a “403 Not Authorized” error when Locust tried to test them. Try commenting out this method and re-running Locust to see how it affects the test.
2. Next, open the docs for the pet store API. The test case above is written specifically for this API, so having this page open alongside this tutorial will help you go through the endpoints.
Run the locust command below as you did in the “Running a Load Test Against Static Sites” section (step one).
locust
Finally, enter https://petstore.swagger.io/v2 as the host in the Locust UI.

Conclusion
In this tutorial, you’ve learned how to run a load test against a static website and an API. Now you’ve got a better idea of how to test your site for a large influx of users. Load testing comes in handy when preparing an application for release to customers. The same is true in testing auto-scaling configuration or application performance for low latency.
Now think about your current applications or ones that you support. How would they respond when a swarm of concurrent users is using it? What kinds of things do you think can load test scenarios point out to make your application perform better?


