


If you’re wondering how to create reproducible Docker containers with Docker Compose, you’ve come to the right place. In this step-by-step Docker Compose tutorial, you’re going to learn how to create simple containers, map ports with Docker Compose all the way to complex multi-container scenarios.
Not a reader? Watch this related video tutorial!
Not seeing the video? Make sure your ad blocker is disabled.
Are you ready? Let’s dig in!
Prerequisites
If you’d like to follow along step-by-step, in this tutorial, ensure you have the following:
- A fresh install of Ubuntu Server LTS with SSH Enabled. This guide will use Ubuntu Server LTS 20.04.1 as the Docker host machine.
- A computer with VS Code installed (optional). This guide will use Visual Studio Code 1.52.1 to SSH to the Docker host and run commands.
- The VS Code official SSH extension installed and connected to the Docker host. (optional)
What is Docker Compose?
Single commands can get long, really long in Docker. Take the below as an example. This example creates a container for a software application called bookstack.
docker create \
   --name=bookstack \
   -e PUID # UID of user to take ownership of application/files \
   -e PGID # GID of user to take ownership of application/files \
   -e DB_USER # The database user \
   -e DB_PASS # The database password \
   -e DB_HOST # The database host \
   -e DB_DATABASE # The database to be used \
   -e APP_URL # The url your application will be accessed on (required for correct operation of reverse proxy) \
   -v /host/path/to/config:/config # Location of any uploaded data \
   -p 80:80/tcp # Web UI port \
   --restart unless-stopped \
   linuxserver/bookstack:version-v0.31.4
As the complexity of a docker environment increases, so does the amount of flags and conditions required for a working container setup. The Docker command line starts to become cumbersome and difficult to troubleshoot; especially once multi-container setups start entering the mix.
Docker Compose is a way to create reproducible Docker containers using a config file instead of extremely long Docker commands. By using a structured config file, mistakes are easier to pick up and container interactions are easier to define.
Docker Compose quickly becomes invaluable when dealing with container dependencies or multi-container environments.
Docker Compose is a fantastic way to step into Infrastructure as Code without the complexity of distributed systems like Kubernetes.
Docker Compose uses a config file structure called YAML. YAML is similar to JSON or HTML in that YAML is a structured, machine-readable language. YAML specifically focuses on being as human-readable as possible while keeping that structured power.
YAML does have a downside where tabs and other whitespace are significant and must be formatted properly. VS Code does a lot of this hard work for you and is also why you will see many of the examples being done in VS Code.
Installing Docker Compose
Let’s now get started getting your hands dirty. Assuming you’re connected to your Docker host, it’s time to install Docker Compose.
Docker Compose is a separate package from the Docker runtime. But installing Docker Compose will also install the Docker runtime so you’ll kill two birds with one stone!
To install Docker Compose and the Docker runtime, run the following two commands.
# update the software list (known as a repository) and then install docker compose
# with any needed dependencies. the -y flag is used to skip confirmation
sudo apt update -y
sudo apt install docker-compose -y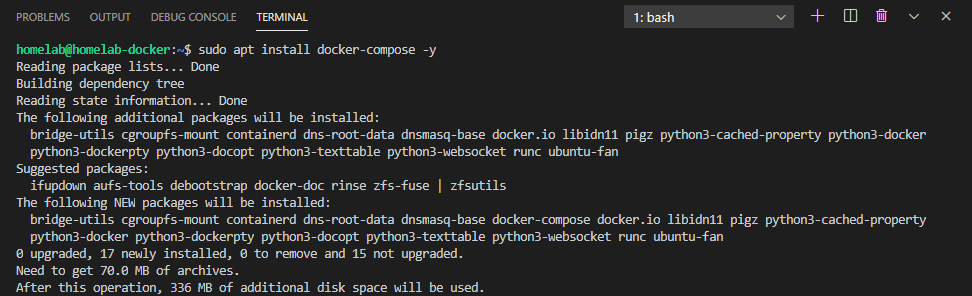
Once installed, you should now create a folder structure to store containers.
Creating a Folder Structure for Docker Compose
Before you can create a container with Docker Compose, you should first create a folder to store containers. You should not only create a folder structure to store containers but you’ll find that various Docker commands are sensitive to the location of various configuration files; Docker Compose is no different.
The most important component of Docker Compose is it’s configuration file called docker-compose.yaml. This configuration file, as explained above, dictates how the Docker runtime should build a container.
When you run Docker Compose, the command will look for its configuration file in the same folder as the command is run. Due to this requirement, it’s always best to create a separate folder when running Docker Compose.
There may only be one Docker Compose configuration file per folder.
To demonstrate creating a Docker container with Docker Compose, first create a folder structure to store the future container and its configuration file using a small fileserver called Caddy.
Caddy is a fileserver, similar to apache httpd or nginx, but written in the Go language. Caddy is specifically designed for ease of use (and will automatically generate or serve an index.html file) without configuration. This combination makes caddy a good choice for beginners.
Assuming you’re logged onto your Docker host, create the folder structure as follows:
- In your home directory, create a folder called containers. This folder will be a good placeholder for this and other containers.
- Inside the containers folder, create a subfolder called caddy. This folder will contain the Docker Compose configuration file and the Caddy container itself.
- Finally, inside of the container folder, caddy, create a blank text file called docker-compose.yaml that will become the Docker Compose configuration file.
With the folder structure and Docker Compose configuration file created, you can now start begin filling out that configuration file with a Docker Compose configuration.
Creating a Docker Compose Configuration File
At its most basic form, a docker-compose.yaml file for the caddy container looks like the following. In your favorite Linux text editor or with VS Code, copy and paste the code below into the Docker Compose configuration file created earlier.
version: "3.7"
services:
  caddy:
    container_name: "caddy"
    image: "caddy:latest"
    ports:
      - "80:80"
Let’s step through each of the options shown:
versionspecifies the version of the docker-compose file. Each new definition of Docker Compose includes breaking changes to the specification. Therefore the version is important so Docker Compose can tell what features it needs to use. Version 3.7 is the latest version that Ubuntu 20.04.1 LTS supports.
The full specification for Docker Compose 3.x can be found here. The linked documentation mentions every single option you can use within Docker Compose
servicescontain the specifications for the actual containers. You can define multiple containers in this section.caddyis the name of the first container (this is purely for reference).container_namedefines the actual name given to the container by Docker and must be unique.imageis the name of the image. In this case, caddy from the Docker Hub is defined. The name or number after the tag separated by a colon is the version.
Port Mapping
That last option in particular requires a special mention:
ports:
  - "80:80"
In Docker Compose, the ports directive allows you to set one or more mappings from the host to the container. For example, above you have mapped port 80 on the host to port 80 on the container. However, you do not need to match the port number. The example below maps port 8800 on the host to port 80 in the container.
ports:
  - "8800:80"
You could also define multiple ports like below.
ports:
  - "80:80"
  - "443:443"
Doing so would map both port 80 and 443 to the host (a common configuration for web servers, to serve both HTTP and HTTPS).
The Docker image creator defines available ports at the time of creation. Be sure to check the documentation of the image you’re working with on Docker Hub or the maintainer’s website for mappable ports. There is no point mapping a port if the port isn’t in use!
With that in mind, lets look at actually running the container.
Running the Container
By now you should have the docker-compose.yaml file inside of your ~\containers\caddy folder. Now’s the time to create and start the Caddy container.
On your terminal run the following command which will bring up the Docker containers defined in the docker-compose.yaml file.
# This command must be run in the same folder as the file. The -d flag runs
# the command *detached*, which will bring up the container in the background
sudo docker-compose up -d
You may notice that you did not have to specify the location of the docker-compose.yaml file when running
sudo docker-compose up -d. Docker Compose expects you to run all commands inside the folder that contains the docker-compose.yaml file, as many commands are relative to that folder.
Now verify that the container is up and running by navigating to http://<your ip>. This guide is using http://homelab-docker for reference.
You can see this processing happening in VS Code while SSHed into the Docker host in the below animation:
Success! You have now successfully used Docker Compose to start a container from a config file. With that first important step taken, let’s look at how you manage the state of your container.
Commands to Manage Detached Containers
In the previous section, you started the caddy container using the -d flag. Doing so ran a container in a detached state. When a container is in a detached state, that the container will continue to run in the background. But, this poses a problem: how do you manage that container if you no longer have direct control?
To solve this problem, Docker Compose has a series of commands that will manage containers started with a docker-compose.yaml file:
docker-compose restartis used to restart a container that is currently running. Doing so is different from actually rerunningdocker-compose up -d. The restart command will simply restart an existing container, re-run thedocker-compose up -dcommand, and recreate the container from scratch (if the config file has been changed).docker-compose stopwill stop a running container without destroying the container. Similarly,docker-compose startwill start the container up again.docker-compose downwill stop the running containers and also destroy them. This is where having bind mounts of volumes come into play (read more below).docker-compose pullwill pull the current version of the docker image (or images) off the repository. If using thelatesttag, you can follow withdocker-compose down && sudo docker-compose up -dto replace the container with the latest version. Usingdocker-compose pullis a convenient way to update containers quickly with minimal downtime.docker-compose logswill show the logs of the running (or stopped) container. You can also address individual containers (if there are multiple containers defined in the compose file) withdocker-compose logs <container name>.
A full list of docker-compose commands can be seen by running
docker-composewith no additional arguments or referenced here in the documentation.
Now that you have a running container, let’s look at using content saved locally on your machine.
Creating Bind Mounts in Docker Compose
Bind Mounts are how Docker maps important user data to local storage on your server. To start, generate some content for the container to host:
- On the Docker host, Inside of the ~/containers/caddy folder create a new folder called files.
2. Create a new file called index.html inside of the ~/containers/caddy folder that looks like below. This will be the main page the Caddy webserver will serve up.
<body><h2>hello world!</h2></body>3. Modify your Docker Compose configuration file to look like below. The example file below is adding the volumes section and pointing a bind mount to the files folder just created to make it available to the container.
version: "3.7" services: caddy: container_name: "caddy" image: "caddy:latest" ports: - "80:80" volumes: #the ./ refers a folder relative to the docker-compose file - "./files:/usr/share/caddy"4. Run docker-compose up -d again. Docker Compose will now recognize the file has been changed and recreate your container.
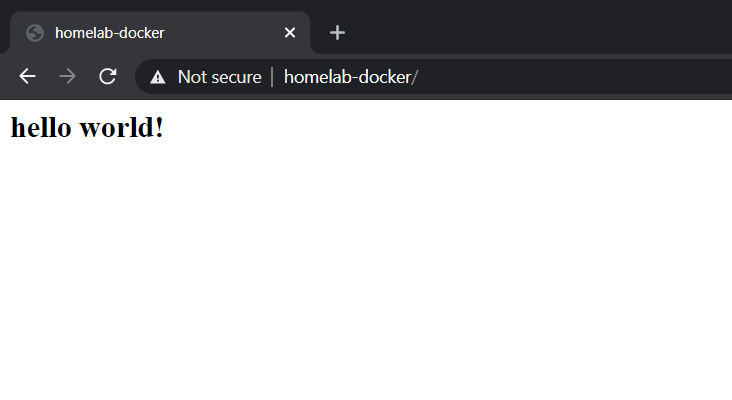
5. Navigate to the container’s page with a browser and you should now see it is serving the “Hello World!” page.
You can see the following in the below animation:
You are now hosting content stored locally on your machine! However, what if your content is on an external source like a network share?
Using Docker Compose with Docker Volumes
Once you create a simple container with Docker Compose, you’ll probably need that container to access files somewhere else perhaps on a network share. If so, you can configure the container to use Docker volumes right in your Docker Compose configuration file.
For demonstration purposes, this guide will be creating a Network File Share (NFS) server on the Docker host. Serving local content as an NFS mount holds no practical purpose outside of demonstration. If you were to mount an NFS volume, it will generally be from an external source like a NAS or remote server.
Set up an NFS Share
If you don’t already have an NFS share set up, build one now on the Docker host for this tutorial. To do so:
- Install the NFS server package by running
apt install nfs-kernel-server -y.
2. Add the container as an NFS export (similar to a Windows CIFS share) by running the following.
# Add a line to the /etc/exports config file to create a NFS share for # /home/homelab/containers. This share is only exposed to localhost (to # prevent other computers from having access) echo '/home/homelab/containers localhost(rw,sync,no_root_squash,no_subtree_check)' | sudo tee -a /etc/exports # Restart the NFS server with the new config sudo systemctl restart nfs-kernel-server3. Now verify that the host exposes the NFS share by running showmount -e localhost. This command will show any currently exposed NFS shares and who has access.
In the below screenshot, you can see /home/homelab/containers is exposed, but only to the localhost computer (which is the same server running the Docker host).
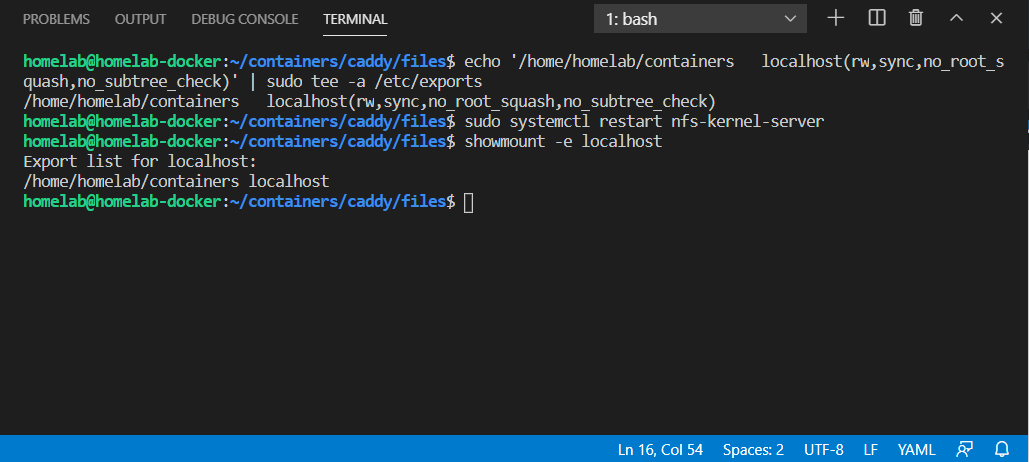
If you see the folder /home/<username>/containers in the output, the NFS share is set up.
Defining a Docker Named Volume
Once you’ve created the NFS share, you now need to tell Docker how to access that share. Using Docker Compose, you can do that by defining a named volume in the Docker Compose configuration file.
A named volume is a way for Docker to abstract network-based file shares. Network file sharing comes in all sorts of shapes and sizes these days: CIFS (windows) shares, NFS (Linux) shares, AWS S3 Buckets, and more. By creating a Named Volume, Docker does the hard part of figuring out how to talk to the network share and lets the container just treat the share as if it is local storage.
To create a named volume:
- Open the Docker Compose configuration file (docker-compose.yaml). If you’re following along, the file should be located in the ~/containers/caddy folder.
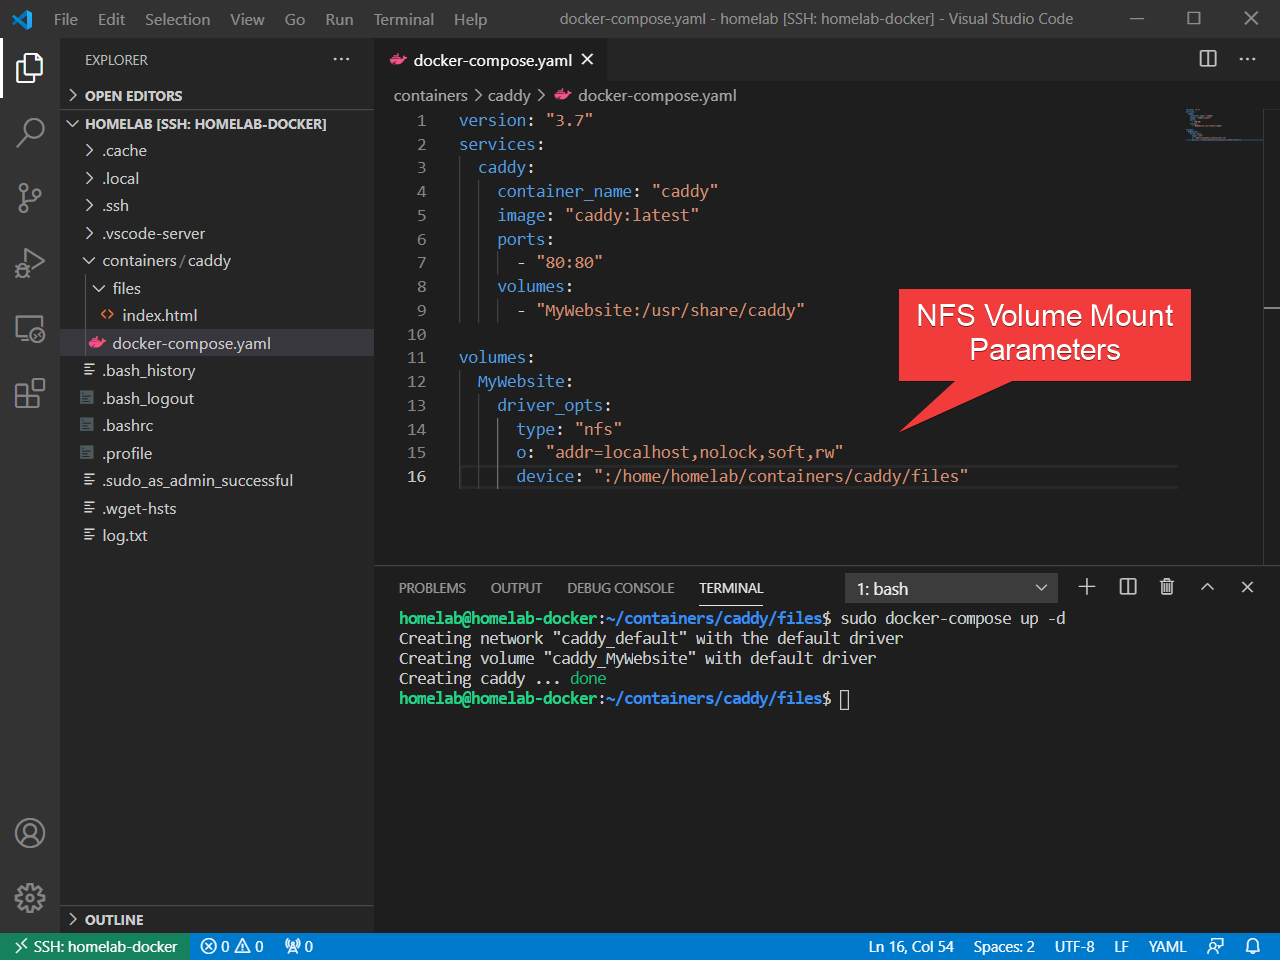
2. Inside of the Docker Compose configuration file, add a volumes section after the services section. Your configuration file should like below. The volumes section creates a named volume called MyWebsite. Within that named volume, the parameters needed (such as IP, NFS settings, and path) are specified. The volumes parameter within the services section is also modified, to point to the name volume as opposed to a local folder.
version: "3.7"
 services:
   caddy:
     container_name: "caddy"
     image: "caddy:latest"
     ports:
       - "80:80"
     volumes:
       - "MyWebsite:/usr/share/caddy"
 volumes:
   MyWebsite:
     driver_opts:
       type: "nfs"
       o: "addr=localhost,nolock,soft,rw"
       device: ":/home/homelab/containers/caddy/files"
3. Once you’ve defined the named volume pointing to the NFS share in the Docker Compose configuration file, run docker-compose up -d to create and start the container. If all goes well, the container and website should come back up.
4. Navigate to the container’s page again. The index.html content should appear just as if the file was being mounted locally. However, that file is being mounted through the NFS server set up on the network.
Since you can now mount external Docker volumes in Docker Compose, you can now bring all sorts of network storage into your containers. However, Docker Compose can do more than just define single containers or volumes. Let’s dive into more complex, multi-container scenarios.
This tutorial will no longer be using the caddy container, so you can remove the container using
docker-compose down.
Defining Multiple Containers in Docker Compose
Most Docker containers do not work inside a vacuum. Docker containers usually have service dependencies like databases or separate web services that speak over an API.
Using Docker Compose, you can group containers together defined within a single file. By defining multiple containers in a single file, containers can communicate between dependent services and simplify the organization of complex container layouts.
To demonstrate such a scenario, let’s set up a popular wiki application called BookStack.
BookStack is a popular wiki software known for its ease of use and hierarchal layout (as opposed to a flat layout, such as mediawiki).
BookStack, like many web applications, requires a separate database to function properly, as well as the information required to communicate to the database. Setting up such a situation is where Docker Compose excels.
Create the Docker Compose Configuration File
BookStack does not have an internally maintained Docker image, however, linuxserver.io maintains a reputable Docker Hub image on BookStack’s behalf. While the documentation on the docker hub site has a recommended Docker Compose configuration file, this tutorial will build a new configuration file while explaining the concepts.
On the Docker host:
- First, create a folder for BookStack. If you followed the previous section’s tutorials, you should have a ~/containers folder. Create a folder called bookstack in there.
2. Then create a blank Docker Compose configuration file called docker-compose.yaml inside of the bookstack folder.
3. Now open up the Docker Compose configuration file and define two containers: the bookstack container and the bookstack_db (mariadb) container.
version: "3.7"
 services:
   bookstack:
     container_name: "bookstack"
     image: "ghcr.io/linuxserver/bookstack"
     ports:
       - "8080:80"
     volumes:
       - "./files:/usr/share/caddy"
     depends_on:
       - "bookstack_db"
   bookstack_db:
     container_name: "bookstack_db"
     image: "mariadb"
     volumes:
       - "./db:/var/lib/mysql"
So far, this docker-compose.yaml file is mostly using concepts already introduced: You have two services (bookstack, and bookstack_db), both with images and bind mounts. The bookstack container has a port mapping from host port 8080 to internal port 80.
Given the extremely low overhead of Docker containers, it is common practice to define a separate database container for every web application. Doing so allows for a greater separation of duties. This is distinctly different from traditional database setups, where a single database installation may serve hundreds of web applications.
One new option you can see in the above file is the depends_on command. This command tells Docker the order in which the containers should start. Defining the depends_on command tells Docker that the bookstack_db container must start first.
Setting up Container Communication with Environment Variables
This configuration file built in the last section isn’t complete yet. While you have defined two services (containers), they aren’t speaking to each other! The bookstack container has no idea how to communicate with the bookstack_db container. Lets resolve that using environment variables.
Environment variables are the most common way of providing variables to Docker containers. These are variables given at runtime (or defined in the docker-compose.yaml configuration file) to provide information about what the container needs to do.
Environment Variables are defined by the person who creates the Docker image. They will be different depending on the Docker image you are using, and you must refer to the documentation from the creator regarding what environment variables to use.
There are two methods of defining environment variables; directly in the docker-compose.yaml file itself or as a separate file.
A separate file is, typically, the recommended method, especially if variables contain sensitive data such as passwords. A docker-compose.yaml file is designed to be shared or even uploaded to a public-facing GitHub repo. Having a separate file for sensitive data reduces the chance of an accidental security breach.
On the Docker host, now create two environment variables; one for the bookstack container and one for the bookstack_db container.
- Create a new file in the ~/containers/bookstack folder called bookstack.env with the following content:
APP_URL is the IP address or hostname of your server. This article is using homelab-docker
 APP_URL=http://homelab-docker:8080
 DB_HOST is the container name you gave your container
 DB_HOST=bookstack_db
 DB_USER is defined in the bookstack_DB environment file
 DB_USER=bookstack_user
 DB_PASS is also defined in the bookstack_DB environment file
 DB_PASS=MySecurePassword
 DB_DATABASE is the name of the database within mariadb
 DB_DATABASE=bookstack
2. Create a new file in the ~/containers/bookstack folder called bookstack_db.env and include the following content:
The root password for our database, keep it secret, keep it safe
 MYSQL_ROOT_PASSWORD=MySecureRootPassword
 The database bookstack will be using
 MYSQL_DATABASE=bookstack
 the user bookstack will be using
 MYSQL_USER=bookstack_user
 the password bookstack will be using
 MYSQL_PASSWORD=MySecurePassword
3. As a best practice, now ensure both env files are not readable by other users.
chmod 600 bookstack.env bookstack_db.envYou should change read access because both the bookstack.env and bookstack_db.env files have sensitive data in them.
4. Update the ~/containers/bookstack/docker-compose.yaml Docker Compose file to reference these two environment files shown below.
version: "3.7"
 services:
   bookstack:
     container_name: "bookstack"
     image: "ghcr.io/linuxserver/bookstack"
     ports:
       - "8080:80"
     volumes:
       - "./files:/usr/share/caddy"
     depends_on:
       - "bookstack_db"
     env_file:
       - "./bookstack.env"
   bookstack_db:
     container_name: "bookstack_db"
     image: "mariadb"
     volumes:
       - "./db:/var/lib/mysql"
     env_file:
       - "./bookstack_db.env"
5. Now start the bookstack and bookstack_db containers using Docker Compose.
sudo docker-compose up -dYou can see each of the aforementioned steps in this section performed in VS Code below.
Monitoring Docker Compose Logs
The Docker engine works with Docker Compose to perform many different tasks in the background. Being able to monitor what’s going on especially when working with multiple containers at once is helpful.
To monitor the bookstack container, for example, use the logs command. In this tutorial, once you see the logs show [services.d] done, you can go to the bookstack URL.
sudo docker-compose logs bookstack
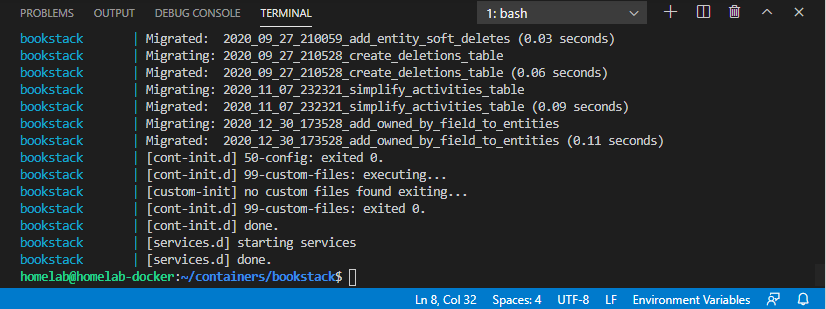
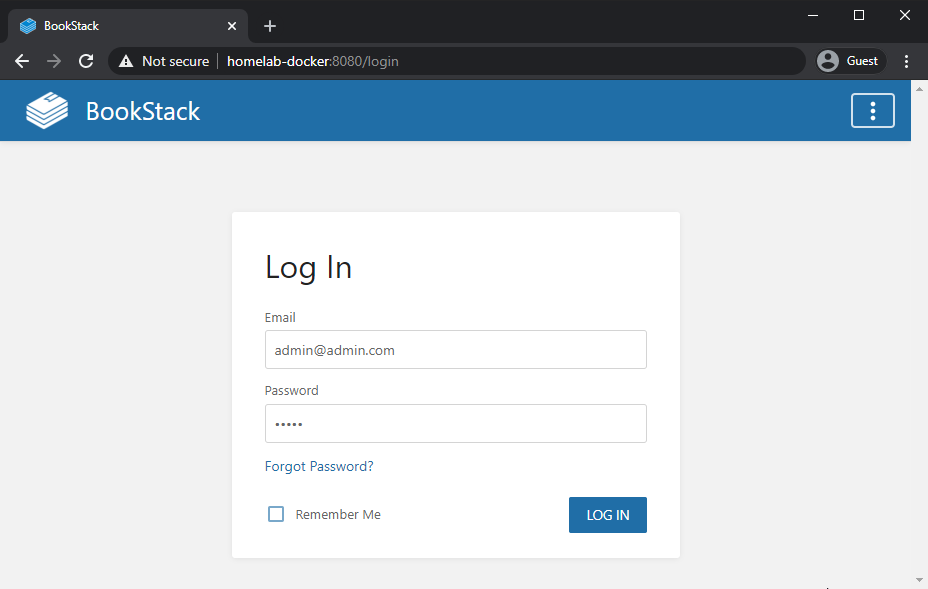
At this stage, you should have a fully functional wiki running within its own container, with its own database, entirely within Docker!
As long as you have the bookstack and bookstack_db folders, you can recreate your bookstack environment from scratch.
Docker Compose and Networking
Up to this point, you haven’t learned too much about the communication and networking aspect of how containers work together. Let’s change that.
When you create multiple containers within a single docker-compose.yaml file as you’ve done in the previous sections, they are all assigned to the same network (usually called name-of-parent-folder_default).
You can see the network created for the containers when you run docker-compose up -d as shown below.
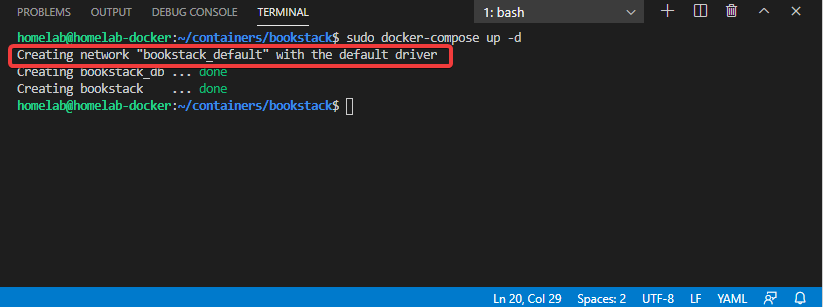
When all containers get assigned within the same network, Docker creates DNS entries for them internally. That is why in the previous example, you referred to your database as bookstack_db in the environment variables. That bookstack_db name is actually a DNS entry that points to the database container’s IP address.
You also do not have to rely on Docker Compose to autogenerate networks for you. You can manually define internal or external networks. Manually defining networks is great when you have a container that needs to speak to another container in a separate docker-compose.yaml file. You could expose the ports, or you can create a network they can both join!
Note that when you start explicitly defining networks, you also have to explicitly define the default network. Docker Compose will stop creating that network automatically once you start defining the networks
Now modify the bookstack docker-compose.yaml to include an externally created network.
- Create the external network with
docker network create my_external_network.
2. Define the external network in docker-compose.yaml:
version: "3.7"
 services:
   bookstack:
     container_name: "bookstack"
     image: "ghcr.io/linuxserver/bookstack"
     ports:
       - "8080:80"
     volumes:
       - "./files:/usr/share/caddy"
     depends_on:
       - "bookstack_db"
     env_file:
       - "./bookstack.env"
     networks:
       - "my_external_network"
       - "bookstack_default"
   bookstack_db:
     container_name: "bookstack_db"
     image: "mariadb"
     volumes:
       - "./db:/var/lib/mysql"
     env_file:
       - "./bookstack_db.env"
     networks:
       - "bookstack_default"
 networks:
   bookstack_default:
   my_external_network:
     external: true
3. Run docker-compose up -d to recreate the containers. Your two containers are now joined to two networks as shown below.
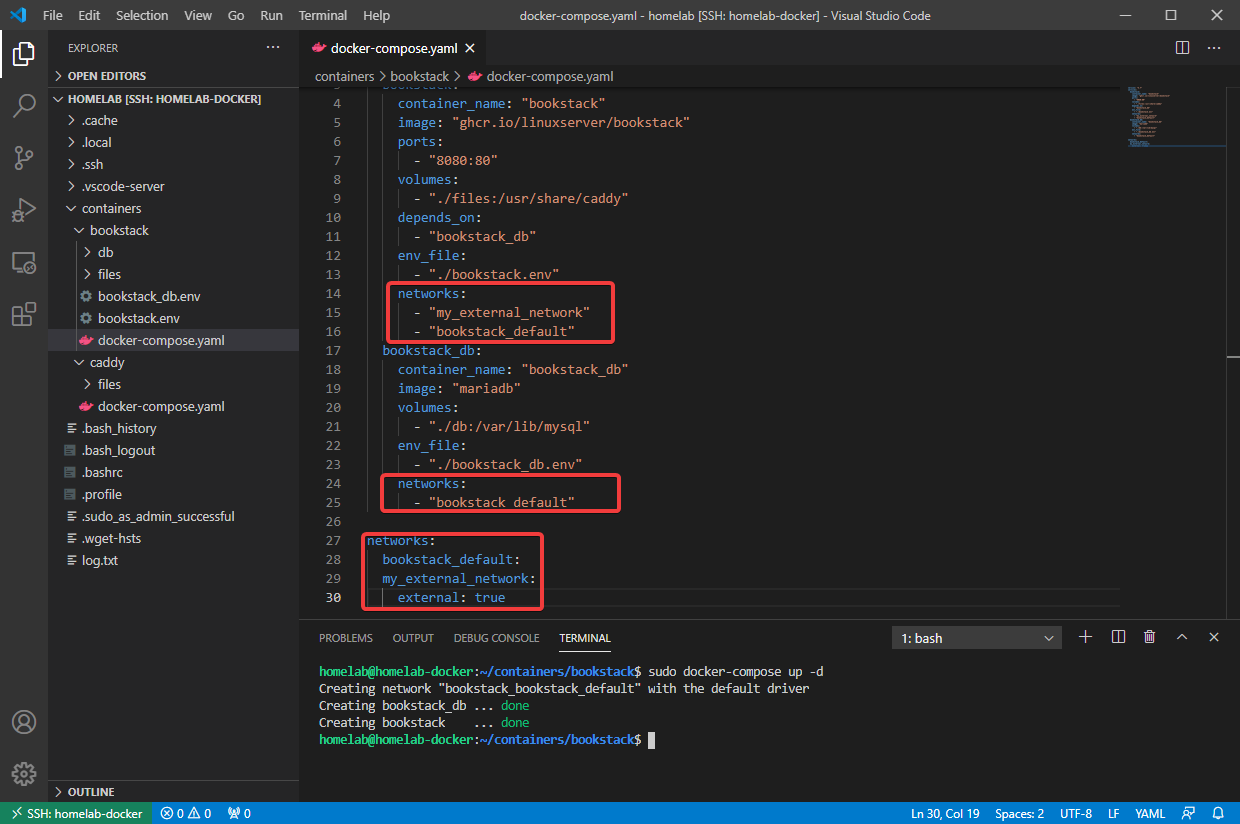
The bookstack container is now also joined to an externally defined network. This allows you to create another container that turns the bookstack HTTP traffic into HTTPS before it leaves Docker (referred to as a reverse-proxy).
Setting a Specific User to Run a Container
By default, all Docker containers run as a sandboxed root user. This is equivalent to running a virtual machine logged in as the default Administrator user. While this generally isn’t a problem, there are security concerns if the sandbox is compromised.
The other issue with running as root is file permissions. You may notice that if you try to delete the db folder within the bookstack folder, you actually can’t; the contents are owned by root.
While most images do not appreciate running as a non-root user, linuxserver.io images in particular offer an environment variable to set the user that runs inside the container. You can do so by adding UID=1000 and GID=1000 inside the bookstack.env configuration.
1000:1000 is the default user ID and group for the first user in ubuntu (which you may not be). You can read more about User IDs and Group IDs at Related: A Windows Guy in a Linux World: Users and File Permissions)
You can also force a UID and GID using the
userparameter in docker-compose, but this is not recommended as most containers do not behave well when forced to a different user
Setting the Restart Policy
If you’d like containers built with Docker Compose to restart on failure, use the restart policy by adding a restart: <option> parameter under the container settings in docker-compose.yaml.
restart: "no"
restart: always
restart: on-failure
restart: unless-stopped
Adding this parameter will cause containers to automatically restart on failure to help maintain uptime in the event of unexpected power issues.
Manually setting DNS entries for Containers
Just like with Windows and Linux, Docker also has a “hosts file”. By using the extra_hosts parameter in a config file, you can force a host to resolve to a specific IP. This can be useful when you have DNS constraints, such as split DNS or a test server you want to interact with temporarily.
extra_hosts:
  - "somehost:x.x.x.x"
  - "otherhost:x.x.x.x"
Running Commands
Once the container is started, you can run commands inside of the container using the docker-compose run. For example, maybe you’d like to start up a Bash terminal inside of your bookstack container. To do that, you’d run the command below.
docker-compose run web bash
Conclusion
At this stage, you should have enough information to follow along with the majority of docker-compose tutorials out on the web. Having this knowledge can vastly expand your ability to move into the world of Docker, and the building of web apps in Infrastructure as Code.


