


Organizations are increasingly adopting Jenkins to automate their build and test processes, making manually managing Jenkins jobs difficult. The good news is Jenkins DSL plugin allows you to define Jenkins jobs in a Domain Specific Language (DSL) syntax.
Jenkins DSL makes it possible to store jobs in version control systems, share them with other users, and generate new jobs from templates. And in this tutorial, you’ll learn how to take advantage of the Jenkins DSL plugin to help with automating application development.
Read on, so you never have to click through the Jenkins UI to create a job tediously!
Prerequisites
This tutorial will be a hands-on demonstration. If you’d like to follow along, be sure you have the following.
- A Linux machine – This guide uses Ubuntu 20.04.
- Pipeline: Job to add the Pipeline suite of plugins used to implement and integrate continuous delivery pipelines in Jenkins.
- Pipeline: Groovy to the ability to directly execute Groovy code.
Installing the Jenkins DSL Plugin
Maintaining consistency between jobs can be difficult, but the Jenkins DSL plugin solves this problem. How? By allowing you to define jobs in a programmatic form, in a human-readable file.
But before creating jobs, you’ll have to install the Jenkins DLS plugin first:
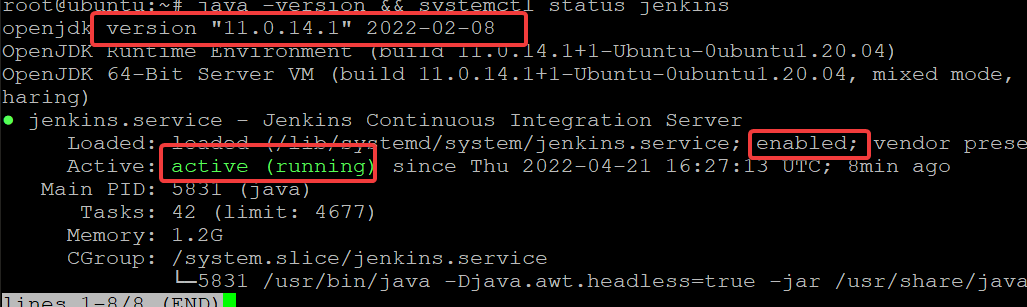
1. SSH to your Jenkins server and run the following command to verify that you have the required -version of java installed and the jenkins service is running.
java -version && systemctl status jenkinsYou’re all set to install the Jenkins DSL plugin if you see an output similar to the below.
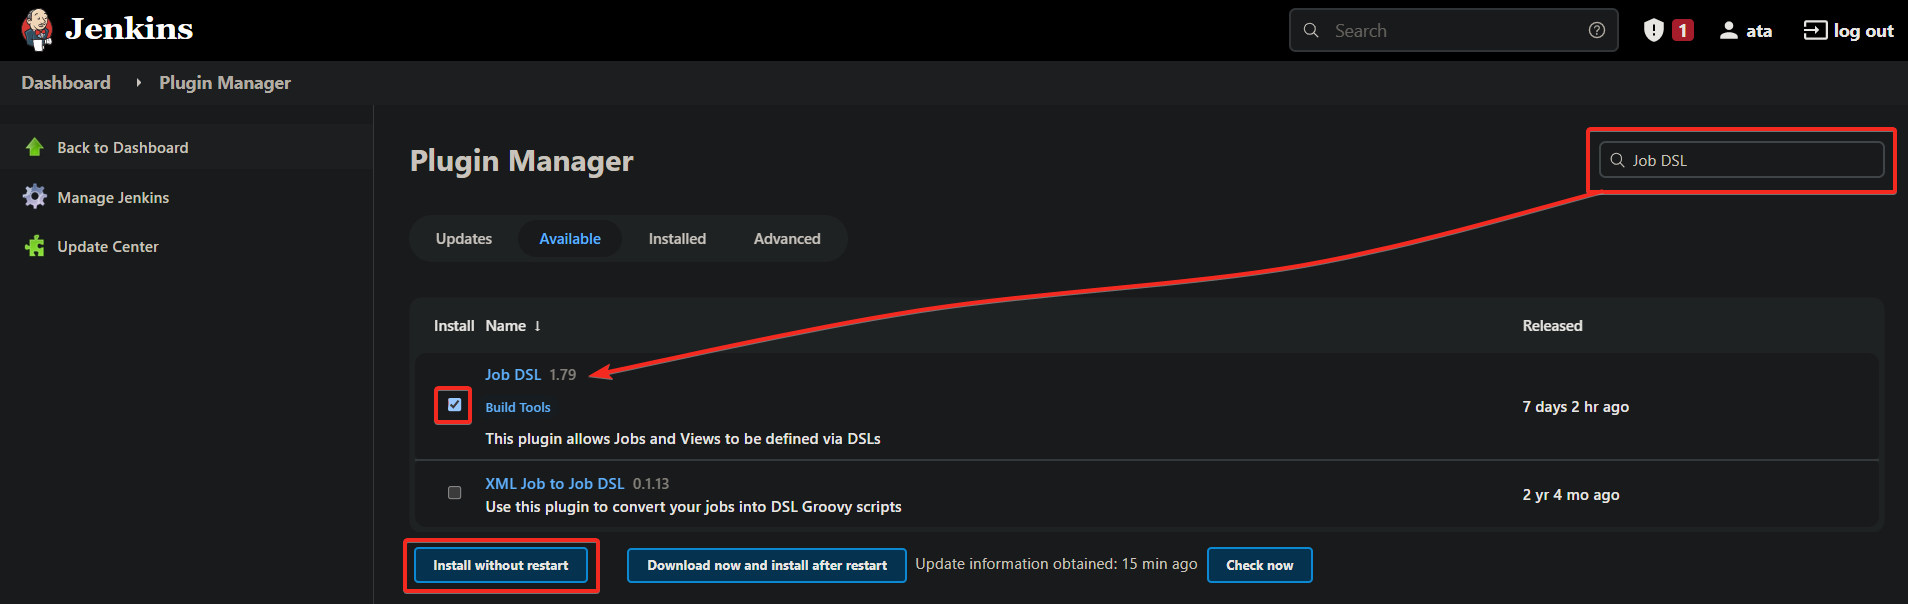
2. Next, open your favorite web browser and navigate to http://your_server_ip:8080/pluginManager/available. Replace your_server_ip:8080 with your Jenkins server’s actual IP address and port number.
3. Lastly, install Jenkins DSL Plugin with the following:
- As shown below, type in Job DSL in the search box on the top right.
If you already have the Job DSL plugin installed and upgraded from an older version, the Job DSL scripts will not appear in the list when searching for Job DSL. You can navigate to http://your_server_ip:8080/pluginManager/installed to check if the plugin Job DSL is there.
- Tick the checkbox beside the Job DSL option.
- Click Install without restart at the bottom to install the Jenkins Job DSL plugin.
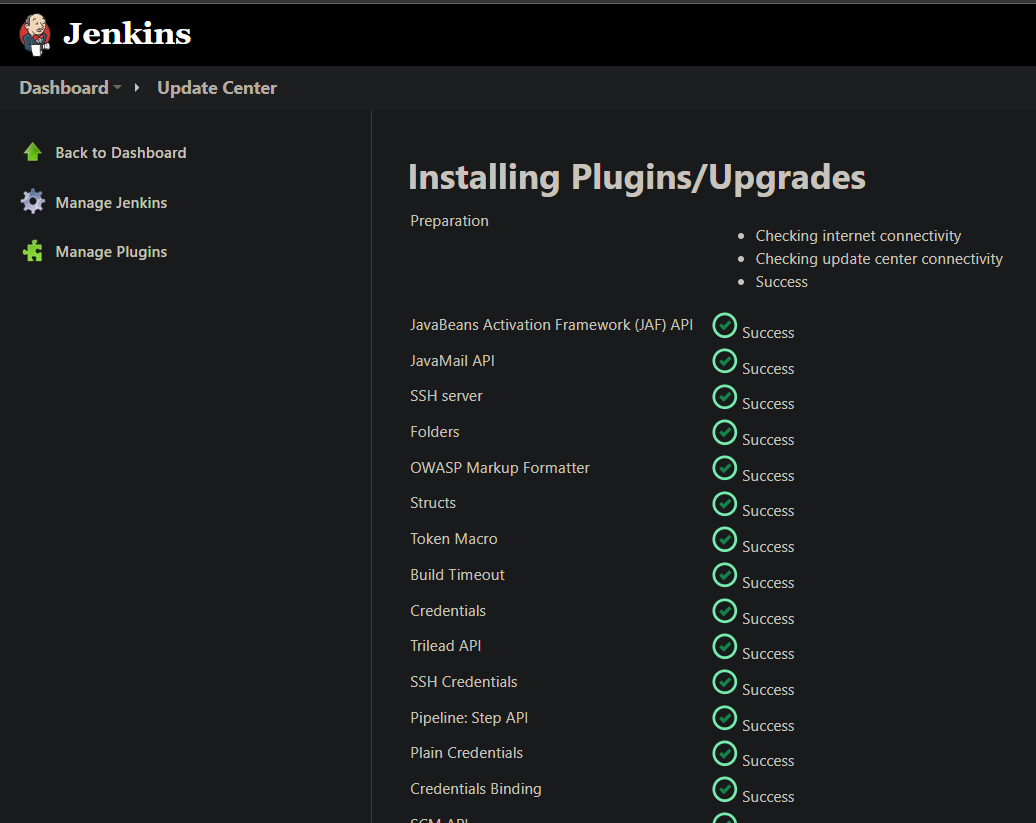
The Jenkins UI will show you a progress bar while installing the plugin. Once installation is complete, you’ll see the Success messages similar below.
Creating a Jenkins Seed Job Using the Jenkins DSL Plugin
Now that you have the Jenkins DSL plugin installed feel free to create a Jenkins seed job. Write a basic Job DSL script and incorporate the script into a Jenkins seed job. You’ll create a freestyle job that prints out a ‘Hello World!’ message to the Jenkins console.
To incorporate a Job DSL script into a Jenkins seed job:
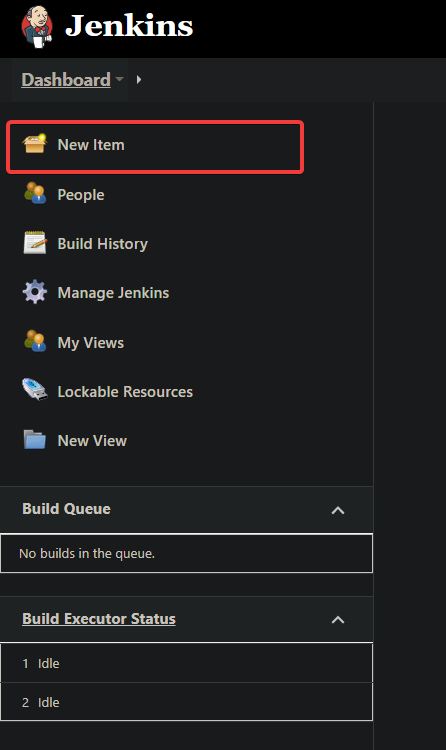
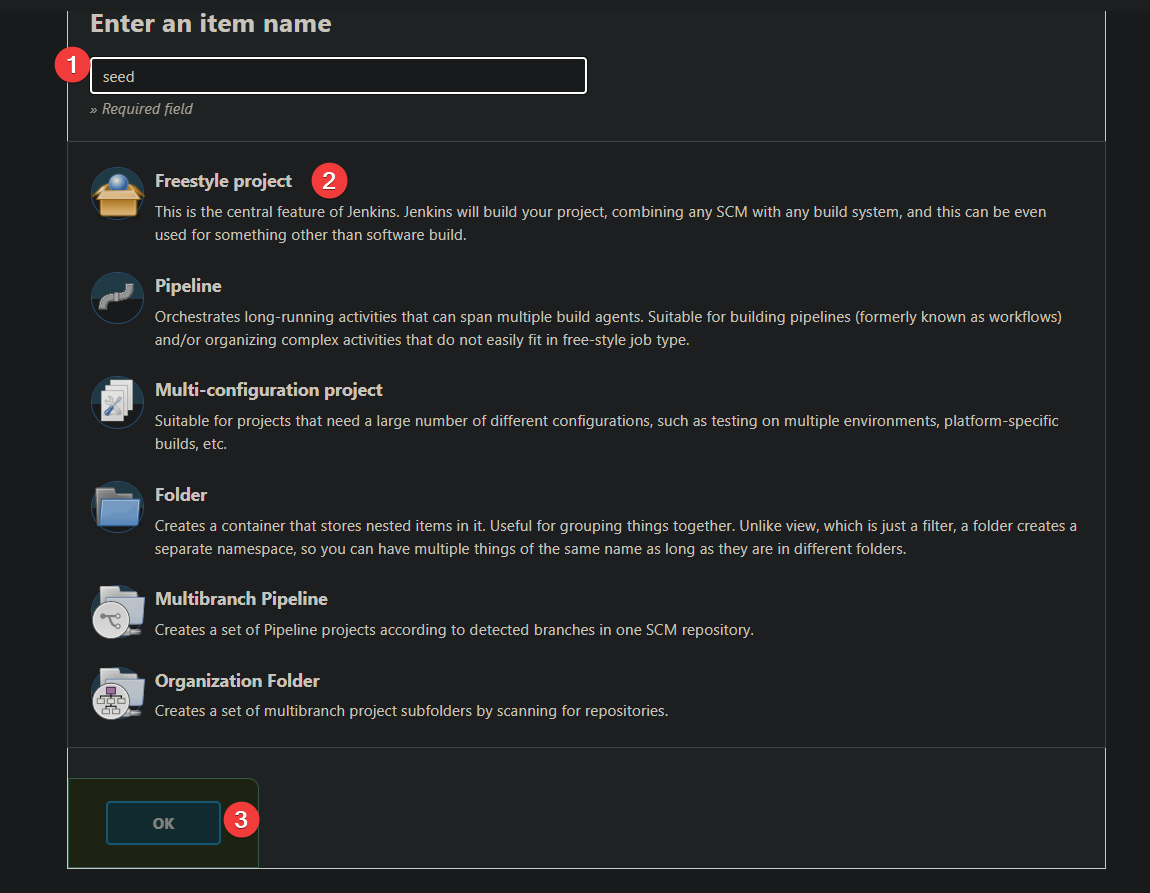
1. Navigate to your Jenkins Dashboard, and click New Item in the left sidebar. Your browser redirects your browser to a page where you can create a new item (step two).
2. Next, create a new item with the following:
- Enter an item name, as shown below. But the item name is set to seed in this tutorial.
- Select Freestyle project (a repeatable build job, script, or pipeline) from the options below.
- Click OK at the bottom to create the new item, and your browser redirects to the new item’s configuration page.
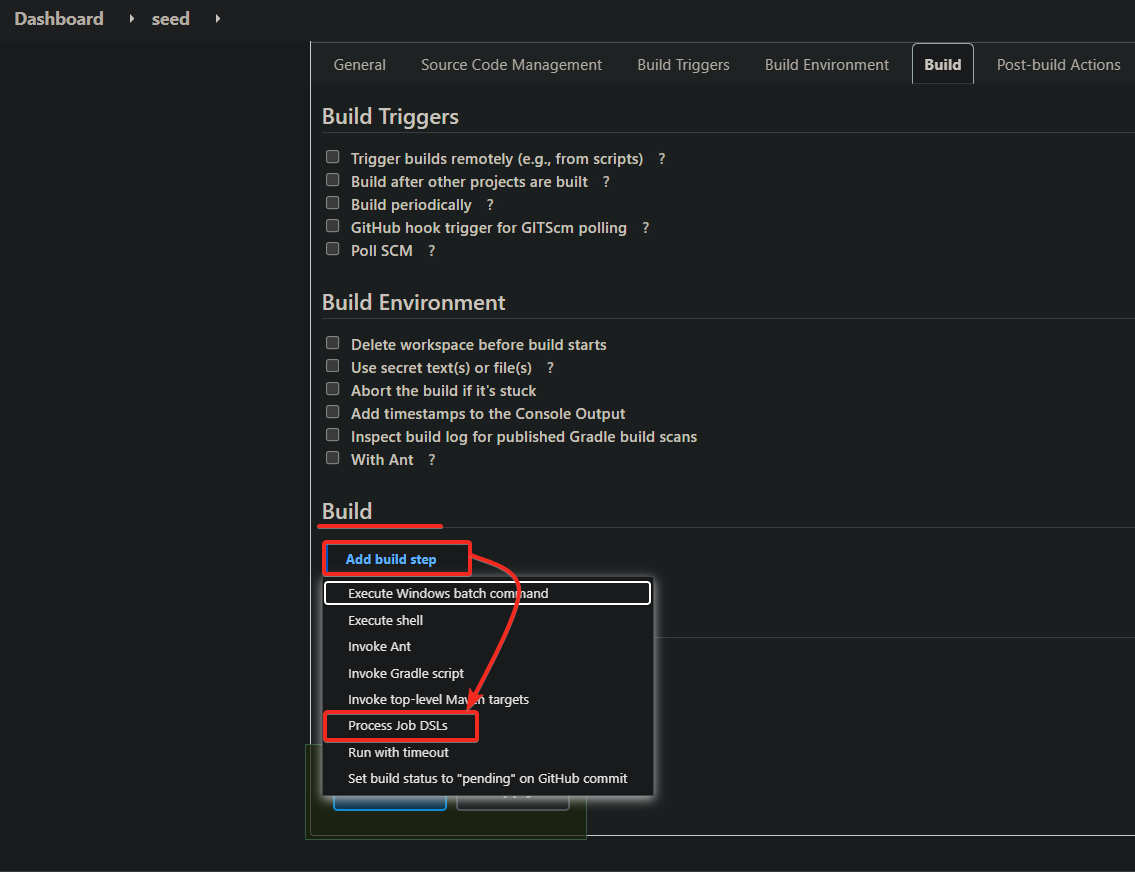
3. Keep the default settings for all other sections on the new item’s configuration page.
Scroll down to the Build section, click the Add build step dropdown button, and select Process Job DSLs. Doing so opens an option where you’ll provide a DSL script (step four).
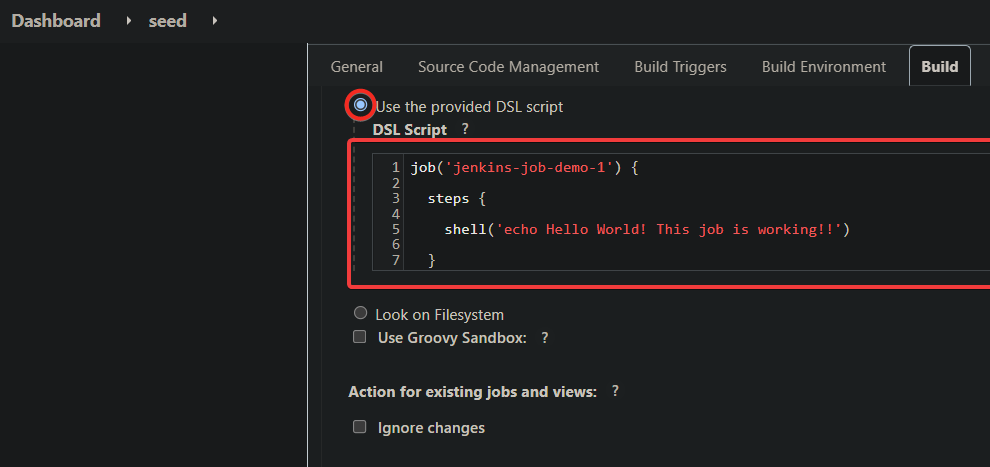
4. Now, select the Use the provided DSL script option, as shown below, and populate the following code block to the field.
This code block is a freestyle job definition named jenkins-job-demo-1 that uses the shell step to print a “Hello World” message. The job’s name is what will appear in the Jenkins UI.
// Sets the API method you want to use (job)
job('jenkins-job-demo-1') { // Sets the name of the job to jenkins-job-demo-1
	// Define what the job does
  steps {
		// Prints a message
    shell('echo Hello World! This job is working!!')
  }
}
There are many available methods to create different types of Jenkins jobs, which you can find in the official documentation.
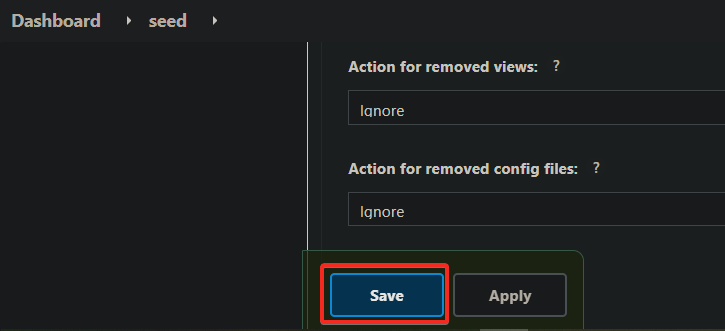
5. Click Save at the bottom of the page to save the configuration for the new item (seed).
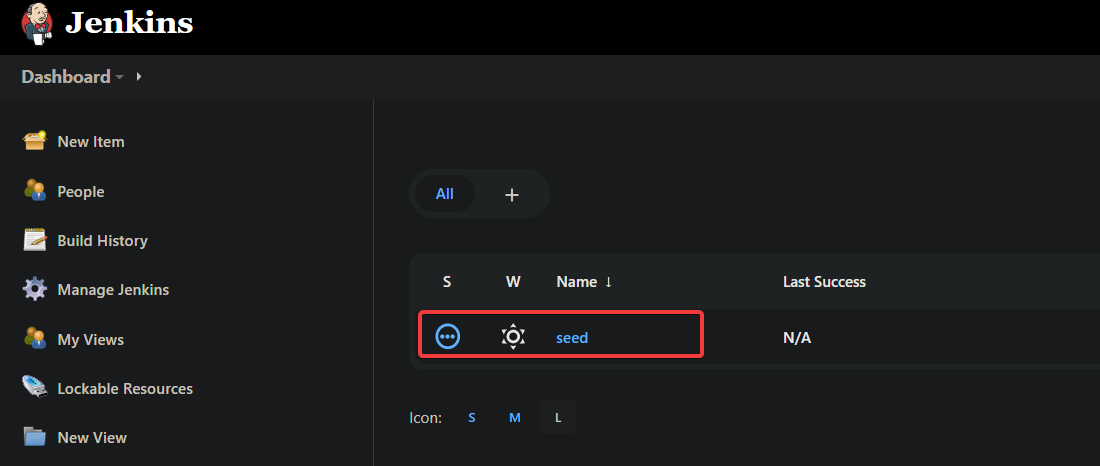
6. Lastly, navigate to your Jenkins Dashboard to verify the seed job you created exists, as shown below.
Running a Seed Job
You’ve successfully created and verified the seed job. But how do you know the job works? You’ll run the seed job against the DSL script you provided in step four of the “Creating a Jenkins Seed Job Using the Jenkins DSL Plugin” section.
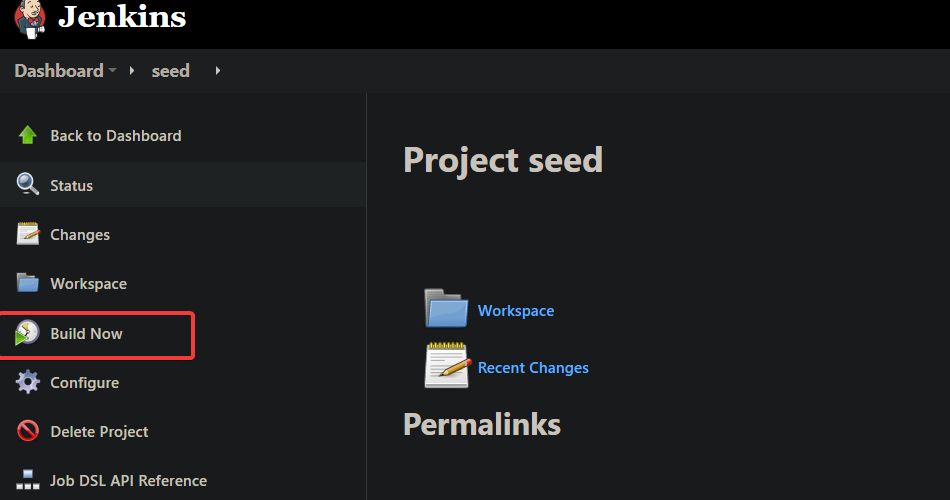
1. On your Jenkins Dashboard, click on the seed job to navigate its configuration page.

2. Next, click Build Now in the left sidebar to run the job.
3. Press F5 to refresh the page. You’ll see a new build appear under the Build History section with a success status (green check) at the bottom left, as shown below.
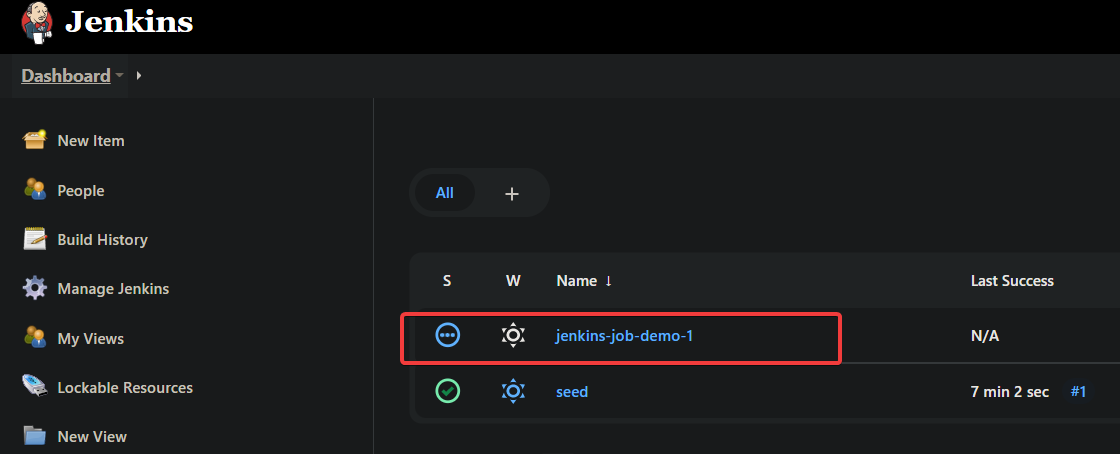
This output indicates the seed job ran successfully, which created a new Jenkins job (jenkins-job-demo-1) under the Generated Items section.

4. Now, navigate to your Jenkins Dashboard. As shown below, you’ll see the new Jenkins job (jenkins-job-demo-1) created by the seed job.
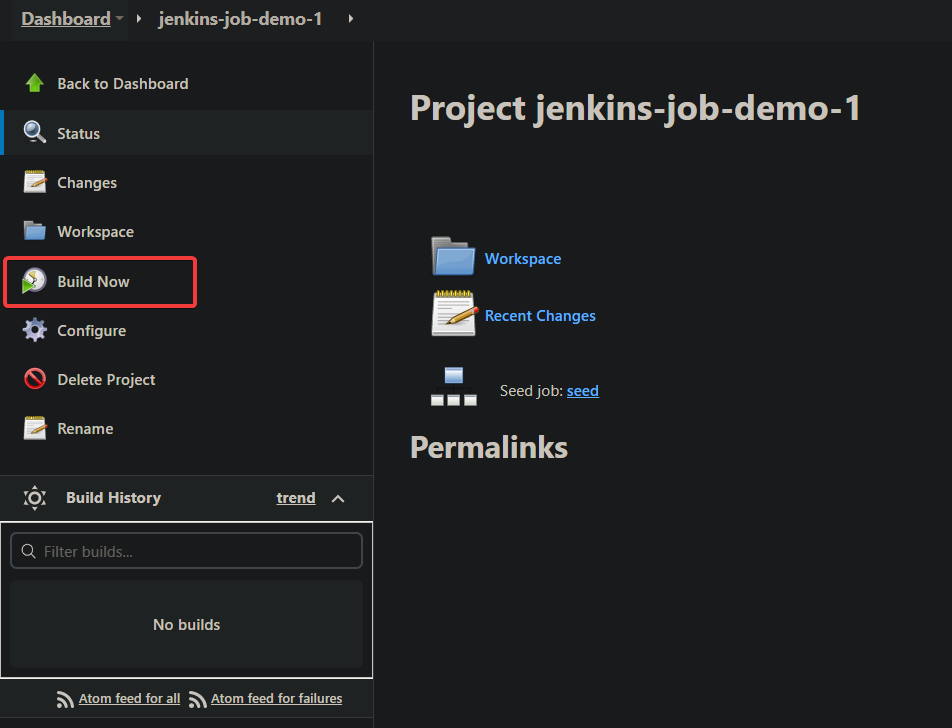
Click on the newly generated job to access its configuration page.
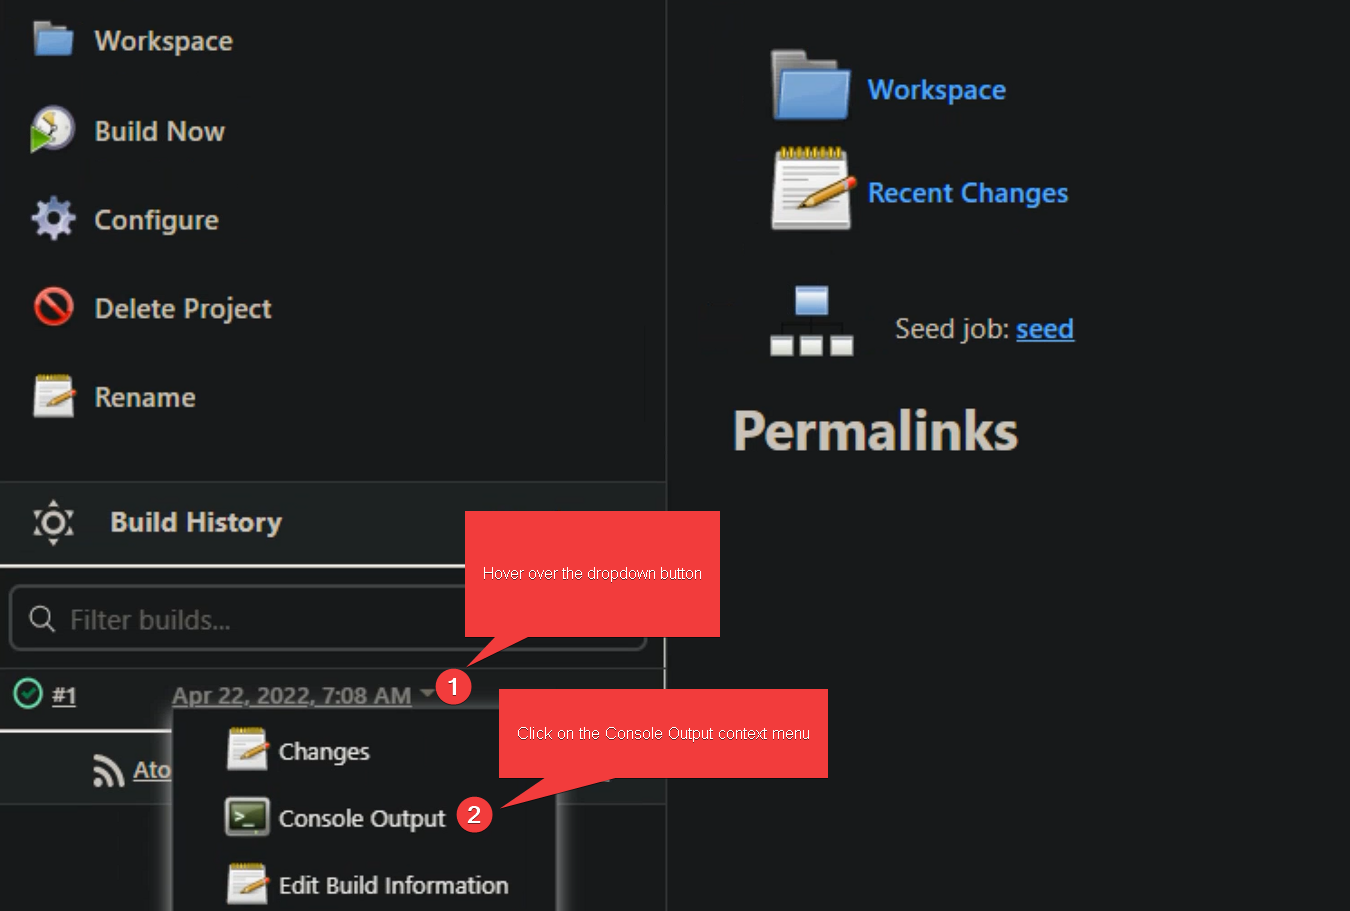
5. Click on Build Now to run the generated job (jenkins-job-demo-1).
6. Finally, click the arrow down button next to the successful build under the Build History section, as you see below. Choose Console Output from the context menu to see the job’s output.
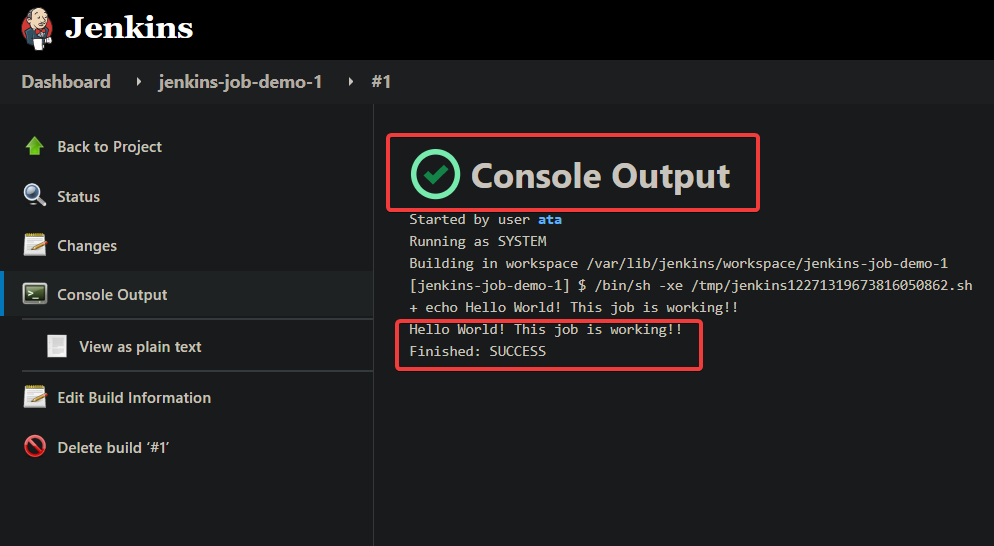
If the generated job works, you’ll see the message saying Hello World! This job is working!!, as shown below, which is the message you defined in the Job DSL script.
At this point, you’ve successfully created and run a Jenkins job using the Job DSL plugin!
Creating a Job for a CI/CD Pipeline Using the Jenkins DSL Plugin
So far, you’ve learned how to create and run a Jenkins freestyle job using the Job DSL plugin. You’ll automate the non-human part of the software development process by creating a Jenkins job for a CI/CD pipeline.
Specifically, you’ll create a job that pulls code from a GitHub repository, builds the code, and runs the unit tests.
To create a Jenkins job for the CI/CD pipeline:
1. Navigate to http://your_server_ip:8080/job/seed/configure in your web browser to configure your seed job. Replace your_server_ip with your Jenkins server IP address, and replace seed with your job’s name.
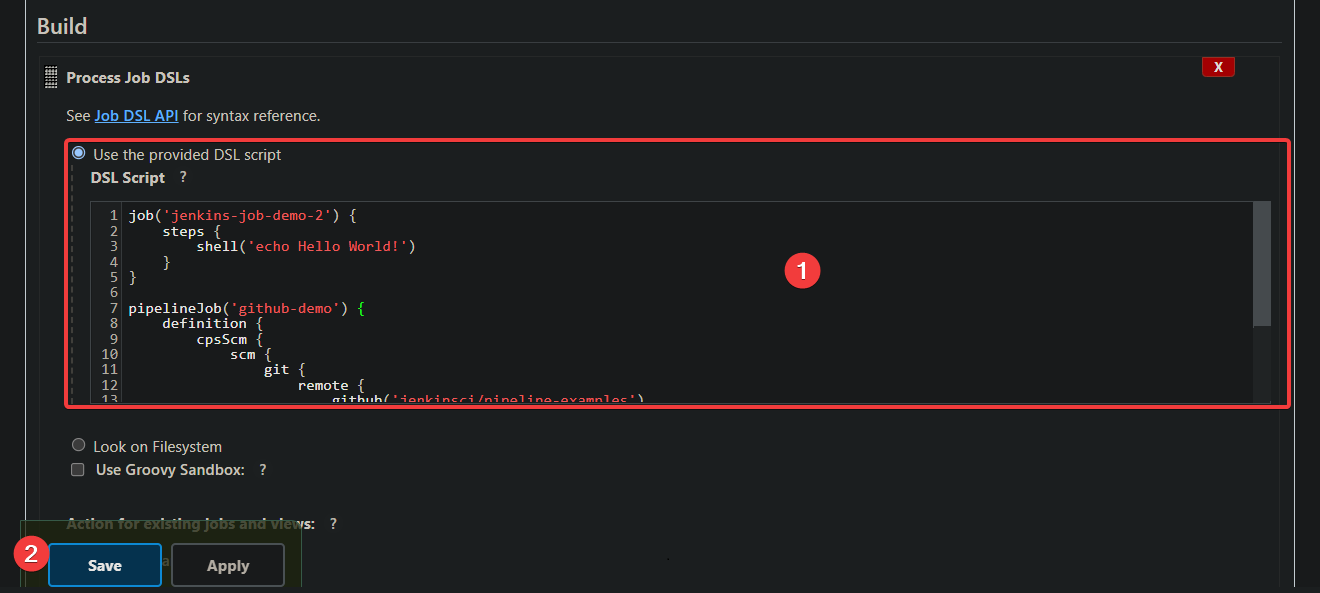
2. Next, scroll down to the Build section, find the DSL Scripts field, and replace the existing content with the following code.
job('jenkins-job-demo-2') {
    steps {
        shell('echo Hello World!')
    }
}

pipelineJob('github-demo') {
    definition {
        cpsScm {
            scm {
                git {
                    remote {
                        github('jenkinsci/pipeline-examples')
                    }
                }
            }
            scriptPath('declarative-examples/simple-examples/environmentInStage.groovy')
        }
    }
}
Click on Save once you’ve added the code to save the changes.
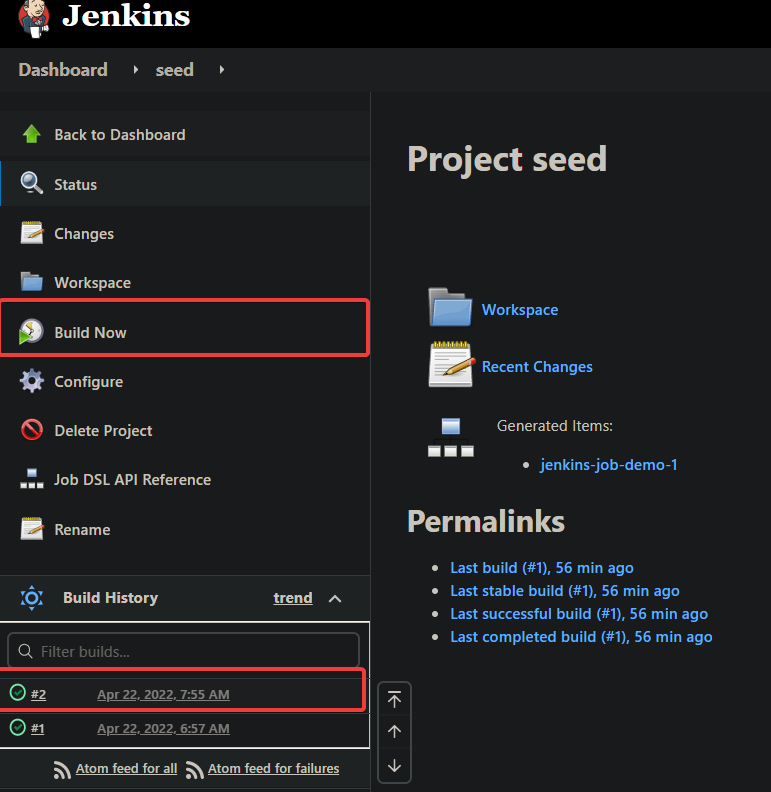
3. Click Build Now in the left sidebar on the next screen to rerun the seed job, as shown below. Under the Build History section (bottom-left), you’ll see that the seed job ran successfully.
Click on the new build (#2) to access the build’s configuration page.
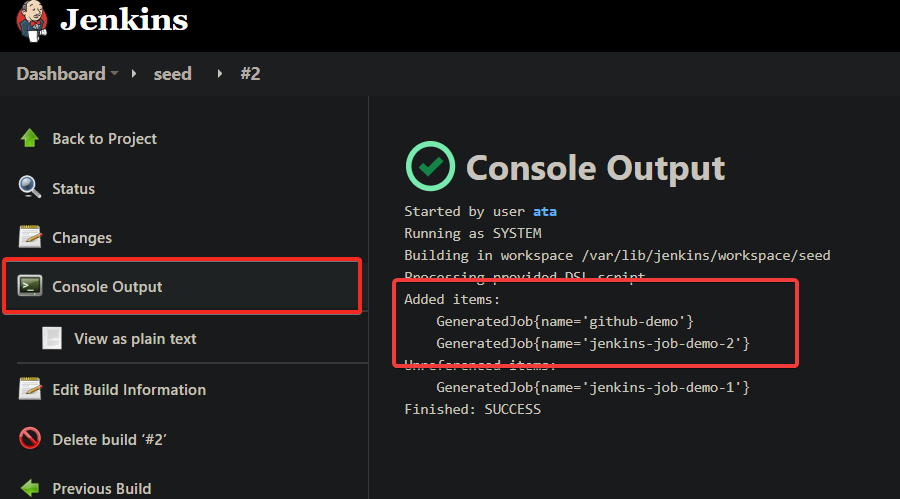
4. Now, navigate to the Console Output of the new build. You’ll see an Added items message and the name of the new job, as shown below.
This output indicates that the new pipeline job was added successfully.
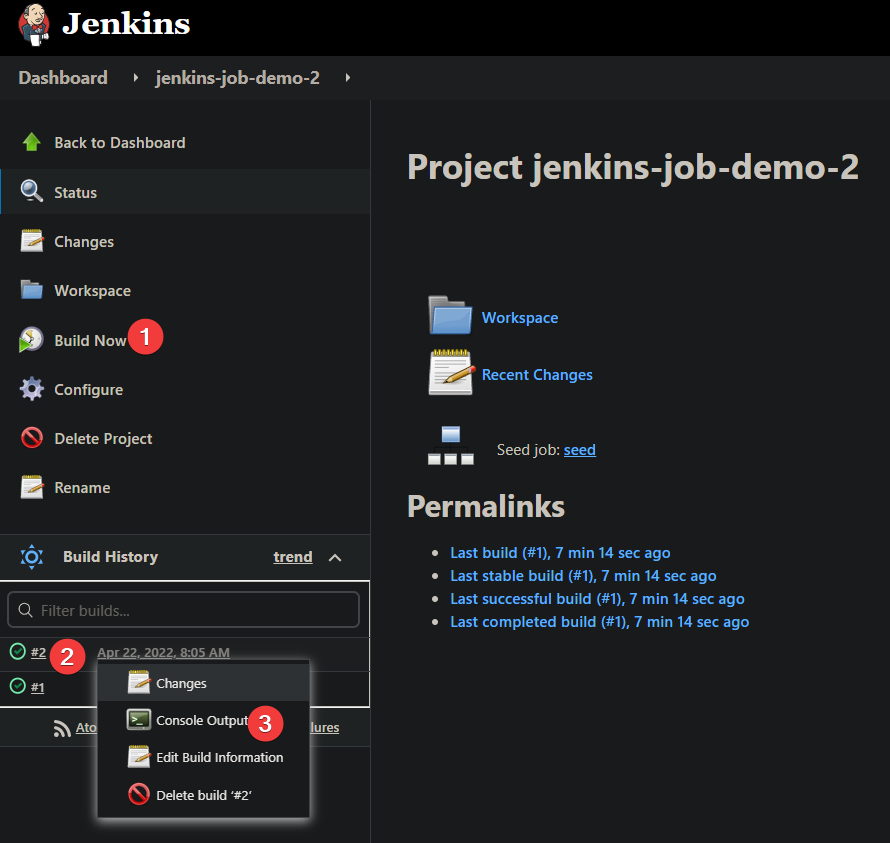
5. Return to the Jenkin dashboard, and you’ll see the new pipeline job added (jenkins-job-demo-2) to the list of jobs. Click on that new pipeline job to access the job’s configuration page.

6. Finally, click on Build Now to run the new pipeline job. You will see that the job ran successfully, as indicated under the Build History section.
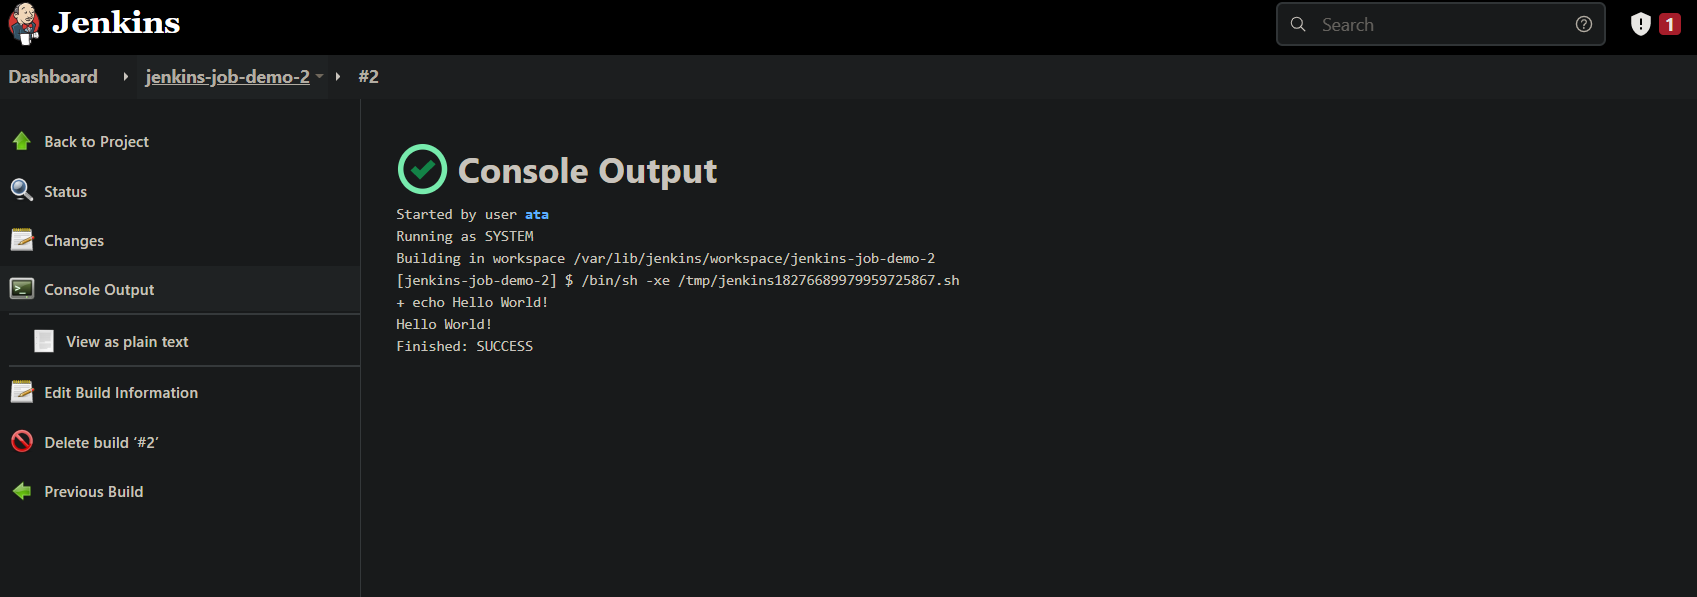
Click on the dropdown arrow next to the job and select Console Output.
In the Console Output below, you can see the job’s output, that Jenkins successfully cloned the repository, built the code, and ran the unit tests.
Conclusion
In this tutorial, you’ve learned how to create Jenkins jobs with the Job DSL plugin. You’ve touched on enhancing application development by creating a CI/CD pipeline with the Jenkins Pipeline plugin.
The Job DSL plugin and the Jenkins Pipeline plugin work side-by-side to offer a powerful way you can manage Jenkins jobs and build pipelines. Why not configure these plugins to create sophisticated build pipelines that automatically trigger Jenkins jobs as part of the build process?


