


A domain controller on Linux server?! Impossible! The reaction is valid, especially for those who hear the concept for the first time. Turns out that not only can you set up a domain controller Linux server, but you can also do so for free!
Whether you opt for Linux for cost, standardization, or greener, leaner tech stack, learning how to set up a Linux DC is a good skill for every administrator.
Read on to learn how to use Samba as a reliable domain controller Linux server.
Scan Your AD for 930+ Million Compromised Passwords. Download Specops Password Auditor, a FREE read only tool that identifies password-related vulnerabilities.
Prerequisites
This tutorial will be a hands-on demonstration. If you’d like to follow along, be sure you have an Ubuntu Server. This tutorial will use an Ubuntu Server 22.04 LTS with the following configuration.
- Hostname:
oddjobs-dc - IP Address:
192.168.8.10 - Domain:
OJI.COM - FQDN:
oddjobs-dc.oji.com
Preparing the Domain Controller on Linux Server
After meeting all the prerequisites, you must ensure there are no default operating system settings that might hamper the functioning of the DC. Don’t worry. This step is not as complicated as it may sound. Follow the below steps to accomplish this task.
Setup the Hosts File Entry
The first task is to add your server’s hostname and FQDN entries in the local hosts (/etc/hosts) file.
1. First, open your preferred SSH client and log in to your Ubuntu server.
2. Open your hosts (/etc/hosts) file in a text editor, such as nano.
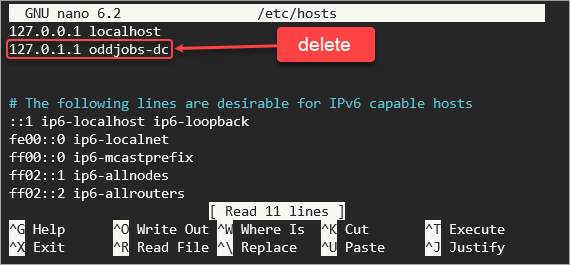
sudo nano /etc/hosts3. Delete any entry that maps your hostname or FQDN to any IP besides the static IP. For example, this server’s static IP address is 192.168.8.10, so leave this entry if it exists. Refer to the example below.
4. Next, add an entry to map your host’s FQDN and static IP address. In this tutorial, the server FQDN is oddjobs-dc.oji.com, so the entry to add is:
192.168.8.10 oddjobs-dc.oji.com oddjobs-dc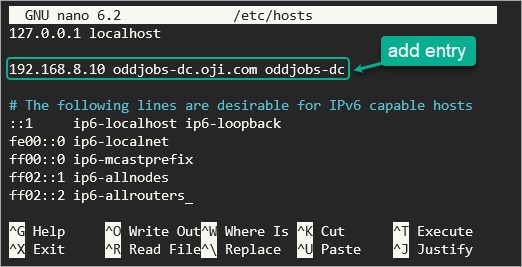
5. Save the hosts (/etc/hosts) file and exit the editor.
Confirm Hostname and FQDN Resolution
Run the commands below to confirm the server’s hostname and that the FQDN resolves to the correct IP address.
# verify server FQDN
hostname -A

# verify FQDN resolves to your server IP address
ping -c1 oddjobs-dc.oji.com
As you can see below, the commands returned the expected FQDN and IP address.

Disable the Network Name Resolution Service
Ubuntu has a service called systemd-resolved, which takes care of the DNS resolution requests. This service is unsuitable for Samba, and you must disable it and manually configure the DNS resolver instead.
1. Disable the systemd-resolved service by running the command below.
sudo systemctl disable --now systemd-resolved
2. Next, remove the symbolic link to the file /etc/resolv.conf.
sudo unlink /etc/resolv.conf3. Create a new /etc/resolv.conf file in your text editor. This example uses nano.
sudo nano /etc/resolv.conf4. Populate the /etc/resolv.conf file with the following information. Replace 192.168.8.10 with your server’s IP address and oji.com with your domain. Leave the nameserver 1.1.1.1 as the fallback DNS resolver, which is the public DNS resolver by Cloudflare.
# your Samba server IP Address
nameserver 192.168.8.10

# fallback resolver
nameserver 1.1.1.1

# your Samba domain
search oji.com
Your /etc/resolv.conf should look similar to the screenshot below.

5. Save the file and exit the editor.
Installing Samba
After completing the server preparation, it is time to install Samba and other required packages to provision the domain controller.
1. First, ensure that the repository cache is up to date by running the below command.
sudo apt-get update2. Run the command below to install the required packages for a fully functioning domain controller.
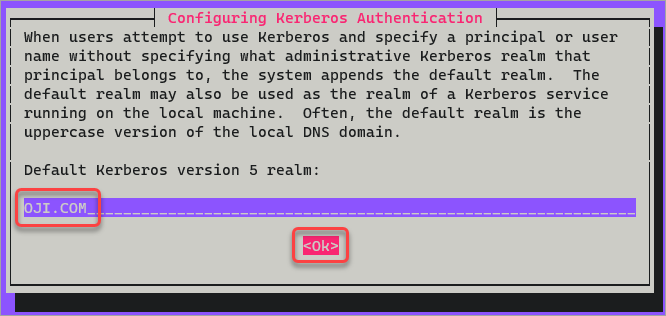
sudo apt install -y acl attr samba samba-dsdb-modules samba-vfs-modules smbclient winbind libpam-winbind libnss-winbind libpam-krb5 krb5-config krb5-user dnsutils chrony net-tools3. On the Configuring Kerberos Authentication step, type the DNS domain in uppercase. In this example, the default realm domain is OJI.COM. Highlight Ok, and press Enter to accept the value.
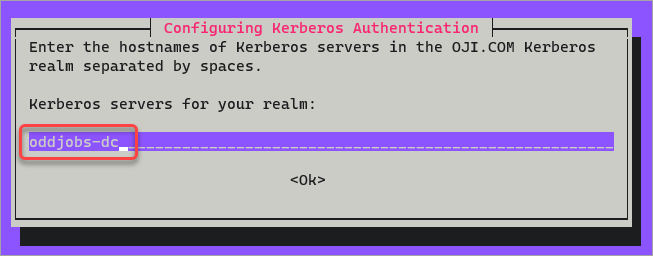
4. On the next screen asking for the Kerberos servers for your realm, type the server hostname and press Enter.
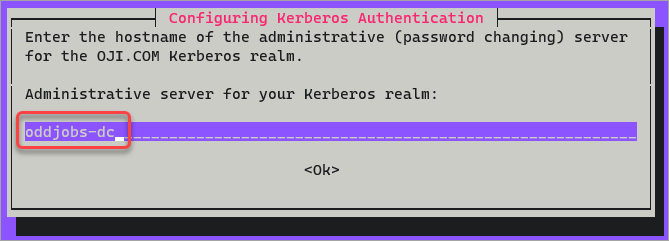
5. On the next screen asking for the Administrative server for your Kerberos realm, type the server hostname and press Enter.
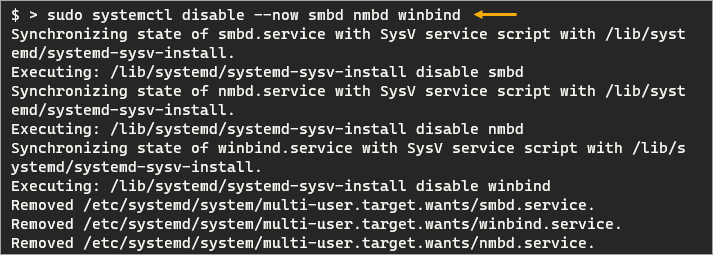
6. After the configuration, disable the unnecessary services (winbind, smbd, and nmbd).
sudo systemctl disable --now smbd nmbd winbind
7. Enable and activate the samba-ad-dc service. This service is what Samba needs to act as an Active Directory domain controller Linux server.
# unmask the samba-ad-dc service
sudo systemctl unmask samba-ad-dc

# enable samba-ad-dc service
sudo systemctl enable samba-ad-dc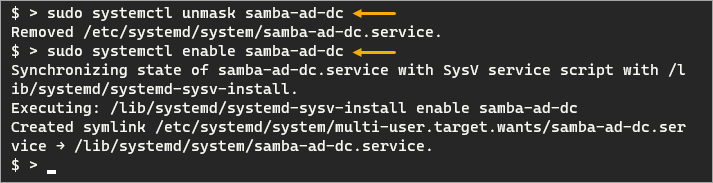
Provisioning the Domain Controller Linux Server
Using the samba-tool binary, you can now provision the domain controller upon your Samba installation. Samba-tool is a configuration tool to interact with and configure various aspects of a Samba-based AD.
1. For good measure, backup the existing /etc/samba/smb.conf and /etc/krb5.conf files.
sudo mv /etc/samba/smb.conf /etc/samba/smb.conf.bak
sudo mv /etc/krb5.conf /etc/krb5.conf.bak
2. Run the below command to promote the Samba to an Active Directory domain controller Linux server.
The –use-rfc2307 switch enables the Network Information Service (NIS) extension, which allows the DC to manage UNIX-based user accounts appropriately.
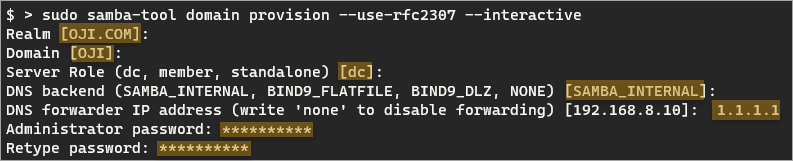
sudo samba-tool domain provision --use-rfc2307 --interactive3. Answer the prompts as follows.
- Realm – the tool automatically detects your Kerberos realm. In this example, the realm is
OJI.COM. Press Enter to accept the default.
- Domain – the tool automatically detects the NetBIOS domain name. In this example, the NetBIOS is
OJI. Press Enter to continue.
- Server role – the tool automatically populates the server role as a domain controller (
dc). Press Enter to continue.
- DNS backend – the default is
SAMBA_INTERNAL. Press Enter to accept the default.
- DNS forwarder IP address – type the fallback resolver address you specified in
resolve.confearlier, which is1.1.1.1. Press Enter to continue.
- Administrator password – set the password of the default domain administrator. The password you specify must meet Microsoft’s minimum complexity requirements. Press Enter to proceed.
- Retype password – retype the default domain administrator password and press Enter.
At the end of the configuration, you’ll see the following information.

4. The samba-tool command generated the Samba AD Kerberos configuration file at /var/lib/samba/private/krb5.conf. You must copy this file to /etc/krb5.conf. To do so, run the following command.
sudo cp /var/lib/samba/private/krb5.conf /etc/krb5.conf5. Finally, start the samba-ad-dc service.
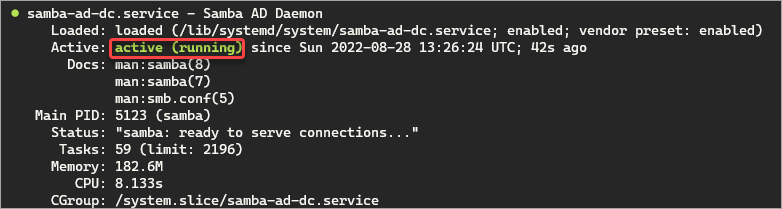
sudo systemctl start samba-ad-dc
sudo systemctl status samba-ad-dc
As you can see below, the service status is now active (running).
Testing the Domain Controller Linux Server
The Samba AD DC server is now running. In this section, you will perform a few post-installation tests to confirm key components are functioning as desired. One such test is to attempt logging into the default network shares on the DC.
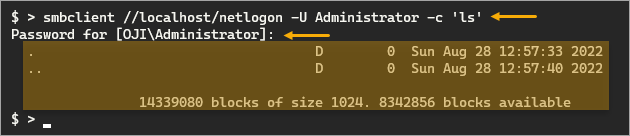
Run the smbclient command to log on as the default administrator account and list (ls) the contents of the netlogon share.
smbclient //localhost/netlogon -U Administrator -c 'ls'
Enter the default admin password. The share should be accessible without errors if the DC is in a good state. As you can see below, the command listed the netlogon share directory.
Verifying DNS Resolution for Key Domain Records
Run the commands below to look up the following DNS records.
- TCP-based LDAP SRV record for the domain.
- UDP-based Kerberos SRV record for the domain.
- A record of the domain controller.
host -t SRV _ldap._tcp.oji.com
host -t SRV _kerberos._udp.oji.com
host -t A oddjobs-dc.oji.com
Each command should return the following results, indicating that the DNS resolution works.

Testing Kerberos
The last test is to attempt to issue a Kerberos ticket successfully.
1. Execute the kinit command for the administrator user. The command automatically appends the realm to the user account. For example, the administrator will become [email protected], where OJI.com is the realm.
kinit administrator2. Type the administrator password on the prompt and press Enter. If the password is correct, you’ll see a Warning message about the password expiration, as shown below.

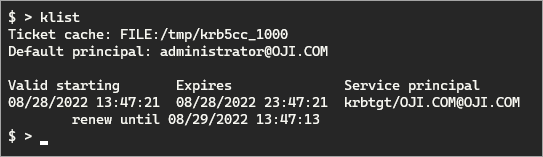
3. Run the klist command below to list all tickets in the ticket cache.
klistThe screenshot below shows that the Kerberos ticket for the administrator account is in the ticket cache. This result indicates that Kerberos authentication works on your domain controller Linux server.
Extend the functionality of Group Policy and simplify the management of fine-grained password policies. Target any GPO level, group, user, or computer with dictionary and passphrase settings with Specops Password Policy. Try it Free!
Conclusion
Congratulations on reaching the end of this tutorial. You have now learned to stand up an Active Directory domain controller Linux server quickly. Deepen your knowledge on the subject by learning to create users and join client computers in the domain.


