


Do you need centralized domain management for your networks but aren’t keen on using a Windows Server and paying the additional license cost? Samba Active Directory is one of the best and free alternatives you can try on Linux.
Samba is an open-source solution primarily known for its network file server and print services. But since version 4.0, Samba allows you to provision the Active Directory server role, too.
This tutorial will teach you how to install and configure Samba Active Directory on Ubuntu 20.04. Get ready and jump right in!
Prerequisites
This post is a hands-on demonstration. If you’d like to follow along, you’ll need the following requirements.
- An Ubuntu 20.04 server. Throughout this tutorial, the server’s name will be
dc1, the domain will beexample.com, and the IP address is172.16.1.10. - A user account with sudo privileges.
- A Windows 10 computer on the same network as the Ubuntu server.
Setting Up the Server Hostname
The first step is to set up the server’s identity in the network. To do so, you’ll need to assign the server’s hostname and fully qualified domain name (FQDN) by following the steps below.
1. First, log in to your Ubuntu server and open the terminal session.
2. Next, run the hostnamectl command below to change your server’s hostname. The command below changes the hostname to dc1.
# set up the hostname
hostnamectl set-hostname dc1
3. Now, open the /etc/hosts file for editing using your preferred editor, such as nano. Inside the file, append an entry specifying the server’s IP address, FQDN, and hostname in this format – server-IP hostname.domain.com hostname.
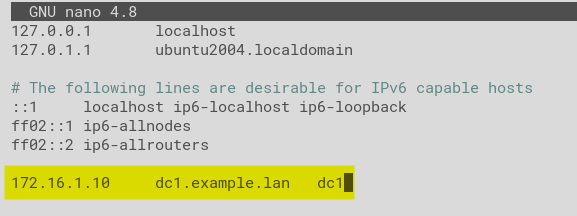
For this example, the hosts file entry is: # setup FQDN dc1.example.lan 172.16.1.10 dc1.example.lan dc1
# setup FQDN dc1.example.lan
172.16.1.10 dc1.example.lan dc1
After adding the new entry, save and exit the file.
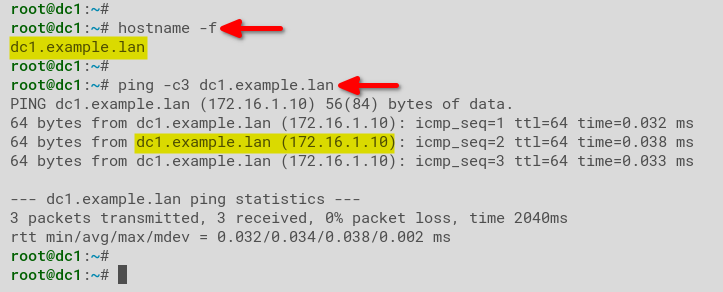
4. Finally, run the command below to verify the FQDN of the Samba server. # verify FQDN hostname -f # verify FQDN is resolved to the Samba IP address ping -c3 dc1.example.lan
# verify FQDN
hostname -f

# verify FQDN is resolved to the Samba IP address
ping -c3 dc1.example.lan
As you can see below, the FQDN of the Samba server is dc1.example.lan, which resolves to 172.16.1.10.
Disabling the DNS Resolver
The systemd-resolved service controls the DNS configuration on the Ubuntu server, which is not suitable with Samba Active Directory. To set up Samba Active Directory, you’ll first have to disable the systemd-resolved service and replace the /etc/resolv.conf configuration file.
- Run the following commands to disable and stop the
systemd-resolvedservice at once, and remove the symbolic link to the file/etc/resolv.conf, in order.
# stop and disable systemd-resolved service
sudo systemctl disable --now systemd-resolved

# remove the symlink file /etc/resolv.conf
sudo unlink /etc/resolv.conf
2. Next, create a new /etc/resolv.conf file.
# create a new /etc/resolv.conf file
touch /etc/resolv.conf
3. Open the /etc/resolv.conf using your preferred editor and define the DNS resolver using the configuration below. Be sure to put the Samba server IP address on top of the line. Save the file and exit after editing.
# Samba server IP address
nameserver 172.16.1.10

# fallback resolver
nameserver 1.1.1.1

# main domain for Samba
search example.lan
4. Lastly, run the following command to make the file /etc/resolv.conf file immutable. This step ensures that the resolver does not change unknowingly for any reason.
# add attribute immutable to the file /etc/resolv.conf
sudo chattr +i /etc/resolv.conf
Installing Samba
After you set up the FQDN and configure the name resolution, you’ll be installing Samba to your system and enabling the Samba Active Directory service. As of this writing, the official Ubuntu repository provides Samba v4.13.
1. Run the apt command below to refresh your Ubuntu server’s package index.
sudo apt update2. Now, execute the below command to install Samba with all packages and dependencies.
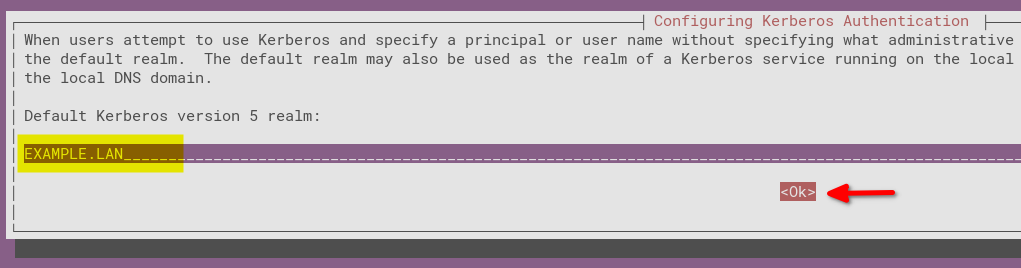
sudo apt install -y acl attr samba samba-dsdb-modules samba-vfs-modules smbclient winbind libpam-winbind libnss-winbind libpam-krb5 krb5-config krb5-user dnsutils chrony net-tools3. Type the default realm domain name in uppercase. In this example, the FQDN is dc1.example.lan, so the default realm domain name should be EXAMPLE.LAN. Highlight Ok and press Enter.
4. On the next prompt, type the server FQDN. This step defines the default Kerberos server. Highlight Ok and press Enter.
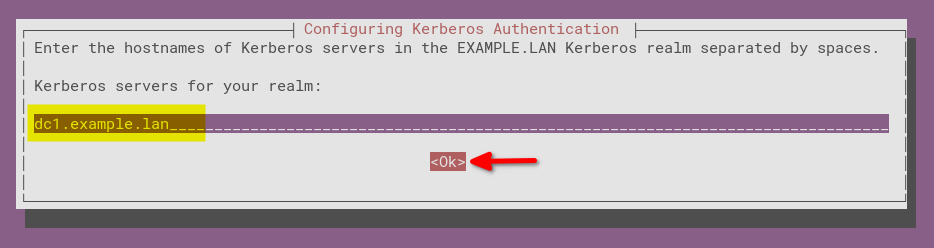
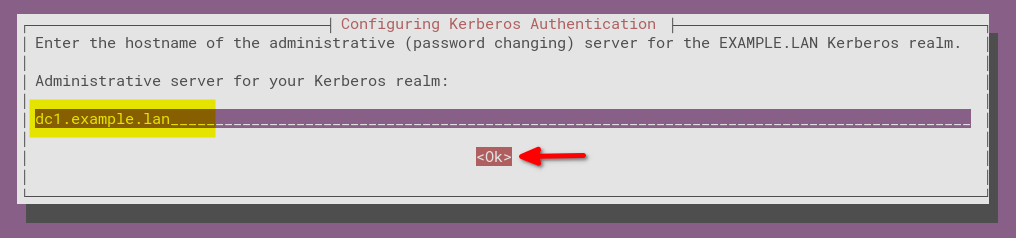
5. Next, type the server FQDN again to specify the Kerberos administrative server. Highlight Ok, and press Enter to complete the initial Samba configuration.
6. After the Samba installation, run the following command to stop and disable services that the Samba Active Directory server does not require smbd, nmbd, and winbind. The server only needs the samba-ac-dc to serve as Active Directory and domain controller.
# stop and disable samba services - smbd, nmbd, and winbind
sudo systemctl disable --now smbd nmbd winbind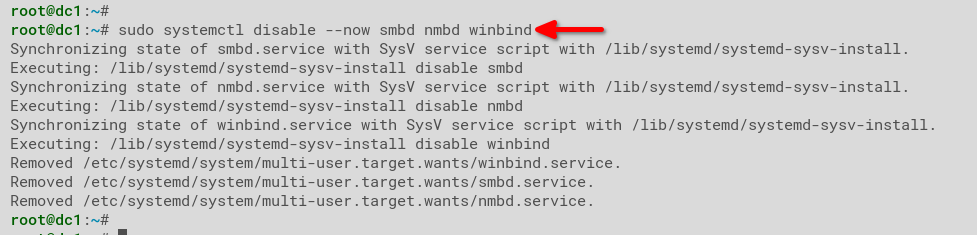
7. Lastly, run the commands below to activate and enable the samba-ad-dc service.
# activate samba-ad-dc service
sudo systemctl unmask samba-ad-dc

# enable samba-ad-dc service
sudo systemctl enable samba-ad-dc
Configuring Samba Active Directory
Now you’ve installed Samba on your system. There are several more steps to configure the Samba Active Directory. The Samba installation came with a command-line tool called samba-tool to provision the Samba Active Directory.
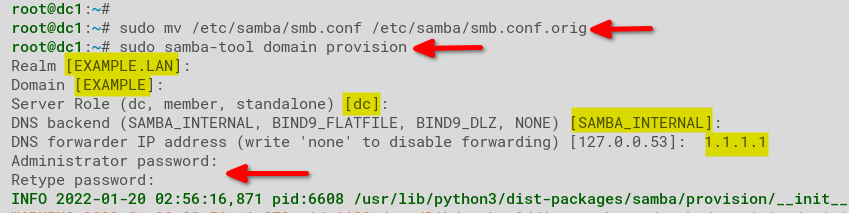
1. First, create a backup of the /etc/samba/smb.conf file for good measure. The provisioning process will replace this file.
# backup default Samba configuration file
sudo mv /etc/samba/smb.conf /etc/samba/smb.conf.orig
2. Now, run the samba-tool command below to start provisioning Samba Active Directory.
# provisioning Samba Active Directory
sudo samba-tool domain provision
3. On the Realm prompt, accept the default value and press Enter.
4. On the Domain prompt, press Enter again to accept the default value.
5. On the Server role prompt, leave the default and press Enter.
6. On the DNS backend prompt, leave the value as default (SAMBA_INTERNAL) and press Enter.
7. Next, type the additional DNS forwarder IP address. This example will add the Cloudflare DNS 1.1.1.1 as the DNS forwarder. This option is only available when you’re using the SAMBA_INTERNAL DNS backend.
8. Type in your Samba Active Directory Administrator password and press Enter.
The provisioning automatically creates the new Samba configuration file (/etc/samba/smb.conf) and the Kerberos configuration (/var/lib/samba/private/krb5.conf) file.
After the Samba Active Directory provisioning, you’ll receive the output similar to the screenshot below.

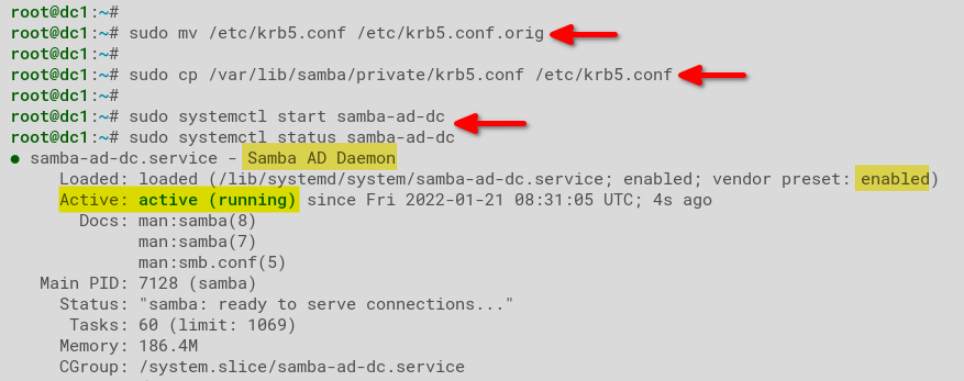
9. Now, run the below commands to backup the default Kerberos configuration and replace it with the file /var/lib/samba/private/krb5.conf.
# rename default Kerberos configuration to krb5.conf.orig
sudo mv /etc/krb5.conf /etc/krb5.conf.orig

# copy the Kerberos configuration generated by the samba-tool
sudo cp /var/lib/samba/private/krb5.conf /etc/krb5.conf
10. Finally, execute the systemctl commands below to start the Samba Active Directory service samba-ad-dc and verify that the service status is active (running).
# start samba-ad-dc service
sudo systemctl start samba-ad-dc

# verify samba-ad-dc service
sudo systemctl status samba-ad-dc
The samba-ad-dc service is active (running) and enabled, as you can see below. The Samba AD daemon will now start automatically on system startup.
Setting Up Time Synchronisation
Samba Active Directory depends on the Kerberos protocol, and the Kerberos protocol requires that the AD server and workstation times are synchronized. To ensure proper time synchronization, you’ll need to set up a Network Time Protocol (NTP) server on Samba, too.
Benefits of AD time synchronization include replay attack prevention and resolving AD replication conflicts.
1. Run the below commands to change the default permission and ownership of the directory /var/lib/samba/ntp_signd/ntp_signed. The user/group _chrony must have read permission to the ntp_signed directory.
# allow group _chrony to read the directory ntp_signd
sudo chown root:_chrony /var/lib/samba/ntp_signd/

# change the permission of the directory ntp_signd
sudo chmod 750 /var/lib/samba/ntp_signd/
2. Now, open the configuration file /etc/chrony/chrony.conf in a text editor and add the following configuration to the bottom of the file. This configuration enables chrony NTP server and points the NTP socket location to /var/lib/samba/ntp_signd. Save the configuration file and exit the editor.
# bind the chrony service to IP address of the Samba AD
bindcmdaddress 172.16.1.10

# allow clients on the network to connect to the Chrony NTP server
allow 172.16.1.0/24

# specify the ntpsigndsocket directory for the Samba AD
ntpsigndsocket /var/lib/samba/ntp_signd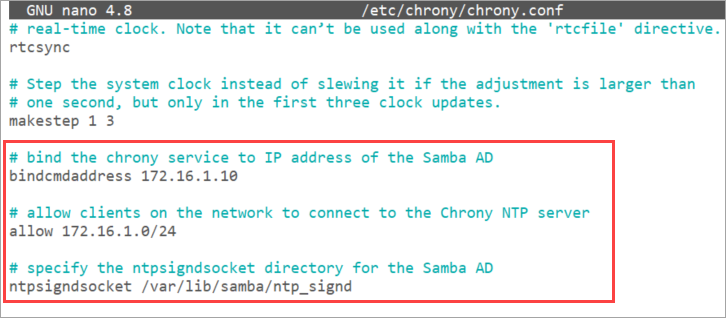
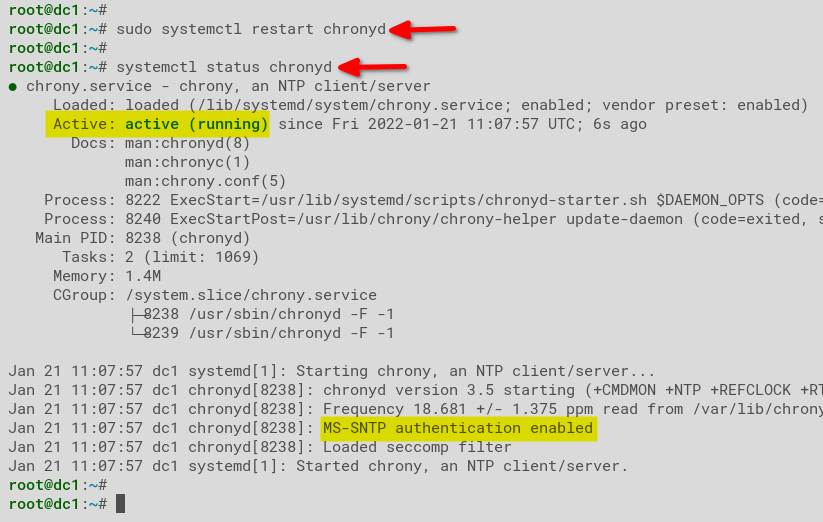
3. Next, run the following commands to restart and verify the chronyd service on the Samba AD server.
# restart chronyd service
sudo systemctl restart chronyd

# verify chronyd service status
sudo systemctl status chronyd
As you can see below, the chronyd service is enabled and active (running). At the bottom of the chronyd log message, you’ll see the message MS-SNTP authentication is enabled, which confirms that the NTP authentication extension is functional.
Verifying Samba Active Directory
After the installation, you should verify the Samba configuration to ensure that what you’ve done so far works. You can do so by verifying the Samba DNS configuration, default shared folder (File Server), and testing the Kerberos authentication.
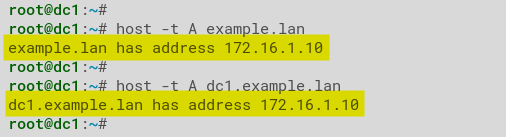
1. Run the host commands below to verify the AD domain name example.lan and dc1.example.lan.
# verify domain example.lan
host -t A example.lan

# verify domain dc1.example.lan
host -t A dc1.example.lan
And the result should confirm that both host records point to the Samba server IP address 172.16.1.10.
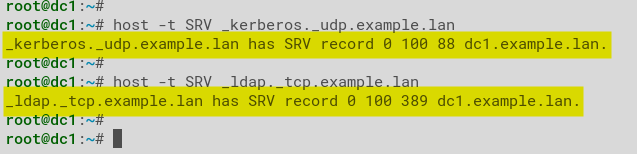
2. Next, verify that _kerberos and _ldap service record both point to your Samba Active Directory server’s FQDN.
# verify SRV record for _kerberos
host -t SRV _kerberos._udp.example.lan

# verify SRV record for _ldap
host -t SRV _ldap._tcp.example.lan
In this example, the output below confirms that both SRV records resolve to dc1.example.lan.
3. Next, run the smbclient command below to verify the default resources available on the Samba Active Directory.
# checking available resources on Samba AD
smbclient -L example.lan -N
You should see that the default shared folder on the Samba Active Directory is sysvol and netlogon, and the default service available is IPC$.

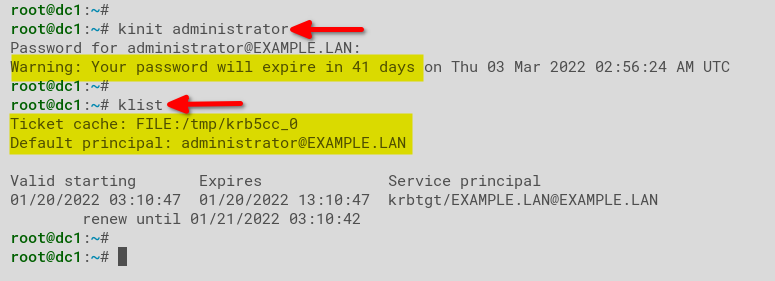
4. Lastly, run the below kinit commands to authenticate to the Kerberos server using the user Administrator and verify the Kerberos tickets cached on your system.
Note: The domain part should be in uppercas
e.
# authenticate to Kerberos using administrator
kinit [email protected]

# verify list cached Kerberos tickets
klist
You will receive the output similar to the screenshot below. The administrator Kerberos ticket is stored at the file /tmp/krb5cc_0 and will expire in 41 days.
Creating a New Samba Active Directory User
At this point, you’ve finished configuring Samba Active Directory. But as you know, there are no users yet. Now it’s time to create your first Samba AD user account using the samba-tool command.
1. Run the below command to create a new user named alice, whose password is alice_password88.
# create a new user in Samba
sudo samba-tool user create alice alice_password88
2. Next, run the samba-tool command below to verify available users on Samba.
# checking users on Samba
sudo samba-tool user list
As you can see below, the new user alice is available on the Samba Active directory.
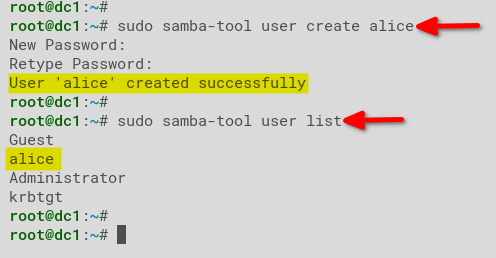
Joining and Logging In to Samba Active Directory Domain
Now that you have created a new user, what’s left is to join a workstation to the Active Directory domain. Afterward, you can then log in to the workstation using the Samba AD user credentials.
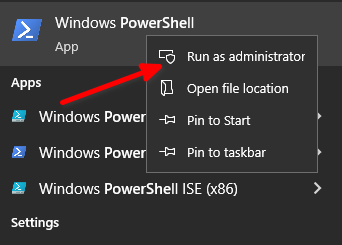
1. Log in to your Windows PC and open PowerShell as administrator.
2. Run the below command to list the available ethernet adapters on your Windows PC.
# checking available interface using Powershell command
Get-NetAdapter -Name "*"
You may see different outputs on your PowerShell screen. This example shows one network interface called Ethernet Instance 0 2.

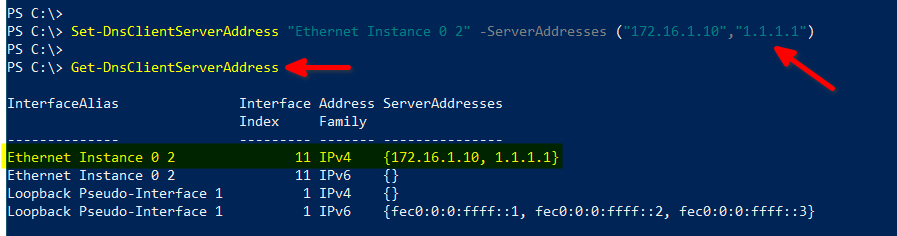
3. Execute the following command to change the adapter’s DNS server to the Samba Active Directory’s IP address with additional fallback Cloudflare DNS 1.1.1.1. Doing this step ensures that your workstation uses the Samba AD server for name resolution.
# setup DNS resolver using Powershell
Set-DNSClientServerAddress "Ethernet Instance 0 2" –ServerAddresses ("172.16.1.10","1.1.1.1")
4. Run the below command to verify your DNS resolver, and make sure that your computer uses the Samba AD server as the default DNS resolver.
# verify DNS resolver
Get-DnsClientServerAddress
You’ll receive a similar output like the screenshot below.
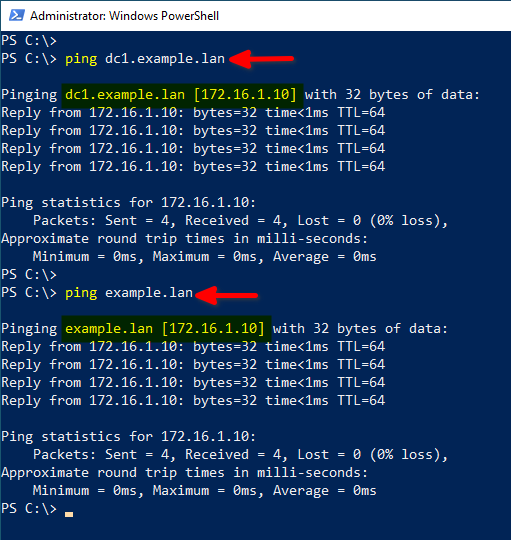
5. Now, ping the server hostname and domain.
# ping the AD domain dc1.example.lan
ping dc1.example.lan

# ping the AD domain example.lan
ping example.lan
You should see the reply from the AD server as below. Confirm that the result points to the Samba AD server’s IP address.
6. Next, run the following command to join the workstation to the Samba Active Directory domain.
# add Windows 10 to Active Directory
Add-Computer -DomainName "example.lan" -Restart
7. Type in the Samba AD administrator user name and password, click OK. The computer will automatically restart as part of the domain join process.
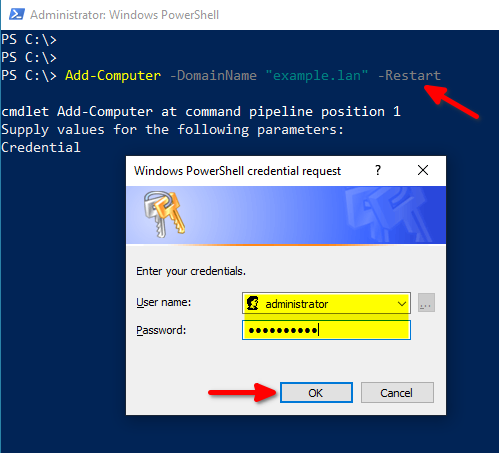
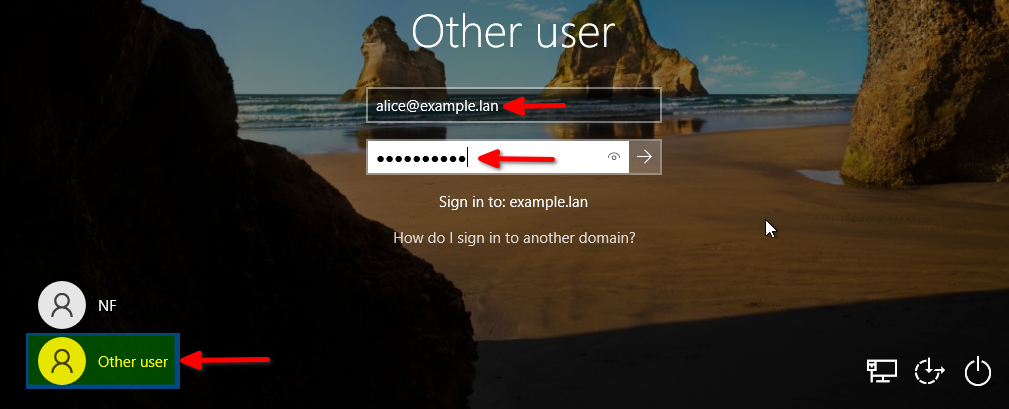
8. After restarting, click Other users on the login screen. Type in the Active Directory username and password of the Samba AD user you previously created ([email protected]), and press Enter to log in.
9. After a successful login, open a PowerShell window and run on or both commands below to verify the currently logged-on username.
whoami
query user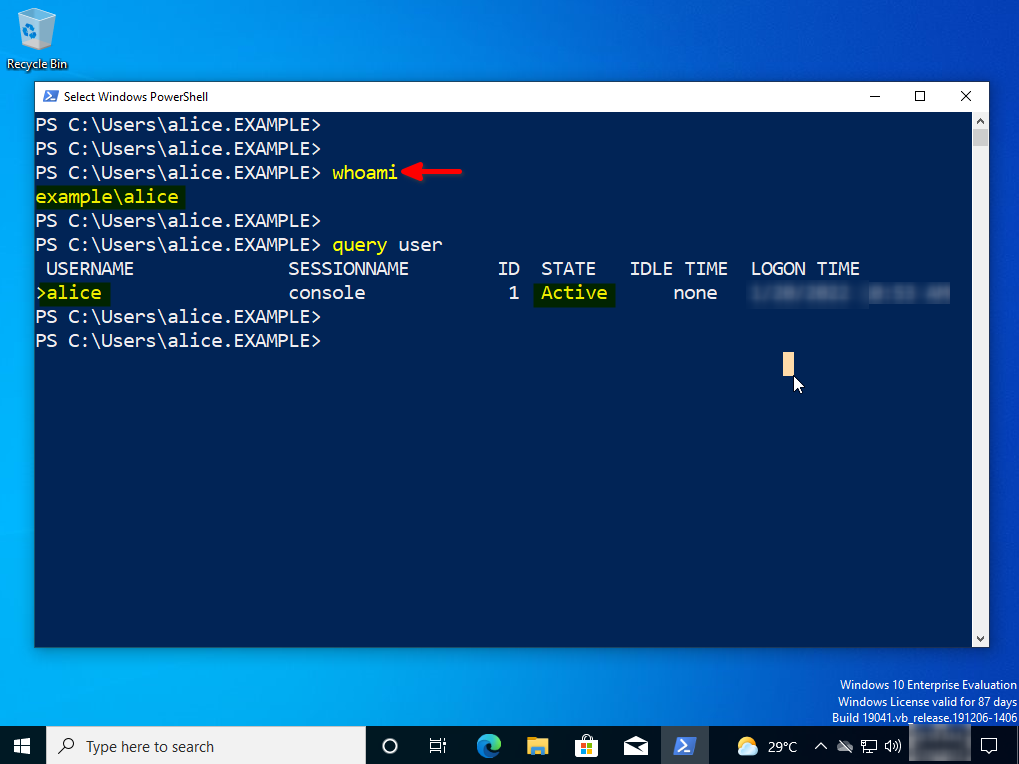
Conclusion
The concept and application of Active Directory are not exclusive to the Windows ecosystem. You’ve learned in this tutorial that you can enjoy the same Active Directory benefits in Linux by implementing the Samba Active Directory.
Throughout this tutorial, you’ve learned how to install and configure the Samba Active Directory on Ubuntu 20.04. You’ve also learned to create new users and join a Windows workstation to the Samba Active Directory domain.
What’s next for you? How about integrating Samba to CUPS service for printing support or setting up a Samba Share file server? You see, there’s more to Samba than Active Directory!


