


The complexity of certificate management for secure digital communication can be overwhelming. If you wish for a simpler, more accessible way to handle certificates, Certificate Utility (Certutil) is here to brighten your journey!
In this tutorial, you will navigate the ins and outs of this command-line utility, empowering you to safeguard your digital assets.
Read on and harness Certutil’s potential to streamline your certificate management!
Prerequisites
Before you dive into using Certutil, ensure you have the prerequisites below in place to ensure a smooth experience as you follow along in this tutorial:
- A Windows OS – This tutorial uses Windows 11.
- PowerShell 5 or later installed on your Windows machine – This tutorial uses PowerShell 7.
Retrieving Certificate Information via the certutil Command
Think of certificate information as a comprehensive reference guide for your digital certificates. Understanding your certificates is about technical prowess and safeguarding your digital identity and privacy. But how do you retrieve certificate information?
Certutil is a command-line utility in a Windows OS that lets you manage and manipulate certificates and certificate services. This utility is primarily used for various certificate-related operations, such as viewing, importing, exporting, and verifying digital certificates.
To retrieve information about a certificate using Certutil:
1. Open your preferred web browser, and download the sample_cert_files zip file, if you want to follow along, containing two sample files (alice.crt and alice.key).
2. Once downloaded, extract the zip file into a folder of your choice (i.e., C:\Users\admin\Downloads\sample_cert_files).
3. Now, open PowerShell in administrator mode and run the following certutil command to retrieve information about the downloaded certificate. Ensure you replace the file path with the actual path of your downloaded certificate.
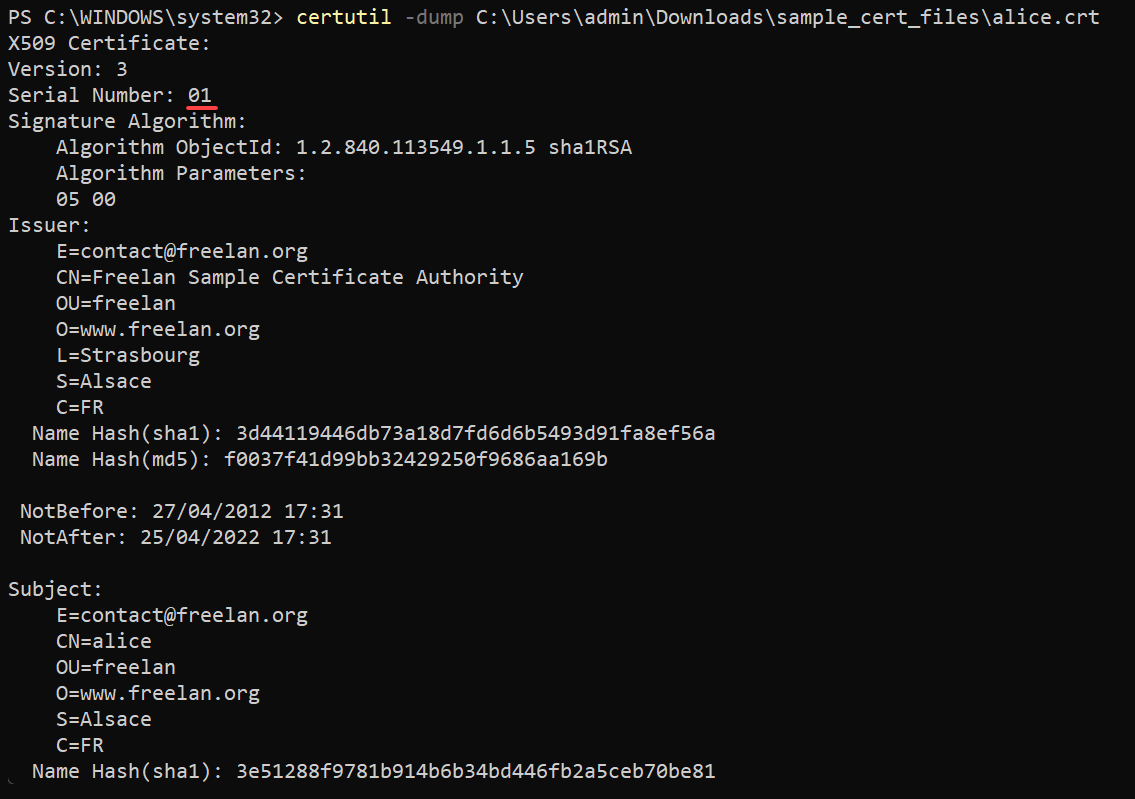
certutil -dump C:\Users\admin\Downloads\sample_cert_files\alice.crtYou will see a wealth of information about the certificate in the output below, such as its Serial Number, Signature Algorithm, Issuer Name, and more. You can use this information to verify that your certificates are legitimate.
Note the certificate’s serial number (01) for later use, like deleting certificates.
Installing Certificates to Secure Digital Environments
In today’s online world, data privacy is paramount. You must ensure your online interactions are secure and confidential, protecting your data from prying eyes. How? By installing certificates to establish secure communication and authentication in digital environments.
Certificates, in this context, are like digital badges of trust; they let you verify the identity of parties in a communication. This behavior ensures data is transmitted and received securely and that the parties involved are who they claim to be.
To install a certificate, follow these steps:
1. Execute the below certutil command to install a certificate in a specified certificate store. Ensure you replace the placeholders as follows:
<store_name>– The certificate store name where you want to install the certificate. Common store names include Root, My, CA, and TrustedPublisher.<cert_file>– The path to the certificate file you want to install
But in this example, the certutil command installs the alice.cert certificate to the TrustedPublisher store.
💡 Ensure you have the certificate file in a supported format, such as .crt or .cert, and the source of the certificate is trusted. Installing untrusted or malicious certificates can compromise security.
certutil -addstore <store_name> <cert_file>
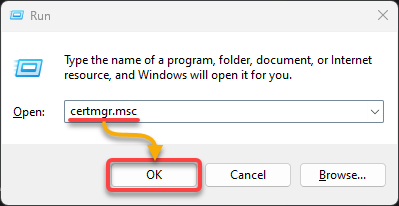
2. Once installed, press the Win + R keys to open the Run dialog, type certmgr.msc, and press Enter (or click OK), as shown below. Doing so opens the Certificate Manager, where you can access, view, and manage your certificates (step three).
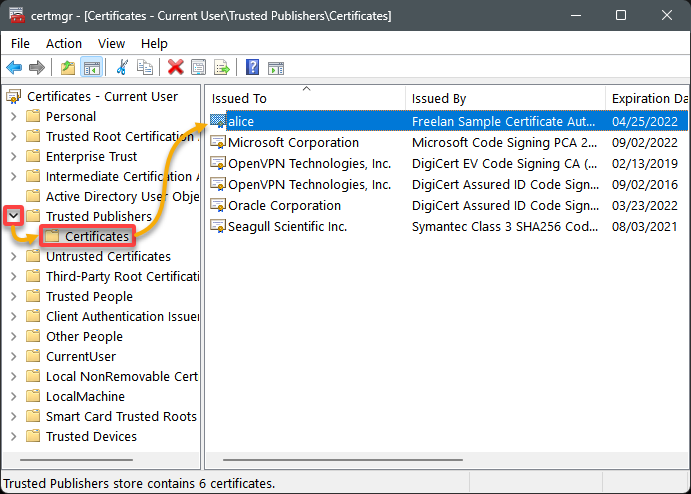
3. Lastly, expand the certificate store folder (Trusted Publishers) where you added your certificate, and select the Certificates folder to view all available certificates.
In the table below, you can verify that your newly added certificate (alice) exists.
Deleting Obsolete and Unnecessary Certificates
Now that you have bolstered your digital defenses, it is time to look closer into housekeeping. Like tidying up your living space, occasionally decluttering your digital certificates is essential.
If you find old, expired certificates in your system or certificates have been compromised, removing them ensures your security mechanisms remain efficient and up-to-date.
To delete certificates, proceed with the following steps:
Execute the following command to delete (-delstore) a specific certificate, replacing the following:
<store_name>– The name of the certificate store (i.e., TrustedPublisher) where the certificate to delete is located.SerialNumber– The serial number of the certificate you want to delete, in this case, the one you noted in the “Retrieving Certificate Information” section (01).
This command ensures Windows will no longer trust the compromised certificate.
certutil -delstore <store_name> "SerialNumber"
Encoding and Decoding Files
Besides Certutil’s basic certificate operations, another vital skill you need in your digital toolkit is file security — encoding and decoding files. Knowing how to protect sensitive information is crucial in this age of digital communication and privacy concerns.
Certutil lets you encode and decode files for securely storing sensitive data or transferring them over an insecure network.
To encode and decode files, proceed with the outlined steps below:
1. Execute the following command, which does not provide output to the console but creates a file called Hello.txt that contains the text Hello. This text file is your sample file to encode and decode.
"Hello" > Hello.txt2. Next, run the below command to -encode your text file (Hello.txt) with Base64 encoding and save it as Hello-encoded-b64.txt.
This command takes the plain text and transforms it into a code that is unreadable to prying eyes.
certutil -encode Hello.txt Hello-encoded-b64.txt
3. Once encoded, run the below Get-Content command to view the contents of the encoded text file.
Get-Content Hello-encoded-b64.txtIf the encoding worked as expected, you will see a Base64 encoded version of the text file’s content.

4. Now, execute the command below to -decode your text file (Hello-encoded-b64.txt) and save it as decoded-hello.txt.
certutil -decode Hello-encoded-b64.txt decoded-hello.txt
5. Ultimately, run the following command to view the contents of the decoded text file (decoded-hello.txt).
Get-Content decoded-hello.txtBelow, the file’s contents (Hello) are the same as the original Hello.txt file.

Downloading Files via the certutil Command
While Certutil is primarily used for certificate operations, it can also be used to download files from the web using the -urlcache option.
This feature is handy for scenarios where you must download certificate files programmatically or via scripts. Moreover, certutil lets you download certificate files without relying on a full-fledged web browser or additional third-party tools.
To download a file via Certutil:
Run the following certutil command to fetch the URL and update the cache forcefully (-f). Ensure you replace <url> and <file_name> with the file’s URL and name to save it.
The -f flag tells certutil to ignore the cache and directly fetch the file from the specified URL, even if a copy of the file already exists in the cache. This flag is helpful when you want to ensure you are getting the latest version of the file.
certutil.exe -urlcache -f <url> <file_name>In this example, the command downloads a BIN file (Lato-Regular.bin) from the filexamples.com website (https:/filesamples.com/samples/font/bin/) and saves it as Lato-Regular.bin.

Finally, run the below command to list (ls) the downloaded BIN file (Lato-Regular.bin) to verify it was downloaded successfully.
ls Lato-Regular.bin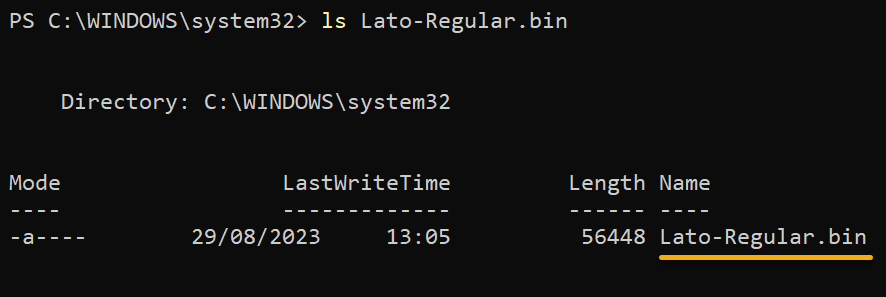
Conclusion
In this tutorial, you have gained valuable insights into the versatile Certutil command-line tool, unlocking its potential for certificate-related tasks. Whether securing a web server, managing digital identities, or ensuring the integrity of data transmission, Certutil can be a lifesaver.
You have learned the fundamental functions of Certutil, from managing certificates to encoding, decoding, and downloading files. You are now well-equipped to leverage Certutil’s capabilities to enhance the security and reliability of your digital interactions.
Why not learn about certificate lifecycle management? Perhaps automate an entire certificate lifecycle, including certificate issuance, renewal, and revocation, using scripts and scheduled tasks? Save time and enhance security by ensuring certificates are always up to date!


