

IT administrators are always looking for new ways to increase their efficiency and productivity, and one of the best options is using the Windows Subsystem for Linux (WSL). Rather than relying on a remote Linux machine for development, go for a Windows 11 Linux guest.
Not a reader? Watch this related video tutorial!In this tutorial, you’ll learn how to install and set up a Windows 11 Linux guest on your system. At the same time, you’ll use some of the most common Linux tools for daily IT administrator tasks.
Get started increasing efficiency and productivity today!
Prerequisites
This tutorial will be a hands-on demonstration. If you’d like to follow along, be sure you have a machine running Windows 11.
Installing WSL on Windows 11
The Windows Subsystem for Linux (WSL) is a compatibility layer for running Linux binary executables (in ELF format) natively on Windows 10 and Windows Server.
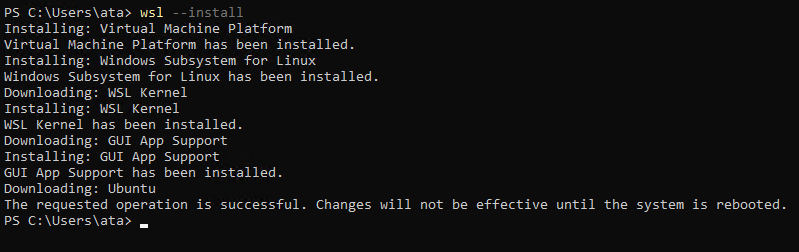
WSL is not installed by default on your Windows system, but you can install WSL install WSL through the Microsoft Store or use a PowerShell command. In this tutorial, you’ll install WSL by running commands in PowerShell.
1. Run PowerShell as administrator so you can run commands that require elevated privileges.
2. On PowerShell, run the below command to perform the following:
- Enable the necessary optional components.
- Download the latest Linux kernel.
- Set WSL 2 as your default, and install a Linux distribution.
wsl --installYour windows version must be Windows 10 version 1903 or higher to use this command to install WSL 2. If you’re running an older version of Windows, you can manually install WSL.
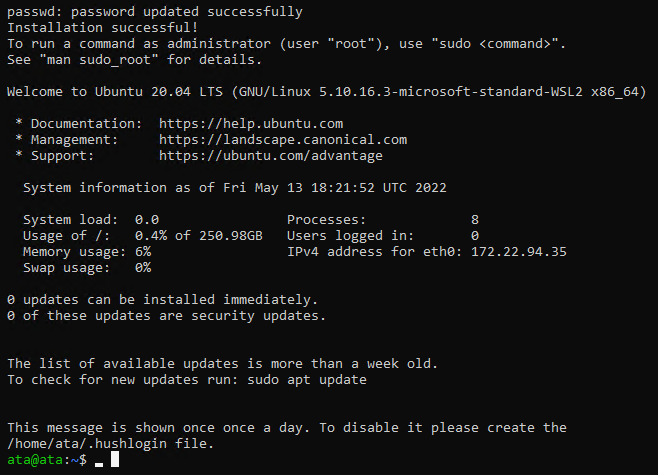
3. Reboot your machine after installation finishes for the changes to take effect. Once your machine reboots, you’ll have to set your username and password for your selected Linux distribution.
4. After reboot, provide your username and password when prompted, and press ENTER.
This user is your Linux administrator user with sudo (Super User Do) privileges. This user automatically signs in when you launch your Linux distribution.
This account is different than your Microsoft account or the administrator account on your Windows machine.
Input a valid Unix username character, including lowercase letters, numbers, and periods. Your username cannot start with a period. Your password must be eight characters long and contain uppercase and lowercase letters, numbers, and special characters.

Every time you install a new Linux distribution or reset your existing Linux distribution, you’ll need to create a new user account.
Once the user is created, you’ll be logged into your newly-installed Linux distribution, as shown below.
Changing the Default Linux Distribution
You’ve successfully installed a Linux distribution on WSL. But by default, Ubuntu is the Linux distribution installed, one of the most popular Linux distributions used by developers.
What if you prefer a different Linux distribution? Even though you already have Ubuntu installed, you can still change your default Linux distribution. You’ll install Kali Linux and set it as your default Linux distribution for this tutorial.
But why Kali Linux? Because it’s the most popular distribution used by ethical hackers and penetration testers.
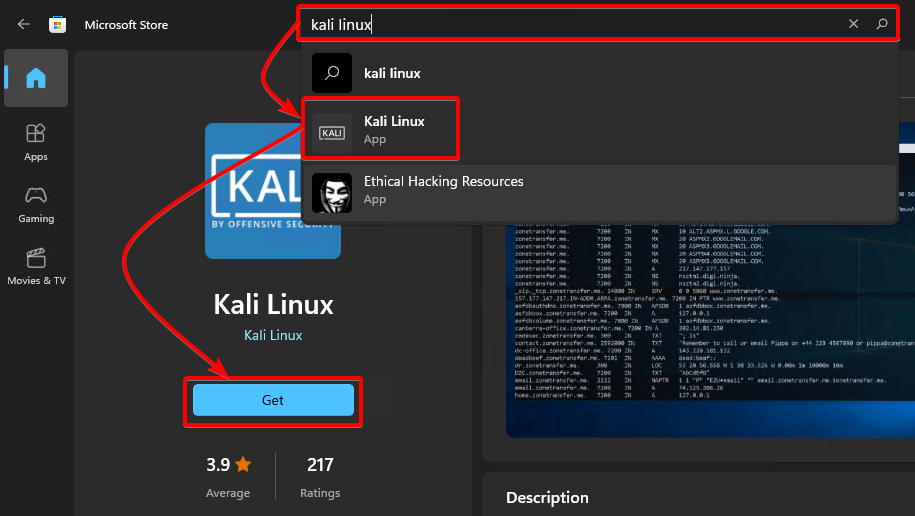
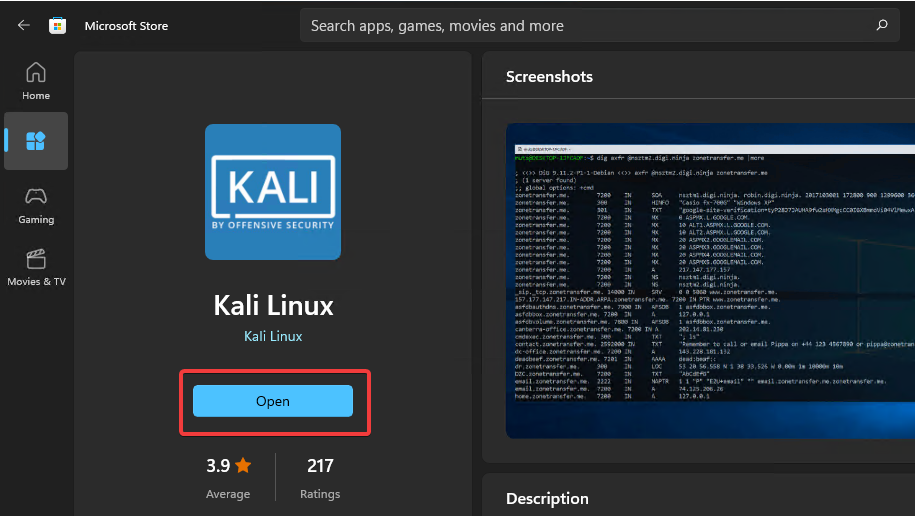
1. Open the Microsoft Store, and install Kali Linux with the following:
- Search for kali linux, and click on the Kali Linux app from the results list, as shown below.
- Click on the Get button on the left pane to install Kali Linux. The installation may take a few minutes to complete.
2. After installing Kali Linux, click on Open to launch Kali Linux. You’ll be asked to create a user account the first time you launch Kali Linux (step three).
3. When prompted, provide a username and password, then press ENTER to create a user account. Once the user is created, you’ll be logged in to your newly installed Kali Linux distribution, as shown below.
At this point, you have a minimal installation of Kali Linux, only the bare minimum required to get started with Kali Linux. To take full advantage of Kali Linux, you must install the necessary tools for your specific purpose.

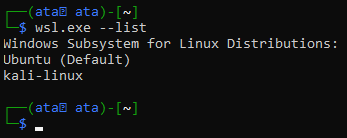
4. Now, run the below command to see the list of available Linux distributions.
wsl.exe --listYou’ll see your Ubuntu and Kali Linux distributions listed below. You can also see Ubuntu as the default distribution.
5. Run the following command, which doesn’t provide output but sets kali-linux as the default distribution (–setdefault).
wsl.exe --setdefault kali-linux6. Finally, run the below command to verify that Kali Linux is now your default distribution.
wsl.exe --list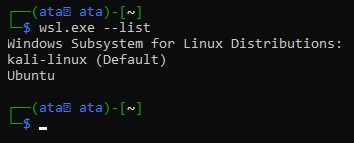
Installing Kali Linux Tools
Having a minimal installation of Kali Linux limits you from performing your admin tasks. To get the full features of Kali Linux, you can install the Kali Linux tools required for your specific purpose.
In this tutorial, you’ll install and use the default meta-package, which installs more than 600 tools used for ethical hacking, penetration testing, and security auditing.
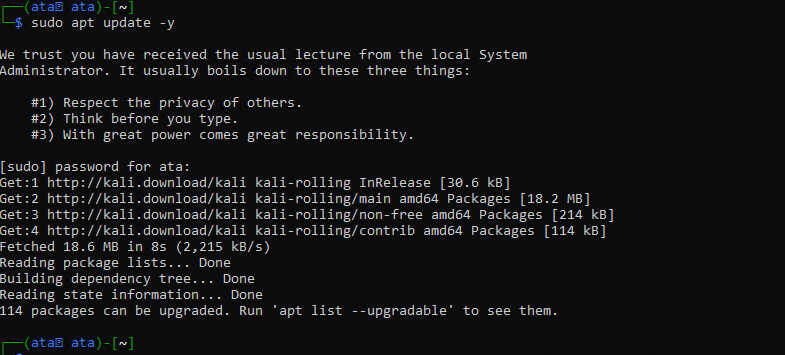
1. Run the following apt update command to update the package manager index.
sudo apt update -yNote that you must run every command with sudo privileges unless stated otherwise. Most of the Kali Linux tools require root privileges to run.
As shown below, Kali Linux will fetch the latest package lists from the repositories and upgrade any outdated packages.
2. Next, run the below apt install command to install the kali-linux-default meta-package.
A few prompts pop up that you will need to answer before the installation can complete.
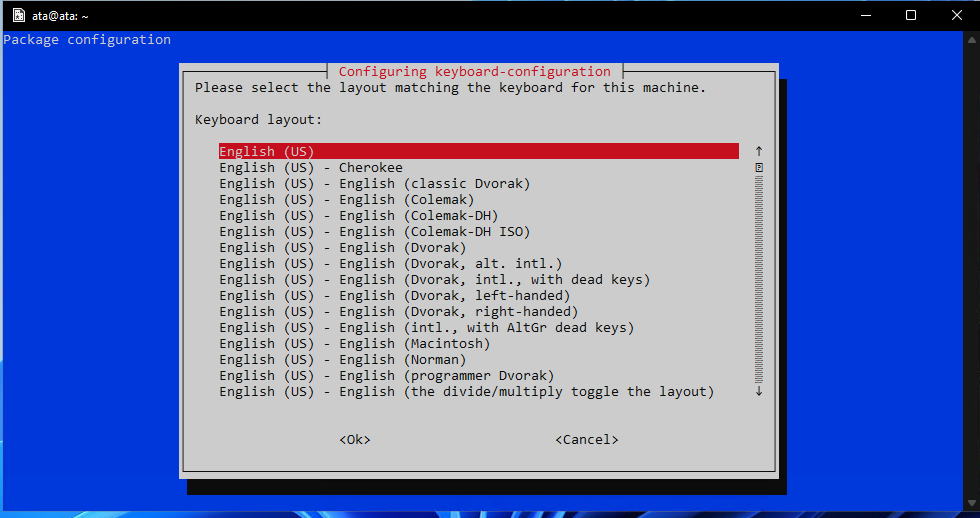
sudo apt install kali-linux-default -y3. Select your keyboard layout from the list and press ENTER to continue.
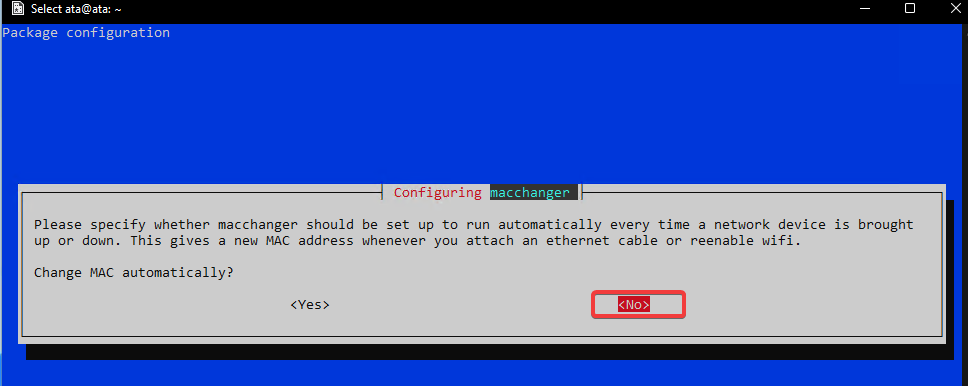
4. Now, leave the <No> option selected and press ENTER.
macchanger is a tool that lets you change the Media Access Control (MAC) address of network interfaces, which is useful for ethical hacking and penetration testing. This tool hides your real identity on a network by changing your MAC address, but you won’t be hiding your identity in this tutorial.
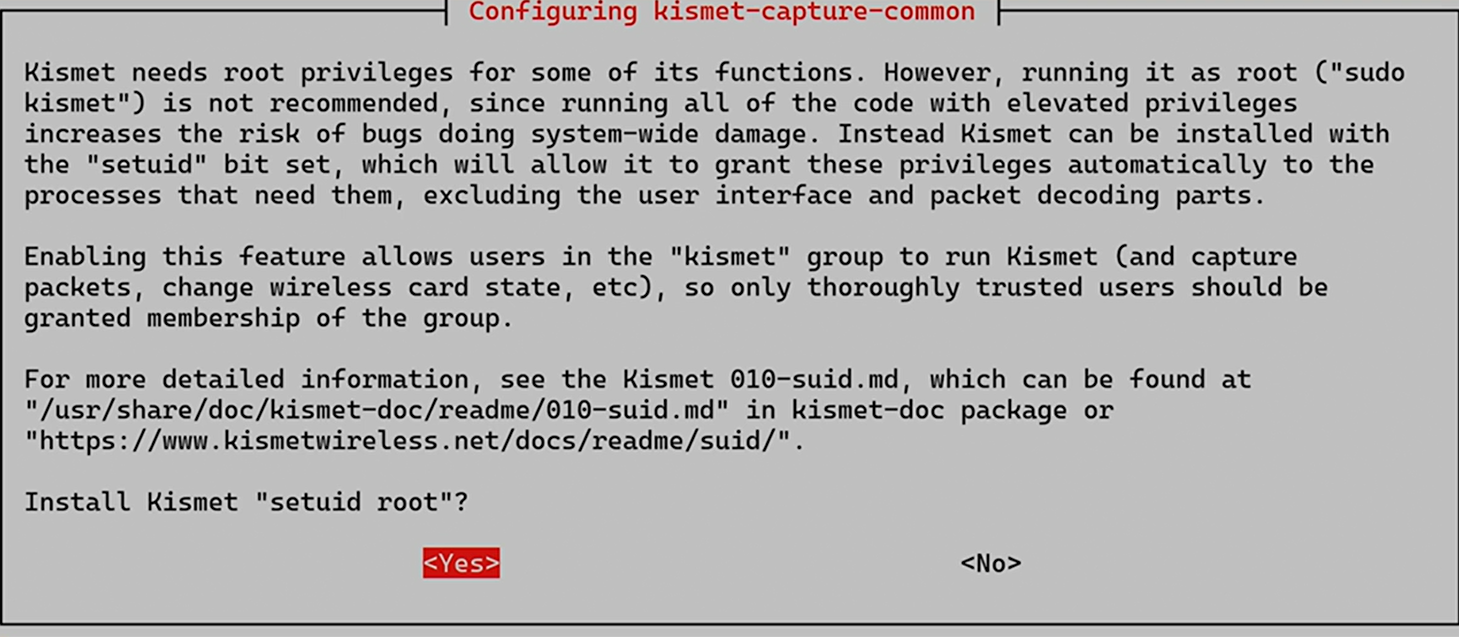
5. Select Yes and press ENTER to install the kismet-capture-common package.
Kismet is a wireless network detector, sniffer, and intrusion detection system. Kismet lets you find hidden networks and monitor their activity so that it doesn’t require superuser privileges (run as the root user directly).
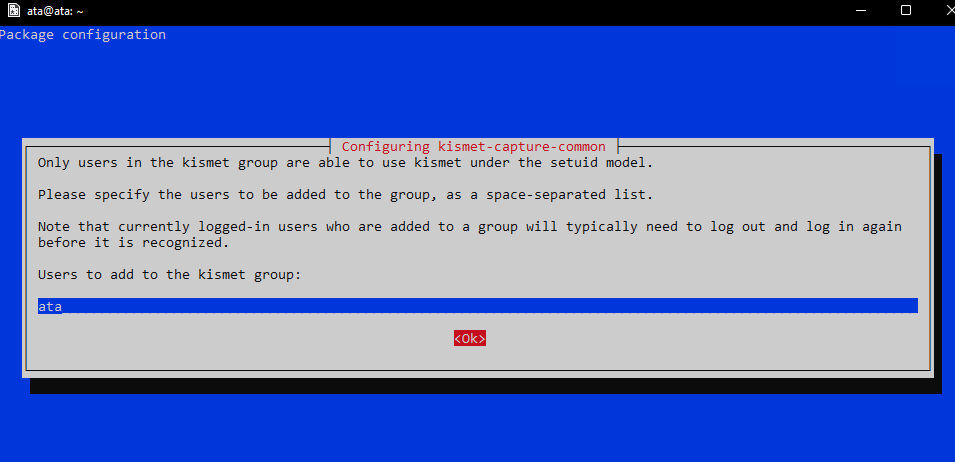
6. Next, type your user here and press Enter so that your user can use Kismet with superuser privileges as well.
After adding extra users, press Tab to select the <OK> option and press ENTER.
7. Select Yes and press ENTER to enable non-root users to capture packets.
Enabling this option is a security risk in some situations. But since you’re using Kali Linux on Windows for learning purposes in your lab, it’s not a big deal. If you use Wireshark to explore traffic, this is a great feature to have.
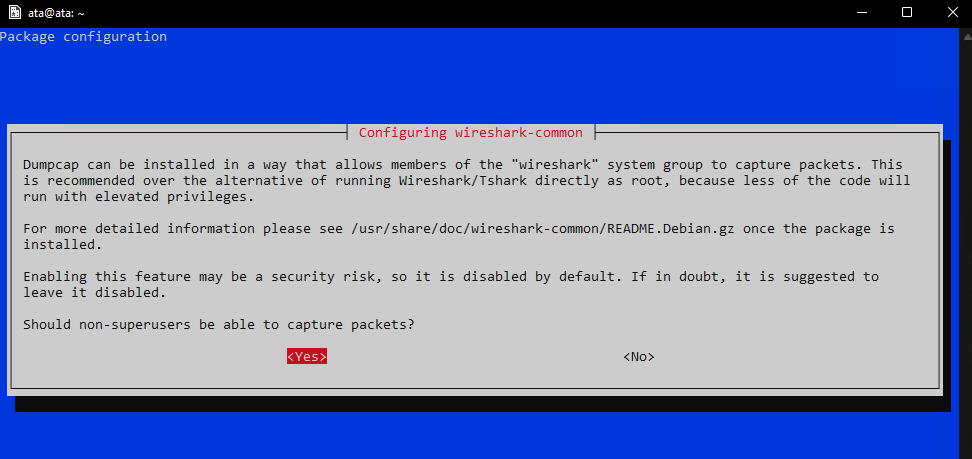
If you don’t need to do network packet capture or analysis, you can select No and press Enter to continue. You can always change this setting later if you need to.
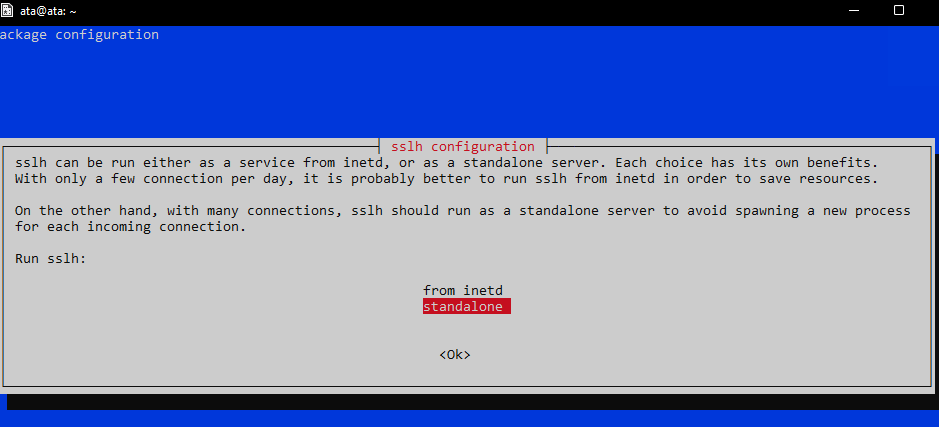
8. Now, select standalone and press ENTER to run sslh as standalone.
sslh accepts connections to multiple services on the same port. This feature is useful in running several services on the same server without running different servers on different ports. For example, you could run SSH and HTTP on port 443 with sslh.
You won’t be using this feature in this tutorial, but it is useful to know.
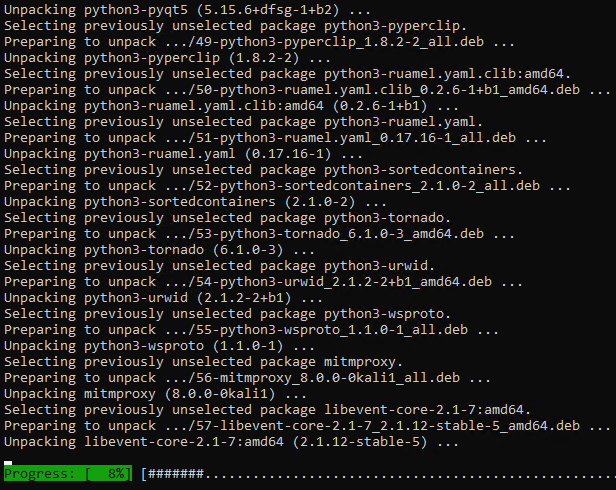
At this point, Kali Linux takes care of installing and configuring all of the tools for you, which may take some time to finish. Relax and take a break while Kali Linux does its thing.
This tutorial uses a machine with eight cores/16 threads CPU, and it takes about 20 minutes to complete the installation.
9. Rerun the apt update command to ensure you’re running the latest versions of all tools once the installation finishes.
sudo apt update -y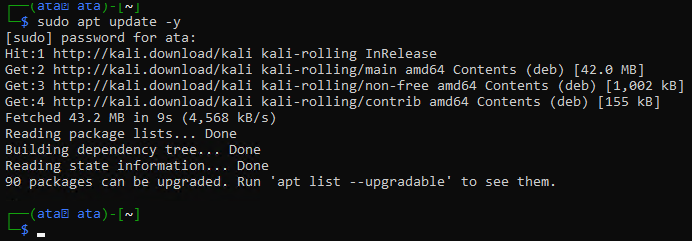
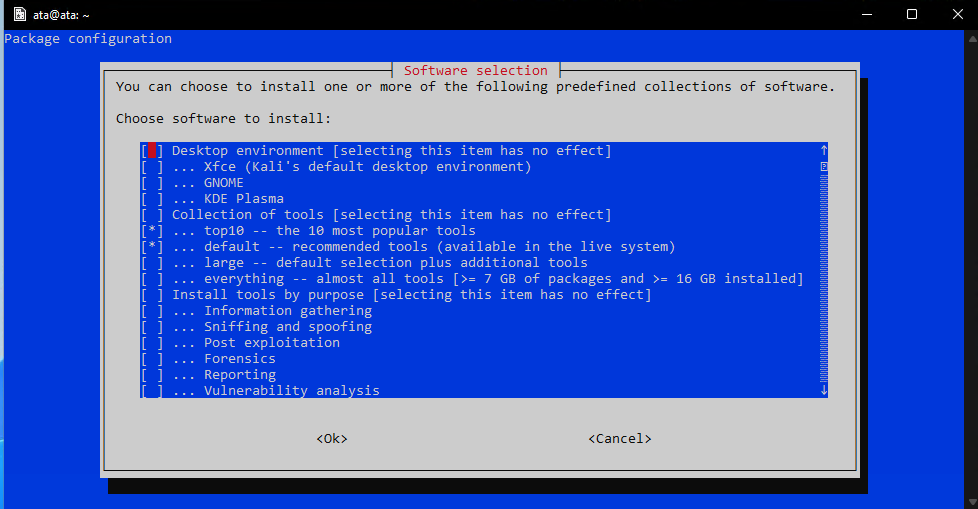
10. Finally, run the tasksel command below to list all of the available tools to you.
sudo taskselThis output below shows just a small subset of the tools available, so scroll down to see the complete list. You can see that the top 10 tools and default are marked (*) as installed.
If you’d like to install the rest of the tools:
- Highlight the tools and press the spacebar to select them
- Press the Tab key to select the <Ok> button and press ENTER to install the selected tools.
Host-Scanning and Port-Scanning with Nmap
Now that you have Kali Linux tools installed and configured on your Windows 11 system, you can look at what the meta-package offers. You won’t need to deep dive into all of the tools but rather see how to use a few popular ones.
Suppose you want to find out what open ports on a host are available to connect to. You can use Nmap to scan for open ports on a host quickly. Nmap is a network exploration and security auditing tool you can use to identify hosts and services on a network and security issues. At the same time, Nmap lets you scan for vulnerable, open ports on systems.
Note that Nmap might not be compatible with Windows 11.
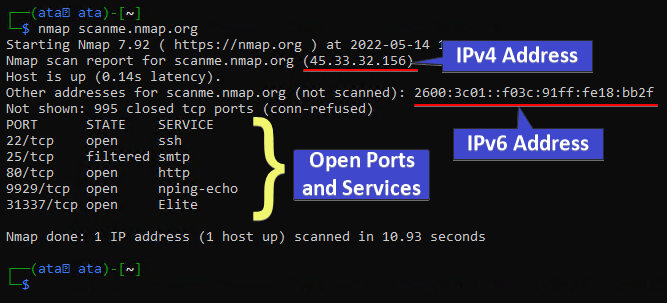
Run the below nmap command to scan for open ports on the target host iscanme.nmap.org. Replace this hostname with the IP address or hostname of the machine that you want to scan or a network range.
By scanning for open ports, you can quickly enumerate what services run on a host. This information is useful when figuring out how to attack a system as a pentester.
nmap iscanme.nmap.org
In the output below, the Nmap scan shows many valuable pieces of information:
- The IPv4 address of the target host.
- The IPv6 address of the target host (if available).
- The ports that are open on the target host and the services running on those open ports.
Each port has a state associated with it, which can be:
- Open – A service is listening for connections on this port.
- Closed – Nmap was able to connect to the port, but there was no service listening.
- Filtered – Nmap could not determine if the port is open or closed, which happens for many reasons, such as a firewall blocking Nmap’s probes.
- Open/Filtered – Nmap could not determine if the port is open or filtered.
- Closed/Filtered – Nmap could not determine if the port is closed or filtered.
Specifying DNS Servers for Hostname Resolution
Nmap does many things behind the scenes that could be customized using the command line argument.
For instance, you can use the --dns-servers argument to specify which DNS servers to use for hostname resolution. By default, Nmap will use the DNS servers configured on the machine where it’s running.
Run the command below to use Google’s public DNS servers for hostname resolution. They are generally fast and reliable. But you can replace the 8.8.8.8,8.8.4.4 DNS servers with any DNS servers that you want to use.
nmap --dns-servers 8.8.8.8,8.8.4.4 scanme.nmap.org
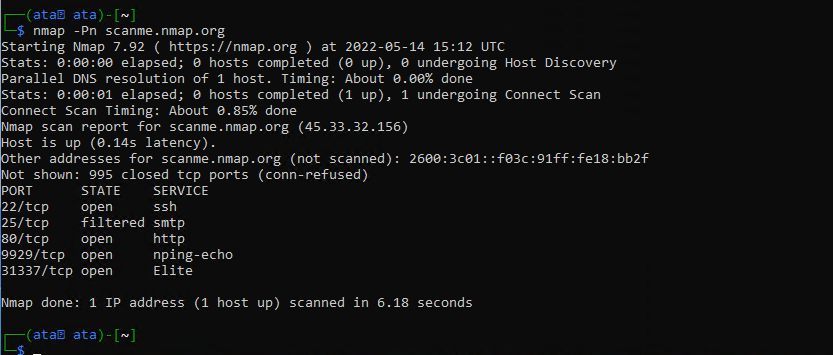
Afterward, Nmap determines if the target host is online or not by conducting a ping sweep with an ICMP echo request.

Now, run the below command to skip the ping sweep.
nmap -Pn scanme.nmap.org
After the ping sweep and the target is online, Nmap scans for open ports. By default, Nmap scans the most common 1,000 ports for each protocol.
Learn more about different types of port scans that Nmap can perform in Nmap’s Port Scanning Technique documentation.
Conclusion
In this tutorial, you’ve learned how to install WSL on Windows 11, set up a default Linux distribution, and use basic Linux commands. You’ve also touched on scanning for open ports on a Linux host with Nmap.
With WSL, you can get the best of both worlds: the flexibility and power of Linux with the ease of use of Windows 11 GUI.
But these are just a few things you can achieve with WSL. Why not experiment and explore to see what else WSL can offer? Perhaps installing the GIT version control system or setting up a Node.js development environment?


