

Scratching your head over AWS networking woes? If you feel like your Virtual Private Clouds (VPCs) are sort of isolated islands with limited connectivity, you’re in for a treat. Let AWS Transit Gateway be your bridge to seamless interconnection!
In this tutorial, you’ll transform how you manage and interconnect your Amazon Virtual Private Clouds (VPCs), on-premises datacenters, and remote offices.
Revolutionize your cloud network architecture!
Prerequisites
This tutorial comprises hands-on demonstrations, so ensure the following are in place to follow through:
- AWS account – A free-tier account will suffice.
- An IAM User with the necessary permissions to create and manage Transit Gateway resources. At a minimum, the user should have access to the AWS Management Console with AmazonEC2FullAccess and AmazonVPCFullAccess policies.
Creating VPCs for Your AWS Transit Gateway Setup
With the prerequisites in place, you shift focus to the bedrock of your AWS infrastructure—VPCs. VPCs establish the boundaries within which your transit traffic will flow. This foundation ensures secure and efficient communication between your VPCs and on-premises networks.
Creating a VPC in AWS involves defining your virtual network environment, including your IP address range, subnets, route tables, and network gateways.
To create VPCs for your AWS, carry out the following:
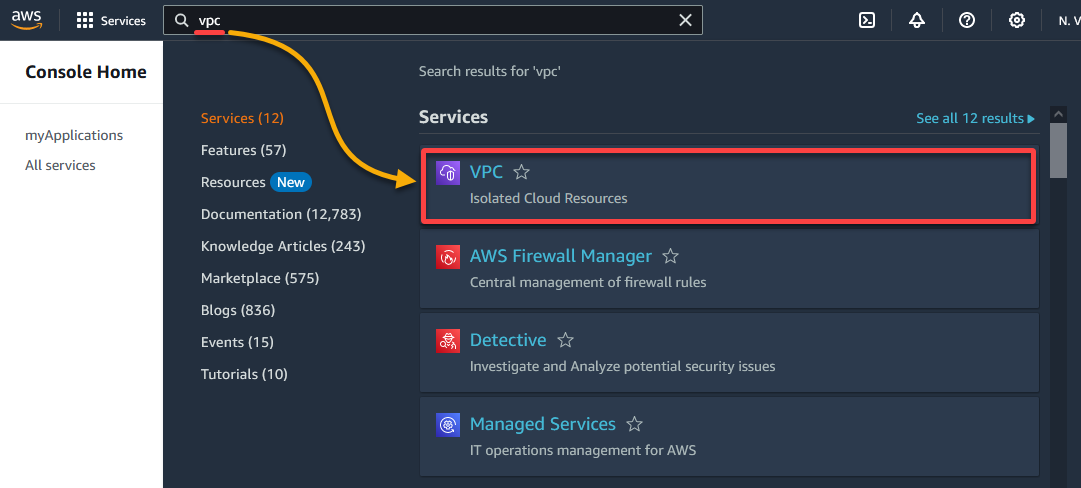
1. Launch your preferred web browser, and log in to your AWS Management Console.
2. Next, search for and select VPC from the results list to access the VPC dashboard (step three).
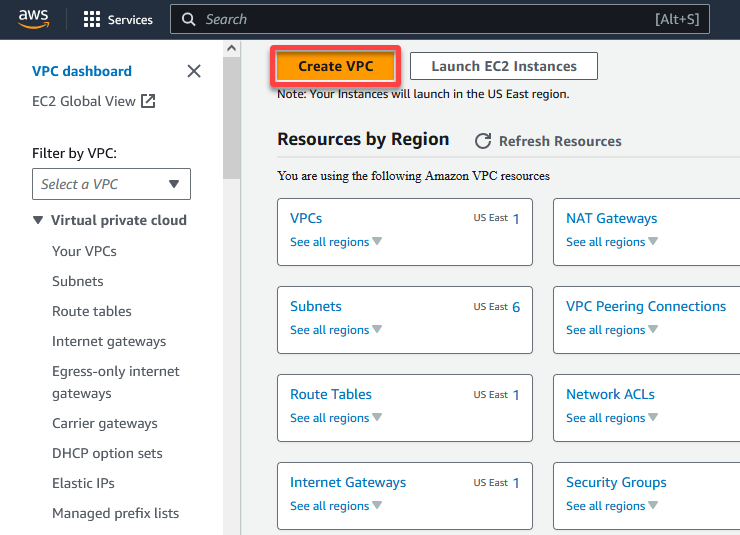
3. On the VPC dashboard, click Create VPC, redirecting your browser to a page where you’ll configure a VPC (step four).
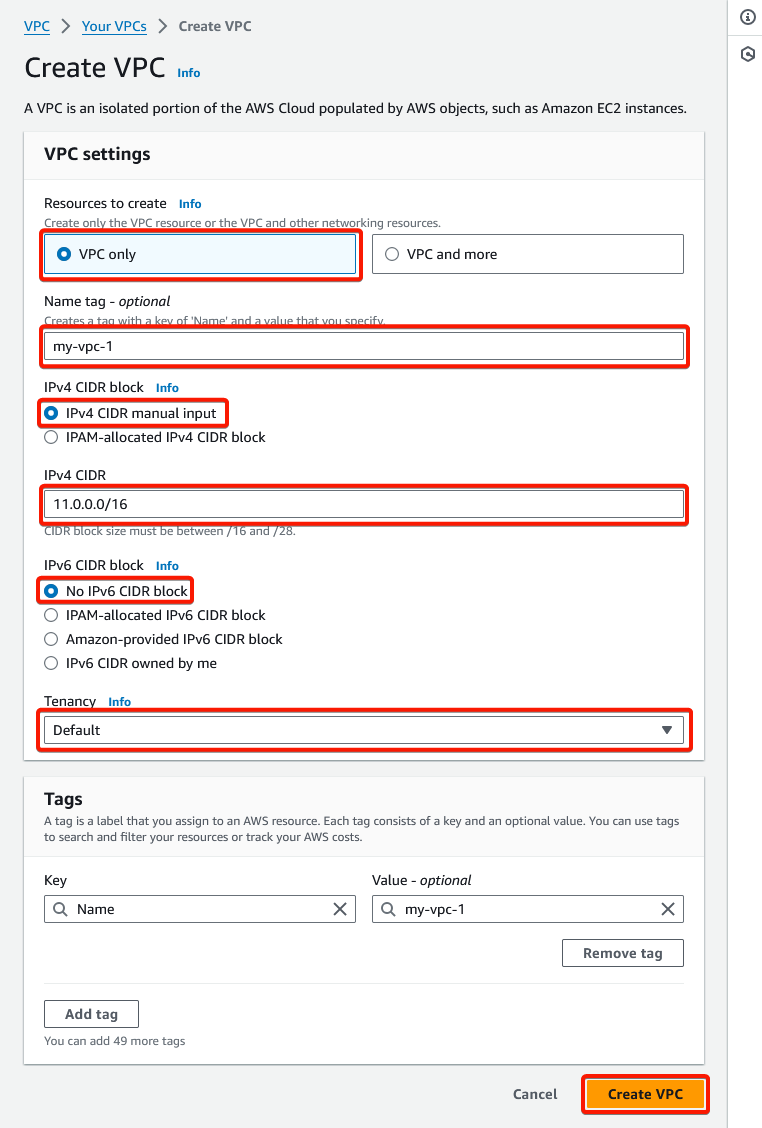
4. Now, configure your new VPC as follows:
- Resources to create – Choose the VPC only option to create the VPC without any additional resources being provisioned automatically for complete control over resources.
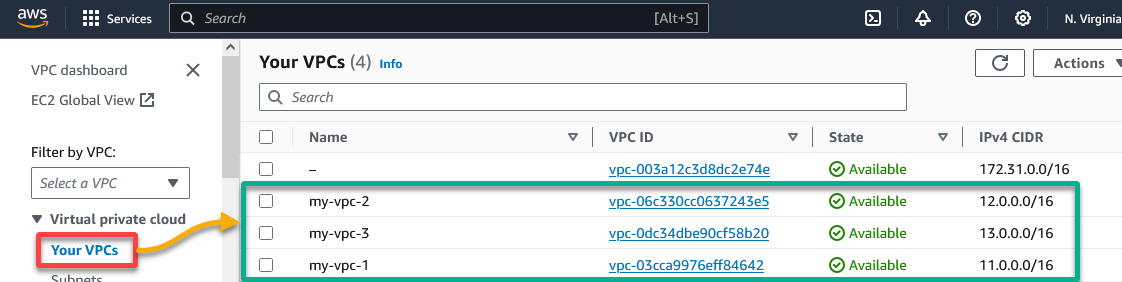
- Name tag – Provide a unique name for your VPC (i.e., my-vpc-1). In this tutorial, you’ll create three VPCs named my-vpc-1, my-vpc-2, and my-vpc-3.
- IPv4 CIDR block and IPv4 CIDR – Choose IPv4 CIDR manual input and enter the desired CIDR block. Remember, all VPCs must have a valid IPv4 address range.
This tutorial uses the following CIDR block for each VPC: my-vpc-1 (11.0.0.0/16), my-vpc-2 (12.0.0.0/16), and my-vpc-3 (13.0.0.0/16). - IPv6 CIDR block (Optional) – Choose Amazon-provided IPv6 CIDR block to support IPv6 traffic.
- Tenancy – Select the Default tenancy, which makes your EC2 instances launch on shared hardware (standard and most cost-effective option).
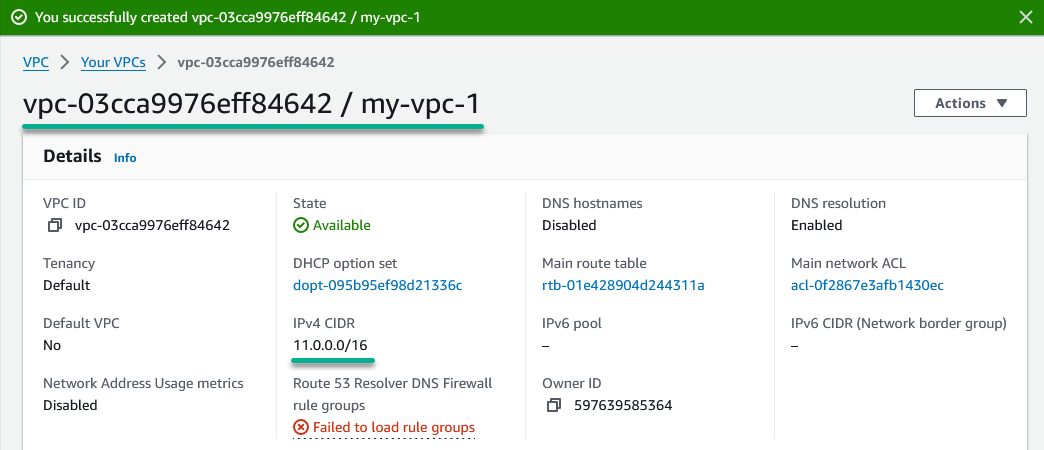
Once configured, click Create VPC (bottom-right) to create the VPC.
Once successful, you’ll see a message, as shown below.
5. Repeat steps three to four to create the other VPCs (i.e., my-vpc-2 and my-vpc-3).
6. Lastly, navigate to Your VPCs in the VPC dashboard to view your newly created VPCs.
Creating Subnets for Your VPCs
With VPCs at your disposal, you’ll now work on the building blocks of a well-organized and scalable AWS environment—Subnets. Subnets enable you to segment your network infrastructure, improve resource isolation, and enhance security within your VPCs.
Subnets are like designated neighborhoods within your VPC, each with its own set of IP addresses and routing rules.
To create subnets for your VPCs, perform the following:
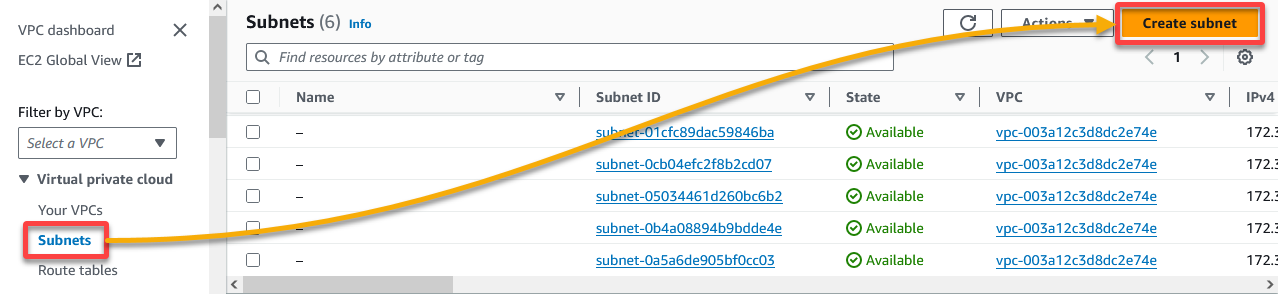
1. Navigate to Subnets under Virtual private cloud (left pane), and click Create subnet (upper-right) to initiate creating a new Subnet.
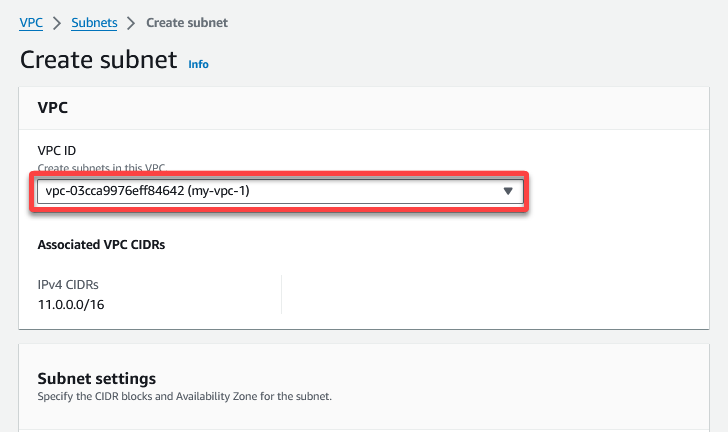
2. Choose your newly created VPC in the VPC ID dropdown field on the Create subnet page.
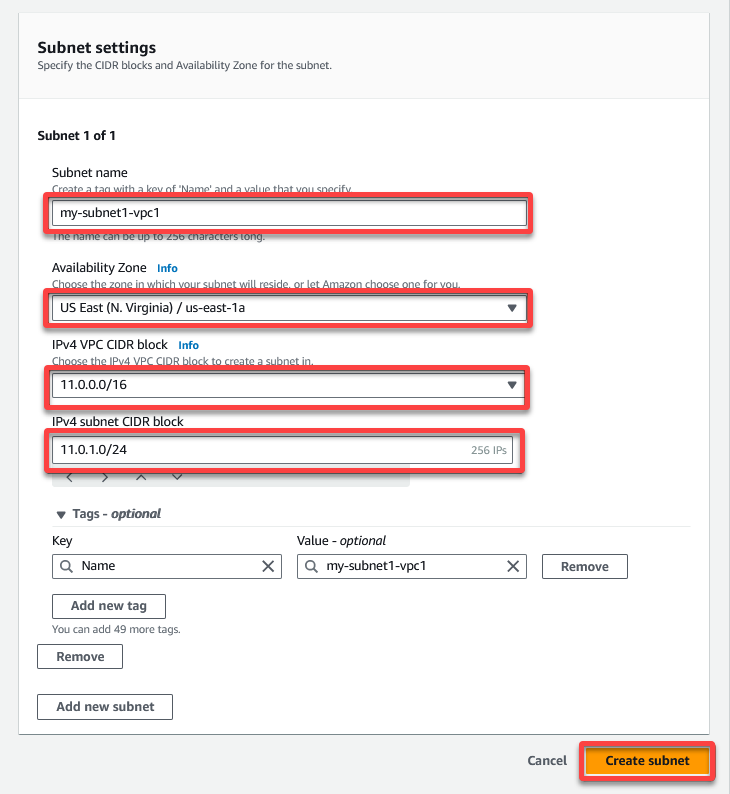
3. Under the Subnet settings section, configure the following:
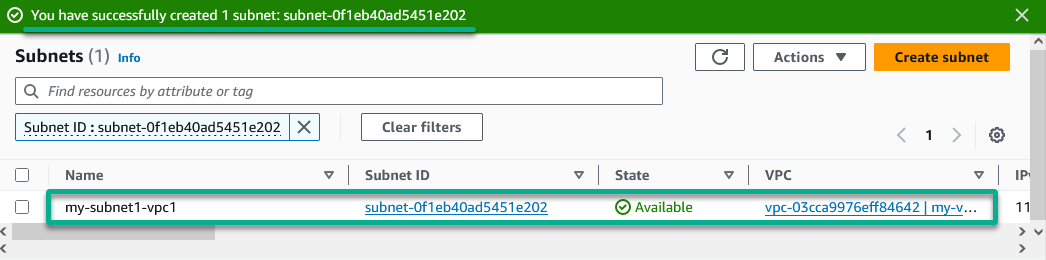
- Subnet name – Enter a name for your Subnet (i.e., my-subnet1-vpc1), which creates a tag with a Key as Name and the Value as the Subnet name you specify.
- Availability Zone – Choose a zone for your Subnet (i.e., US East (N. Virginia) / us-east-1a) or leave the default as No Preference to let AWS choose one for you.
- IPv4 VPC CIDR block – Choose a CIDR block for the Subnet (i.e., 11.0.0.0/16).
- IPv4 subnet CIDR block – Choose a subnet CIDR block for the Subnet (11.0.1.0/24)
The same case applies to your other two VPCs, 12.0.1.0/24 and 13.0.1.0/24, respectively.
Once configured, click Create subnet (bottom-right) to create the Subnet.
You’ll see the success message below and your newly created Subnet after successful Subnet creation.
4. Now, repeat steps one to three to create Subnets for your other two VPCs, then navigate back to the Subnets tab to view your newly created Subnets.

Creating Route Tables For Your Subnets
Now that your VPCs boast well-defined subnets, you must ensure seamless network traffic flow between them. How? You create the blueprint for your network’s connectivity by creating route tables. By default, VPCs come with a main route table, and you can create additional custom Route Tables as needed.
Think of Route Tables as your VPC’s GPS, directing network packets from one subnet to another or the internet gateway. Each subnet in a VPC must be associated with a route table, which controls the traffic between subnets.
To create Route Tables for your Subnets, complete the steps below:
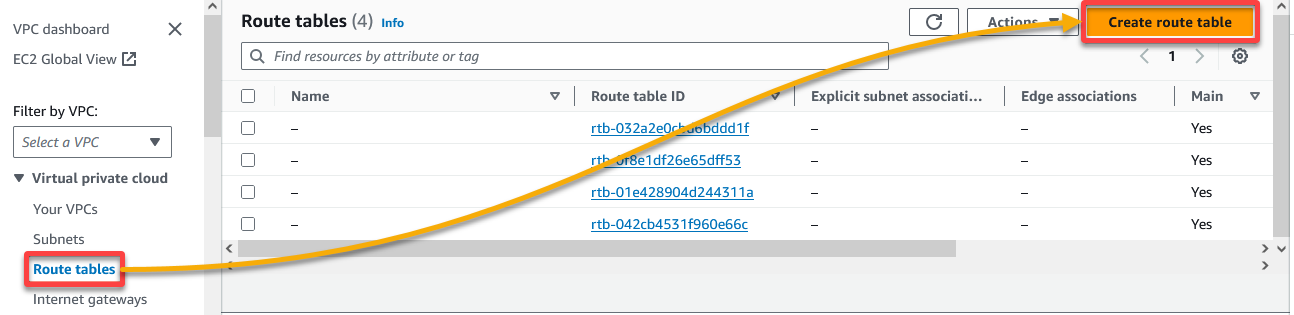
1. Navigate to Route tables (left pane), then click Create route table (upper-right) to initiate creating a custom route table.
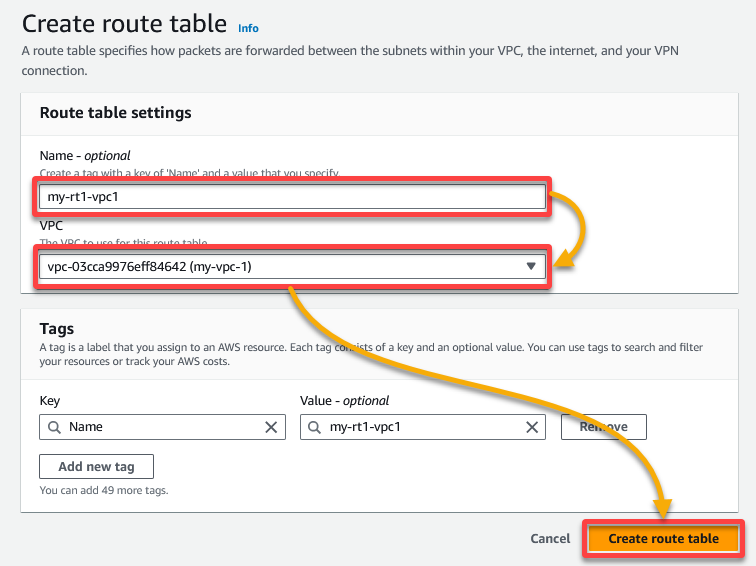
2. In the Create route table page, set the Route Table settings with the following:
- Name – Provide a unique Route Table name (i.e., my-rt1-vpc1).
- VPC – Select the VPC (i.e., my-vpc-1) from the dropdown field to create the Route Table.
Once set, click Create route table to create the Route Table.
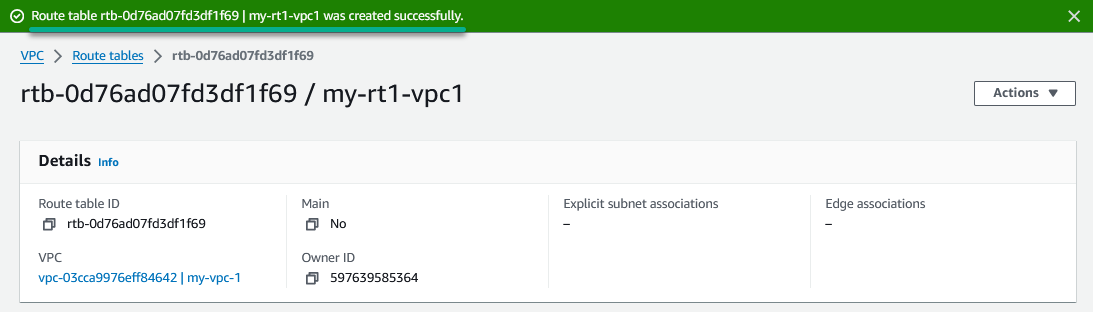
You’ll see the message below once you’ve successfully created the Route Table.
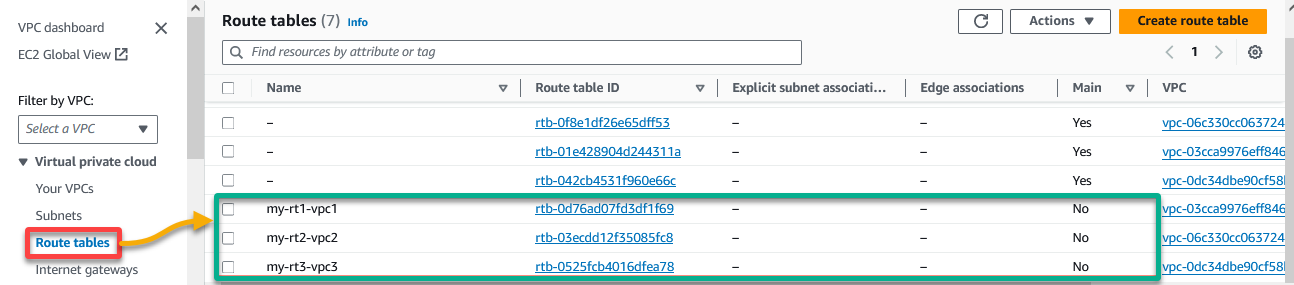
3. Subsequently, repeat steps one and two to create the route tables for your other VPCs (i.e., my-rt2-vpc2 and my-rt3-vpc3), then verify your newly created route tables.
Associating Your Subnets With the Route Tables
You’ve laid down the groundwork by defining routes within your Route Tables. Now, you must ensure your Subnets are properly directed along those routes—no getting lost in the cloud!
Associating your Subnets with Route Tables in your VPCs assists in controlling the traffic flow between Subnets within the VPC.
To associate your Subnets with a Route Table, execute the following:
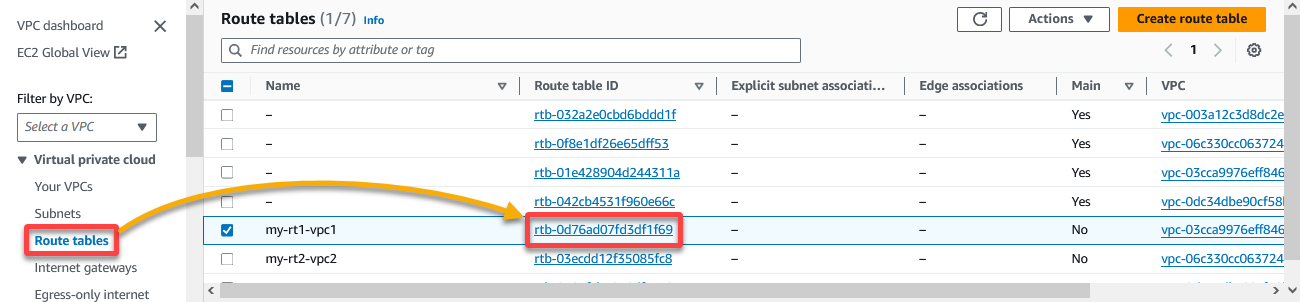
1. In the VPC dashboard, navigate to Route tables (left pane), then click the ID of a Route Table you wish to associate with a Subnet.
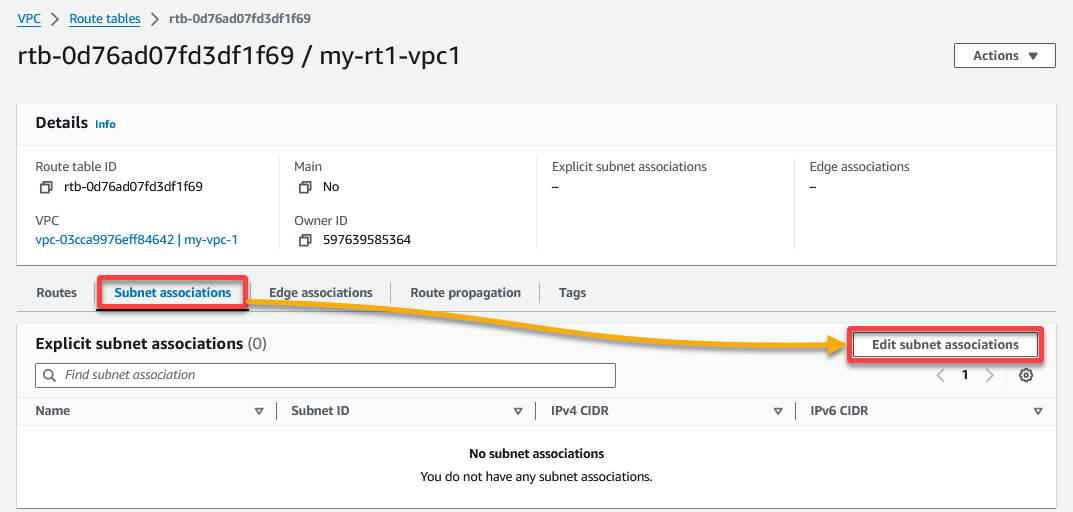
2. Next, navigate to the Subnet associations tab for the set Route Table, and click Edit subnet associations to see the list of Subnets you can associate.
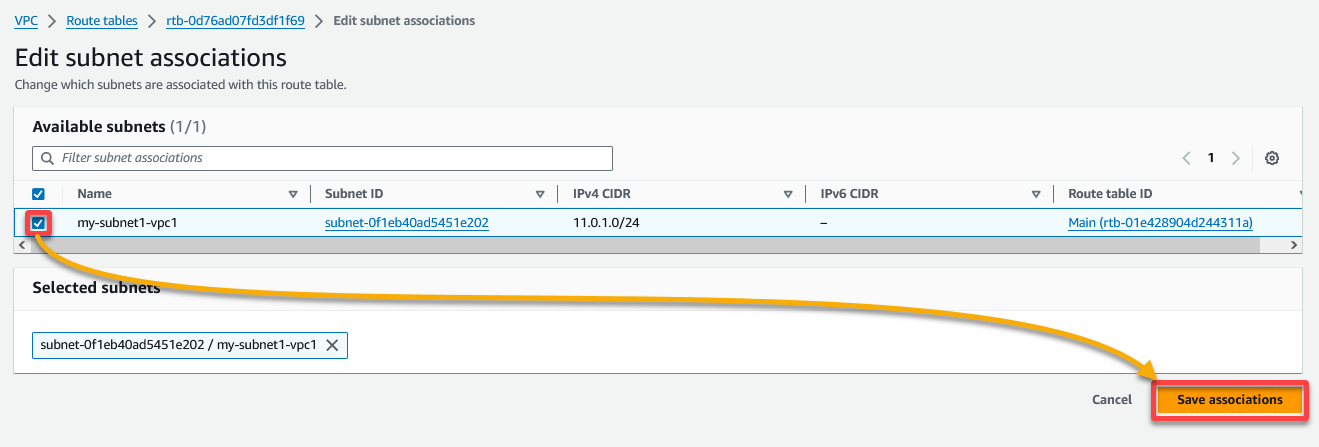
3. Tick the box next to the Subnet to associate with your selected Route Table (or untick ones to exclude), and click Save associations to apply the changes.
Upon saving, you’ll see the success message below.
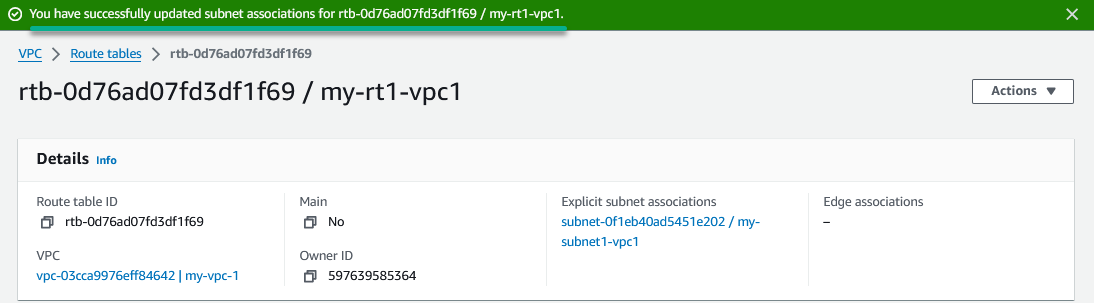
4. Now, repeat the association process for the other two Route Tables, navigate back to the Route tables page, and confirm the Route Tables have Explicit subnet associations.

Creating an Internet Gateway in AWS
You’ve built a solid foundation for internal communication within your VPCs, which is awesome! But what’s the next step? You’ll need a bridge between your VPC and the vast expanse of the internet—an Internet Gateway.
When you create an Internet Gateway, you enable internet access to your instances within a VPC. Similarly, you allow communication between your VPC and other networks, such as on-premises.
To create an Internet Gateway in AWS, follow these steps:
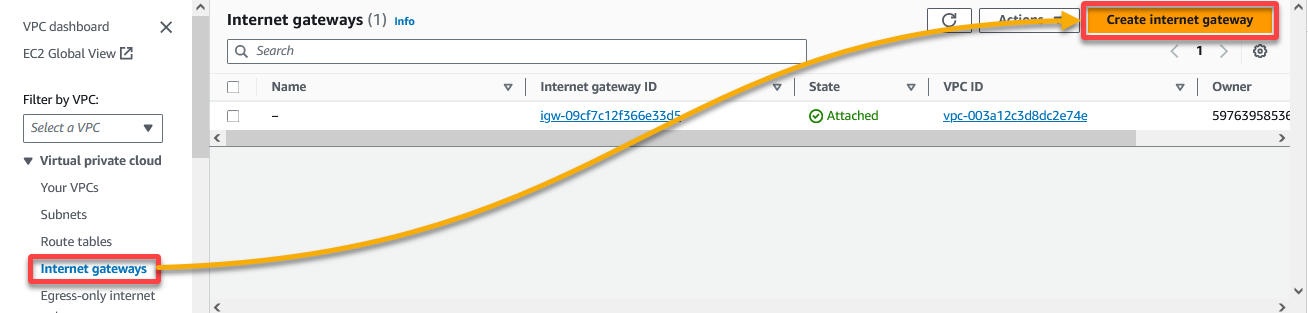
1. In the VPC dashboard, navigate to Internet gateways (left pane) and click Create internet gateway (upper-right). Your browser redirects to a page where you’ll configure a new Internet Gateway (step two).
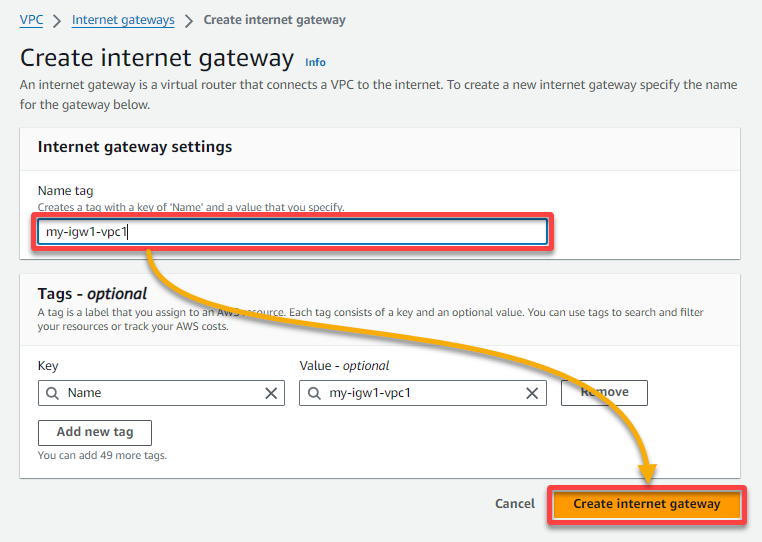
2. Provide a unique name for the new Internet Gateway (i.e., my-igw1-vpc1, in this case), and click Create internet gateway to proceed.
An AWS VPC comprises public and private subnets, which is fundamental to designing a secure and scalable network architecture.
A public subnet in your VPC has a route to the internet, typically through an Internet Gateway, while a private subnet doesn’t have a direct route to the internet. Instead, a private subnet relies on a Network Address Translation (NAT) gateway to access the internet.
In this example, only one VPC (my-vpc-1) will have a public subnet. The other two VPCs (my-vpc-2 and my-vpc-3) won’t have access to the internet and will rely on the Transit Gateway to establish communications with each other.
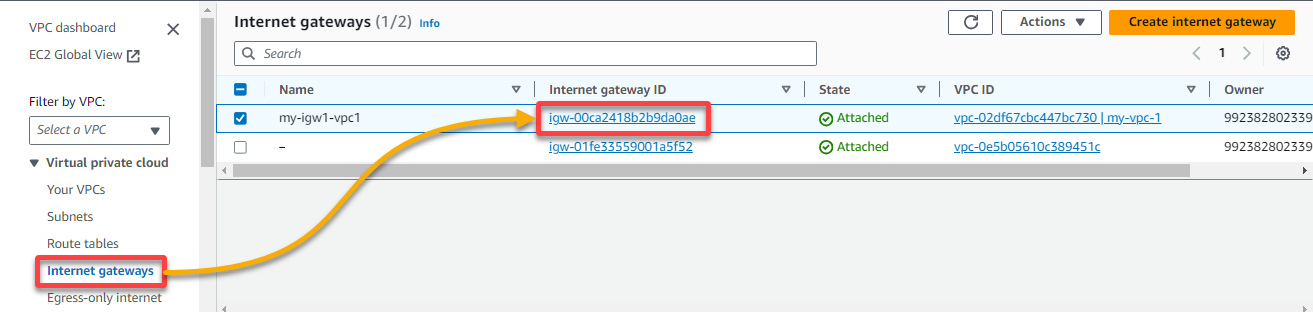
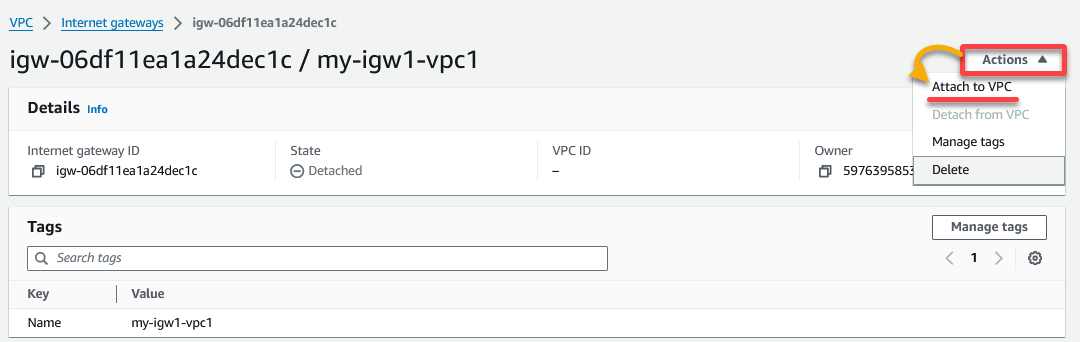
3. Once created, click the ID of your Internet Gateway from the list to access its details page.
4. Now, click the Actions dropdown (upper-right), and choose Attach to VPC to initiate attaching your Internet Gateway to a VPC.
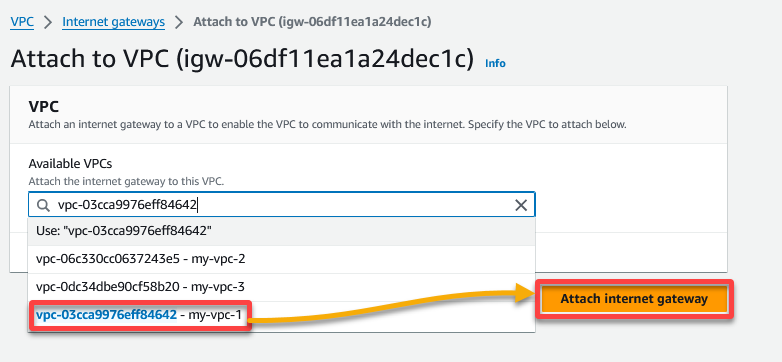
5. Choose the VPC (i.e., my-vpc-1) to which you want to attach the Internet Gateway and click Attach internet gateway to confirm.
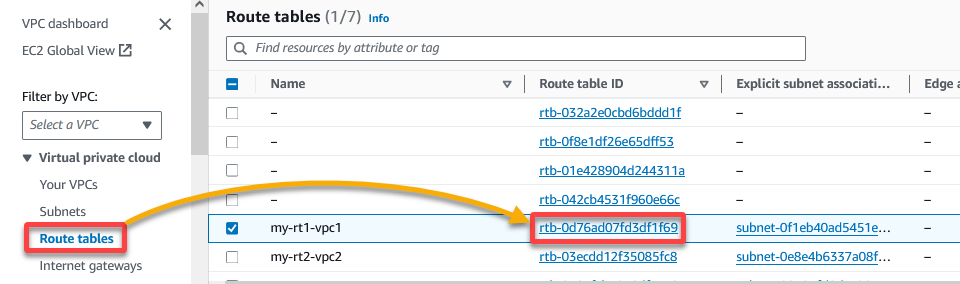
6. Once attached, navigate to Route tables (left pane), and select the Route Table associated with the Subnet that requires internet access.
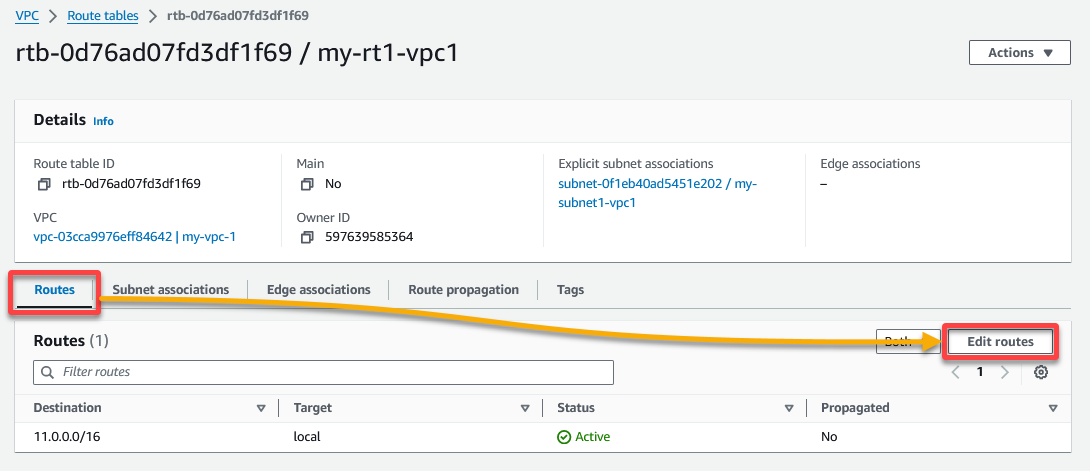
7. Click Edit routes under the Routes tab on the next page to edit routes in the selected Route Table.
8. Next, click Add route (lower-left), input the Destination as 0.0.0.0/0, set the target to your Internet Gateway, and click Save changes to update the Route Table.
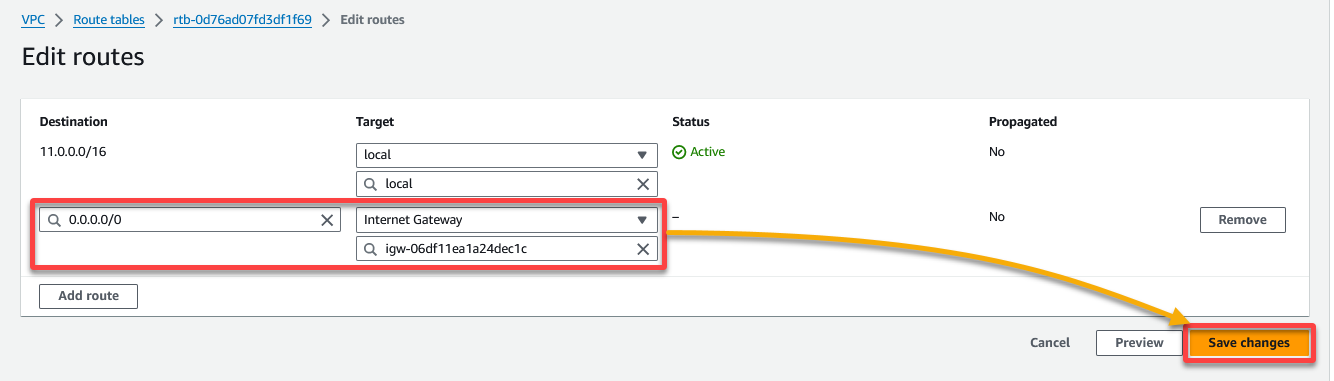
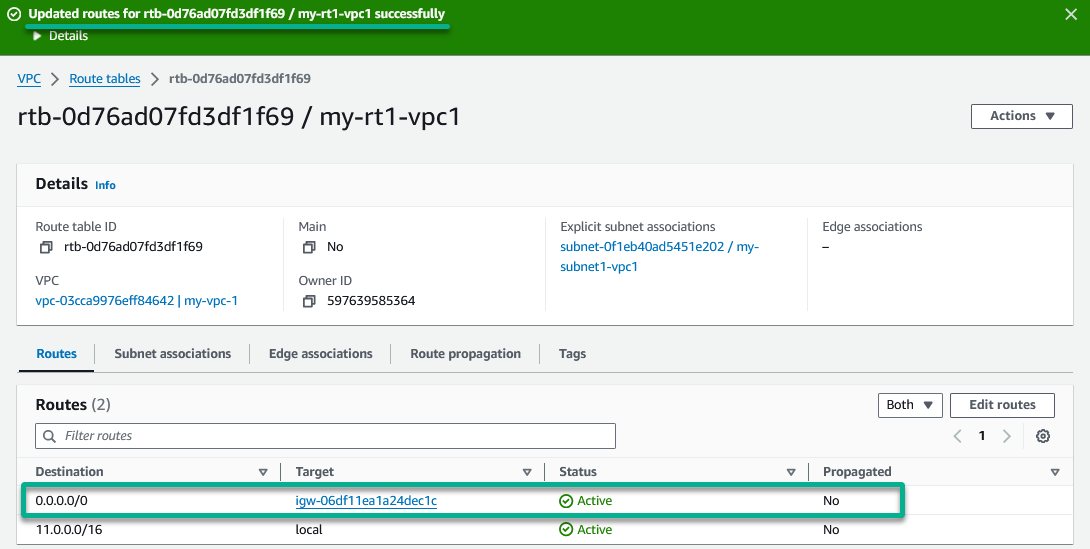
After saving the changes, the below success message appears.
Creating an AWS Transit Gateway
With established internet connectivity, you can now have a robust, scalable, and highly available transit network architecture at your fingertips.
But first, you’ll create a Transit Gateway as a centralized hub. This hub simplifies network connectivity and management across multiple VPCs, VPNs, and on-premises networks.
To create a Transit Gateway, proceed with these steps:
1. On the VPC dashboard, navigate to Transit gateways (left pane), and click Create transit gateway (upper-right) to initiate creating a Transit Gateway.

2. Provide a Name tag (i.e., my-tgw-1) for your Transit Gateway, which should be descriptive and meaningful.
Optionally, set the following as needed:
- Description – Add a brief description for your Transit Gateway.
- Specify an Autonomous System Number (ASN) used for Border Gateway Protocol (BGP) routing.
- Configure the advanced options such as route table propagation and association settings.
Once configured, click Create transit gateway (bottom-right) to finalize creating your Transit Gateway, which may take time.

3. Afterward, note the Transit Gateway’s ID from the list once successfully created.

Configuring the VPC Attachments
After establishing the Transit Gateway as the backbone of your network, you must link your VPCs to this central hub by configuring the VPC attachments. This process involves connecting your VPCs and Transit Gateway, enabling seamless traffic flow and communication across your network.
To configure your VPCs to work with your Transit Gateway, undertake the following:
1. On the VPC dashboard, navigate to Transit gateway attachments (left pane) and click Create transit gateway attachment. Your browser redirects to a page where you’ll configure the Transit Gateway attachment (step two).

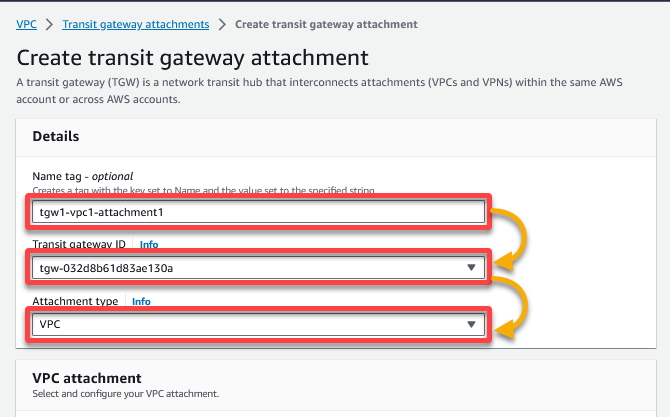
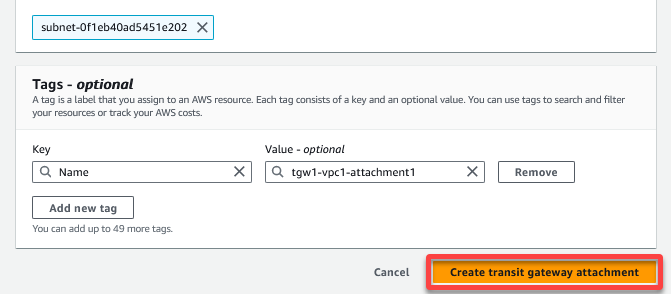
2. Configure the details below for the Transit Gateway attachment:
- Name tag – Input a unique Transit Gateway attachment name (i.e., tgw1-vpc1-attachment1).
- Transit gateway ID – Select the (i.e., my-tgw-1) you noted in the last step of the “Creating an AWS Transit Gateway” section.
- Attachment type – Choose VPC from the dropdown to establish a connection between your Transit Gateway and a specific VPC in your network infrastructure.
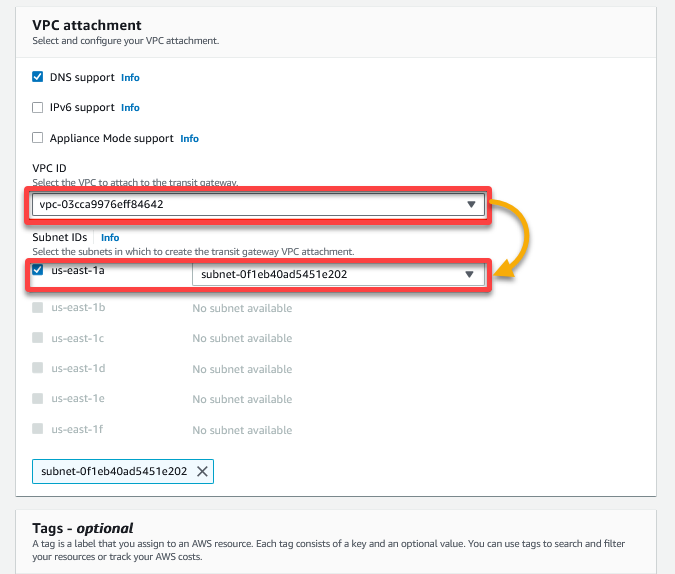
- VPC ID – Choose a VPC (i.e., my-vpc-1) to attach to your Transit Gateway.
- Subnet IDs – Specify the Subnets within the VPC you wish to associate with this attachment.
💡 Optionally, choose whether the Transit Gateway should propagate DNS support to the VPC.
- Leave the default settings as is, and click Create transit gateway attachment to confirm and create the attachment.
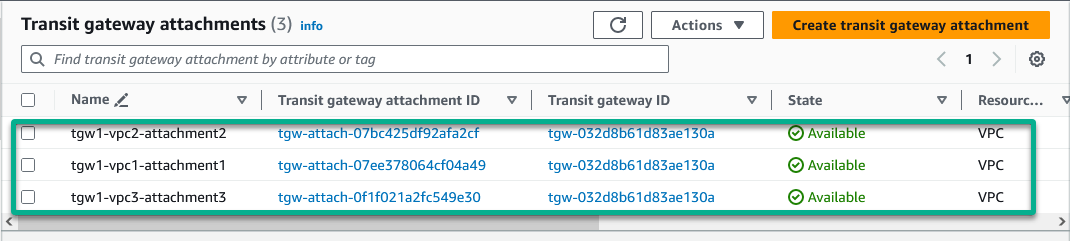
3. Repeat the steps in creating a Transit Gateway for your two other VPCs (i.e., tgw1-vpc2-attachment2 and tgw1-vpc3-attachment3).
4. Now, view the status of each VPC attachment on the Transit gateway attachments page.
The status should indicate Available for each attachment, as in the following.
Configuring and Updating Your Route Tables
Pivoting from establishing connections between your VPCs and the Transit Gateway, why not further control the flow of network traffic? This process optimizes performance, enhances security, and adapts your network to changing business needs.
Configuring Route Tables ensures traffic destined for the specified IP ranges is routed through the transit gateway.
To configure your Route Tables, fulfill these steps:
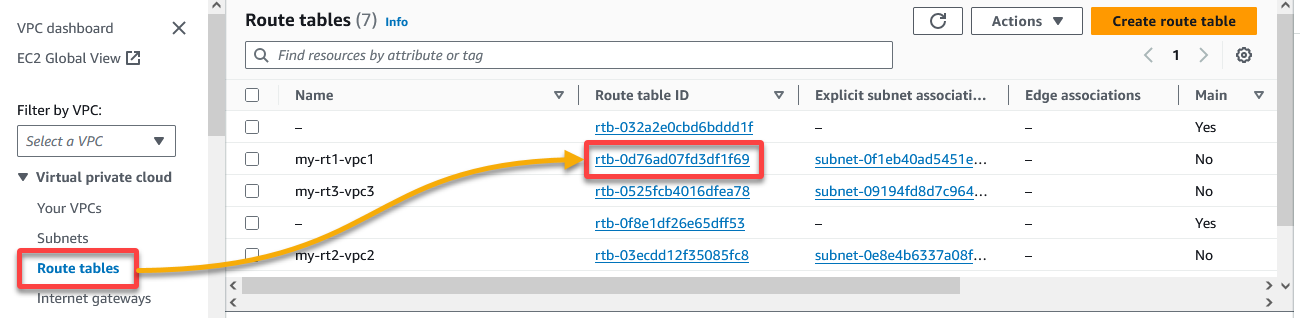
1. On the VPC dashboard, navigate to Route tables (left pane) and access the Route Table (i.e., my-rt1-vpc1) associated with a VPC (i.e., my-vpc-1) to connect to the Transit Gateway.
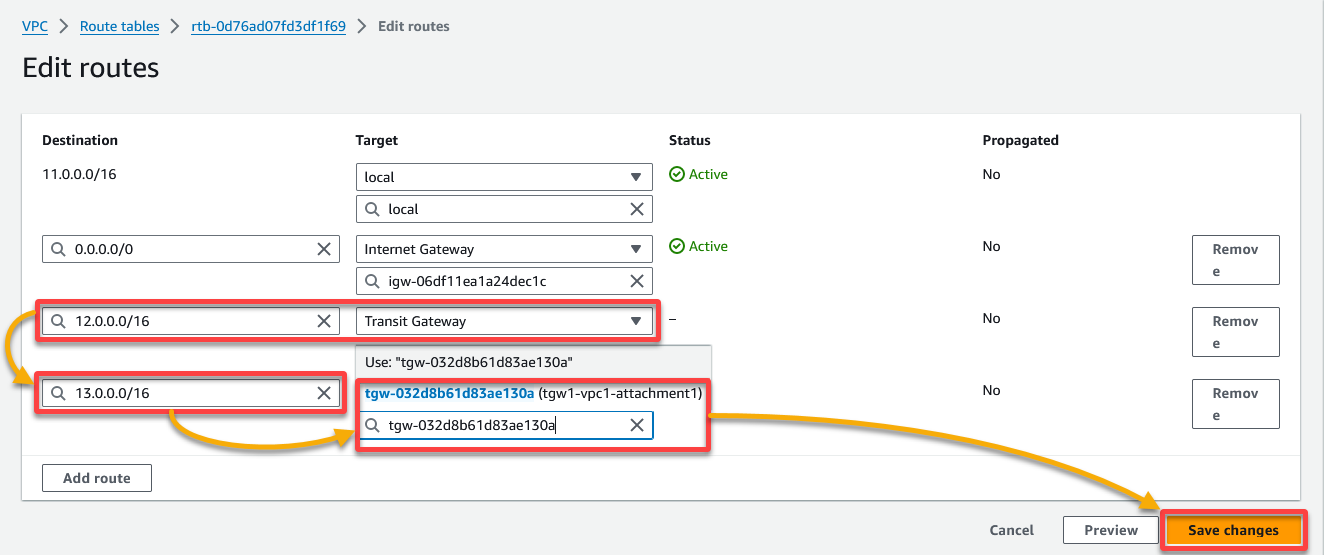
2. Next, click Edit routes under the Routes tab to modify the Route Table entries.
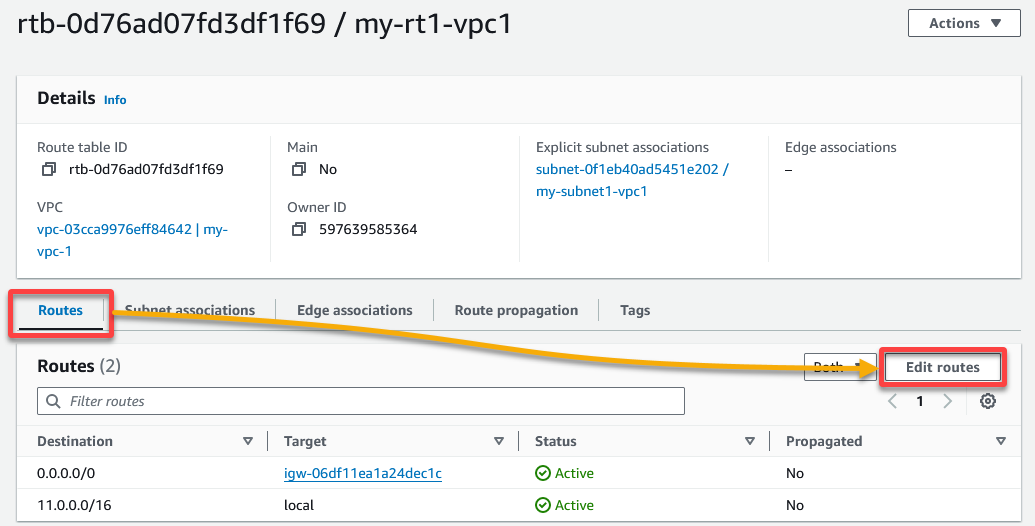
3. Add a new route that points to the Transit Gateway for the destination IP range you want to route through the Transit Gateway (i.e., tgw1-vpc1-attachment1). Once set, click Save changes to update the route table configurations.
This example adds a new route to the first VPC CIDR IP (i.e., 12.0.0.0/16) and the second VPC (i.e., 13.0.0.0/16).
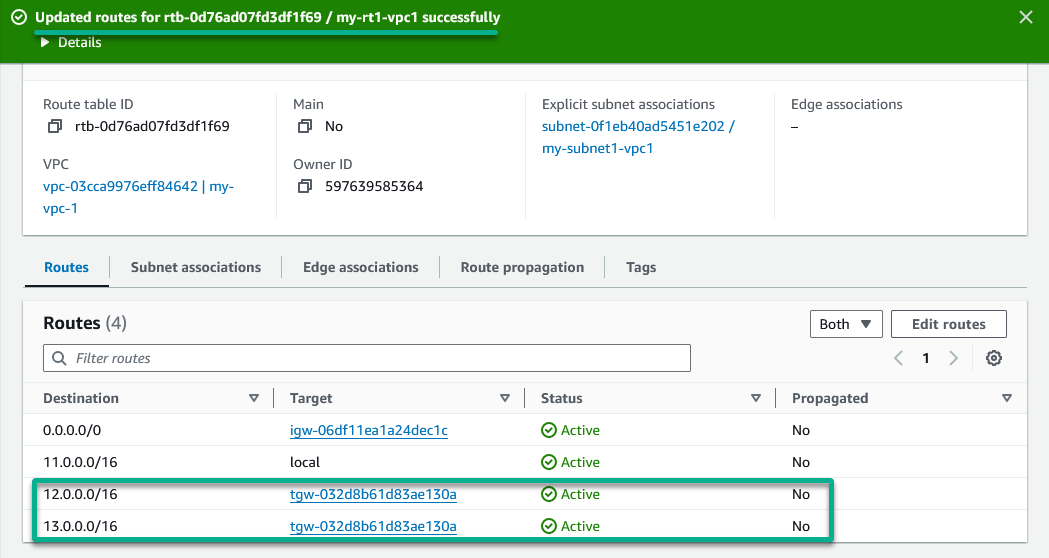
Once updated, a success message indicates the route changes have been effected.
4. Lastly, repeat the same steps of the Route Table update for the remaining VPCs (i.e., my-vpc-2 and my-vpc-3) to connect to your Transit Gateway.
For instance, my-vpc-2 routes to my-vpc-1 (i.e., 11.0.0.0/16) and my-vpc-3 (i.e., 13.0.0.0/16) CIDR IP, respectively. Additionally, my-vpc-3 routes to my-vpc-1 (i.e., 11.0.0.0/16) and my-vpc-2 (i.e., 12.0.0.0/16) CIDR IP.
Launching EC2 Instances Into the Transit Gateway
With your Route Tables configured for precise network traffic control, it’s time to bring your network to life by launching EC2 instances. Launching an Amazon Elastic Compute Cloud (EC2) instance in AWS involves creating a virtual server in the cloud.
To launch EC2 instances into your Transit Gateway, accomplish the following:
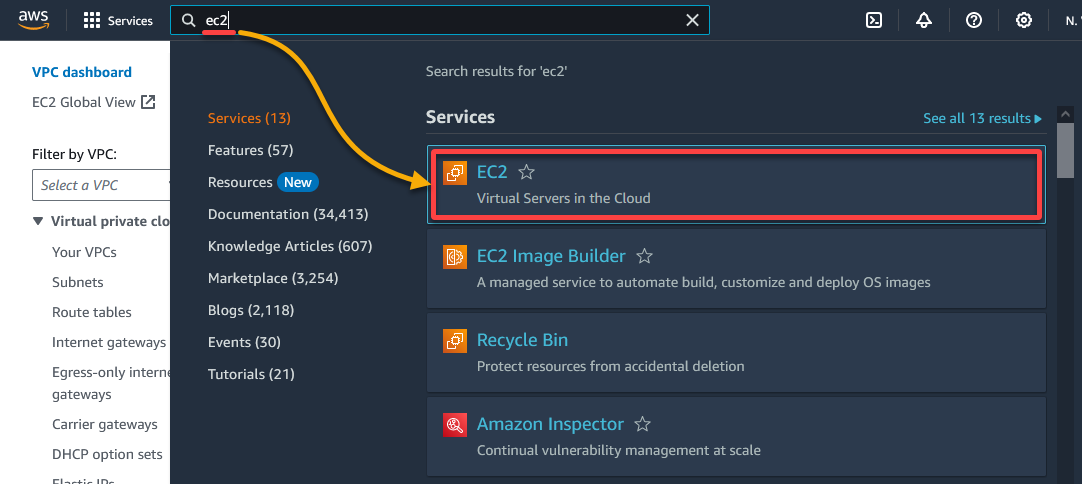
1. Open the AWS Management Console, then search for and select EC2 to access the EC2 dashboard.
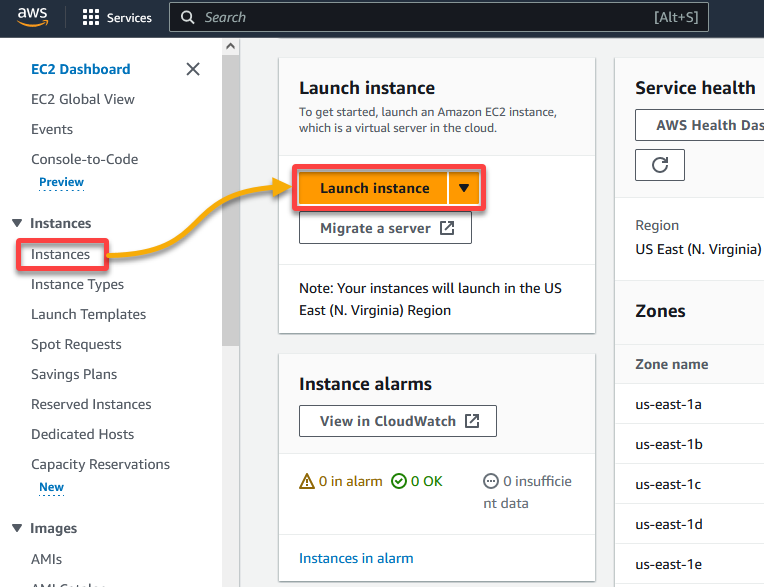
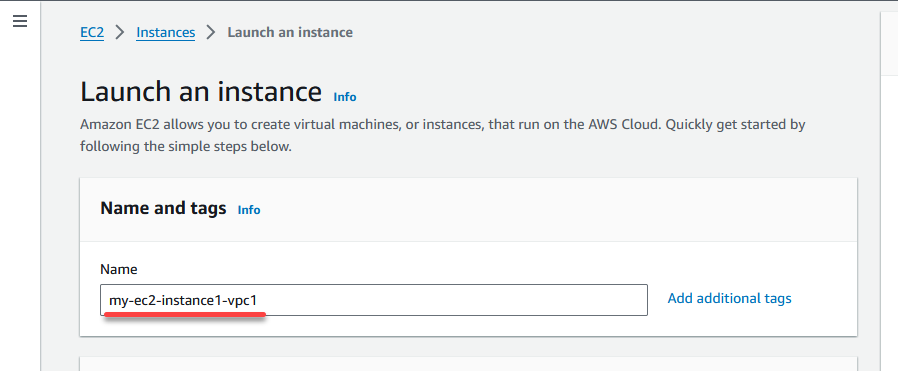
2. On the EC2 dashboard, navigate to Instances (left pane), then click Launch Instance to start the EC2 instance creation process.
3. Next, input a unique name (i.e., my-ec2-instance1-vpc1) for your EC2 instance.
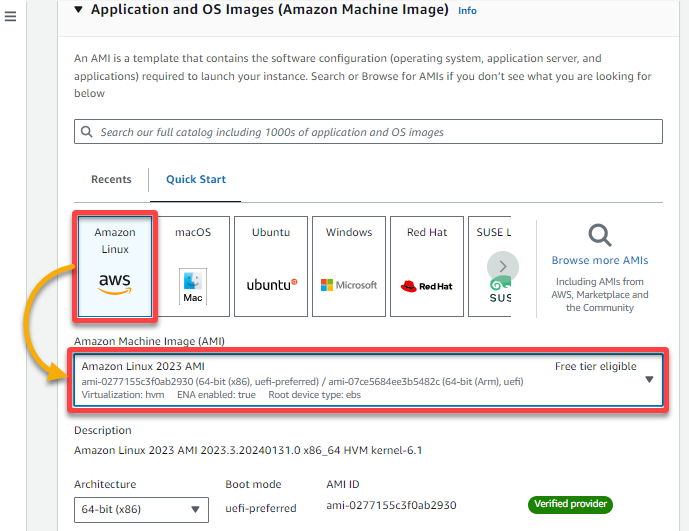
4. Select the desired Amazon Machine Image (AMI) for your EC2 instance. But in this case, select the Amazon Linux image.
This image provides a solid foundation for building and running your applications on AWS infrastructure.
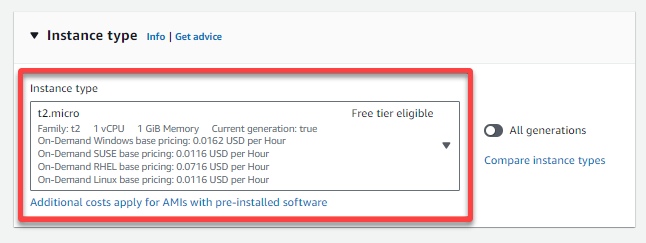
5. In the Instance type section, choose the type of instance to launch.
In this example, choose t2 micro, which offers a cost-effective and flexible solution for launching EC2 instances.
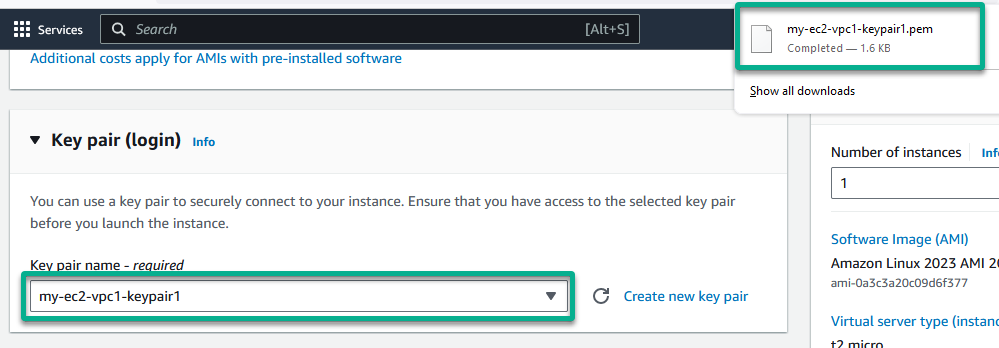
6. Further, click Create a new key pair in the Key pair (login) section to generate a new key pair.
This key pair establishes a secure connection to your EC2 instance.

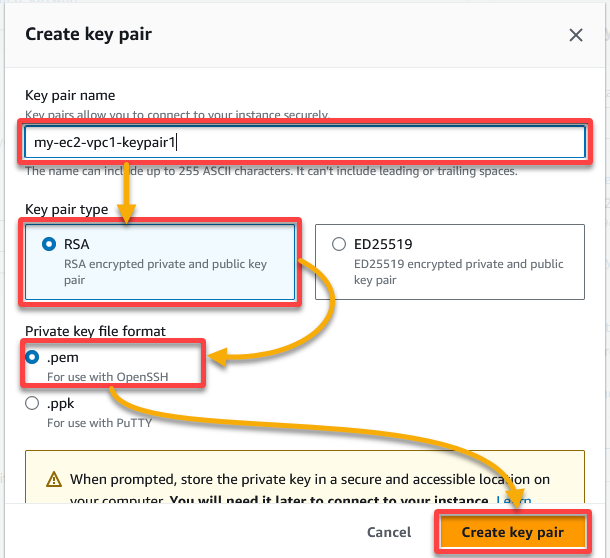
7. Configure the key pair in the Create key pair dialog box as follows:
- Key pair name – Provide a unique name (i.e., my-ec2-vpc1-keypair1) for the key pair.
- Key pair type – Select RSA as the key pair type to use the RSA algorithm for generating the key pair.
- Private key file format – Choose .pem as the key file format to ensure compatibility with SSH clients.
Once configured, click Create key pair to finalize creating the key pair.
The newly created key pair is auto-selected and downloaded for future use when connecting to the EC2 instance.
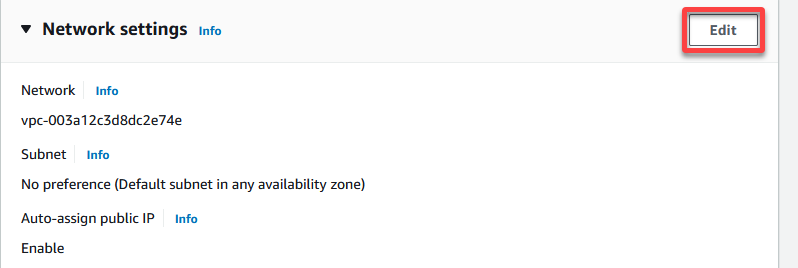
8. In the Network settings section, click Edit to configure network-related settings for your EC2 instance.
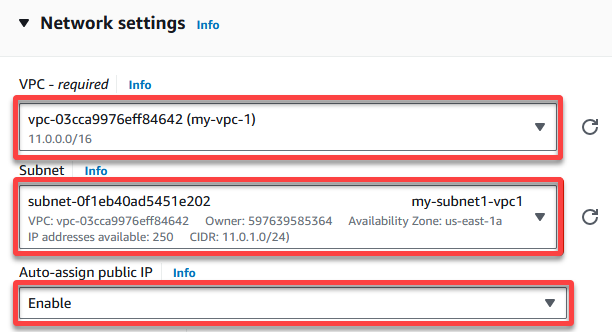
9. Configure the EC2 instance’s network settings with the following:
- VPC – Select the VPC (i.e., my-vpc-1) you want your EC2 instance to be part of.
- Subnet – Choose the Subnet (i.e., my-subnet1-vpc1) associated with your Transit Gateway.
- Auto-assign public IP – Choose the Enable option to assign a public IP address to your EC2 instance automatically. This option allows your EC2 instance to communicate with the internet if needed.
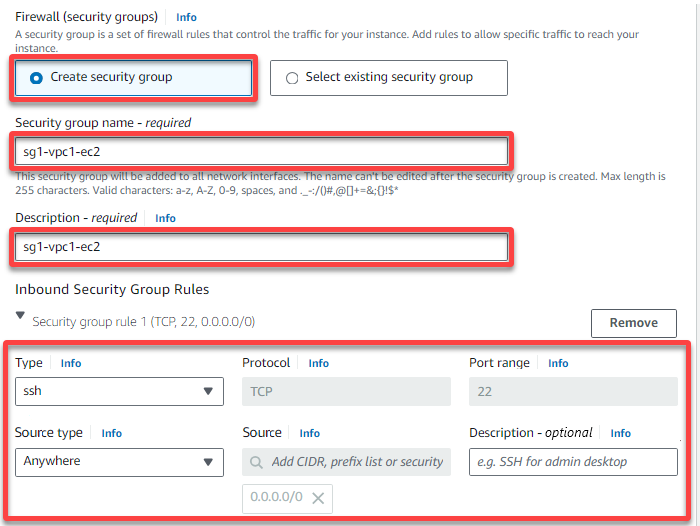
- Firewall (security groups) – Choose the Create security group option to define the firewall rules that control inbound and outbound traffic to and from the EC2 instance.
- Security group name – Provide a unique security group name (i.e., sg1-vpc1-ec2).
- Description – Write a description that briefly explains the purpose and scope of the security group.
- Create the inbound rules so you can SSH into the EC2 instance and access it from anywhere on the internet.
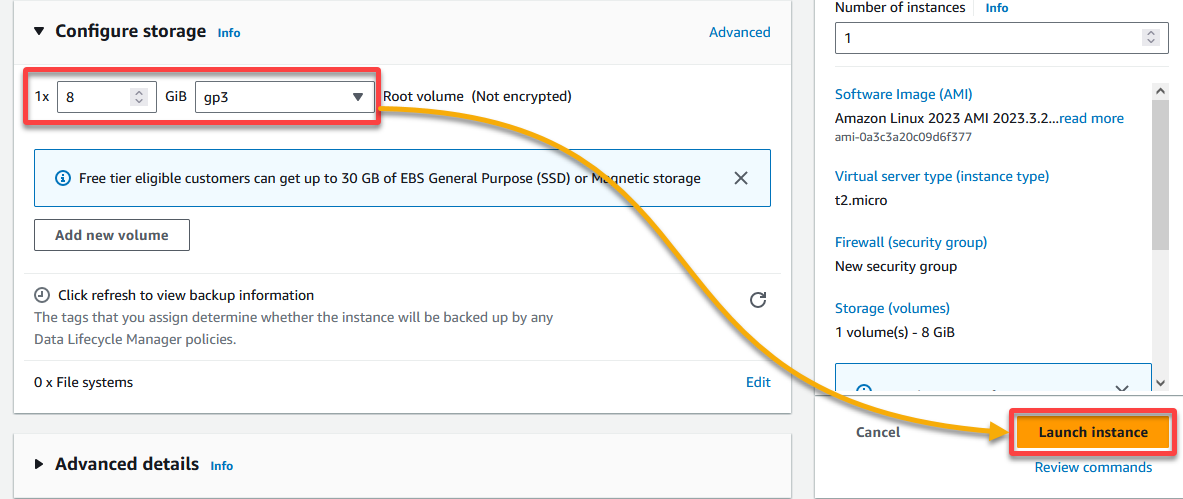
10. Finally, tweak the instance storage settings, then hit Launch instance to bring your EC2 instance into the Transit Gateway.
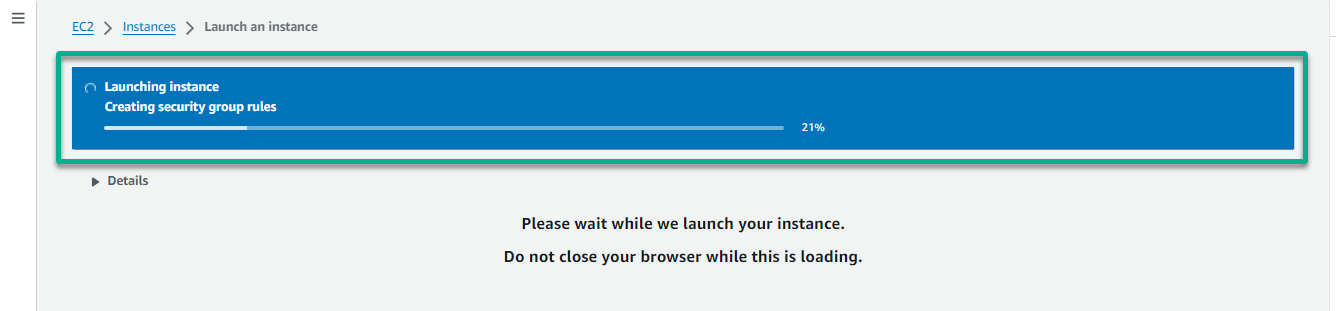
The screen below appears to show the progress of the EC2 creation.
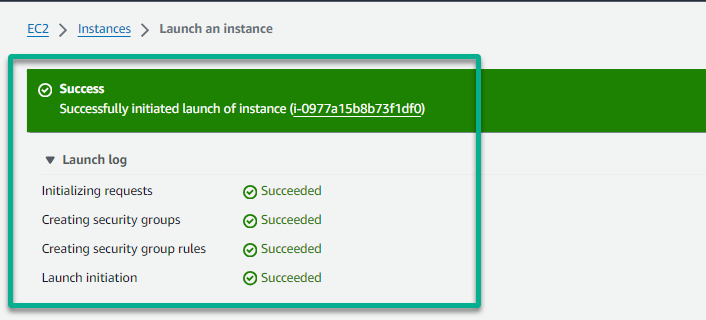
Once created, you’ll see the following that confirms the EC2 instance has been created successfully.
11. Repeat the same process of launching an EC2 instance for the other two VPCs (i.e., my-ec2-instance2-vpc2 and my-ec2-instance3-vpc3).
12. Ultimately, navigate to Instances to view the currently running instances in AWS.

Testing the Transit Gateway Connectivity
With successfully launched EC2 instances, you must ensure seamless connectivity between these instances and other resources in your network environment. You’ll test your Transit Gateway connectivity with your newly created Amazon EC2 instances.
This test involves verifying that the instances in their different VPCs attached to the transit gateway can communicate.
To test your Transit Gateway connectivity, continue with these steps:
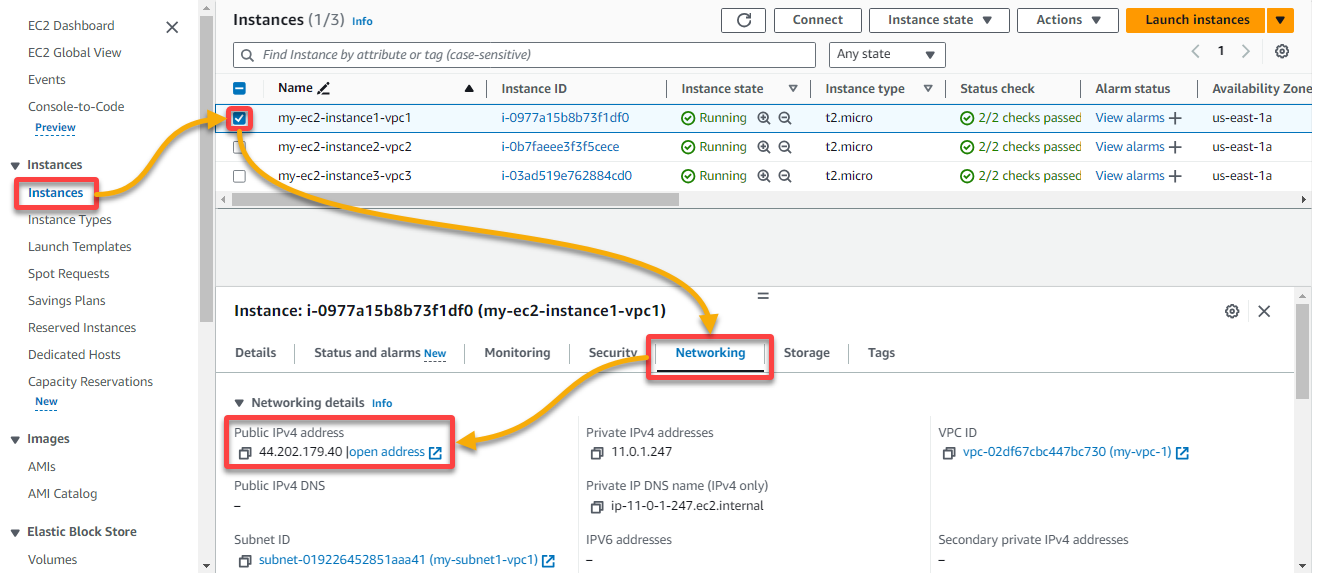
1. On the EC2 Dashboard, navigate to Instances, and select an EC2 instance (i.e., my-ec2-instance1-vpc1). This instance identifies the public IP address or public DNS name under the Networking tab.
In this example, note the public IP address (i.e., 44.202.79.40), as you will need later in the following steps.
2. Open a terminal and run the command below, which has no output but navigates to the directory (cd) where the private key file you downloaded is located.
cd /path/to/private-key-directory3. Next, execute the following ssh command to connect to your EC2 instance.
Ensure you substitute private-key.pem with the name of your private key file (i.e., my-ec2-vpc1-keypair1.pem) and <ec2-public-ip> with the public IP address (i.e., 44.202.79.40) or DNS of your EC2 instance.
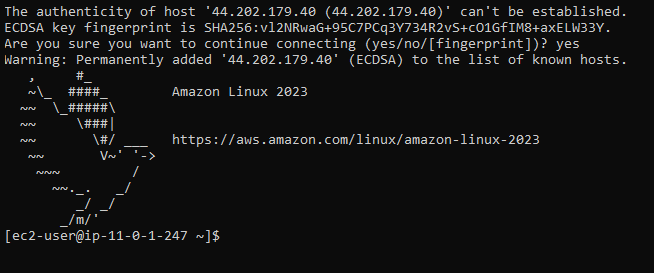
ssh -i private-key.pem ec2-user@<ec2-public-ip>💡 You’ll typically log in as
ec2-userwhen dealing with Amazon Linux instances. But with other Linux distributions might vary—the user could beubuntu,centos, oradmin—depending on the AMI.
Type yes and hit Enter to authenticate the SSH connection to your EC2 instance.
This prompt only shows up the first time you connect to the instance.

If the private key matches the public key on the instance, you’ll be connected to your EC2 instance’s command line.
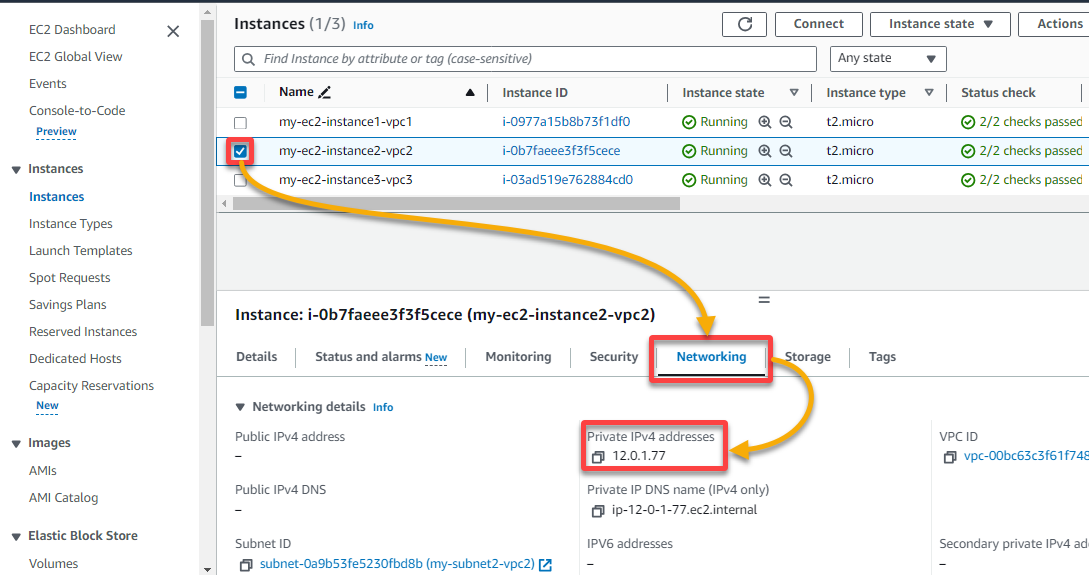
4. Find and copy the Private IPv4 address (i.e., 12.0.1.77) of the second EC2 instance (i.e., my-ec2-instance2-vpc2) you want to ping, as shown below.
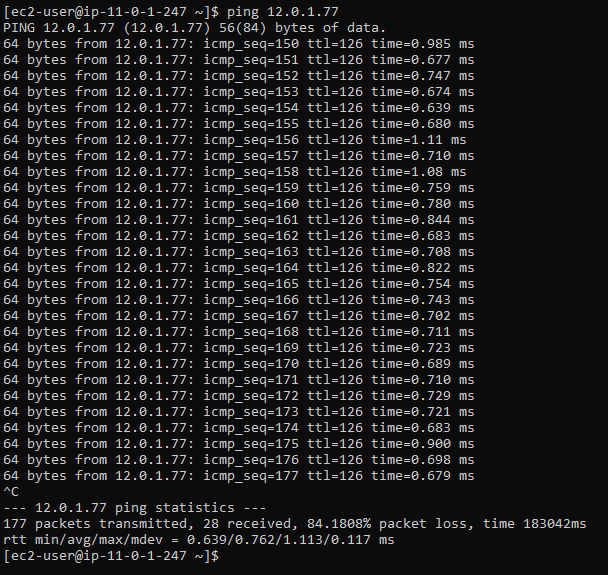
5. From the first EC2 instance terminal, run the ping command to test the connectivity to the private IP address of the second EC2 instance (i.e., 12.0.1.77).
ping <private_ip>Verify that you receive ICMP responses, indicating successful communication, as in the following output.
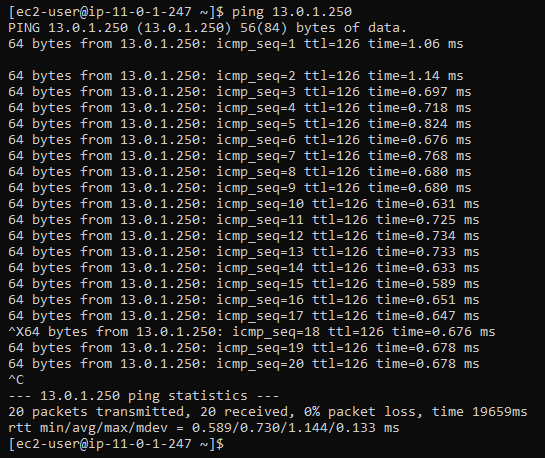
6. Finally, repeat steps five to six to ping test the private IPv4 address of the third EC2 instance.
There you have it! You’ve successfully performed a ping test to validate connectivity between your EC2 instances in different VPCs connected through a Transit Gateway.
With the ping test results, you can adjust configurations and troubleshoot any issues.
Conclusion
Throughout this tutorial, you’ve dived headfirst into the intricate workings of the AWS Transit Gateway. You’ve learned how to lay the foundation for seamless communication between virtual private clouds (VPCs) and on-premises networks.
By creating and configuring essential components like route tables, VPC attachments, and security groups, you’ve gained the tools to architect scalable and robust network infrastructures.
As you move forward, consider how you can leverage the knowledge you’ve gained to build even more sophisticated and resilient architectures. Why not explore advanced networking features AWS offers, such as VPC peering, VPN connections, and Direct Connect integrations, to optimize your network design further?
Keep experimenting and building remarkable solutions with the Transit Gateway at the heart of your network architecture!


