

If you need to set up AWS Virtual Private Cloud (VPC), you could make it happen via the AWS Management Console but automating it is so much more fun! In a DevOps scenario, building AWS services via tools like Terraform is a more scalable and automated approach to cloud resource provisioning.
In this tutorial, you will learn how to build and run a Terraform configuration to build a Terraform VPC from scratch!
Prerequisites
This post will be a step-by-step tutorial. If you’d like to follow along, ensure you have the following in place:
- An AWS account
- Terraform – This tutorial will use Terraform v0.14.9 running on Ubuntu 18.04.5 LTS, but any operating system with Terraform should work.
- A code editor – Even though you can use any text editor to work with Terraform configuration files, you should have one that understands the HCL Terraform language. Try out Visual Studio (VS) Code.
Understanding AWS VPCs
The AWS cloud has dozens of various services from compute, storage, networking, and more. Each of these services can communicate with each other just like an on-prem datacenter’s services. But, each of these services is independent of one another, and they are not necessarily isolated from other services. The AWS VPC changes that.
An AWS VPC is a single network that allows you to launch AWS services within a single isolated network. Technically, an AWS VPC is almost the same as owning a datacenter but with built-in additional benefits of scalability, fault-tolerance, unlimited storage, etc.

AWS VPCs are restricted by region. You cannot have one VPC spanning across regions with up to five VPCs supported per region.
Building the Terraform Configuration for an AWS VPC
Enough talk, let’s get down to building!
1. To start, create a folder to store your Terraform configuration files in. This tutorial will create a folder called terraform-vpc-demo in your home directory.
mkdir ~/terraform-vpc-demo
 cd ~/terraform-vpc-demo
2. Open your favorite code editor and copy/paste the following configuration already created for you saving the file as main.tf inside of the ~/terraform-vpc-demo directory. Information about each resource to create is inline.
The main.tf file contains all the resources which are required to be provisioned.
Terraform uses several different types of configuration files. Each file is written in either plain text format or JSON format. They have a specific naming convention of either .tf or .tfjson format.
The Terraform configuration below:
- Creates a VPC
- Creates an Internet Gateway and attaches it to the VPC to allow traffic within the VPC to be reachable by the outside world.
- Creates a public and private subnet
Subnets are networks within networks. They are designed to help network traffic flow be more efficient and provide smaller, more manageable ‘chunks’ of IP addresses
- Creates a route table for the public and private subnets and associates the table with both subnets
- Creates a NAT Gateway to enable private subnets to reach out to the internet without needing an externally routable IP address assigned to each resource.
Create the VPC
 resource "aws_vpc" "Main" {                # Creating VPC here
   cidr_block       = var.main_vpc_cidr     # Defining the CIDR block use 10.0.0.0/24 for demo
   instance_tenancy = "default"
 }
 Create Internet Gateway and attach it to VPC
 resource "aws_internet_gateway" "IGW" {    # Creating Internet Gateway
    vpc_id =  aws_vpc.Main.id               # vpc_id will be generated after we create VPC
 }
 Create a Public Subnets.
 resource "aws_subnet" "publicsubnets" {    # Creating Public Subnets
   vpc_id =  aws_vpc.Main.id
   cidr_block = "${var.public_subnets}"        # CIDR block of public subnets
 }
 Create a Private Subnet                   # Creating Private Subnets
 resource "aws_subnet" "privatesubnets" {
   vpc_id =  aws_vpc.Main.id
   cidr_block = "${var.private_subnets}"          # CIDR block of private subnets
 }
 Route table for Public Subnet's
 resource "aws_route_table" "PublicRT" {    # Creating RT for Public Subnet
    vpc_id =  aws_vpc.Main.id
         route {
    cidr_block = "0.0.0.0/0"               # Traffic from Public Subnet reaches Internet via Internet Gateway
    gateway_id = aws_internet_gateway.IGW.id
     }
 }
 Route table for Private Subnet's
 resource "aws_route_table" "PrivateRT" {    # Creating RT for Private Subnet
   vpc_id = aws_vpc.Main.id
   route {
   cidr_block = "0.0.0.0/0"             # Traffic from Private Subnet reaches Internet via NAT Gateway
   nat_gateway_id = aws_nat_gateway.NATgw.id
   }
 }
 Route table Association with Public Subnet's
 resource "aws_route_table_association" "PublicRTassociation" {
    subnet_id = aws_subnet.publicsubnets.id
    route_table_id = aws_route_table.PublicRT.id
 }
 Route table Association with Private Subnet's
 resource "aws_route_table_association" "PrivateRTassociation" {
    subnet_id = aws_subnet.privatesubnets.id
    route_table_id = aws_route_table.PrivateRT.id
 }
 resource "aws_eip" "nateIP" {
   vpc   = true
 }
 Creating the NAT Gateway using subnet_id and allocation_id
 resource "aws_nat_gateway" "NATgw" {
   allocation_id = aws_eip.nateIP.id
   subnet_id = aws_subnet.publicsubnets.id
 }
3. Now, create another file inside ~/terraform-vpc-demo directory, name it vars.tf and paste the content below.
Vars.tf is a Terraform variables file that contains all the variables that the configuration file references.
You can see variables references in the configuration file by:
var.regionvar.main_vpc_cidrvar.public_subnetsvar.private_subnets
variable "region" {}
 variable "main_vpc_cidr" {}
 variable "public_subnets" {}
 variable "private_subnets" {}
It is possible to include all configuration values in a single configuration file. To keep things clear and make it easier for developers and admins, it is important to break things up.
4. Create one more file inside ~/terraform-vpc-demo directory, paste in the following code, and name it as provider.tf to define the AWS provider. The tutorial will be creating resources in the us-east-2 region.
The providers file defines providers such as AWS, Oracle or Azure, etc., so that Terraform can connect with the correct cloud services.
provider "aws" {
   region = "us-east-2"
 }
provider "aws" {
region = "us-east-2"
}5. Finally, create one more file inside the ~/terraform-vpc-demo directory, name it terraform.tfvars, and paste the code below. This variables file contains the values that Terraform will use to replace the variable references inside of the configuration file.
main_vpc_cidr = "10.0.0.0/24"
 public_subnets = "10.0.0.128/26"
 private_subnets = "10.0.0.192/26"
Now, open your favorite terminal (Bash in this case) and verify all of the required files below are contained in the folder by running the tree command.
tree terraform-vpc-demo 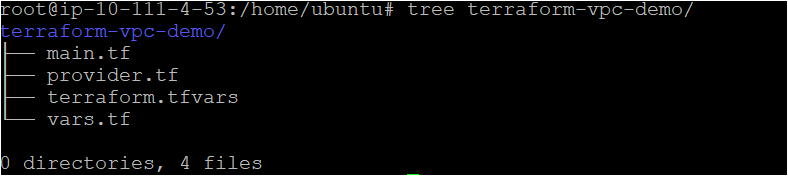
Running Terraform to Create the AWS VPC
Now that you have the Terraform configuration file and variables files ready to go, it’s time to initiate Terraform and create the VPC! To provision, a Terraform configuration, Terraform typically uses a three-stage approach terraform init → terraform plan → terraform apply. Let’s walk through each stage now.
1. Open a terminal and navigate to the ~\terraform-vpc-demo directory.
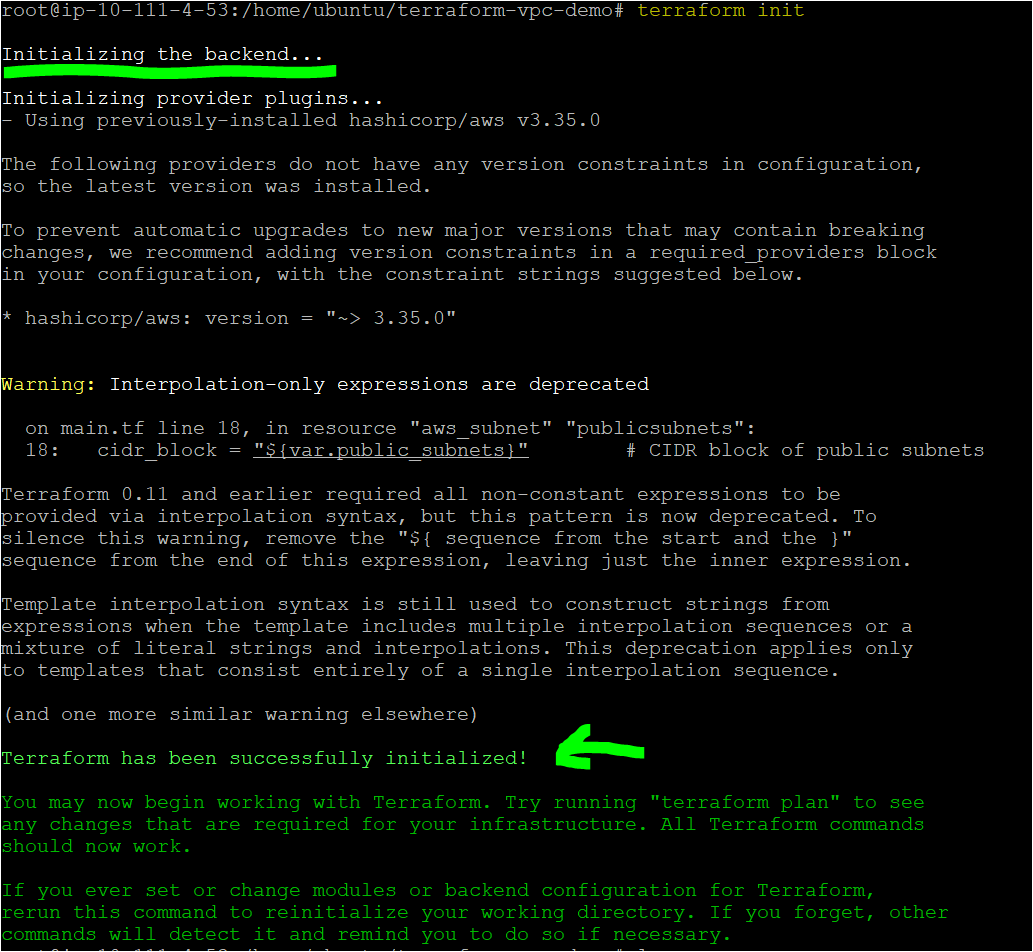
cd ~\terraform-vpc-demo2. Run the terraform init command in the same directory. The terraform init command initializes the plugins and providers which are required to work with resources.
terraform initIf all goes well, you should see the message Terraform has been successfully initialized in the output, as shown below.
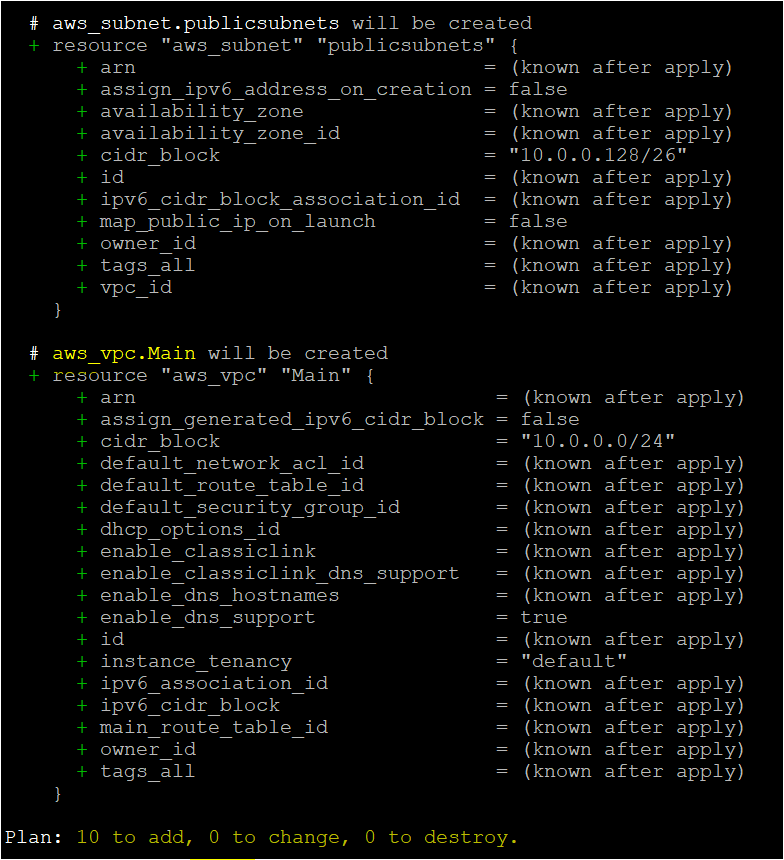
3. Now, run the terraform plan command. This is an optional, yet recommended action to ensure your configuration’s syntax is correct and gives you an overview of which resources will be provisioned in your infrastructure. terraform plan
terraform planIf successful, you should see a message like Plan: "X" to add, "Y" to change, or "Z" to destroy in the output to indicate the command was successful. You will also see every AWS resource Terraform intends to create.
4. Next, tell Terraform actually to provision the AWS VPC and resources using terraform apply. When you invoke terraform apply, Terraform will read the configuration (main.tf) and the other files to compile a configuration. It will then send that configuration up to AWS as instructions to build the VPC and other components.
terraform apply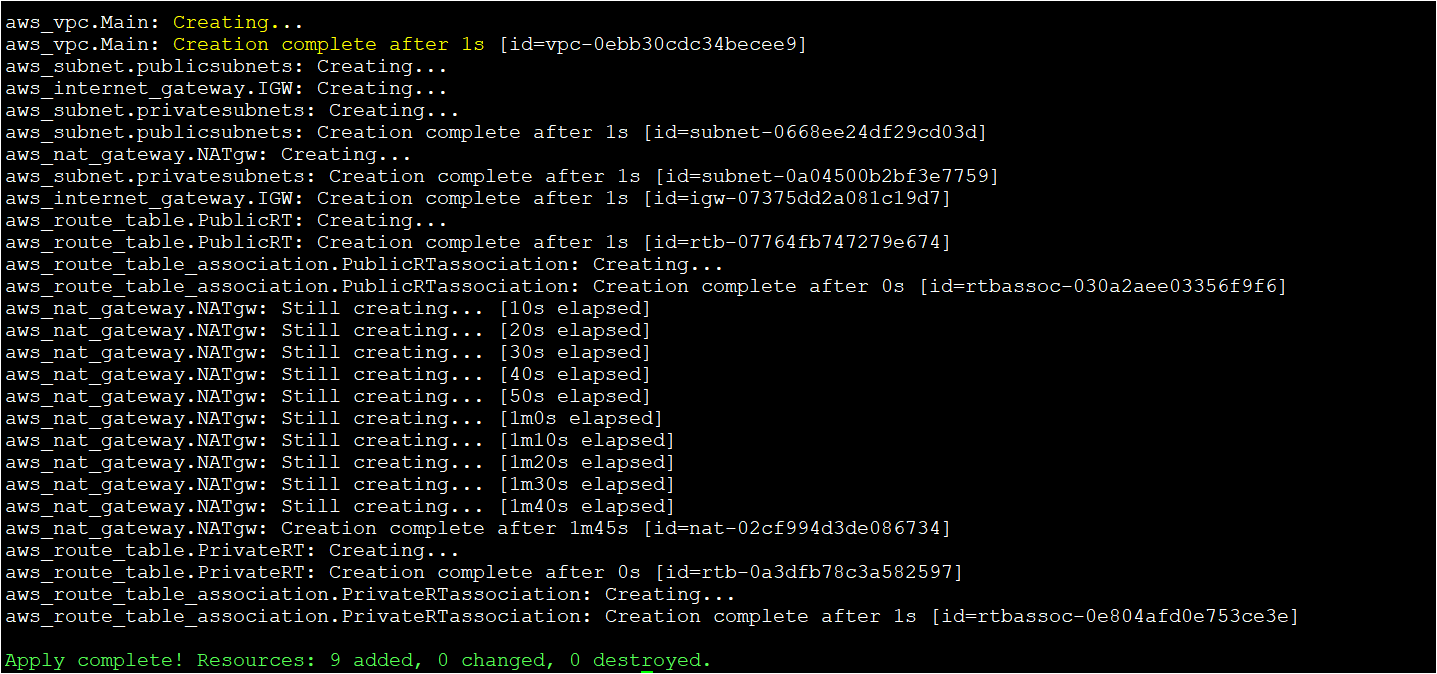
Notice the IDs defined in the Terraform output. You’ll need these IDs to correlate the resources created in the next section.
The Terraform command executed successfully, so let’s switch over to the AWS Management Console to confirm that the VPC and components were created successfully.
Verifying the AWS Terraform VPC
By now, you should have created the VPC with Terraform. Let’s verify by manually checking for the VPC in the AWS Management Console.
1. Open your favorite web browser and navigate to the AWS Management Console and log in.
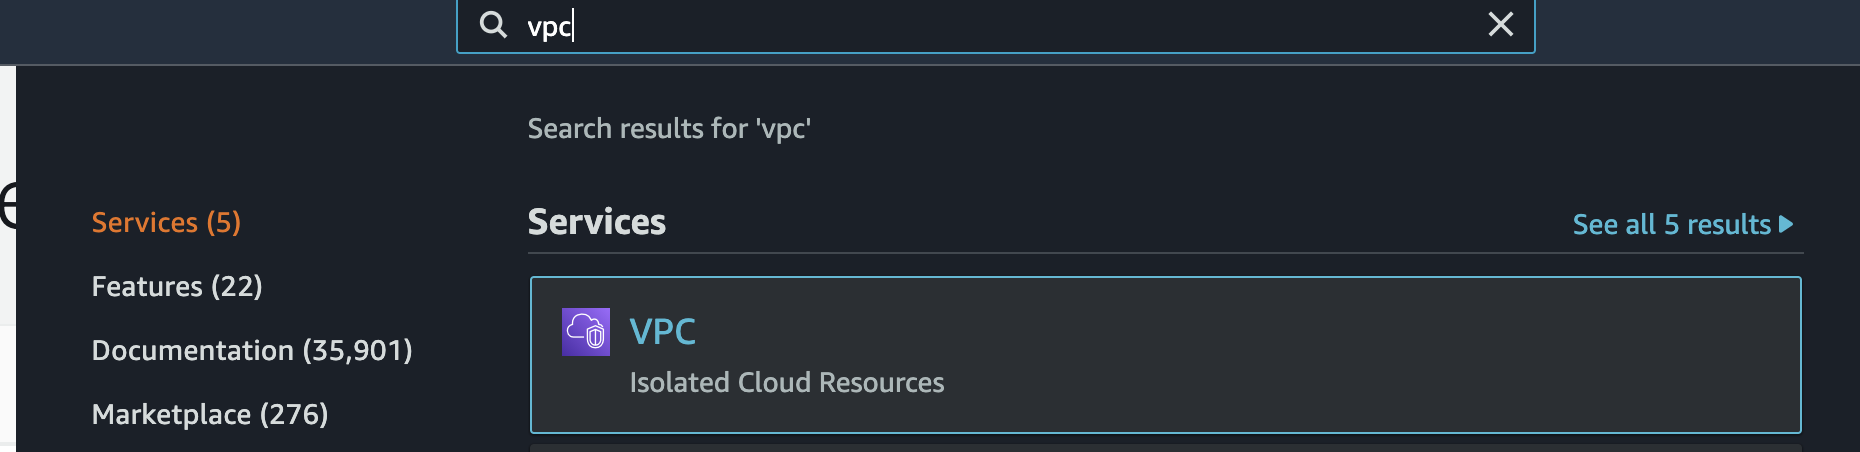
2. While in the Console, click on the search bar at the top, search for ‘vpc’, and click on the VPC menu item.
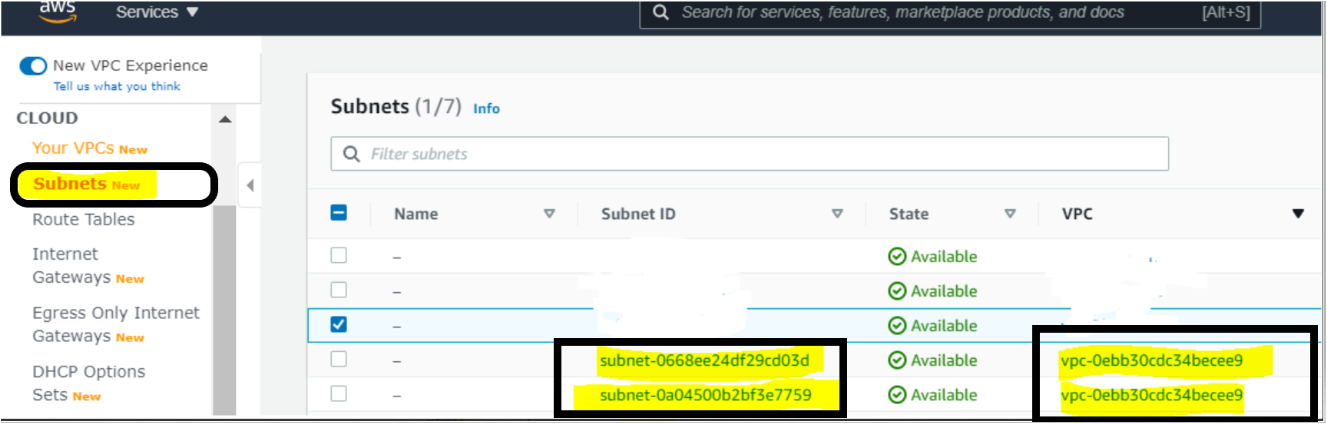
3. Once on the VPC page, click on Your VPCs. You should see the VPC created with the same ID Terraform returned earlier.

4. Since Terraform created more than just the VPC resource but all of the resources required for the VPC, you should then find each resource on this page also.


With all the components successfully created, using Terraform, this VPC is ready to go!
Conclusion
In this tutorial, you’ve learned how to use Terraform to deploy an AWS VPC and its components using Terraform.
Building an Amazon Virtual Private Cloud with Terraform allows you to create resources quickly, easily, and predictably. You are now ready to use this knowledge with other AWS services and build powerful services on top of it.


