


Feeling overwhelmed by the complexities of big data solutions? Well, you are not alone. You will need an application/framework to process that data at speed. Apache Hadoop, one of the most popular solutions, is here to save the day, offering lightning-fast data processing capabilities.
In this tutorial, you will learn to set up Apache Hadoop on your Linux machine and unleash its immense potential.
Dive in and revolutionize the way you handle massive data sets!
Prerequisites
This tutorial comprises hands-on demonstrations. Thus, before you dive in, ensure you have everything you need to get started:
- A Linux system (i.e., Debian, Ubuntu, CentOS, Red Hat Enterprise Linux (RHEL) with at least 8 GB of RAM – This tutorial uses a Debian 12 server.
- A non-root user with administrator privileges.
💡 This tutorial employs the root account for command execution (not the best practice) to showcase administrative tasks like system configuration. But, for security, always use a non-root user with
sudoprivileges for similar actions on your system.
Installing OpenJDK 11 and OpenSSH
With the prerequisites out of the way, you will establish a robust environment conducive to running Apache Hadoop effectively. Apache Hadoop, built on Java, facilitates distributed processing of massive datasets across clusters.
Currently, the latest Apache Hadoop requires you to install the following:
- OpenJDK 11 – Provides the Java Development Kit necessary for Hadoop, ensuring compatibility and optimal performance.
- OpenSSH – Facilitates secure communication between nodes in your Hadoop cluster, a fundamental requirement for seamless operation.
To install OpenJDK 11 and OpenSSH, carry out the following:
1. Connect to your server and run the echo command below, which has no output but enables the unstable Debian repository.
echo "deb http://deb.debian.org/debian unstable main non-free contrib" >> /etc/apt/sources.list2. Next, run the following apt update command to refresh and ensure your Debian package index is up-to-date with the latest package information available from the repositories.
💡 If logged in with a non-root user, prepend
sudoas you run commands requiring elevated privileges throughout this tutorial.
apt update
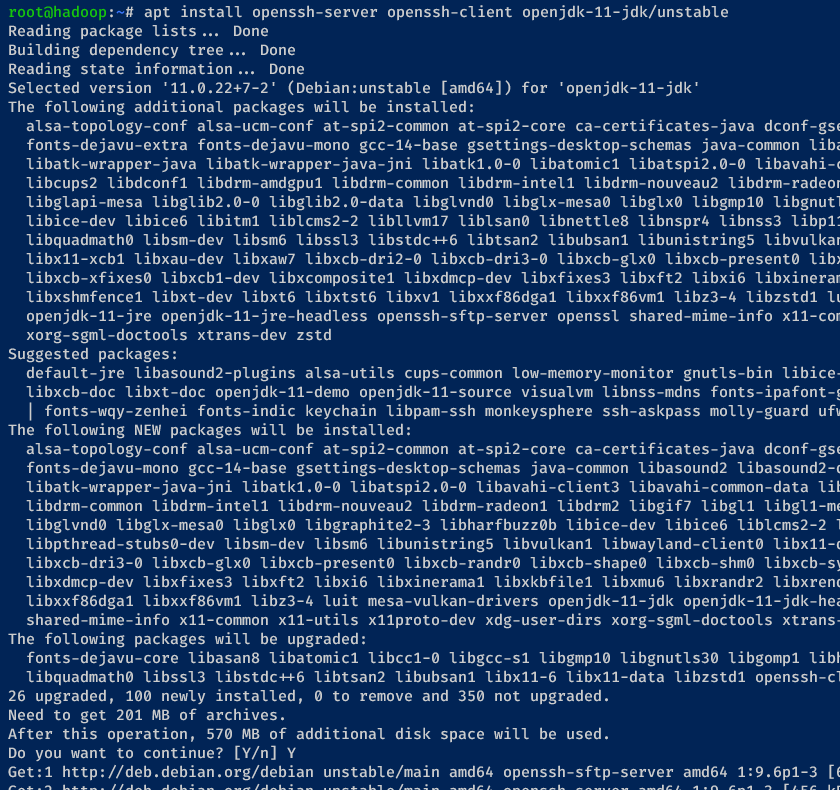
3. Now, run the command below to install OpenJDK 11 and OpenSSH (server and client).
apt install openssh-server openssh-client openjdk-11-jdk/unstableEnter y and hit Enter to proceed with the installation when prompted.
4. Once installed, run the command below to verify the Java --version.
java --versionThe output below confirms Java OpenJDK 11 is installed.

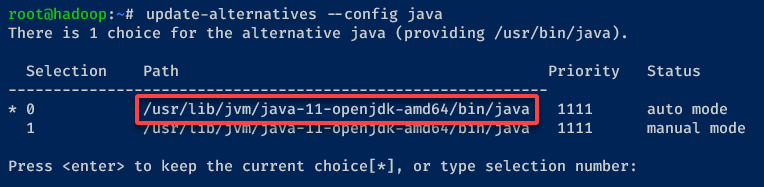
5. Lastly, execute the following update-alternatives command to verify the installation path of Java OpenJDK.
update-alternatives --config javaNote down the installation path (i.e., /usr/lib/jvm/java-11-openjdk-amd64), as you will need it later, then press Enter to confirm.
Setting Up a Dedicated Hadoop User
With Java OpenJDK 11 and OpenSSH installed, you need a dedicated Hadoop user to run the Apache Hadoop single-node cluster. You will configure the hadoop user and set up password-less authentication via SSH key.
Follow these steps to add a new hadoop user and set up password-less authentication via SSH key.
To set up a dedicated Hadoop user, proceed with these steps:
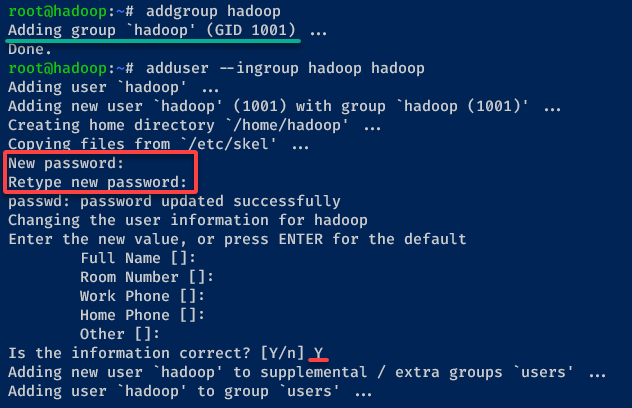
1. Run the following commands to add a new group and user called hadoop on your system.
addgroup hadoop
adduser --ingroup hadoop hadoop
Configure the hadoop user with the subsequent prompts as follows:
- Input and repeat the new password.
- Press Enter and leave user details as default.
- Input Y to confirm and add the hadoop user.
2. Once added, execute the command below to log in as the hadoop user.
su - hadoop
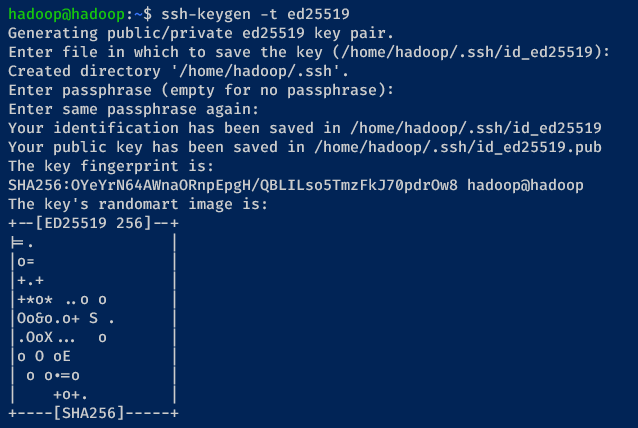
3. With the hadoop user logged in, run the ssh-keygen command below to generate an SSH key pair.
Ensure the hadoop user can log in passwordless to install Apache Hadoop in the single-node cluster (pseudo-distributed cluster) mode.
ssh-keygen -t ed25519Press Enter to confirm and generate the key without a passphrase.
Once complete, your SSH private key becomes available at ~/.ssh/id_ed25519, while the public key is at ~/.ssh/id_ed25519.
4. Next, run the cat command below to copy the public key ~/.ssh/id_ed25519.pub to ~/.ssh/authorized_keys. This command does not provide output but allows the hadoop user to log in to the server without a password.
cat $HOME/.ssh/id_ed25519.pub >> $HOME/.ssh/authorized_keys5. Now, run the following ssh command to verify the hadoop user authentication.
ssh hadoop@localhostType yes, and press Enter to confirm and add the server fingerprint. If successful, you will log in to the server without password authentication.

Downloading and Extracting Apache Hadoop on Linux
Coming from setting up a dedicated Hadoop user, the first hurdle in getting started with Hadoop is obtaining the software itself. You must download the Apache Hadoop binary package and set up its installation directory.
To download the Apache Hadoop binary package, perform the following:
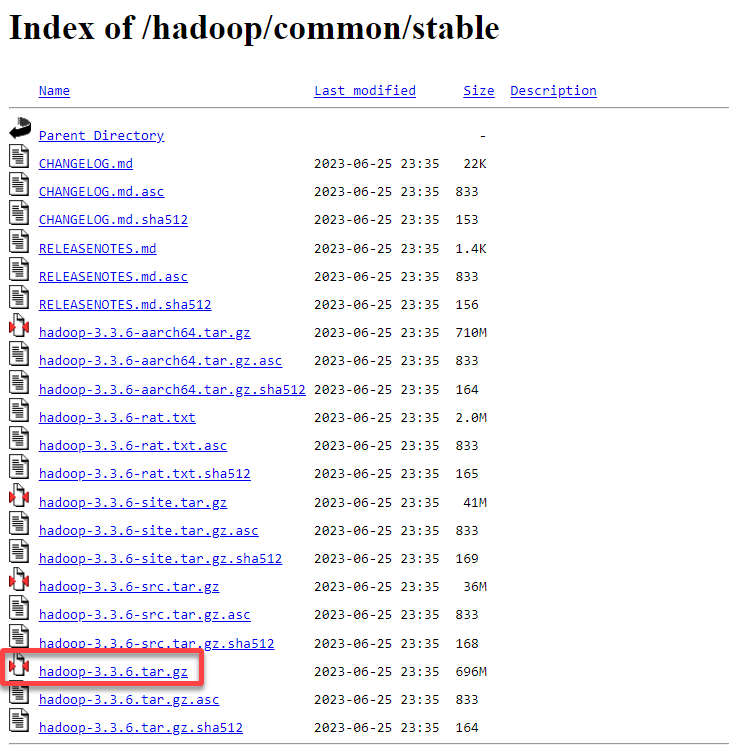
1. Open your preferred web browser, visit the Apache Hadoop download page, and copy the Apache Hadoop stable version link.
2. Next, run the following commands, which return no output to the terminal, to download (wget) and extract (tar) the Apache Hadoop binary package.
Ensure you substitute the following accordingly:
<package_URL>– The Apache Hadoop binary package link you copied in step one.<package_name>– The package name (i.e., hadoop-3.3.6.tar.gz).
# Download the Apache Hadoop binary package
wget <package_URL>
# Extract the package to the working directory
tar xzf <package_name>3. Lastly, run the following commands to rename (mv) the extracted directory (hadoop-3.3.6) to hadoop and list files and subdirectories (ls) to confirm the change.
mv hadoop-3.3.6 hadoop
ls
Once renamed, your main Apache Hadoop installation directory becomes /home/hadoop/hadoop.

Setting Up Environment Variables for Seamless Operations
Merely having the software files is not enough to realize Apache Hadoop’s potential. You must ensure seamless operation and accessibility by configuring environment variables. You will set up these environment variables required by Apache Hadoop via the ~/.bashrc config file.
To set up environment variables for Apache Hadoop, execute the following actions:
1. Open the ~/.bashrc file using your preferred editor (i.e., nano or vim), and insert the following configuration at the bottom.
This configuration creates environment variables such as $HADOOP_HOME and $YARN_HOME and adds Apache Hadoop utilities to the system PATH.
# Specifies the root directory of the Hadoop installation
export HADOOP_HOME=/home/hadoop/hadoop
# Specifies the same directory as HADOOP_HOME
export HADOOP_INSTALL=$HADOOP_HOME
# Specifies the directory where MapReduce is installed
export HADOOP_MAPRED_HOME=$HADOOP_HOME
# Specifies the directory where Hadoop common libraries are stored
export HADOOP_COMMON_HOME=$HADOOP_HOME
# Specifies the directory where HDFS libraries are stored
export HADOOP_HDFS_HOME=$HADOOP_HOME
# Specifies the directory where YARN libraries are stored
export YARN_HOME=$HADOOP_HOME
# Specifies the directory containing native libraries for Hadoop
export HADOOP_COMMON_LIB_NATIVE_DIR=$HADOOP_HOME/lib/native
# Adds Hadoop binaries to the system PATH for easy execution
export PATH=$PATH:$HADOOP_HOME/sbin:$HADOOP_HOME/bin
# Defines extra parameters to be passed to the Java Virtual Machine (JVM)
export HADOOP_OPTS="-Djava.library.path=$HADOOP_HOME/lib/native"
# Force Hadoop to use SSH for communication
export PDSH_RCMD_TYPE=ssh
2. Next, save the changes, exit the file, and run the command below to reload the ~/.bashrc file. This command has no output but applies your configuration changes.
source ~/.bashrc3. Once ~/.bashrc is reloaded, execute the following commands to verify the environment variable $HADOOP_HOME and binary $PATH.
echo $HADOOP_HOME
echo $PATH
As you can see below, the $HADOOP_HOME variable points to the Apache Hadoop installation directory /home/hadoop/hadoop. Also, both the sbin and bin paths for Apache Hadoop are added to the system $PATH.

4. Next, open the /home/hadoop/hadoop/etc/hadoop/hadoop-env.sh file in your editor.
Uncomment the export JAVA_HOME line, and add the Java OpenJDK 11 installation directory as value. This installation directory is the one you noted in the last step of the “Installing OpenJDK 11 and OpenSSH” section (/usr/lib/jvm/java-11-openjdk-amd64).
export JAVA_HOME=/usr/lib/jvm/java-11-openjdk-amd645. Save the changes, exit the file ~/hadoop-env.sh, and run the following command to verify the Apache Hadoop version.
hadoop versionAssuming all goes well, you will see the Apache Hadoop version in the following output.

Creating an Apache Hadoop Cluster on a Single Node
Setting up environment variables lays the groundwork for a functional Hadoop environment. But, the true power of Hadoop lies in its ability to distribute and process data across multiple nodes.
In this example, you will create a pseudo-distributed cluster of Apache Hadoop on your server. You must create additional directories and modify some files within the /home/hadoop/hadoop/etc/hadoop/ directory.
To create and configure the Apache Hadoop cluster on a single node, follow these steps:
1. Execute the command below to create additional directories (mkdir) for Apache Hadoop.
mkdir -p ~/tmp ~/hdfsdata/{namenode,datanode}2. Once created, open the /home/hadoop/hadoop/etc/hadoop/core-site.xml file in your editor, and insert the configuration below between the <configuration>...</configuration> block.
This configuration sets up the Hadoop Distributed File System (HDFS) to 192.168.5.15:9000 and bases the temporary directory on /home/hadoop/tmp.
<configuration>

	<!-- Specifies the directory where Hadoop stores temporary data -->
	<property>
	  <name>hadoop.tmp.dir</name>
	  <value>/home/hadoop/tmp</value>
	</property>

    <!-- Specifies the default file system URI for Hadoop -->
    <property>
        <name>fs.defaultFS</name>
        <value>hdfs://192.168.5.15:9000</value>
    </property>

</configuration>
3. Next, open the HDFS configuration (/home/hadoop/hadoop/etc/hadoop/hdfs-site.xml) and add the following configuration between the <configuration> ... </configuration> block.
This configuration defines properties that configure the storage and replication behavior of HDFS. This way, you ensure reliable and fault-tolerant data storage and retrieval within your Hadoop ecosystem.
<configuration>

	<!-- Determine where the DFS name node stores the name table. -->
	<property>
		<name>dfs.namenode.name.dir</name>
		<value>/home/hadoop/hdfsdata/namenode</value>
	</property>

	<!-- Determine where the DFS data node stores its blocks -->
	<property>
		<name>dfs.datanode.data.dir</name>
		<value>/home/hadoop/hdfsdata/datanode</value>
	</property>

	<!-- Specifies the default replication factor for file blocks -->
	<property>
		<name>dfs.replication</name>
    <!-- Creates (1) an Apache Hadoop single-node cluster -->
    <!-- (pseudo-distributed cluster) -->
		<value>1</value>
	</property>

</configuration>
4. Now, open the MapReduce config file (/home/hadoop/hadoop/etc/hadoop/mapred-site.xml) and add the configuration below.
This configuration defines settings that ensure efficient and effective MapReduce job execution within your Hadoop ecosystem.
<configuration>

    <!-- Specifies the framework used for MapReduce processing -->
    <property>
        <!-- Name of the property -->
        <name>mapreduce.framework.name</name>
        <!-- Value of the property, indicating the framework -->
        <value>yarn</value>
    </property>

    <!-- Defines the classpath for MapReduce applications -->
    <property>
        <!-- Name of the property -->
        <name>mapreduce.application.classpath</name>
        <!-- Value of the property, specifying directories and wildcard for MapReduce libraries -->
        <value>$HADOOP_MAPRED_HOME/share/hadoop/mapreduce/*:$HADOOP_MAPRED_HOME/share/hadoop/mapreduce/lib/*</value>
    </property>

</configuration>
5. Ultimately, open the default Yet Another Resource Negotiator (YARN) configuration (/home/hadoop/hadoop/etc/hadoop/yarn-site.xml) and add the configuration below.
In this configuration, these defined properties configure aspects of the YARN resource management framework. These aspects specify auxiliary services and whitelisting environment variables for NodeManager containers.
These settings ensure efficient resource utilization and controlled execution environments within your Hadoop ecosystem.
<configuration>

    <!-- Specifies the auxiliary services provided by the NodeManager -->
    <property>
        <!-- Name of the property -->
        <name>yarn.nodemanager.aux-services</name>
        <!-- Value of the property, indicating the auxiliary service -->
        <value>mapreduce_shuffle</value>
    </property>

    <!-- Defines a whitelist of environment variables allowed for NodeManager containers -->
    <property>
        <!-- Name of the property -->
        <name>yarn.nodemanager.env-whitelist</name>
        <!-- Value of the property, specifying a comma-separated list of environment variables -->
        <value>JAVA_HOME,HADOOP_COMMON_HOME,HADOOP_HDFS_HOME,HADOOP_CONF_DIR,CLASSPATH_PREPEND_DISTCACHE,HADOOP_YARN_HOME,HADOOP_HOME,PATH,LANG,TZ,HADOOP_MAPRED_HOME</value>
    </property>

</configuration>
Starting the Apache Hadoop Single Node Cluster
You have configured the Apache Hadoop cluster on a single node. Now, you will breathe life into your setup and witness the power of Hadoop in action.
But how do you start the cluster? First, you must format the DFS filesystem (only the first time), then start the Hadoop cluster and YARN manager.
To start your Apache Hadoop single-node cluster, proceed as follows:
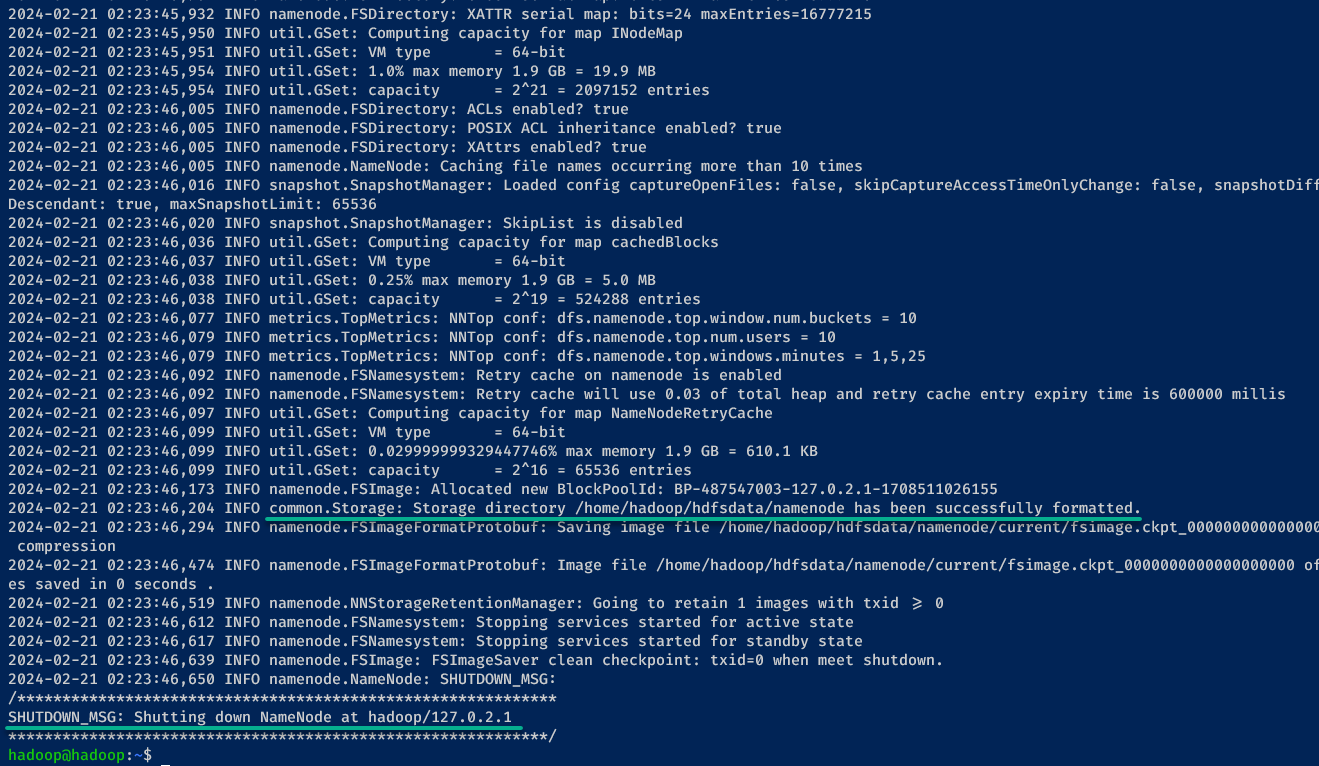
1. Run the hdfs command below to format the DFS namenode filesystem before you start Apache Hadoop for the first time.
By formatting the DFS namenode filesystem, you set up the initial state of the filesystem. Doing so allows Hadoop to manage data storage and retrieval effectively.
hdfs namenode -formatWhen successful, you will notice the message saying common.Storage … has been successfully formatted, and the shutdown message.
2. Once formatted, execute the following command to start the HDFS services on an Apache Hadoop single-node cluster.
start-dfs.shAs you can see below, both datanodes and namenode are starting.

3. Next, run the command below to start YARN services (ResourceManagers and NodeManager).
start-yarn.sh
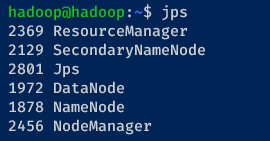
4. Subsequently, run the jps command below to verify Hadoop and Yarn services are running.
jpsIf your Apache Hadoop installation is successful, you will see the running services as follows.
Accessing the Apache Hadoop Web UI
As you dive deeper into the world of Apache Hadoop, understanding how to interact with its GUI is essential. With the Apache Hadoop cluster running, you can now check your installation via web UI.
In this example, you will access the Hadoop NameNode and DataNode, then verify the available node via the YARN ResourceManagers interface.
To access the Apache Hadoop web UI, complete the steps below:
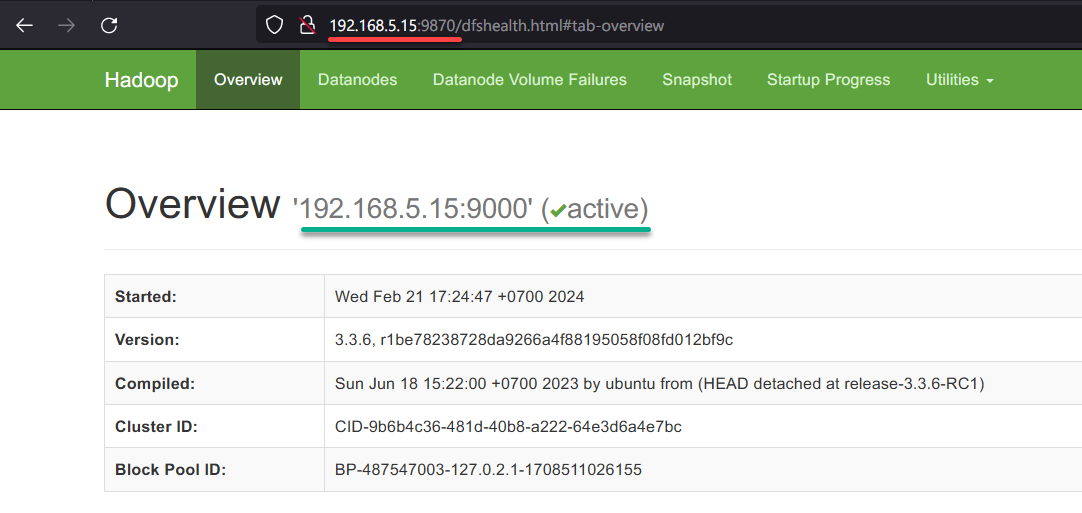
1. Visit your server IP followed by port 9870 (i.e., 192.168.5.15:9870) on your web browser to access the Hadoop NameNode.
On the Overview tab, you will see the Apache Hadoop single-node cluster is active and running.
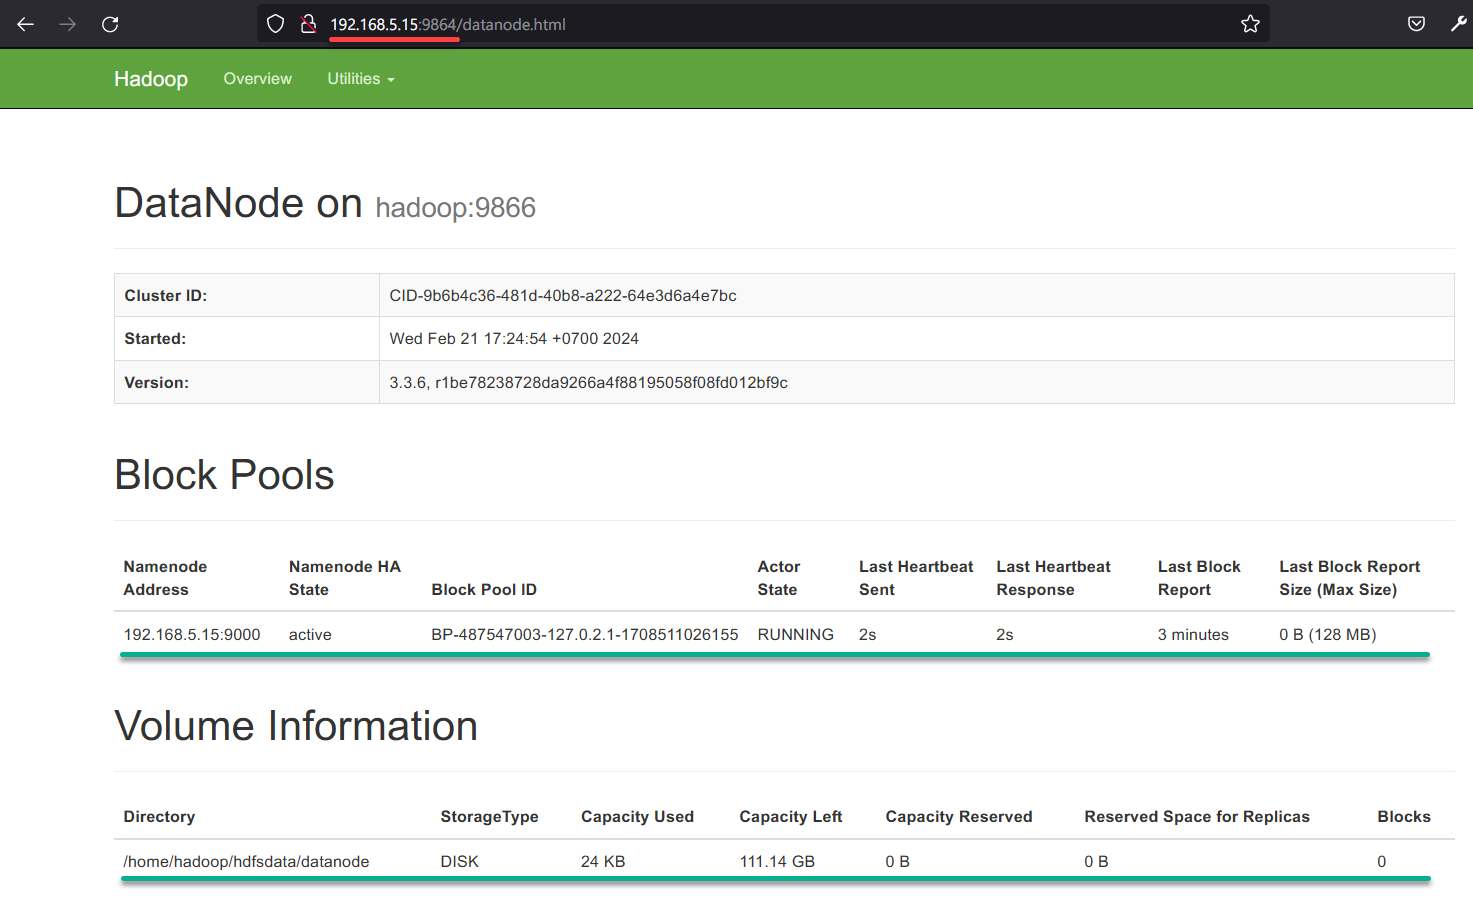
2. Next, open a new tab and visit your server IP followed by 9864 (i.e., 192.168.5.15:9864) to access the DataNode, where you will see the following:
- Block Pools section – Displays your Apache Hadoop installation.
- Volume Information section – Show the details of the DataNode. You can verify the details in the /home/hadoop/hadoop/etc/hadoop/hdfs-site.xml file.
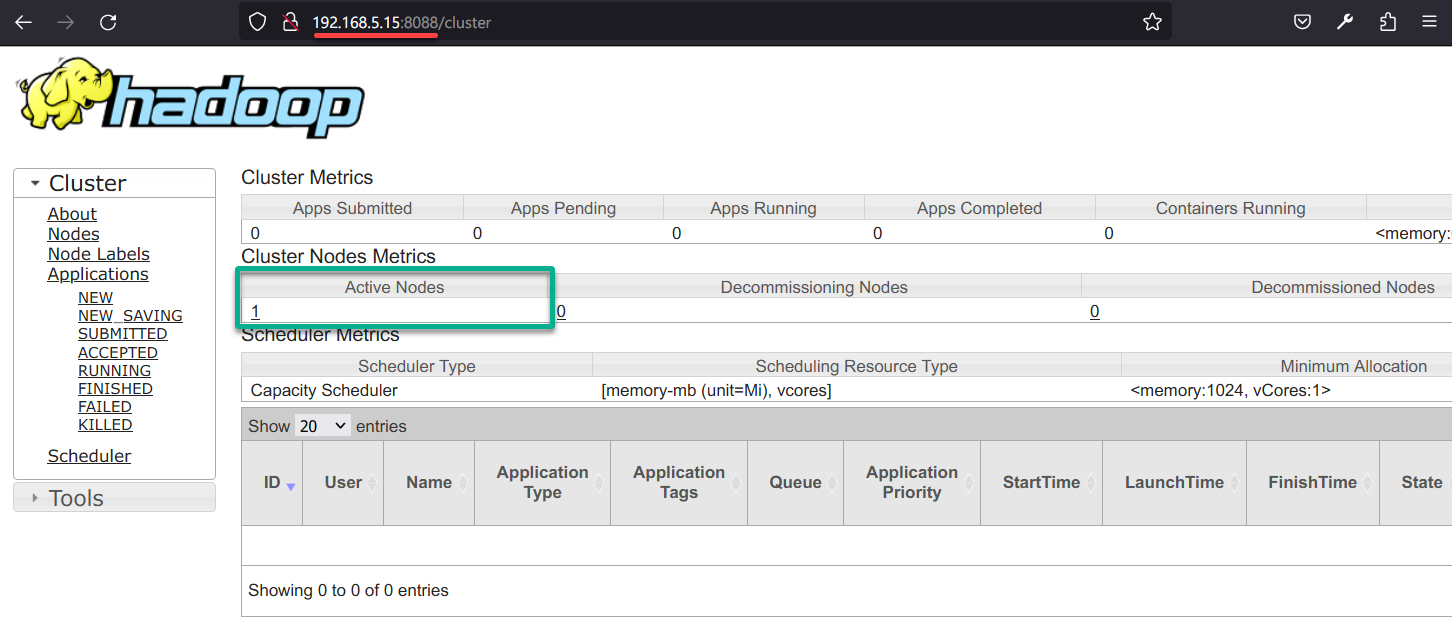
3. Next, open another tab and visit your server IP, followed by port 8088 (i.e., 192.168.5.15:8088) to access the YARN web UI.
Under the Cluster Nodes Metrics, you will see 1 Active Nodes.
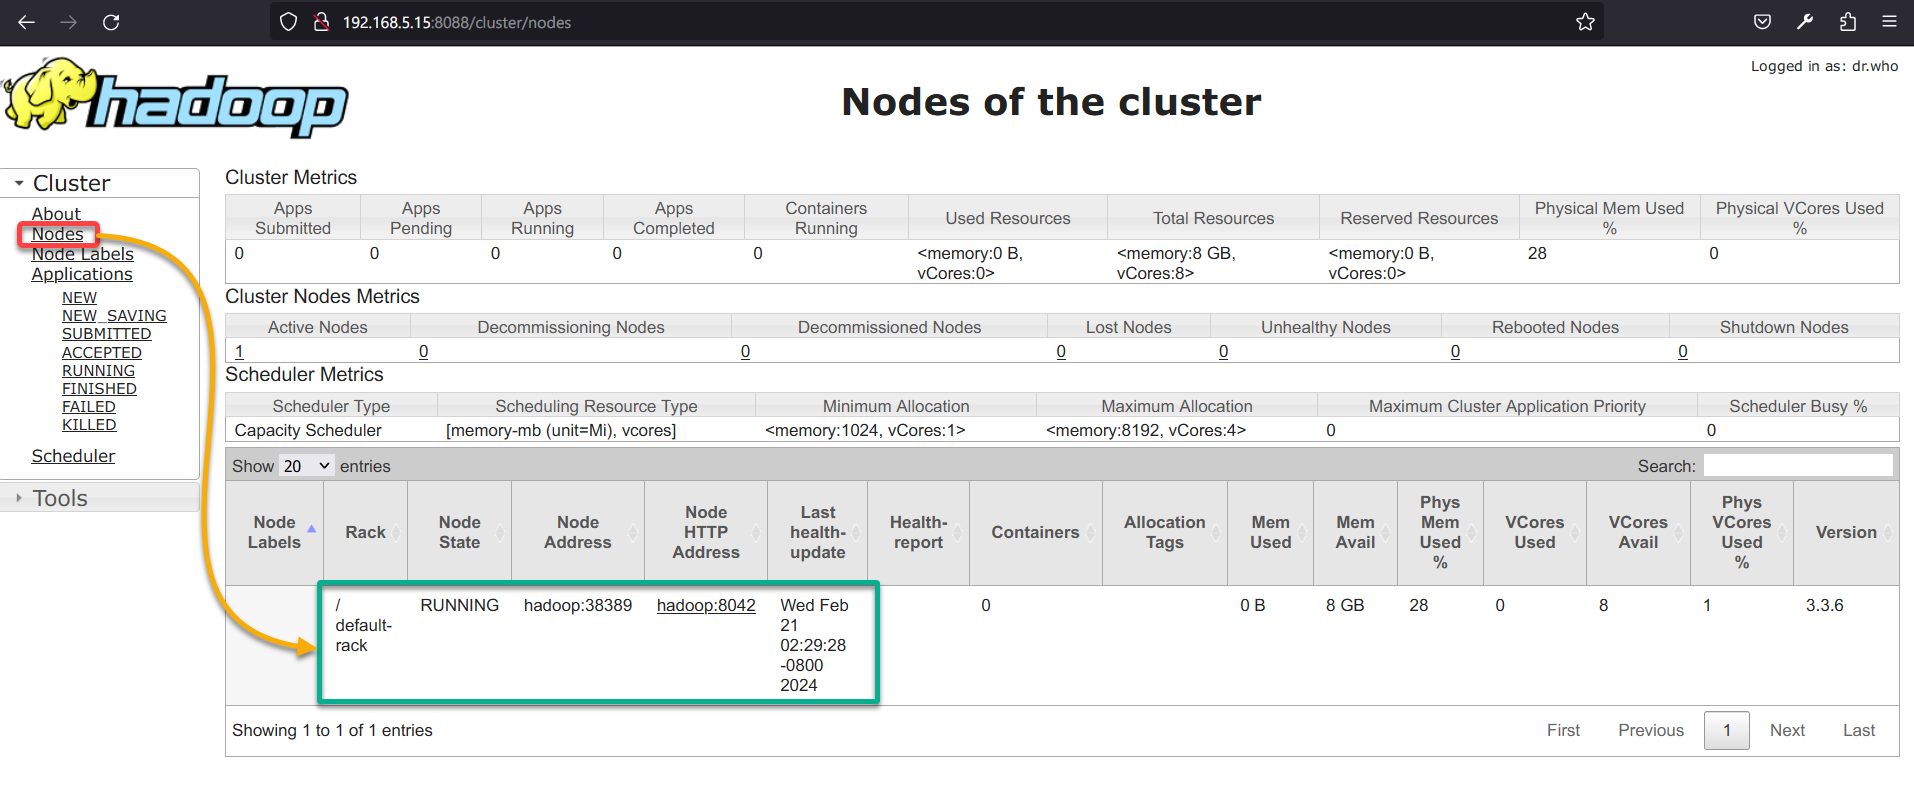
4. Lastly, navigate to Nodes (left pane), and you will see the YARN NodeManager (hostname:8042) is running.
Stopping Apache Hadoop Processes
For routine maintenance or troubleshooting tasks, stopping Apache Hadoop processes is handy. This action helps free up system resources for other applications or processes running on the same cluster, such as memory and CPU.
Apache Hadoop command lines are available by default at the HADOOP_HOME/bin and HADOOP_HOME/sbin directories. In the HADOOP_HOME/sbin directory, you will find scripts for managing the Apache Hadoop process and YARN manager.
To stop Apache Hadoop processes, perform the following:
Execute the following commands to gracefully stop the HDFS and YARN services on your cluster, respectively.
stop-dfs.sh
stop-yarn.sh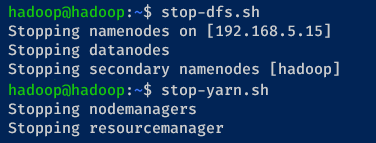
Now, run the jps command below to verify Apache Hadoop processes.
jpsWhen Apache Hadoop processes halt, you will notice the NameNode, DataNode, YARN ResourceManagers, and NodeManagers disappear from the output.

Conclusion
Throughout this tutorial, you took a deep dive into Apache Hadoop on Linux. You have covered everything from downloading Apache Hadoop to creating a single-node cluster, accessing the web UI, and gracefully stopping Hadoop processes.
Along the way, you have gained valuable insights into the power of Apache Hadoop for processing and analyzing large datasets, setting the stage for exciting data-driven projects in the future.
Now, why not consider experimenting with different Hadoop ecosystem tools? Take on Hive with HDFS to enable data processing via SQL-like query. Or Apache Spark for a general and versatile data processing framework.


